# ELO objects and metadata

# Goal and use
The ELO objects and metadata component provides you with basic functions for communicating with an ELO repository.
# Credentials and connection data
Enter connection data for the ELO objects and metadata component. A default connection is available. This is entered in the config files. The user context assumes the session of the user logged into the ELO client. You can also create additional connections to run services with defined rights.
# Triggers
Triggers are the starting points of a flow. The ELO objects and metadata component offers the following triggers:
| Name | Event | Additional information |
|---|---|---|
| Query trigger with generic result | Started when the endpoint is called with an HTTP POST. | Synchronous flow |
| Query trigger with generic result (multi-instance) | Started as a multi-instance trigger when the endpoint is called with an HTTP POST. | Synchronous flow |
| Dynamic keyword list called | The trigger can be started with gen. 1 and gen. 2 metadata. Metadata (gen. 1): Configure dynamic keyword lists with a flow call in the Form designer or in the Field templates. Metadata (gen. 2): Configure dynamic keyword lists with a flow call in the aspects. | Synchronous flow |
| Object created | Started when an object is filed in ELO. | Asynchronous flow |
| Object edited | Started when an object in ELO is changed (e.g. metadata or versions). | Asynchronous flow |
| Object deleted | Started when an object in ELO is changed (e.g. metadata or versions). | Asynchronous flow |
| Object moved | Started when an object in ELO is changed (e.g. metadata or versions). | Asynchronous flow |
# Trigger configuration 'Query trigger with generic result'
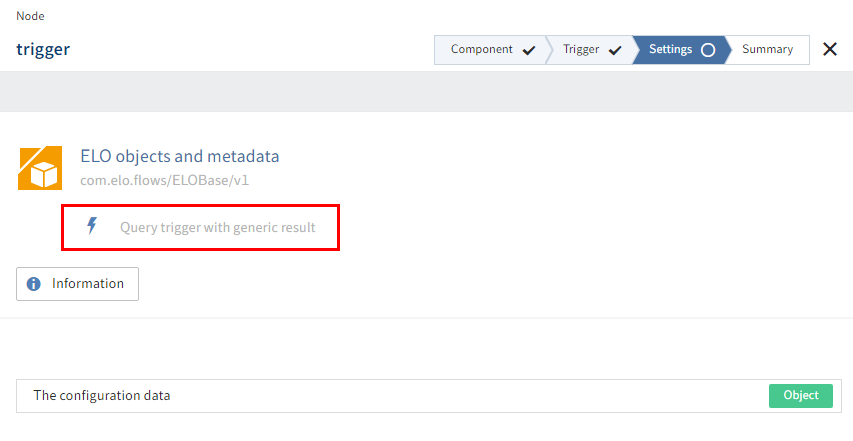
You can transfer configuration data via a REST call or forego the transfer of configuration data entirely. To do this, do not make any additional configurations on the Settings tab.
# Advanced settings
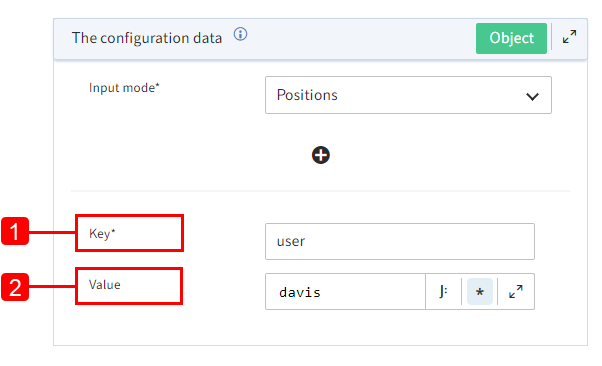
Optional: Enter configuration data via the Positions input mode, e.g. data from a third-party system. Enter your user-defined data in the key-value list. The key (1) is a mandatory field, while the value (2) is optional.
# Example entry
Key - user
Value - renz
# Next steps with the 'Query trigger with generic result' trigger
This trigger is started when the endpoint is called with an HTTP POST. You can get the endpoint under Summary > Service.
# 'Dynamic keyword list called' trigger configuration

Call dynamic keyword lists with a flow call. The trigger can start in the context of gen. 1 and gen. 2 metadata. The call is structured as follows: flows-plugin/trigger/trigger ID and may look like this, for example: flows-plugin/trigger/08e40e34-2e3e-4725-baed-1442d1e25143.
For gen. 1 metadata, the data entered is not automatically transferred formatted. You can configure formatting on the Settings tab as needed. Gen. 2 metadata automatically provide formatting.
# Configure flow call for dynamic keyword lists
To call dynamic keyword lists with flows, the flow call has to be configured in the metadata. The following explains more for both gen. 1 and gen. 2 metadata.
Metadata (gen. 1):
The trigger is started when an ELO Flows call is used to store dynamic keyword lists in the Form designer (gen. 1) or in the Field templates (gen. 1).
You can read the trigger ID in the flow designer for the trigger under Summary > Properties > ID.
Configure in the Form designer:
- Select a field.
- Open the properties for the selected field.
- Under Keyword list, select the option Dynamic Keyword Map.
- In the Script name input field, enter the call according to the convention
flows-plugin/trigger/Trigger-ID.
Store in the Field templates:
- Select a field.
- Enter the call under Keyword list > Dynamic keyword list.
Metadata (gen. 2):
The trigger is started when a flow call is used to store dynamic keyword lists in an aspect field.
Within your package, navigate to Aspects.
Select an aspect or add a new one.
Within the aspect, navigate to the Fields area.
Select a field or add a new one. The settings for the field open.
Select the General text field type.
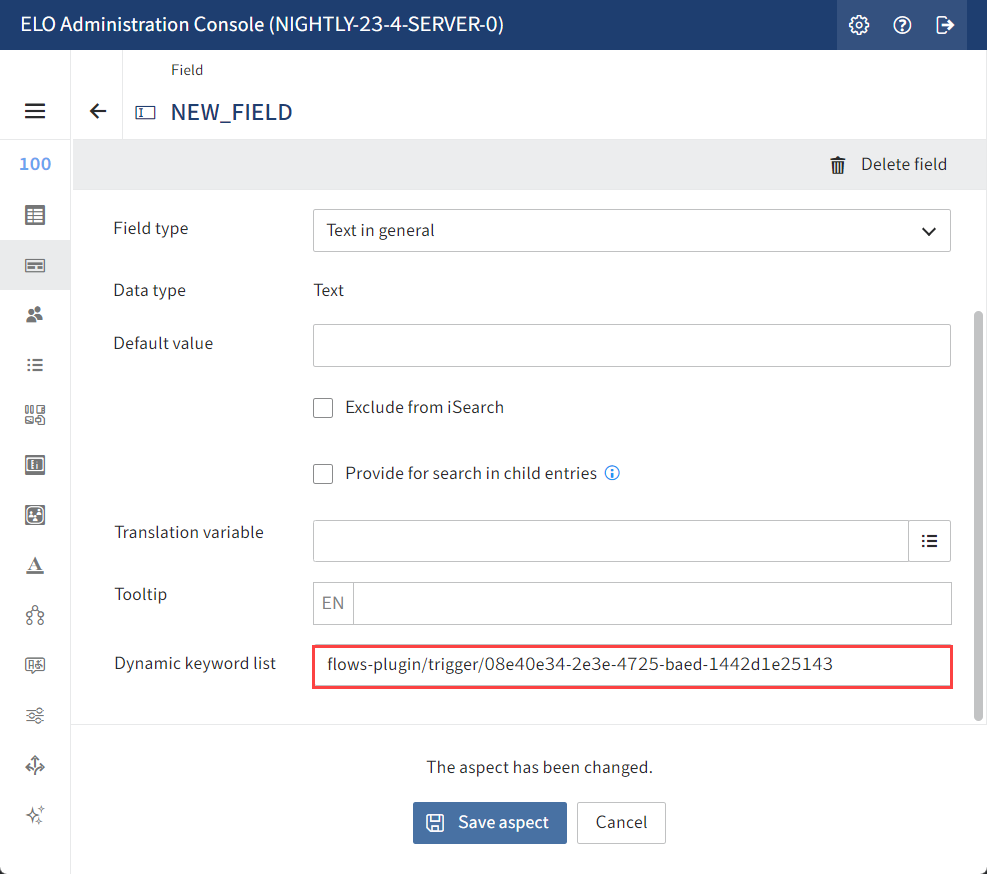
In the Dynamic keyword list input field, enter the call according to the convention
flows-plugin/trigger/Trigger-ID.
# Advanced settings
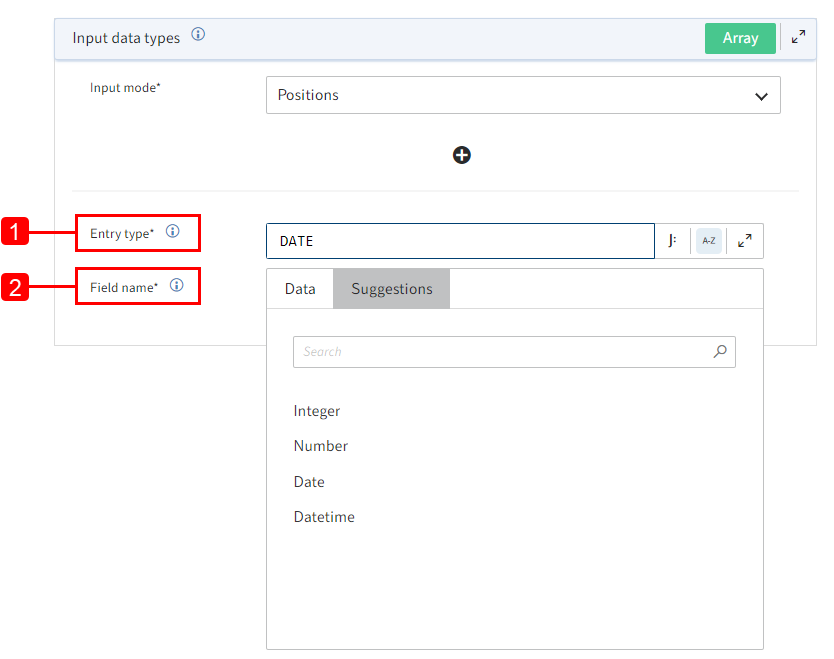
Optional: Manual formatting of gen. 1 metadata entries
1 Entry type: Select an entry type from the drop-down menu. The following options are available: Integer, Number, Date, Datetime.
2 Field name: Enter the field name with dynamic keyword list from the context of forms with gen. 1 metadata.
# Example entry
Entry type - Date
Field name - Filing date
# Next steps for 'Dynamic keyword list called' trigger
Use the result SimpleDynKwlColumnsResult or DynKwlColumnsResult at the end of the flow under synchronous feedback.
# Result definition via 'SimpleDynKwlColumnsResult'
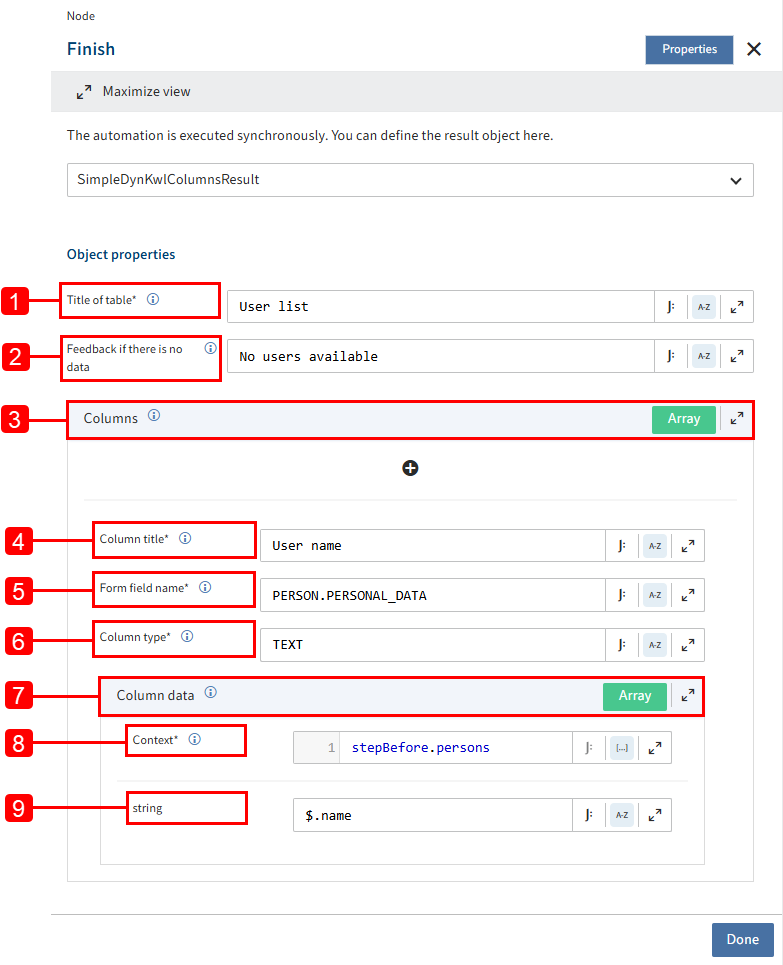
Configure the result object manually with the following object properties:
1 Title of table: The Title of table field is mandatory. Enter the title of the generated results table.
2 Feedback if there is no data: Enter a message text that is displayed if the table does not contain any data.
3 Columns: Open the advanced configuration for the columns by selecting the plus icon.
Information
Manual configuration of individual columns of the result table is optional. If you decide to configure columns, the fields Column title, Form field name, and Column type are mandatory.
4 Column title: Enter a title to be displayed for the column. If you don't want to show a column title in the table, enter null.
5 Form field name: Enter the name of the form field the data should be transferred to. If you don't want to transfer the data from this column to a form field, enter null.
6 Column type: Enter the data type of the column. TEXT is entered by default. Alternatively, you can enter INTEGER, NUMBER, DATE, or DATETIME.
7 Column data: Configure a custom list transformation.
Information
Manual configuration of the list transformation is optional. In this case, the Context field is mandatory.
8 Context: Enter the data context of the transformation, e.g. with relation to the previous steps within your flow.
9 string: Enter the value you want to select.
Information
If you want to perform concatenation for the list transformation, you will have to make your entry in the JSONata editor. You can find more information under Known issues > Concatenation in transformation fields.
- Example entry
- Title of table -
User list - Feedback if there is no data -
No users available - Column title -
User name - Form field name -
PERSON.PERSONAL_DATA - Column type -
TEXT - Intended transformation: Transform List<Person> into a list of names List<String>.
- Context -
stepBefore.persons - string -
$.name
- Title of table -
# Result definition via 'DynKwlColumnsResult'
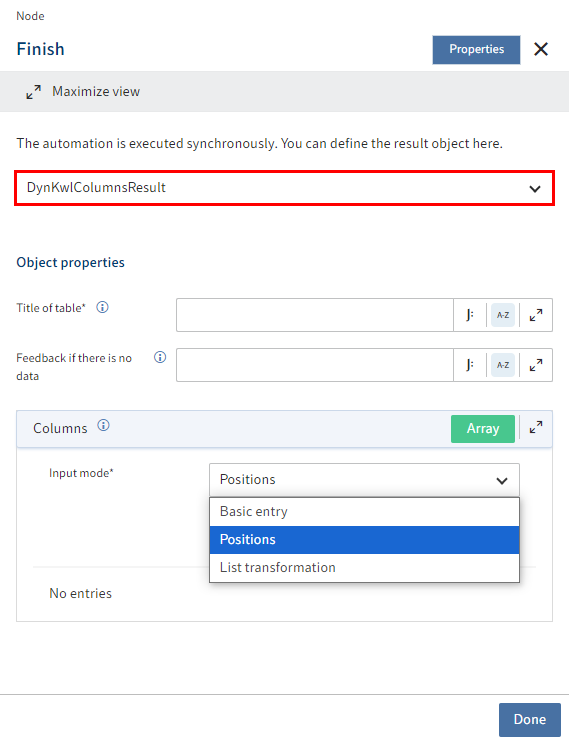
Result definition via DynKwlColumnsResult provides advanced configuration options. When configuring the columns, you can choose between the modes Basic entry, Position, and List transformation.
'Basic entry' input mode
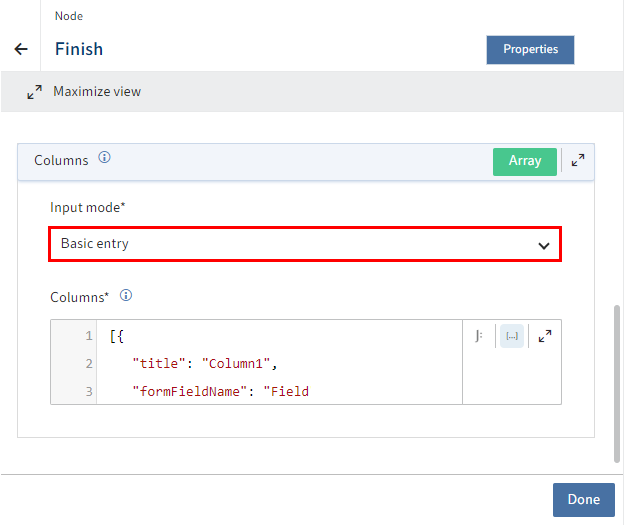
With the input mode Basic entry, you can customize the columns in the form of JSONata commands. Use the Columns field in the JSONata editor.
Example entry
//Example of a static variant for basic entry
[{
    "title": "Column1",
    "formFieldName": "Field1",
    "columnType": "TEXT",
    "data": [
        "Column1-Field1",
        "Column1-Field2"
    ]
},
{
    "title": "Column2",
    "formFieldName": "Field2",
    "columnType": "TEXT",
    "data": [
        "Column2-Field1",
        "Column2-Field2"
    ]
}]
'Positions' input mode
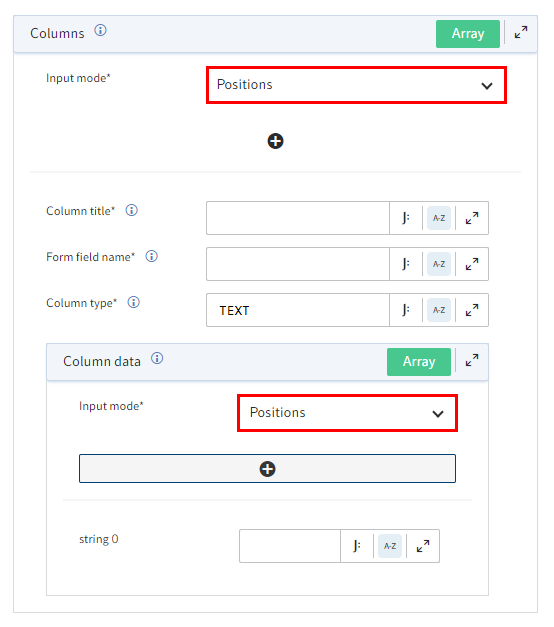
Information
The Positions mode corresponds to the setting options of the result definition via SimpleDynKwlColumnsResult.
In addition to the column title, form field name, and column type, you can also define the column data using positions. In this case, select Positions as the input method and enter a fixed value in the string field. You can select preconfigured suggestions by selecting the arrow icon next to the field, for example.
'List transformation' input mode
The List transformation input mode focuses on the transformation of list data from previous steps of the flow.
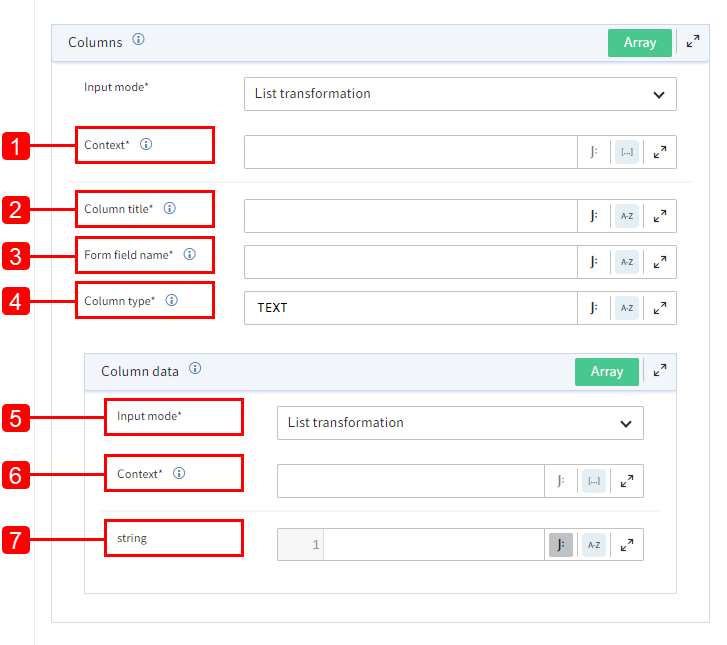
1 Context: Define the context for the transformation, e.g. a previous step in the flow.
2 Column title: Enter the title of the column where the data from the transformed list should appear.
3 Form field name: Enter the name of the form field the data should be transferred to. If you don't want to transfer the data from this column to a form field, enter null.
4 Column type: Enter the data type of the column. TEXT is entered by default. Alternatively, you can enter INTEGER, NUMBER, DATE, or DATETIME.
5 Input mode: For further configuration, choose between the input modes Positions, Basic entry, and List transformation.
Information
Advanced configuration of the list transformation is optional. In this case, the Context field is mandatory.
6 Context: Enter the data context of the transformation, e.g. with relation to the previous steps within your flow.
7 string: Enter the value you want to select.
# 'Object created', 'Object edited', 'Object deleted', 'Object moved' trigger configuration
The triggers with an object relation are started if an ELO object (SORD) is changed.
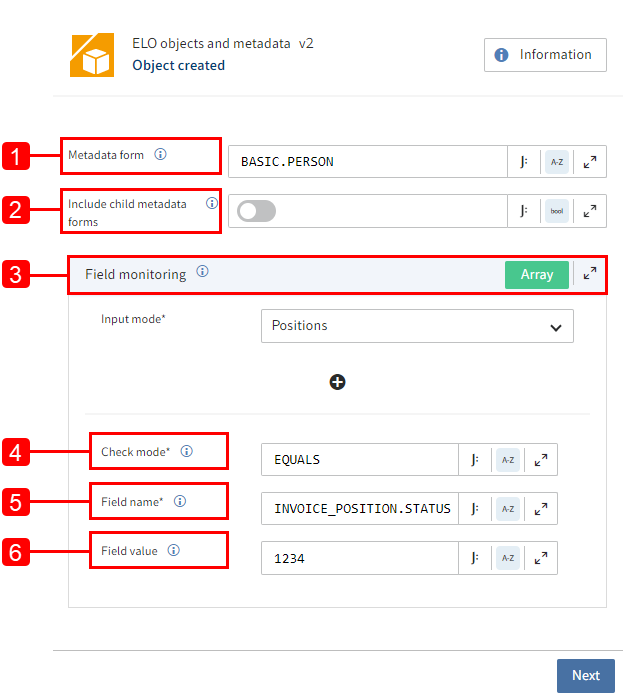
Optional: You can restrict the trigger to specific metadata forms and data fields that are in the context of the created object.
Information
You can use gen. 1 and gen. 2 ELO metadata. For more information on how to use metadata in ELO, refer to General information > Using gen. 1 and gen. 2 metadata.
1 Form: Enter the metadata form the trigger listens to. The trigger is only started for this metadata form.
2 Include child metadata forms: Enable this function if you want the automation to start when a SORD has a metadata form that inherits one of the specified metadata forms.
3 Field monitoring: Enable field monitoring if you only want to start the trigger within the context of specific metadata fields.
4 Check mode: Choose between the check modes Field corresponds to a comparison value and Field was changed.
- Field corresponds to a comparison value - triggers the flow if a specific value is set.
- Field was changed - triggers the flow only if a specific field has been changed.
5 Field name: Enter the date field you want to monitor.
6 Field value: If you select the check mode Field corresponds to a comparison value, enter the value to be checked.
# Example entry
Form: Invoice (gen. 1) or BASIC.PERSON (gen. 2)
Check mode: Field corresponds to a comparison value
Field name: INVOICE_NO (index field) or INVOICE_POSITION.STATUS (aspect field)
Field value: 12345
Next steps
The trigger Object created is an asynchronous flow so you don't have to configure an end node.
# Services
Services are actions that can be run within a flow. The ELO objects and metadata component offers the following services:
# 'Aspects' group
| Name | Function |
|---|---|
| Refresh data sets by ID | Update specific entries by ID (multiple aspect) |
| Refresh data sets | Update existing entries (multiple aspect) |
| Add data sets | Add new entries (multiple aspect) |
| Delete data sets | Delete specific entries (multiple aspect) |
| Search data sets | Search entries (multiple aspect) |
Information
You will find more information on aspects that can be created multiple times in the documentation for ELO packages > Metadata > Metadata forms > Assign aspects. (opens new window)
# 'Permissions' group
| Name | Function |
|---|---|
| Remove all permissions | Removes all permission entries from an object |
| Remove permissions | Removes permissions from an object |
| Add permissions | Adds permissions to an object |
# 'Documents' group
| Name | Function |
|---|---|
| Download working version | Downloads a version of an object and provides it in flows |
| Upload document version | Loads a flow file in an object as a document version |
# 'Links' group
| Name | Function |
|---|---|
| Create ECD link | Creates a new ECD link based on an object ID of a document |
| Create external link | Creates a new external link based on an object ID |
# 'Metadata' group
| Name | Function |
|---|---|
| Change color | Sets the color of an object |
| Load metadata | Reads the metadata of an object and provides it in the flow |
| Load metadata (generation 1) | Reads the metadata (generation 1) of an object and provides it in the flow |
| Change metadata form | Sets the metadata form of an object |
| Change metadata form (generation 1) | Sets the metadata form (generation 1) of an object |
| Set metadata | Sets defined metadata on an object |
| Set metadata (generation 1) | Sets defined metadata (generation 1) on an object |
# 'New' group
| Name | Function |
|---|---|
| New documents | Creates several new documents |
| New documents (generation 1) | Creates several new documents (generation 1) |
| New document | Files a new document to the repository |
| New document (generation 1) | Files a new document (generation 1) to the repository |
| New folder | Creates a new folder in the repository |
| New folder (generation 1) | Creates a new folder (generation 1) in the repository |
# 'Organize' group
| Name | Function |
|---|---|
| Delete all references | Deletes all references to an object |
| Copy | Copies an ELO object and files the copy |
| Delete | Deletes an ELO object |
| Move | Moves an entry in the repository |
| Reference | Creates a reference to an ELO object in the repository |
# 'Additional metadata' group
| Name | Function |
|---|---|
| Load map fields as list | Loads map fields of an object as a list |
| Load map fields | Loads map fields of an object and provides them in flows |
| Write map fields | Writes values to map fields for an object. |
# Without group assignment
| Name | Function |
|---|---|
| Load configuration file | Loads a configuration file from the ELO repository |
# Transfer data sets from individual aspect fields or whole aspects
You can transfer individual aspect fields or whole aspects from existing metadata forms to other metadata forms.
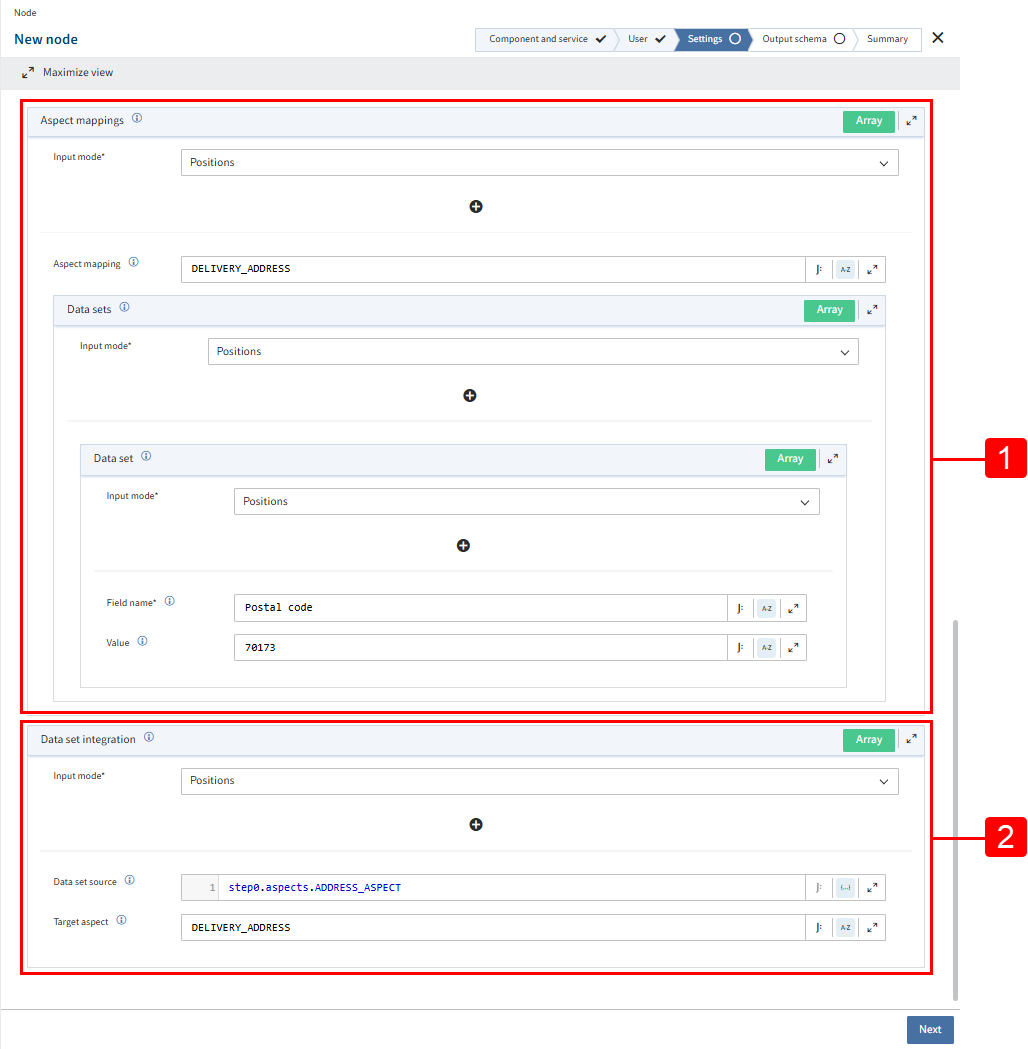
1 Aspect mappings: Use this function to transfer individual aspect field values from one metadata form to another.
2 Data set integration: Use this function to transfer whole aspects from one metadata form to another. You can directly integrate entire data sets from previous steps into the aspects of the current SORD.
It is possible to transfer aspect data in the following services:
- Set metadata
- New documents
- New folder
- New document