# Quick start
Welcome to ELO Flows. We've prepared a quick start guide for you to help you get started!
# Deployment
ELO Flows is provided with the installation of the ELO Server Setup. If it isn't already installed, you can start the ELO Server Setup to do so.
# Flow administration
You can access the flow administration area via the ELO Administration Console. ELO Flows is integrated in the administrative environment of ELO packages (opens new window). You can define and edit the flow logic under Flows.
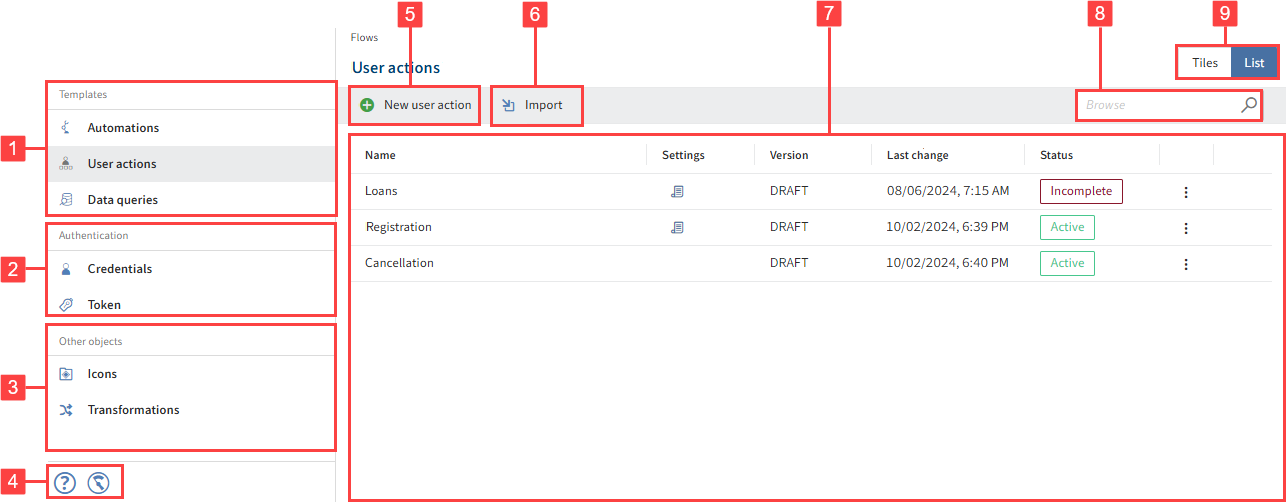
1 Templates: Select the type of flow you want to create. The following flow types are available: Automations, User actions, and Data queries.
For more information on the respective flow types, refer to the Automations, User actions, and Data queries sections.
2 Authentication: Use the options under Credentials and Token to further authenticate your flows.
You will find more information under Credentials and Webhooks and token authentication.
3 Other objects: Add custom icons to your flows and configure transformations for your flows.
Refer to Icons and Transformations for more information.
4 Additional options: The button with the question mark takes you to the ELO Docs online help in a new browser tab. The gauge icon takes you to the monitoring options in ELO Flows.
Refer to Monitoring for more information.
5 New flow: Create a new user action, automation, or data query.
6 Import: Import exported flows as a JSON file.
7 Viewer pane: Here you can see the flows currently available. You can see in the overview which additional settings were activated for the flow (e.g. Save complete execution data), the flow version, when the last change was made, and the flow status. You can also use the three dots menu to export, delete, copy, activate or deactivate individual flows.
8 Browse: Search for specific flows.
9 Viewer pane setting: Select whether you want to display the flows as a list or tile view.
# Flow types
You can choose between three flow types:
The difference is in the initial trigger.
Automations start with ELO events, among other things. If you install a component offering triggers, use them here. In addition to the ELOix events, the action of receiving an e-mail is conceivable with an e-mail component. You could respond to this and run a flow.
User actions start with a manual trigger. These allow users to make entries within an ELO client. This data is transferred to the flow and can be processed there.
Data queries start with a webhook or with ELO events.
# Flow designer
With the flow designer, you can edit existing or new flows.
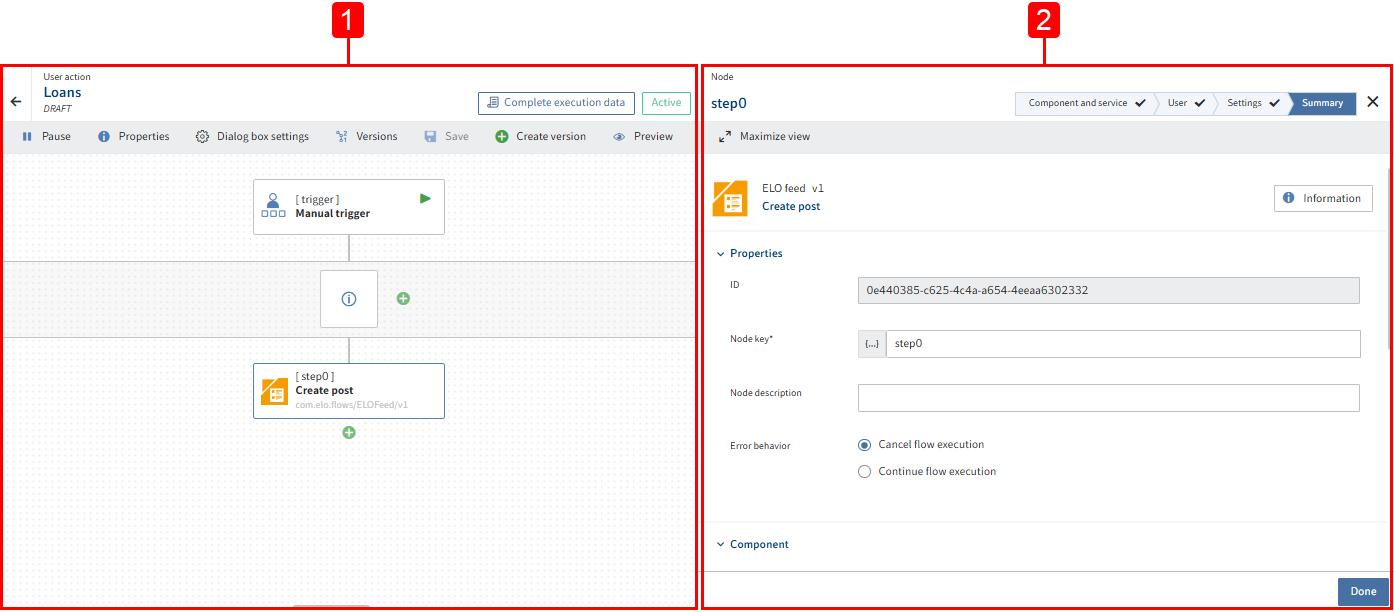
1 Flow designer: Design custom flows and their properties by adding new nodes, deleting nodes, or saving, versioning, activating, or pausing the flow.
2 Configuration area: Select the component you want to integrate into the flow and configure the specific properties of the flow's nodes.
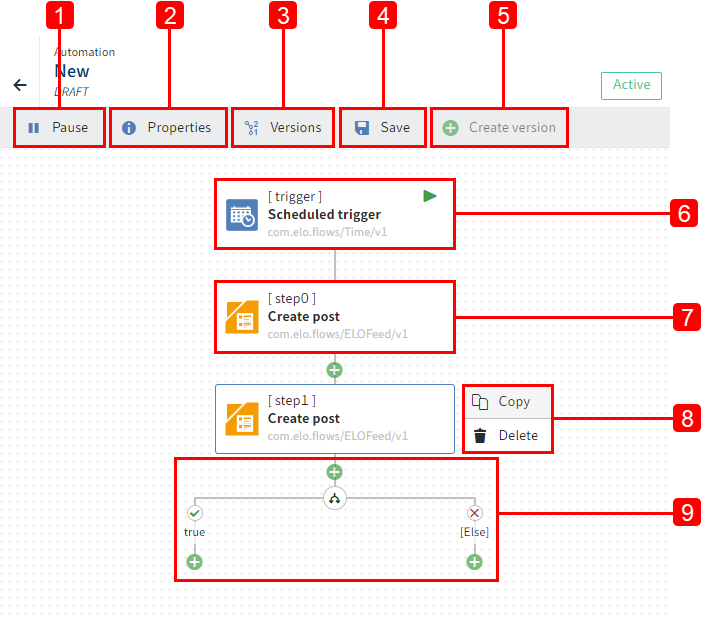
The flow designer contains the following elements:
1 Pause/Continue: Set a flow to Active or Deactivated. Triggers are not called for deactivated flows. For user actions, the respective buttons are hidden in the client.
2 Properties: You can change the name of the entire flow, as well as export and delete the flow here.
3 Versions: You can select the versions to delete them, edit them in the flow designer, or activate or deactivate them. When you edit a flow, it will initially be labeled with DRAFT. Created versions can be found under the name you assigned them. You will find more information on the versioning of flows under Use > Advanced flow.
4 Save: Save regularly so no changes are lost. If the flow is activated, saving results in hot deployment in the ELO client.
5 Create version: Create a new backup of the current version. Enter a version name. You can also add a comment to the version.
6 Trigger node
7 Service node: The additional [Step] indicates the sequence of service nodes you have assigned to the flow.
8 Three dots menu: You can copy or delete an existing node. You can re-use copied nodes in the same flow or use them in a different flow in the flow designer.
9 Branch: You can also create a branch with a true-false condition before each step. You can nest this branch in other branches or continue with services.
# Structure of a flow

A flow consists of the following elements:
1 Trigger: Starts the flow
2 A series of services: Steps in the flow
3 Branch node: True-false condition that determines how the flow proceeds
4 Add node: Adds a service, a service copy, a branch, or a data query flow
# Components
Components are connecting modules or connectors to systems. You can use standard components that are provided, such as the ELO metadata and objects component, or create your own components that interact with the systems you want. You will find more information on the standard ELO Flows components in the Components section.
# Triggers
In ELO Flows, flows are started by triggers. There are different types of triggers.
- Automatic triggers: Among other things, these listen to ELOix events (provided by the ELOix event connector).
- Multi-instance trigger: These triggers enable flow instances to be processed in stacks. One flow instance is started for each object returned by the trigger.
- Manual triggers: These provide a button to manually start the flow in the clients. Behind this button is a definition for the activity UI, which the activities of an entry in the ELO client for ELO Flows map.
- Webhook: A webhook trigger creates a REST endpoint that can be called by external systems.
# Services
Functions that are called in the flow steps are referred to as services in ELO Flows.
# Activities
Activities are user actions that are opened with a button in the ELO clients. The button definition is configured for a user action. This allows you to quickly map common use cases, such as a form activity or a document upload activity.
Refer to User actions under Add activities for more information.