# Create workflow templates
Use the workflow designer to create a new workflow template. Processes are mapped using workflow templates. A workflow template must exist if you want to start a default workflow.
There are two different parts to creating workflow templates. First, create a template. Then configure the template according to your requirements.
# Create template
Select Ribbon > Organize > System > Workflow designer.
The Workflow designer dialog box opens.

Select New.

The Create new template dialog box opens.
Enter a name for the new workflow template. In our example, this is
Newsletter. Click OK to confirm.
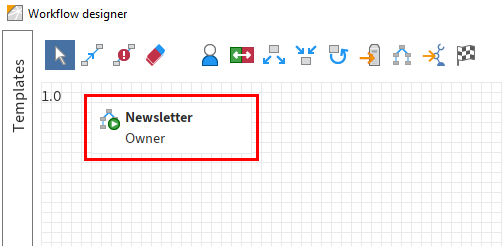
The new template is now available in the Templates column. The start node appears in the workspace.
The start node is always set and cannot be deleted. The workflow starts from here.
Please note
The start node may only be connected to one successor node. You cannot link back to the start node.
You have now defined the basic structure of a workflow template. Edit the template according to the requirements of the workflow.
# Edit start node
Settings that you make for the start node apply for the entire workflow. In the node editor, the title Workflow settings appears instead of the Node settings title.
Select the start node.
The node is selected.
Make the desired settings under Workflow settings. The settings are explained in more detail in the following sections.
Once you have entered all information, select Apply.
The settings for the start node are saved.
# 'General' area
In the General area, you make settings that apply to the entire workflow template.
# Package

Packages allow you to create and edit related configurations. A package contains all the configurations required for a purpose.
If needed, you can choose which package to assign the workflow to from the Package drop-down menu.
For more information, refer to the ELO packages (opens new window) documentation.
# Level

Levels are used in packages to realize different customization levels of a basic package. This allows you to manage customizations made in a test system separately from those in a production system, for example.
If you've selected a package, you can choose which level of the package to manage the workflow template at from the Level drop-down menu.
For more information, refer to the ELO packages > Manage levels (opens new window) documentation.
# Permissions

Select Permissions to open the Workflow permissions dialog box. In this dialog box, you can edit the permissions settings for workflows that are started with a workflow template.
# Icon

Choose a new icon from the Icon drop-down menu if needed.
# Transfer to server

The Transfer to server field is where you enter the repository ID of the server you want to transfer the workflow to.
Information
This option is only required when replicating workflows, i.e. if you have installed the ELO Replication module.
# User

The default setting for the User field is Owner. Owner means: The person who starts the workflow will process all nodes with this setting. You cannot make any changes to the start node here.
# Priority

You can define the priority level of the workflow in the Priority drop-down menu. You can choose between the following priorities: A (=High), B (=Medium), and C (=Low). This function is useful if you have a large number of workflows and you want to rate them according to importance.
# Note

Use the Note field to enter information on the start node. This text appears in the Workflow overview, Workflows for this entry, and Show workflow dialog boxes.

# 'Node name' area
In the Node name area, you can enter a name for the node. You can also enter a translation variable.
# Workflow step
The name of the workflow template is automatically used for the start node. If you want to, you can change the name in the Workflow step field.
# Translation variable
Use the Translation variable field if you want to offer the contents of the Workflow step field in multiple languages. Enter the appropriate translation variable.
You will find more information on the topic of translation in the following texts:
- This documentation > Form-based workflow > Global form settings > Translation variable (prefix)
- Client administration > ELO Java Client > Translation (opens new window)
- ELO packages preview > Other topics > Translations (opens new window)
# 'Escalation management' area
In the Escalation management area, you can set deadlines for the entire workflow (via the start node) or individual nodes.
# Exclude weekends

If the option Exclude weekends is enabled, the maximum duration of the workflow will take into account that Saturdays and Sundays are not regular business days. Weekends will be skipped when calculating the workflow duration.
If this option is cleared, Saturdays and Sundays are included in the calculation. All calendar days count when calculating the maximum workflow duration.
# General escalation
The fields under General escalation allow you to define how long the workflow may remain at the current node.

If the workflow has not been completed by the deadline, it shows up in the list of overdue tasks. The user entered in the field Escalation to will be sent a message.
Information
With a General escalation, the responsible user is selected via the start node and then applies to all nodes.
If you do not enter a maximum duration, there is no automatic check for missed deadlines.

# Escalation B
The fields under Escalation B allow you to define a second escalation level. If this deadline is passed, the corresponding user is informed.
# Escalation C
The fields under Escalation C allow you to define a third escalation level. If this deadline is passed, the corresponding user is informed.
# 'Additional options' area
The Additional options areas contains further settings for workflows.
# Start workflow manually

If the option Workflow may be started manually is enabled, the workflow template can be run via the Start workflow button. If the option is disabled, the workflow template can only be started as a subworkflow.
# Start script

In the Start script field, you can enter a script that will be run when the node becomes active.
Information
Start scripts are run via the ELO Indexserver. You will find additional information on these scripts in the Advanced functions chapter.
# Form
In the Form field, you can link part of a form (template) to the node. The selected templates are displayed when you call the node. Open the Workflow form selection dialog box with Select.
# Script properties
In the Script properties text field, you can enter additional properties for scripts.
# Add node
The template requires additional nodes for a workflow to function. The type of node you choose and which settings you make will depend on the type of the workflow.
The node types have different functions and settings.
When you are creating a node, the method is the same for all node types.
In the following, we explain this method based on the user node. You can find more information on the various node properties in the section Node types.
# Create user nodes
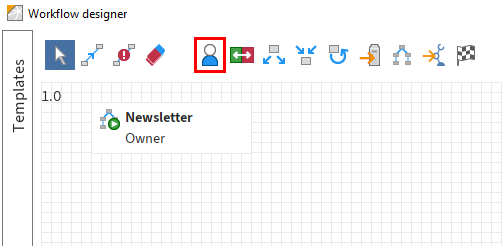
Select the User node button.
The cursor turns into the icon for the user node.
Place the cursor where you want to insert the user node.
Click the left mouse button.

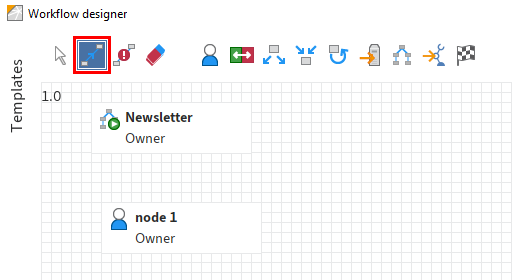
The user node is inserted. The name of this node is Owner by default.
# Link nodes
Use the Establish connection between two nodes function to connect nodes within a workflow.
Please note
The start node may only be connected to one successor node. You cannot link back to the start node.
Select Establish connection between two nodes.
The cursor turns into a node connector icon.
Select the start node, i.e. the node that the connection should start from.
The node is selected.
Select the target node.
The workflow nodes are now connected. The arrow icon indicates the direction of the connection.
Information
It is possible to link nodes in both directions. In this case, the connecting line has two arrows.
# Complete template
Once you have created all nodes and made all settings, you can complete the workflow template with OK.
Alternatively: To save the template without closing the workflow designer, select Apply.
The new workflow template is saved and can be used to create a default workflow.
Information
The Save and Version functions provide options for saving the template. Refer to the Edit and manage templates section for more information on the two functions.