# The workflow designer
Open the workflow designer via Ribbon > Organize > System > Workflow designer.
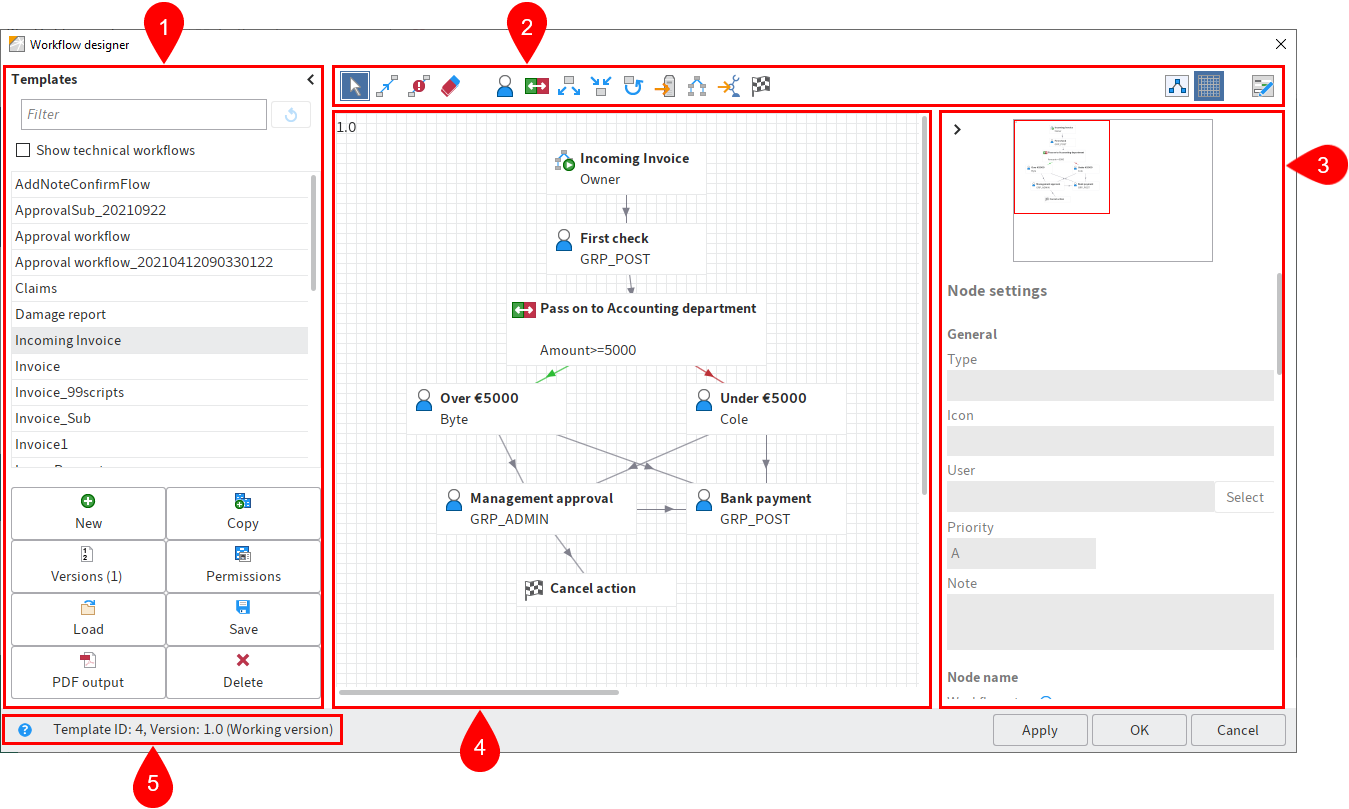
The workflow designer consists of the following areas:
1 Templates: All available workflow templates are listed in the Templates column on the left-hand side. Click an entry to open the graphical interface, which displays workflows as a diagram in the middle viewer pane. In addition, the column contains buttons for managing workflow templates:
2 Toolbar: This is where you find the tools for creating and editing a workflow template.
Information
When you open a workflow template, the Edit workflow templates button appears first. Select Edit workflow templates to switch to edit mode.
3 Node editor: This area contains a preview window and the Node settings area. Define the settings for the individual workflow nodes in the Node settings area.
Information
If the start node is selected, the Workflow settings area is displayed, where you can adjust the general settings.
4 Workspace: In the workspace, the workflow templates are displayed in the graphic view. You can see the steps (nodes) and elements that a workflow consists of and how they are connected.
5 Status bar: This is where you find the ID of the workflow template, the current version, and the node ID of the currently selected workflow node.
# Toolbar

When edit mode is enabled, the buttons for editing workflow templates appear in the toolbar of the workflow designer.
The following functions are available:
# 1 Select tool
If the Select option is enabled, you can drag the nodes of your workflow template to new positions.
If multiple nodes are selected they can be moved together. Select several nodes by selecting one after another while pressing CTRL. It is also possible to draw a frame around the desired node by keeping the left mouse button pressed.
Information
The Select function (arrow icon) must be enabled to draw a frame around several nodes.
# 2 Connection
The Establish connection between two nodes function allows you to connect workflow template nodes. The direction of the connection is determined by the order in which you select the nodes. Select the start node first and then the target node.
You can also identify the direction of the connection by the arrow icon in the middle of the connecting line.
Information
You can connect a node to a maximum of 20 successor nodes.
# 3 Successor node on timeout
The Specify successor node on timeout function allows you to connect one node to another, which is automatically called when the deadline is exceeded.
You can set the deadline in the Node settings under Escalation management > General escalation. If the deadline has passed, the workflow proceeds straight to the respective successor node. Unlike with escalations, the user at the successor node does not have to accept the workflow.
Information
If you use the Specify successor node on timeout function, ELO ignores the Escalation to field. Instead, ELO passes the workflow on to the successor node.
# 4 Delete
The Delete function removes elements from workflow templates.
If you hover the cursor over an element, an eraser icon appears and you can select the element to delete it.
# 5 User node
User nodes determine the steps at which the workflow should be processed by a user or a group.
# 6 Decision node
This node is used to define a condition (if – then) which affects the document flow.
You can use decision nodes to compare fields from a document's metadata form with specific values, for example to check the amount of an invoice.
If the condition is met, the workflow is forwarded to node A (green connection). If the condition is not met, the workflow is forwarded to node B (red connection).
# 7 Distribution node
You can use a distribution node to send the workflow to multiple successors nodes at the same time.
# 8 Collection node
A document is only forwarded to the next station by a collection node once all preceding nodes have been completed or only a predefined number of responses is pending.
For example, if an invoice needs to be approved by two employees, it is not forwarded until both employees have approved the invoice.
# 9 Cycle node
There are processes in workflows that need to be repeated until a specific state is reached. This is what cycle nodes are used for. In the second loop, the node information is not lost because the nodes are copied and inserted next to the existing nodes.
Please note
When using cycle nodes, you need to define a start node (Cycle start option) and an end node (Cycle end option). Both nodes must have the same name, e.g. CYCLE_1. If several cycles exist within the same workflow template, each cycle must have a unique name.
Please note
The name of nodes must not exceed 128 characters. For cycle nodes, the number of cycles is automatically added to the name of the cycle in the format [[1]]. Do not forget these five characters when determining the maximum number of characters.
Only one connection may lead to and from a cycle node, meaning that you may have to use a collection node or a distribution node to connect to multiple nodes.
The end node status determines whether a cycle is passed a second time. However, the entire cycle is already duplicated when it passes the start node, meaning that it is possible to copy nodes within the cycle.
Please note
The nodes within a cycle are not allowed to have connections to nodes outside the cycle.
# 10 Server transfer
The Server transfer node type is used to transfer a workflow document to a second server. The repository ID of the second server must be entered in the server transfer node.
After synchronizing the data to the second server, you can continue processing the workflow on the second server. The workflow is then locked on the first server.
# 11 Subworkflow
The Call subworkflow function allows you to add subworkflow nodes. Once the workflow reaches the subworkflow node, the corresponding subworkflow is started.
The workflow started depends on the template you have selected in the Select template drop-down menu.
# 12 Flow
Add a flow node using the Flow function. Flows can be linked with a workflow using a flow node. When the workflow reaches a flow node, one or more flows are called and run, depending on the settings.
Flow nodes can:
- Trigger events that listen to one or more flows.
- Trigger a specified flow.
# 13 End node
The end node is used to define a unique end point of a workflow.
You do not have to use an end node. If there is no end node, the workflow ends as soon as there are no more unprocessed nodes. It makes sense to use end nodes if you use a collection node that waits for a specific number of predecessor nodes, for example. When this number is reached, the collection node is passed. However, the workflow remains active since there are still open nodes. An end node fully completes the workflow.
# Additional buttons in the toolbar

The following three buttons are also available if the workflow template is not in edit mode. You will find these buttons above the Node editor area.
# 14 Minimized view
This function minimizes or maximizes the graphic display of the workflow. This is helpful when working with complex workflow templates.
# 15 Use grid
This function shows or hides a grid in the background of the workspace.
# 16 Open form designer
This function opens the form designer to create forms for using in a form-based workflow.
Information
For more information, refer to the chapter Form-based workflows.