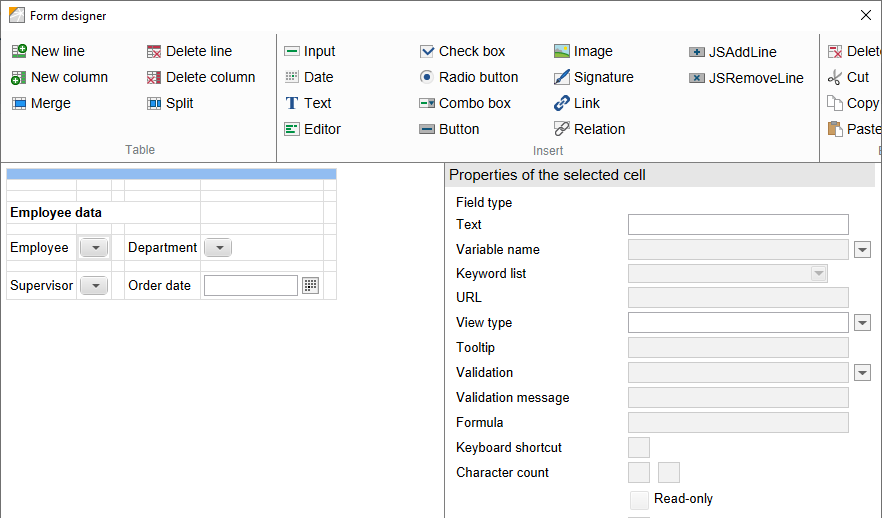
# Cell properties
The following setting options are located in the Properties of the selected cell area.
# Field type
When you have selected a cell with a form field, you see the field type under Field type.
# Text
The Text field has different tasks depending on the selected field type. For example, it is used to label text fields and buttons or to select an image.
For more information, refer to the Toolbar section.
# Variable name
The Variable name field serves various purposes:
- Creating a connection to a field.
- Specifying an action for a button.
- Entering variables for automatically completing fields.

Create connection to a field: Use the drop-down menu for the Variable name field to get a list of available fields. The selection of fields depends on the metadata form connected to the form. You can see which metadata form is connected to the form in the Metadata form field, which is located under Global form settings. You can change the metadata form here, if required.
You also have the option of entering the variable directly in the Variable name field. You must use the following format:
IX_GRP_<GROUP NAME OF THE FIELD>

Setting an action for a button: When you use a Button field type, enter the name of the function to the Variable name field to be called when you click the button.
The function must correspond to the following naming convention:
JS_<;<NAME OF THE FUNCTION>
In addition, you need to store the corresponding function via the Edit form header scripts component.
There are also default functions such as JS_ADDLINE. Buttons with the variable JS_ADDLINE give users the option to duplicate the line above the button when filling out the form. A button with the variable JS_REMOVELINE is used to delete duplicated lines. This deletes the line in which the button is located.

Variables for automatically completing fields: There are default variables. These variables can be used to automatically insert content into fields. They can also used by scripts for evaluation purposes.
Information
If you enter the variables described here in the Variable name field, only the corresponding contents are displayed in the form. When you save the value and/or want to process it, the variable must be read by a script. Write the value to a corresponding form field via the script.
Here is a list of the default variables:
| Variable | Effect |
|---|---|
| WF_SINGLESELECT | If TRUE is returned, the workflow can only be forwarded to one successor node. If FALSE is returned, there can be multiple successor nodes. The output value depends on the properties of the respective node. |
| WF_OWNER | The name of the ELO user who started the workflow. |
| WF_OWNERID | The ID of the user who started the workflow. |
| WF_NAME | The name of the current workflow. |
| WF_NODENAME | The name of the current node. |
| WF_TEMPLATE | The name of the workflow template used. |
| WF_NODEOWNER | The name of the user who is editing the current node. |
| WF_NODEOWNERID | The ID of the user who is editing the current node. |
| NEXT_1 (NEXT_2, etc.) | The ID and the name of the next successor node with the lowest (or second-lowest) ID. For example 2 check. |
Additional variables:
| Variable | Effect |
|---|---|
| ELO_CONNECTUSERNAME | The name of the ELO user currently logged on. |
| ELO_CONNECTUSERID | The ID of the ELO user currently logged on. |
| ELOAS_PATH | The URL of the ELOas used. |
| ELO_SERVICEUSERID | The ID of the ELOwf service user currently logged on. |
The following variables refer to the settings that were made for the current user in the ELO user manager:
| Variable | Effect |
|---|---|
| ELO_USERPROP1 | The Windows user name of the current user if the user is configured in the ELO user manager. |
| ELO_USERPROP2 | The e-mail address of the current user if the user is defined in the user manager. |
| ELO_USERPROP3 | The contents of the Property 5 field. |
| ELO_USERPROP4 | The contents of the Action field. |
| ELO_USERPROP5 | The contents of the Property 1 field. |
| ELO_USERPROP6 | The contents of the Property 2 field. |
| ELO_USERPROP7 | The contents of the Property 3 field. |
| ELO_USERPROP8 | The contents of the Property 4 field. |
| ELO_SUPERIOR | The ID of the current user's supervisor. |
| ELO_SUPERIORNAME | The name of the current user's supervisor. |
Additional variables:
| Variable | Effect |
|---|---|
| ELO_FLOWID | The ID of the current workflow. |
| ELO_FLOWNODE | An ID that is composed of the ID of the current workflow and the ID of the current node. For example 118.1. |
| ELO_NODEID | The ID of the current node. |
| ELO_TEMPLATE | The name of the form used. |
| ELO_OBJID | The ID of the ELO object used. |
| ELO_TICKET | The ELOas ticket. |
You can also use values from the metadata form for completing form fields. The following variables can be used in addition to the variables for fields in the metadata and map fields:
| Variable | Effect |
|---|---|
| IX_ID | Another option for reading the object ID. |
| IX_LOCKED | The user who currently has locked the entry. |
| IX_CREATEDATE | The filing date/creation date (including time) of the selected entry in ISO format. For example 20140827151800. |
| IX_MASKNO | The number of the metadata form used. |
| IX_MASKNAME | The name of the metadata form. |
# Keyword list
You can assign a keyword list to an input field or combo field via the Keyword list field. Date fields have the fixed keyword list #DATE#.

There are several types of keyword lists for input fields and combo boxes:
Keyword: The keyword list of a field in the metadata can be used here. You can also enter keyword lists that do not refer to fields (Global keyword list, Version number keyword list, Version comment keyword list, and Workflow keyword list).
Dynamic keyword map: If you have selected the type Dynamic keyword map, you can enter data in the field using a dynamic keyword list.
- Script name: Enter the name of the Indexserver script that contains the dynamic keyword list in the Script name field.
- Filter: Enter the variables for the required fields in the metadata and map fields in the Filter field. If you require multiple fields, you must separate them using commas.
Please note
You cannot use dynamic keyword lists in combo box fields.
ELOAS: Allows you to store a keyword list via an ELOas ruleset.
ELO Usernames: Allows you to select users and/or groups as a keyword list.
Proceed as follows to select a keyword list:
Select the keyword list type via the drop-down menu of the Keyword list field.
The corresponding input fields appear depending on the selected keyword list type.
Make the required settings.
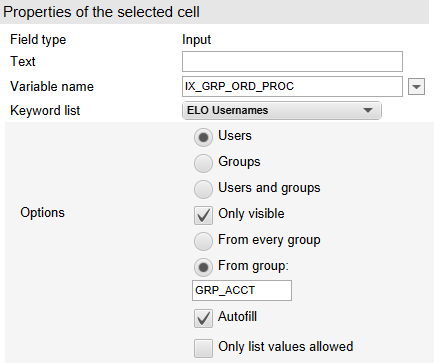
You can also enable the following options for keyword lists in input fields:
Autofill: A pen icon appears in input fields when the autofill option is enabled. When completing the form field, suggestions that match the user's entry automatically appear from the stored keyword list. If this option is not enabled, a button appears next to the input field that expands to a drop-down menu for the keyword list.
Only list values allowed: When this option is enabled, only entries from the keyword list are allowed in the field.
Existing entries: If the Existing entries option is enabled for an input field, ELO suggests terms that have already been entered in this field.

You can open the keyword list with the
F7key. The keyword list also opens automatically as soon as you enter data in a field. ELO then suggests terms that are related to your entry.
# URL
You can enter the document GUID (including brackets) or the website URL in the URL field.
Information
This function is not available for folders.

A left-click on a link to a document opens the external standard browser and downloads the document.
Information
If the URL is left empty in the form designer, the form provides a link to the current document.
Right-click the link to open a context menu. You have the following options in the context menu:
- Open link: Opens websites in the ELO browser. This does not work for documents.
- Open link in new window: Opens websites in the ELO browser. This does not work for documents.
- Copy link to clipboard: Copies the link to the document or website to the Windows clipboard from where it can be moved to other locations.
# Display mode
Use the drop-down menu of the Display field to choose from the available layout options. Change the layout of the selected cell in this manner.
In addition, you can define the elements of the form using CSS properties. Use the Form header scripts component for this.

You can define your own classes that are available via the drop-down menu of the Display field.
Refer to the section Custom styles for more information.
# Tooltip

You can enter a tooltip for all field types except for text fields. The tooltip is shown as soon as the user hovers over the respective field with the mouse. This way, you can provide the user with additional information and notes on the respective field.
# Validation

The Validation field is used to check the entry in the respective field. You can use validation to ensure that only numbers are valid as an entry or that the field cannot be empty, for example.
In the example, the value notempty is entered. This value triggers a check as to whether the field is empty. If the field is empty, a corresponding message is shown.
# Validation message
Enter additional information for the user in the Validation message field. Enter the criteria that are required for the field to be completed correctly and for the validation to work.
In this example, the value You must complete this field is used.

The user sees the text as a validation tooltip when text is entered in the field.
In this example, the text is "You must complete this field".
# Formula
The Formula field is used for performing calculations in a field.
These are the valid arithmetic operators:
- Addition:
+ - Subtraction:
- - Multiplication:
* - Division:
/
Information
The typical calculation rules apply. Parentheses may be used.
The variables of the respective fields serve as wildcards for the actual values.
# Example
The net value of an amount should be calculated in a field. We have added two input fields for the calculation:
The Gross value field with the variable IXMAPGROSS1
The VAT rate (in %) field with the variable IXMAPVAT1
The formula is generally: gross amount/(1+VAT rate)
In this case, the VAT rate must be calculated in decimals. For a tax rate of 19 %, you need to use a value of 0.19. The conversion to a decimal value is included in the formula so that the user can enter the VAT rate directly in percent.

The formula for the Net amount field is then:
IX_MAP_GROSS1/(1+IX_MAP_VAT1/100)
# On-the-fly formulas
You can execute simple calculations in numeric fields. These fields must be configured with one of the validation parameters num or amount.
The formula must start with an equal sign (=). This is followed by the actual mathematical formula, e.g. "= 0.21 * 1234 + 57".
The calculation is done when the user presses the ENTER key or leaves the field.
These inline formulas are limited to numerical computations. Other variables are not available.
# ESum
For fields that are created using JS_ADDLINE, use the ESum function to add up all fields with a common variable name.
You must use the following format:
ESum(IX_MAP_<Name)
or:
ESum(WF_MAP_<Name)
# Example

In this example, there is a JS_ADDLINE line with the Subtotal field that is linked to the IX_MAP_STOT1 variable. The formula ESum(IX_MAP_STOT) adds up all values from the fields (1 to n) that are generated with the variable IX_MAP_STOT.
# Keyboard shortcut
Use the Keyboard shortcut field to assign a shortcut that lets you jump directly to the respective field.

To do so, enter the letter you want to assign to the respective form field to the Keyboard shortcut field. In the form, jump to the respective form field with the keyboard shortcut ALT+<KEY>.
Information
The keyboard shortcut only works when the form is used directly in the browser. Do not use any shortcut that is already used by the respective browser.
# Character count
The two fields next to Character count perform different tasks depending on the field type.
You can use these fields to enter the size of input fields and editor fields.
For more information, refer to the Toolbar section.
# Read-only
All fields that the user can enter data into can be set as read-only. Select the Read-only check box to write-protect a field.
# Example
You want the first user (node A) to be able to complete the customer template. Another user (node B) should be able to see the template but not change it.
First, create the template customer.
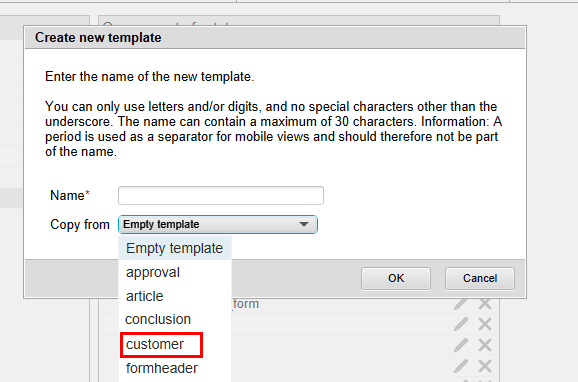
Now copy the customer template. To do so, select the corresponding template under Copy from in the Create new template dialog box.
Please note
Subsequent changes to the original template must also be made in the copy.

Name the copied template customer_prot to ensure that the two templates can be clearly distinguished from one another.

Select the Read-only setting for all fields of the customer_prot template.
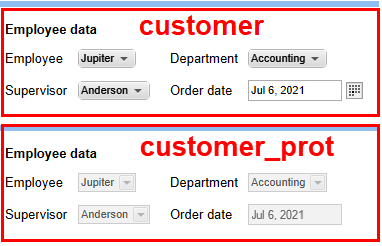
Finally, assign the customer template to node A and assign customer_prot to node B in the workflow template.
# Form columns
The Form columns field shows you how many columns the respective selected cell spans. This is relevant, for example, when the respective cell is connected to multiple cells.