# Translation
This chapter describes options for translating interface texts that are not included in the standard language package.
# Translation files
ELO provides a number of options for translating texts with the help of translation files. This section explains how you can do this.
You can use variables from translation files in:
- Names of fields in metadata
- Names of forms in metadata
- Keyword lists
- Node names in workflows
- Name when forwarding workflows
- In scripts and forms
The translation files are stored as the file type PROPERTIES. The following conditions apply:
- Character encoding: UTF-8
- Path in ELO: Administration//Localization//custom
- One for each language: A properties file with the corresponding country code (de, en, fr, etc.)
The following example describes how to work with translation files using translated fields in the metadata. In principle, this method works for the other points listed above.
You will find more information on using translations in workflows and forms in the ELO workflow (opens new window) documentation.
# Example
In the following example, we use a metadata form named Photo.
Method
Create a text file. You can enter any name for this file. However, you must add an underscore between the end of the name and the language abbreviation and use the file extension .properties. In our example, this is:
masksAndFields_en.properties
For each field, enter a variable and the name of the field in the respective language. You must use the following format:
<prefix>.<variable>=<text>Prefix: You can choose any prefix you like. However, you should use the same prefix for one specific purpose.
Variable: You can choose any variable you like. In this example, we use the group name of the corresponding field to make it easier to map.
Text: The text is displayed as the name of the field. The language should correspond to the respective language abbreviation.
For each language, create a copy of the first properties file with the corresponding language abbreviation. Otherwise, the name of the file must match that of the first file. In our example, this is:
masksAndFields_de.properties
Replace the texts in the corresponding language.
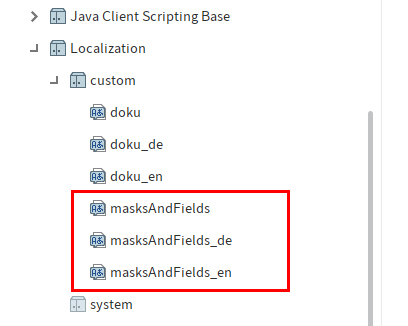
Save the files in ELO. Use the following path:
Administration//Localization//custom
Optional: To provide a default language if a language file is not found, save a corresponding file without the language abbreviation.
Open the ELO Administration Console.
Go to the Field templates area.
Select a field of the selected form.
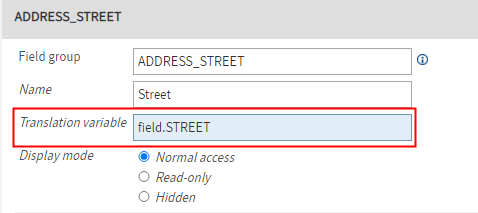
Enter the variable for the corresponding field in the Translation variable field. The variable must match the variable in the properties files.
Save the changes.
Repeat steps 8 to 11 for all fields of the form.
Reload the ELO Indexserver.
Result
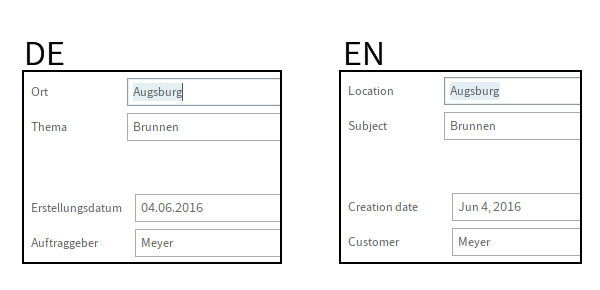
The field names are displayed in the respective language.
# Translation table
You can use the translation table to translate interface texts such as the short names of entries.
The following instructions are an example that can be applied to other scenarios.
# Example
This example explains how to translate the short names of folders.
Requirement
The respective entries must have been filed with a metadata form in which the Translate short name option is enabled.
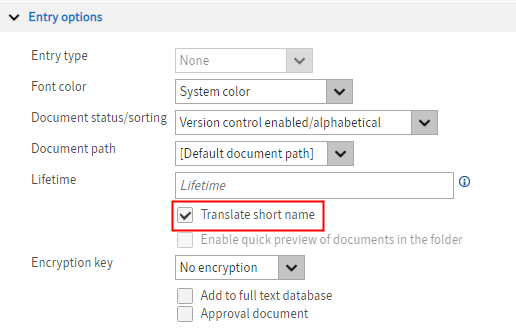
The option must have been set globally in the ELO Administration Console under (Metadata forms and fields > Entry options). If you enable the option later, you must set the option manually for existing entries in the client using the Options tab in the metadata form.
Method
Open the metadata of the folder whose short name you want to translate.
Copy the short name of the folder.
Open the translation table (Organize tab > System > Translation table).
In the translation table, automatically recognized texts are listed in the system language.
Information
You can change the sort order of the table using the table headers. You can only enter new terms if the table has not been sorted manually and there is no triangle icon next to a column header.
Scroll down until you reach the last entry in the table.
Right-click to open the context menu.
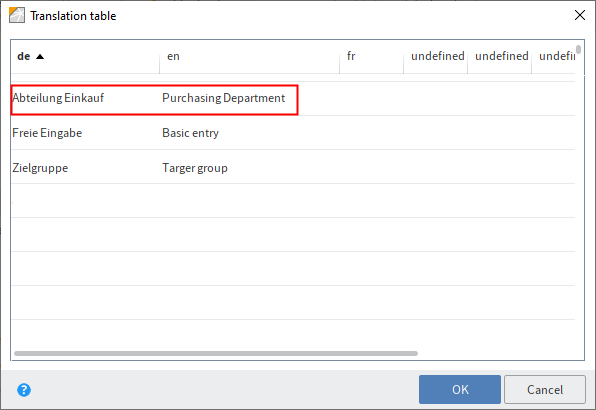
To insert the copied short name below the last entry, select Paste from the context menu.
Information
It is not always possible to translate merged strings. For example, if you want to translate the short name January 01, you cannot just enter January in the translation table. You need to enter the whole string.
Enter the translation you want in the column with the respective language abbreviation.
Select OK.
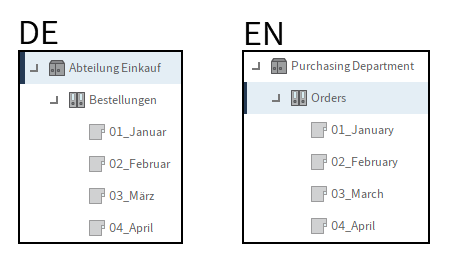
Result
You have entered a translation for the short name.
Outlook
As soon as you change the language, the translated texts are displayed.