# Configuration
The ELO Barcode interface works on two levels. The first level is contained entirely within ELO and is responsible for the recognition of the barcodes and the distribution of the recognized text to the fields of the metadata form. This is usually sufficient for most applications.
If additional processing steps are required, a program can be run via the Microsoft VB-Scripting Host interface, where these steps can be performed.
# Configure metadata form
To process barcode documents with the ELO Java Client, you have to define a metadata form for capturing barcode information in the ELO Administration Console.

Go to Metadata forms and fields in the ELO Administration Console.
Select the metadata form for barcode documents from the list.
In our example, this is the Barcode metadata form.
Optional: Create a new metadata form for barcode documents.

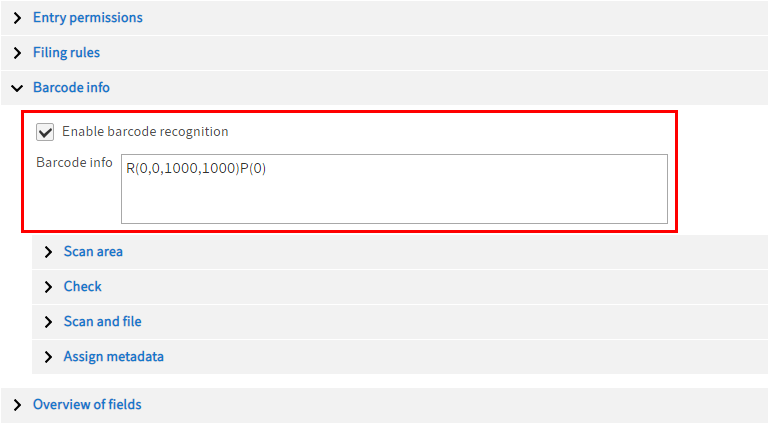
Select the Barcode info area to edit the barcode data.
# 'Barcode info' input field
# Brief overview
Enable the option Enable barcode recognition.
The Barcode info field is completed automatically. With the default settings, the entire page is searched for barcodes (
R(0,0,1000,1000)) and all pages of a document (P(0)).Barcodes are read via instructions. Instructions for targeted processing of barcode information are defined in the Barcode info input field.
Set your preferences under the options Scan area, Check, Scan and file, and Assign metadata. Your settings are automatically entered as instructions into the Barcode info input field.
Please note
Only a complete barcode instruction in the metadata form guarantees that barcode information is read. Each barcode requires one R instruction, one T instruction, and one or more S instructions.
Each entry group – referred to as R group in the following – is preceded by an R instruction. This instruction determines the area scanned for barcodes. This instruction may be followed by an L instruction, which can check minimum and maximum input lengths. This is followed by a T instruction that determines the barcode type and how barcode-free pages are handled. V instructions can then check certain barcode positions for fixed characters that you have defined previously. A sequence of S instructions determines how the barcode is broken down and assigned to the fields in the metadata form. The P instruction defines which page of a document is scanned for barcodes. Another R group can follow after this.
Information
Group names must not be used multiple times in the metadata form.
The instructions are explained in detail in the following.
# R instruction
With the R instruction, you define the area on a page where the barcode information is located. Determine which area of the page is scanned for barcodes.
Syntax: R(<left>,<top>,<width>,<height)
The four coordinates of the R instruction define the checked area in per-thousandths of the total scan area. An entry of form R(100,200,300,400) defines the area from the left = 2.1 cm, top = 6 cm, width = 6.3 cm and height = 12 cm on an A4 page (21*30 cm). Only this zone is scanned for barcodes. If you want to check the entire input area, you can select the entire area by entering R(0,0,1000,1000).
Information
If you need multiple barcode areas on a page, add additional new R parameters to the Barcode info field.
# L instruction
Use the L instruction to check the minimum and maximum length of a barcode.
Syntax: L(<minimum>, <maximum)
Barcodes usually have a fixed length (e.g., a 6-digit document number) per document. When you limit the allowed area (such as L(6,6)) here, you can avoid incorrect recognition caused by incomplete or other barcodes.
# T instruction
The T instruction defines the barcode type.
Syntax: T(<type)
Use the T instruction to define which barcode types you want the program to recognize. The value is binary and entered as a hexadecimal value. The following options are available:
| Codabar | 1 | (0x1) |
| Code 128 | 2 | (0x2) |
| Code 39 | 4 | (0x4) |
| I 2 of 5 | 8 | (0x8) |
| EAN 13 | 16 | (0x10) |
| EAN 8 | 32 | (0x20) |
| UPC A | 64 | (0x40) |
| UPC E | 128 | (0x80) |
| Data Matrix | 2048 | |
| QR code | 512 | |
| PDF 417 | 536870912 | |
| GS1 Databar | 1073741824 |
You can create any combination by adding the corresponding values (e.g., for Code 128 and Code 39 = 2 + 4 = 6).
Pages with no barcode: There are also pseudo-types with values 4096 and 8192 (0x1000 and 0x2000). Type 4096 (0x1000) defines what to do with pages without barcode. If this type is not set, the page is ignored by the barcode manager. If this type is set, a barcode-free page is appended to the previous page that has a recognized barcode (for multi-page documents).
Consecutive pages: Type 8192 (0x2000) decides what happens with consecutive pages that have identical barcodes. With this type, such pages are summarized automatically. If this type is not used, all pages remain independent documents. These pseudo-types are only recognized in the first R group and are then valid for all the forms used in a barcode process. You cannot use types 4096 and 8192 at the same time. Either use type 4096 (collating pages without barcodes), type 8192 (collating pages with identical barcodes), or none at all.
| Add blank pages | 4096 | (0x1000) |
| Add identical pages | 8192 | (0x2000) |
| Create checksum | 16384 | (0x4000) |
Scan direction: Last, a T instruction defines the scan direction of the barcode. If you do not use any special settings, the default setting is left to right. In addition, you can use any combination of the four options:
| Left to right | 65536 | (0x10000) |
| Right to left | 131072 | (0x20000) |
| Bottom to top | 262144 | (0x40000) |
| Top to bottom | 524288 | (0x80000) |
# V instruction
You can use certain characters for validating barcodes with the V instruction.
Syntax: V(<pos>='<character>')
You can check certain barcode positions for fixed characters using the V instruction. If you scan delivery notes, and your barcode consists of a delivery note ID ("DE" in the first two positions) and a delivery note number, you can avoid incorrect scans using the V(1='L') V(2='F') control. Within an R group, you can define as many V instructions as required. Note that apostrophes (') must be placed in front of and behind the check character.
# S instruction
The S instruction assigns barcode information to a field in the metadata form. The group name of the field is used for the assignment. Multiple S instructions can be used.
Syntax:
S(<group name field>=<Startpos>,<number)
The barcode is assigned to the fields using one or multiple S instructions. The S instruction defines which part of the barcode is transferred to which field (<group name of the field) via <startpos> and <number>. The group name of the field provides you with every field that has been assigned a group name in the current metadata form definition.
Information
Group names specified in the metadata form must be unique. Group names must not be used multiple times in the barcode metadata form.
If you fill a metadata form with multiple S instructions, these entries are saved without a separator directly one after another. If you have entered an ISO date (YYYYMMDD) in the barcode and want to transfer it to ELO, you must first change it to ELO format (DD.MM.YYYY or short DDMMYYYY). You can enter S(DLDATE=7,2) S(DLDATE=5,2) S(DLDATE=1,4). This is assuming that the date field is assigned to the first 8 characters of the barcode and that it will be entered into the DLDATE field.
# P instruction
The P instruction defines which page of a document is scanned for barcodes.
Syntax: P (<number of pages)
Information
To scan all pages of a document for barcodes, enter P (0) as the P instruction.
# Example
R(0,0,1000,1000)T(1610685183)S(BAR1=1,50)S(BAR2=1,18)P(0)
For the above example, the following information is evaluated and assigned:
- The R instruction defines the zone on a page where the barcodes are located. The entire page is marked.
- The HEX value of the T instruction is 1610685183. This value corresponds to the binary value 1100000000000010001101011111111. This is how the barcode types are defined that should be evaluated in the document.
- The two S instructions determine that two barcodes are applied to the fields with the corresponding group name.
- The P instruction defines that all pages of the document are scanned for barcodes.
# Scan area
# Page only
Determine what page of a document should be scanned for a barcode.
To search all pages, enter the value 0. A P instruction based on your entry is automatically created in the Barcode info field.
# Scan direction
You can determine the scan direction of a barcode during recognition.
The default is Left to right. This means if you do not use any special settings, barcode recognition always scans from left to right.

# Check
# Minimum/maximum length
To filter out unknown barcodes, you can define a minimum and maximum length.
Barcodes usually have a fixed length (e.g., a 6-digit document number) per document. If you limit the allowed area here, you can prevent detection of unwanted or incomplete barcodes.
# Barcode types
Select the barcodes in the Barcode types list that are used on the documents with barcode information.
Information
You will find more information on the different barcodes in the Barcode types chapter.
Select all barcode types used in this way. You can enable all types with the Select all option.

Information
If you restrict the possible barcode types to a small number, this increases the processing speed and reduces the error rate when recognizing the barcodes.
# Editing settings
Checksum: Use this option to determine whether the checksum should be evaluated for a barcode. When you deactivate the option, the checksum of the barcode is ignored. The checksum is returned when you enable this option. This option only works with barcodes that have a "built in" checksum, such as Code 128.
Narrow quiet zone: Barcodes need free space around the barcode so it can be recognized. When you enable this option, a border of 10 pixels is entered, otherwise the quiet zone is 10% of the image resolution.
# Scan and file
# Filing settings
Ignore non-compliant barcodes: Exclude barcodes of the same type from the check. Documents with multiple pages are read even more precisely to guarantee correct joining in ELO.
You need to activate this option to exclude third-party barcodes.
Add page without barcode to the previous page: Determine what will happen with barcode-free pages within a document with barcode information.
This option adds a barcode-free page to the last page with a recognized barcode. If this option is disabled, ELO Barcode will ignore pages without a barcode.
Join pages with identical barcodes: Determine what happens to consecutive pages with identical barcodes. If this option is enabled, pages with identical barcodes are joined automatically. If this option is disabled, all the pages remain as separate documents.

# Image enhancements
There are several options available to improve the quality of the scanned barcode.
Despeckle: Removes scan noise.
Median: Removes image noise in high-resolution scans.
Oversampling: Improves the image quality in low-resolution scans.
# Noise reduction
Noise reduction removes characters that are probably not part of the barcode. If the value is too large, parts of the barcode may be removed. A typical value is 10.
# Assign metadata
# Information
The recognized barcode can be distributed over multiple metadata fields. Assign fields here.
Information
Assign fields using an S instruction. The group name of the field is used for assignment. For more detailed information on S instructions, refer to the Barcode info input field section.
# Step by step
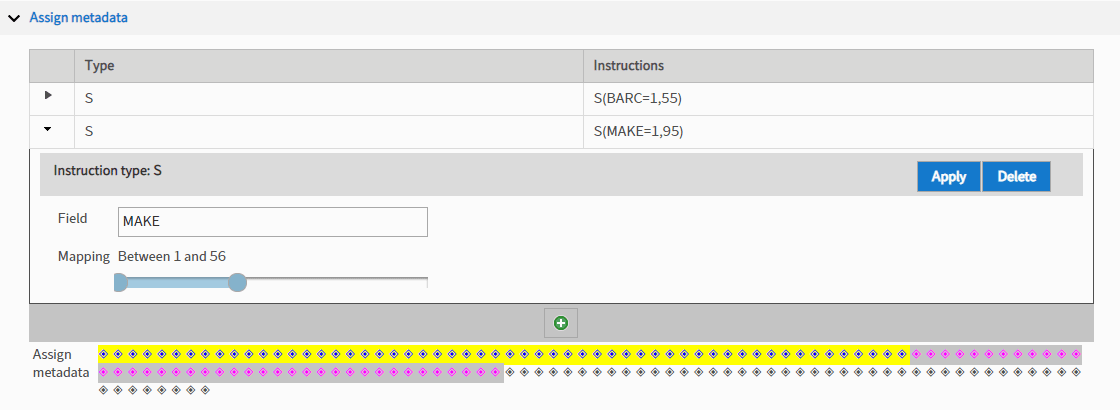
On the left, select the arrow to expand the assignment options.
Select a field you created under Fields.
In the Assignment area, define what section of the barcode is applied to which field.
The selected section is assigned to the selected field during filing.
Select Apply.
The field assignment is shown as an S instruction.
Finish defining the metadata form by selecting Save.
# Result
You have defined all barcode parameters. The barcode instructions are now in the Barcode info field.