# Installation
This chapter contains information on installing the ELO Java Client.
Please note
If possible, avoid installing the ELO Java Client on Microsoft Windows server systems.
If you want to uninstall an ELO Java Client on a Windows server, follow the instructions in the Uninstalling on a Windows server system section.
# Installation with ISO file
Requirements
You will find a list of the system requirements for the ELO Java Client in the ELO system requirements (opens new window) documentation.
You need Windows administrator rights on the local computer to install the ELO Java Client.
Method
There are different ways to install the ELO Java Client. The following method describes how to install ELO from the ISO file.
Select ELO Java Client under Clients.
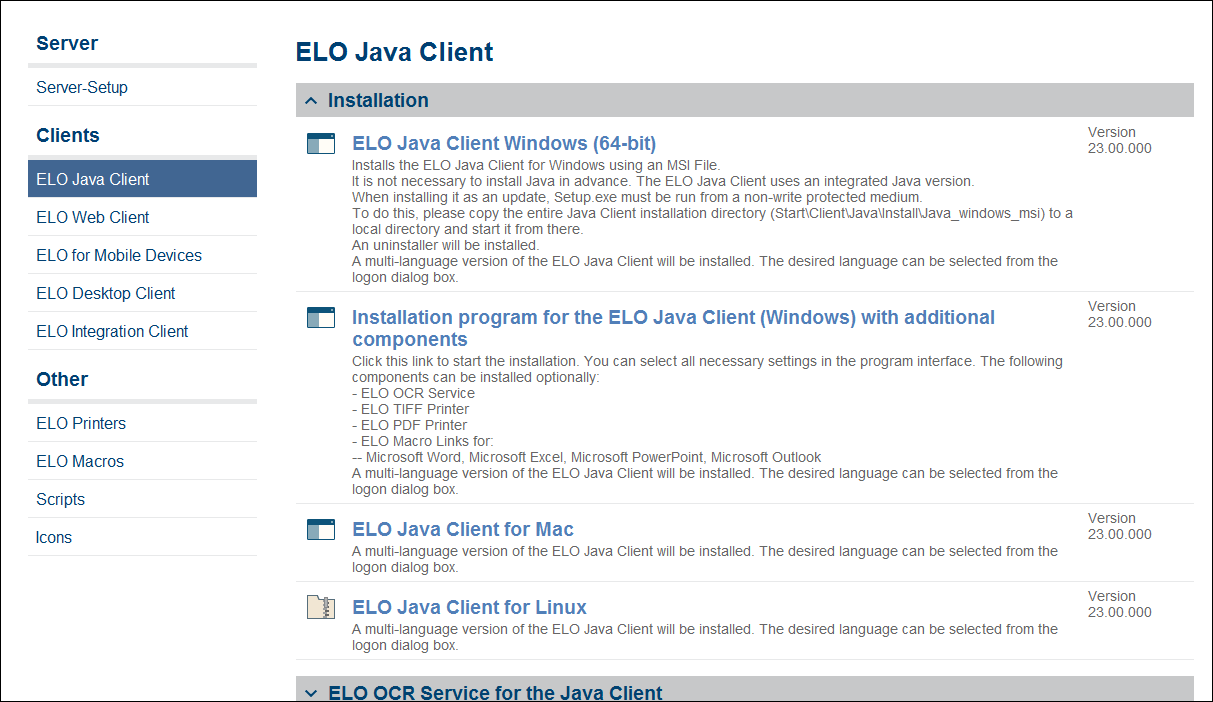
The ELO Java Client page opens.
Select ELO Java Client Windows (64-bit).
Optional: If the Windows User Account Control window appears, confirm with Yes.

The ELO Java Client Setup dialog box appears.
Choose the language for the installation in the drop-down menu and select OK.
Information
The language you select only applies to the language used during the installation. The user can select the language of the ELO Java Client interface in the logon dialog box.
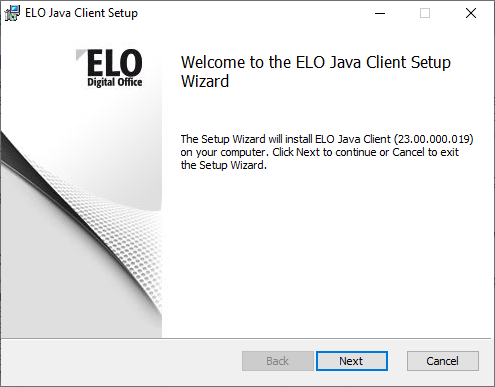
The ELO Java Client Setup dialog box appears.
Select Next.
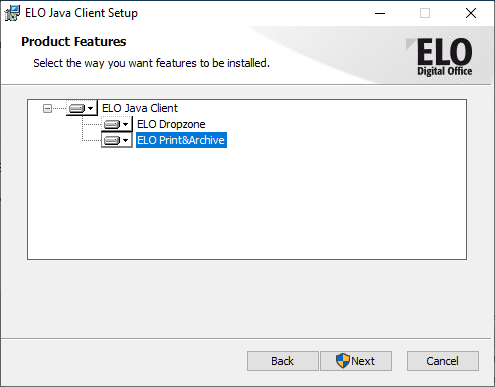
The Product Features page appears.
Optional: Select which additional components you want to install.
The following components are available:
ELO Dropzone: ELO Dropzone allows users to drag and drop documents to ELO using customizable tiles.
ELO Print&Archive: ELO Print&Archive enables users to transfer documents via a virtual printer from a third-party program to ELO.
Please note
ELO Print&Archive is no longer being developed. It is nevertheless compatible with the current versions of the ELO Java Client.
Information
You will find additional information about these components in the ELO Dropzone (opens new window), Filing via ELO Dropzone (opens new window), and ELO Print&Archive (opens new window) documentation.
Select Next.

The Destination Folder screen appears.
Optional: Select Change to change the suggested target folder and choose a different installation directory.
Select Next.
The Ready to install ELO Java Client screen opens.
Select Install.
The installation starts.
A message appears when the installation is completed.
Select Finish to complete the installation.
Result
The ELO Java Client is installed.
# Configure ELO Indexserver
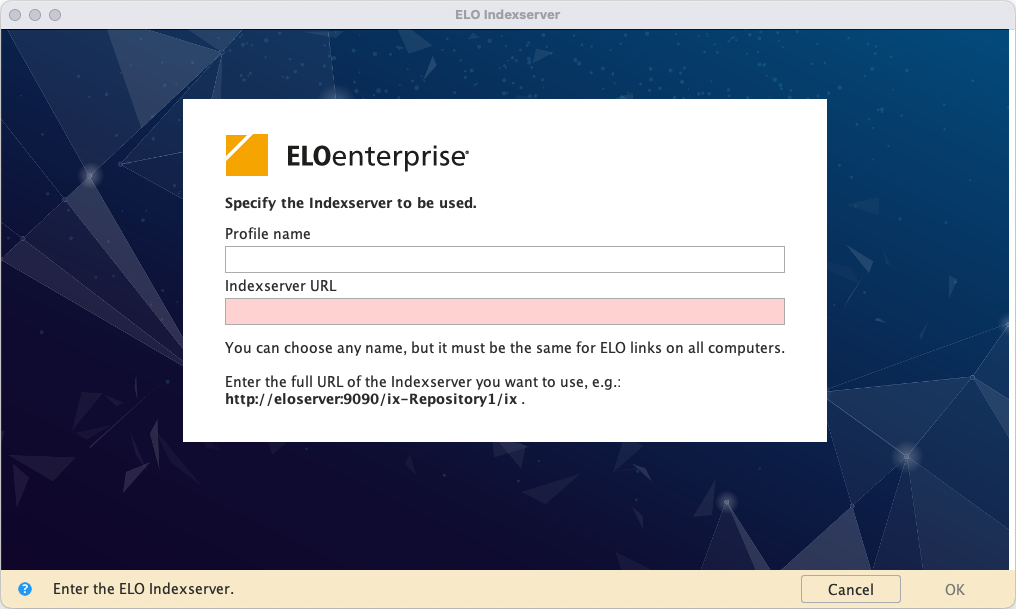
The ELO Java Client needs to connect to an ELO Indexserver to access a repository. When you run the client for the first time, there is no ELO Indexserver connection registered and the ELO Indexserver dialog box appears.
Information
The ELO Indexserver dialog box is also displayed when you remove all existing ELO Indexserver connections, since at least one connection must be entered.
Method
Start the client.
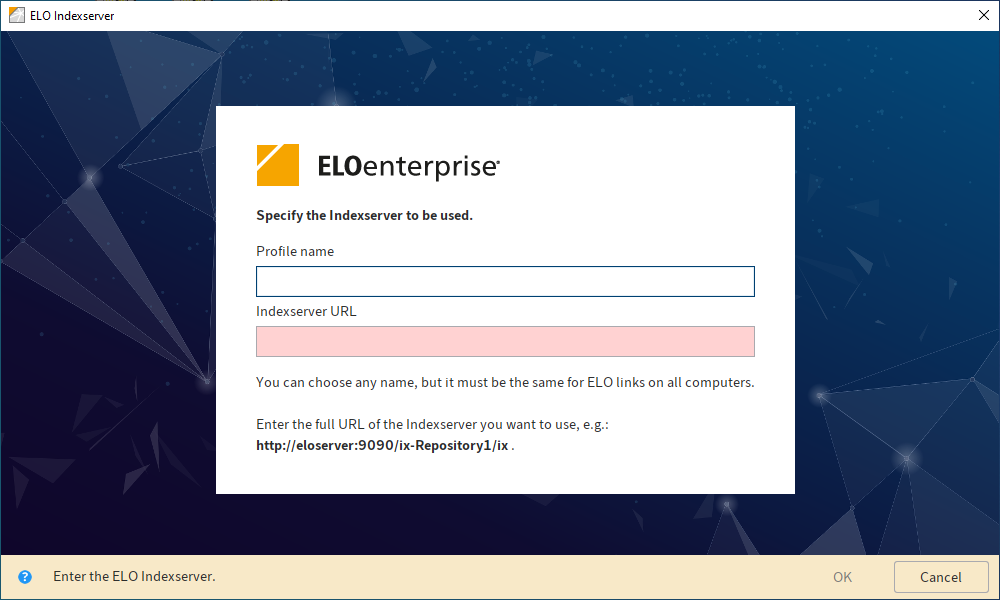
The ELO Indexserver dialog box appears.
Enter a name for the first profile in the Profile name field.
The name is displayed during logon and is used as the name in ELO link files.
This is why you should enter the same name for all computers. The repository name is normally used here.
Enter the ELO Indexserver URL.
URL example:
http://<server name>:<port>/ix-<repository name>/ixInformation
You can find the ELO Indexserver URL in the ELO Application Server Manager. Open the ELO Application Server Manager in your browser. Select the ELO Indexserver you want to use from the list of applications. You will find the corresponding repository name on the left.
You can also use HTTPS if the server is configured accordingly.
If the URL you entered was found, the color of the Indexserver URL field turns to green.
Select OK.
Result
The logon dialog box opens and you can log on the client.
Outlook
Go to the Create new profile section to learn how to add additional repositories or to edit an existing connection.
# Optional: Logging
The ELO Java Client logger is set up via the configuration. You can configure a special logger in the registry for a more detailed log output. In this case, the logger settings in the configuration of the ELO Java Client are inactive and are not used.
Start the Windows Registry Editor (regedit).
Open the following directory:
HKEY_CURRENT_USER\Software\JavaSoft\Prefs\ELO Digital Office\eloenterpriseCreate the logger entry by selecting New > String value from the context menu.
Enter
loggeras the name for the new string.Enter the path to the file with the logger configuration.
Information
The installation directory of the ELO Java Client contains a predefined log4j1.xml file.
Important
You need to specify the storage location of the log file in the log4j1.xml file in the ELO Java Client directory.
If you need a log output before setting up the logger, start the EloClient.bat batch file stored in the ELO Java Client installation directory.
# ELO Java Client with additional components

If you select the Installation Program for ELO Java Client (Windows) with Additional Components menu item, the Make AIO Installer Structure program opens. By default, the program selects a directory shared as ELO JC AIO Installer on the local computer. If you attempt to start copying files and the directory does not exist, you will get an error message.
Method
Select a directory on the local computer or network.
Select Start Copy to copy the files.
After all files have been copied successfully, you will see the status message Copying finished.
Select End and navigate to this directory in a file browser.
You will see several files and folders in this directory that allow you to customize the installer for the ELO Java Client. Immediately after copying the files, the EloJC_AIO.exe file appears.
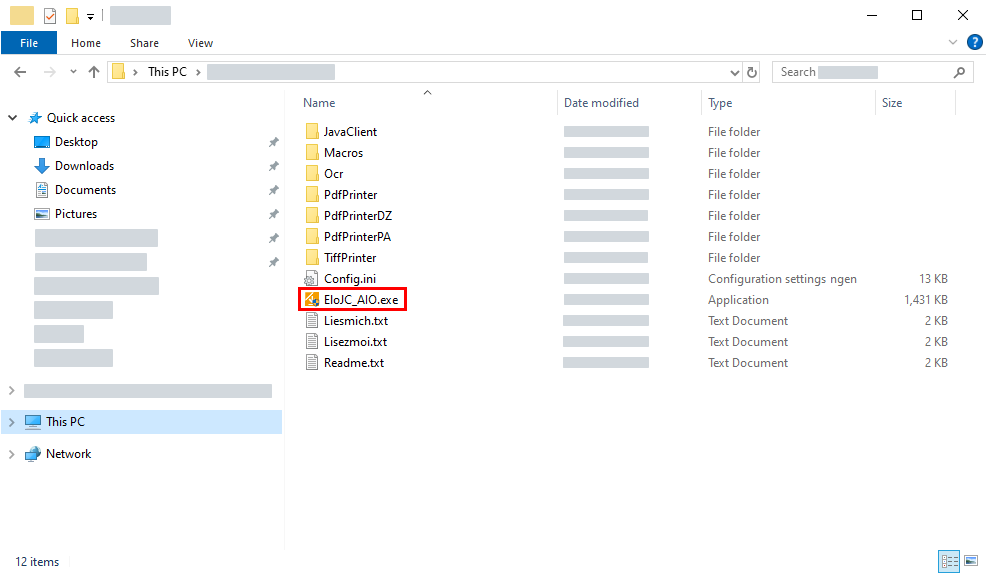
Run the EXE file.
Result
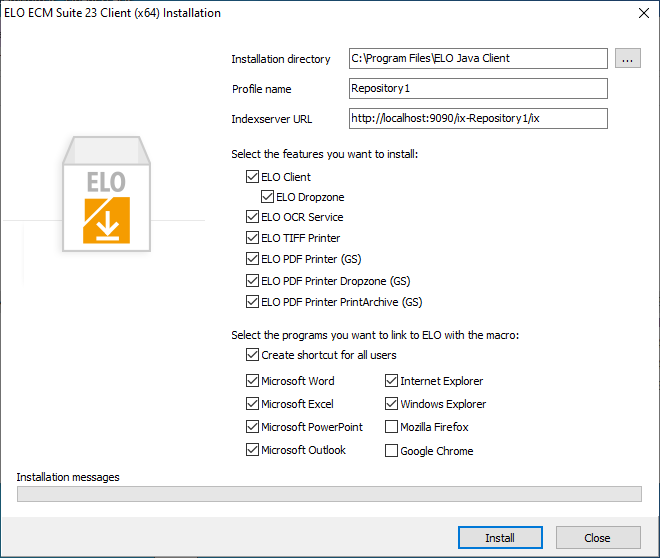
The ELO ECM Suite Client Installation window opens.
This installs the ELO Java Client along with all available optional components by default.
Information
The default entries for installation directory, profile name, and ELO Indexserver URL are just examples of valid entries and usually need to be adjusted for your specific requirements.
Outlook
You can select or remove all the options in this window.
You can also modify the default settings by changing the parameters of the config.ini file. The latter option is particularly useful for network rollouts. You can find more information in the Configuration via the 'config.ini' file section.

The following is a list of possible installation options.
# Installation directory
The ELO Java Client is installed to this directory when you run the program on a local computer. You can change the default directory by specifying INSTALLDIR="<path>" as the command line parameter when you run the file.
# Profile name
This is the name of the profile that the user sees when logging on to the repository with the ELO Java Client. You can enter any name here, but it is recommended to specify a name that helps the user identify the repository they are about to use. It is recommended to specify a name that helps the user identify the repository they are about to use.
Note
The AIO Installer sets up global profile names for all users. If the same profile name already exists in the user profiles, only this name appears in the ELO Java Client profile list.
# ELO Indexserver URL
This is the URL to the ELO Indexserver for your repository. Change the default URL by altering the URL from http://server:9090/ix-database/ix to <http(s)>://<server name>:<Port>/<repository name>/ix.
Select what you want to install: The ELO OCR service performs text recognition on image files, usually from the ELO Intray. The TIFF and PDF printer options install printer drivers that allow documents to be printed from or to ELO in each of the respective output formats.
Select the programs you want to link to ELO with the macro: In this area, define which programs in Windows you want to install an ELO add-in to. The add-in provides you with additional in-program buttons that send documents directly to the ELO repository or Intray.
# Configuration via the 'config.ini' file
You can configure the AIO program via the config.ini file. This offers several options for a rollout installation with predefined values.
Please note
You can find more information on configuration in the AIO Installer directory in the Readme file. Several options are explained in this file.
# Example
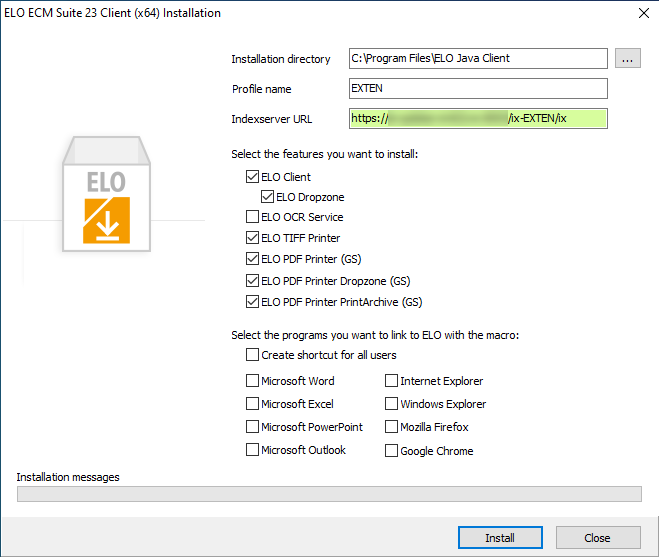
The settings shown correspond to the following values in the config.ini configuration file:
[SETTINGS]
Language=de
SilentInstallation=0
InstallationDir=%ProgramFiles%\ELO Java Client
[clients]
EloClient=1
XMX=
XMS=
SERNO_BARCODE=
Dropzone=1
Ocr=0
[REPOSITORIES]
ServerUrl_1=https://<server>:<port>/ix-EXTEN/ix
ProfileName_1=EXTEN
...
[Macros]
AllUserInstallation=0
Word=0
Excel=0
PowerPoint=0
Outlook=0
WindowsExplorer=0
Firefox=0
Chrome=0
[Printer]
PdfPrinter=1
PdfPrinterDropzone=1
PdfPrinterPrintArchive=1
TiffPrinter=1
PsConverter=1
PdfPrinterRestartSpooler=0
PdfPrinterDropzoneRestartSpooler=0
PdfPrinterPrintArchiveRestartSpooler=0
PsConverterInstaller=ELO_PS_Converter40.msi
PsConverterInstallVcRedist=0
# Uninstalling on a Windows server system section
If you install the ELO Java Client on a Windows server system with the Setup.exe in the AIO installer, a path to the *.mst file in the installation folder is created in the registry entry.
Path example: |C:\Users\Administrator\Desktop\AIO_JC_20_03_000_144\JavaClient\1031.mst
If the installation files are removed later, the client can no longer be deleted because the *.mst file is missing. You will see the following error message: "Error applying transforms".
If you install the ELO Java Client on a Windows server system with the AIO EloJC.exe file, an uninstall error also occurs if the AIO installation folder was deleted beforehand.
In these cases, you can perform one of the following steps to allow uninstallation:
- Install the MSI package. If the ELO Java Client.msi file is executed, no Transforms entry is created that refers to the *.mst file. This allows you to uninstall independently of the installation folder.
- Delete the registry entry with the path to the MST file.
- Use the Microsoft program for troubleshooting installations and uninstallations. For more information, refer to the Microsoft support page (opens new window).
# Terminal server operation
It is also possible to run the ELO Java Client in a terminal server environment.
# Memory
Each instance of the Java Client is assigned 1 GB of RAM by default. This may require excessive amounts of system RAM in terminal server environments. It is possible to reduce this value to 500 MB in most environments without drawbacks.
To do so, open the Windows Registry and search for
ELOJavaClientw.exe.The registry key where this is stored also contains the parameter
-Xmx1000m.Change this value to
-Xmx500m.
Please note
Do not change the memory settings for the ELO Java Client without first testing performance with different document types in the actual repository. Reducing this value to less than 500 MB is not recommended.
# macOS
If you are installing the ELO Java Client on macOS, you need to consider the following information.
Please note
In rare cases, the macOS Gatekeeper prevents the execution of the ELO Java Client or functions such as PDF conversion even if a signature is valid. Apple sets a quarantine flag on the app, which can be removed with the following command:
sudo xattr -r -d com.apple.quarantine /Applications/ELOClient/ELOClient.app
# Java Runtime Environment
The ELO Java Client for macOS includes a Java Runtime Environment package. This means you don't need to install the Java Runtime Environment separately.
# Installation
The installation files are provided as a disk image file (DMG). If you downloaded the installation package from the ELO SupportWeb, the DMG file comes in a ZIP file. If you have already copied the InstallELOClient DMG file to your Mac, continue reading from the Start installation section.
# ZIP file
Download the latest version of the ZIP file for macOS.
Extract the ZIP file to your Mac.
The InstallELOClient DMG file is now available.
# Start installation
You can now proceed with the installation.
Double-click to open the DMG file.
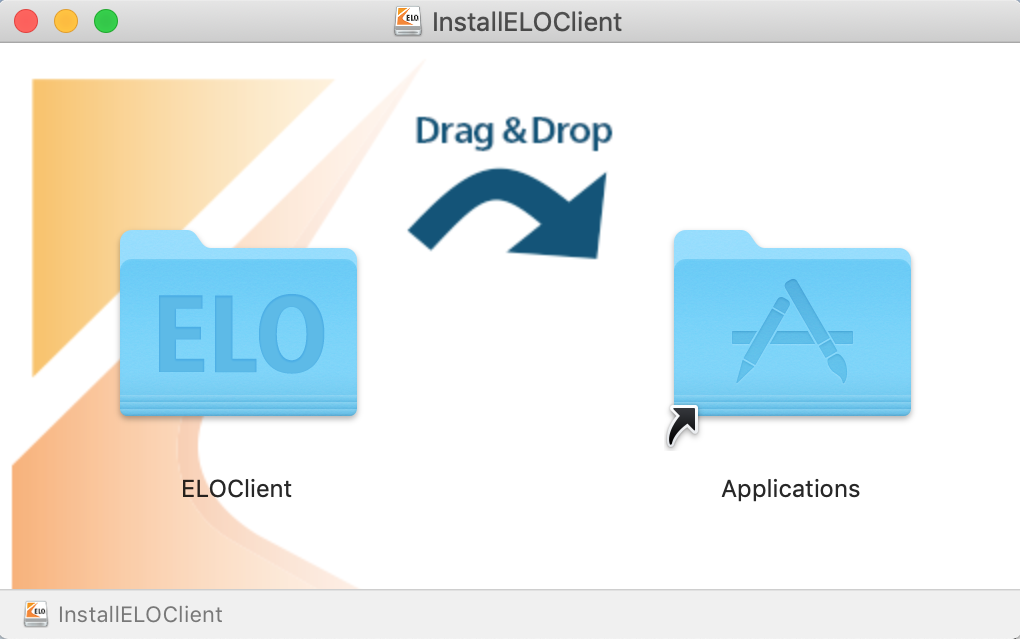
The DMG file is executed. The InstallELOClient finder window appears.
Drag the ELOClient folder to the Applications folder.
Information
A confirmation dialog appears if there is an update. Click Replace to confirm that you want to overwrite existing files.
Installation starts. When installation is completed, the ELOClient folder is located in the Program files directory.
# Start the ELO Java Client
Open the ELOClient folder.
Double-click ELOClient.app to start the ELO Java Client.
The ELO Indexserver dialog box appears. If you have already entered an ELO Indexserver, the logon dialog box appears immediately.
The ELO Java Client needs to connect to an ELO Indexserver to access a repository. Learn how to establish this connection in the Configure ELO Indexserver section.
# Logging
If you want to use parameters when you start the ELO Java Client, you can do this via the terminal.
Execute the following command to see which parameters you can use:
/Applications/ELOClient/ELOClient.app/Contents/MacOS/ELOClient -hTo run the ELO Java Client with the desired parameters, adjust the command as required.
Example:
/Applications/ELOClient/ELOClient.app/Contents/MacOS/ELOClient -logging DEBUG
# Linux
If you want to install the ELO Java Client on a Linux system, you need to consider the following information.
# Install Java
If you are using Linux, there are two different methods for installing the required Java components. Select one of the following methods.
- Install the latest version of Oracle JDK.
OR
- Install the latest versions of OpenJDK and OpenJFX.
# Check Java installation
To check if Java already is installed, proceed as follows:
Start a terminal.
Enter the following command:
java -versionCheck whether the Java version is identical to or higher than the one listed in the version history.
# Install the ELO client
The installation package for Linux comes in a compressed TAR repository (TAR.GZ format).
Download the latest installation package for Linux.
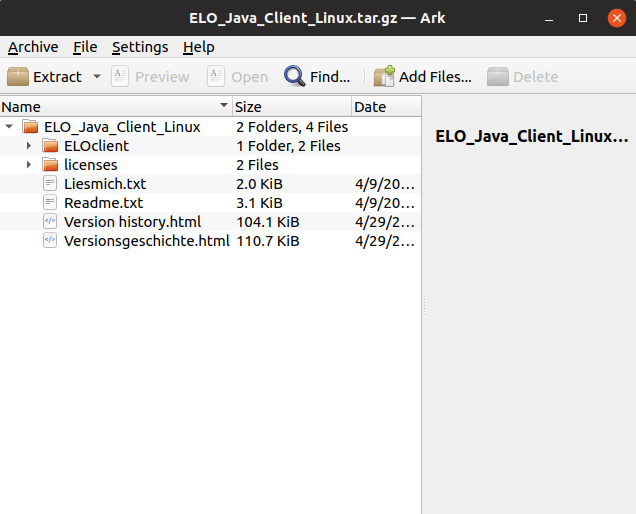
Extract the directory to your Linux computer.
Copy the folder ELOclient in the directory on your Linux computer.
This is the installation directory of the ELO Java Client that the client is run from.
# Start the ELO Java Client
In Linux, the ELO Java Client is started with the ELOclient.sh shell script.
Open the ELOClient folder.
Double-click to open the ELOClient.sh file.
Alternative: Start the shell script with the following terminal command:
./ELOclient.shInformation
If you do not have permission to run the command, run the command
sudo ./ELOclient.sh. You will be asked for the user's password.
The ELO Indexserver dialog box appears. If you have already entered an ELO Indexserver, the logon dialog box appears immediately.
The ELO Java Client needs to connect to an ELO Indexserver to access a repository. Learn how to establish this connection in the Configure ELO Indexserver section.
# Profile
The name of the server connection is the same as the profile for the repository. The name is displayed during logon under the available repositories and is used as the name in ELO link files.
This is why the same name must be entered for all computers. The repository name is normally used here.
# Logging
If you want to use parameters when you start the ELO Java Client, you can do this via the terminal.
Execute the following command in the installation directory of the ELO Java Client to see which parameters you can use:
./ELOclient.sh -hTo run the ELO Java Client with the desired parameters, adjust the command as required.
Example:
./ELOclient.sh -logging DEBUG