# Follow up on a meeting
After a meeting has been conducted, there are still a few tasks you can perform:
| Task | Explanation |
|---|---|
| Create minutes | As soon as the meeting has ended and all texts are final, you can create the minutes. |
| Send message | You can contact the participants after the meeting, e.g. to send them the minutes. |
# Create minutes
You can create minutes and share them with the other meeting participants.
Information
Organizers and minute takers can create minutes.
The minutes are a PDF with the following information:
| Information | Details |
|---|---|
| Meeting metadata | Title, date, location |
| Participant list with information on all members and guests | Present/absent, name, e-mail address, role |
| Minutes text | On the detail page of each item, there is a field for the minutes text. The minute taker and organizer have access to this text field. |
| Information on the items | Title, duration, speaker, description, proposals (possibly with attachments) |
| Decisions | |
| Voting results | Voting issue, result, x of y votes cast |
| Notes relevant to the minutes | Title of note, created by, content |
Method
Select the meeting.
On the ribbon, select Meeting > Meeting > Create minutes.

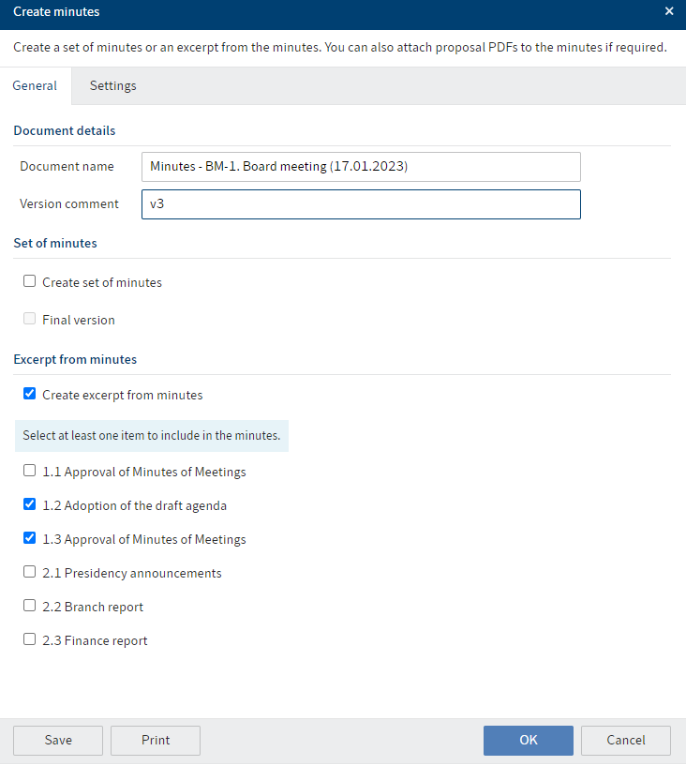
Complete the fields in the Create minutes dialog box as required.
'General' tab
Field Explanation Document name The document name is generated automatically. You can edit it if necessary. Create set of minutes A set of minutes contains all meeting items. You can create new versions until you mark the set of minutes as final. Final version As soon as you have created a final version of the set of minutes, you cannot create more sets of minutes. You can still create excerpts from the minutes. Create excerpt from minutes If items are only relevant for some of the participants, you can create an excerpt from the minutes for these items. You can select the items individually. Information
You can create a set of minutes and an excerpt from the minutes at the same time.
'Settings' tab
Field Explanation Attach proposal PDF to minutes If you select this option, the proposal PDFs are attached to the minutes. Select OK.
Result
The minutes are created in the meeting file in the Minutes folder.
Outlook
You can send the minutes to the meeting participants, e.g. using the Send message function.
# Send message
You can send a message to the participants of the meeting.
Method
Select the meeting.
On the ribbon, select Meeting > Notifications > Send message.

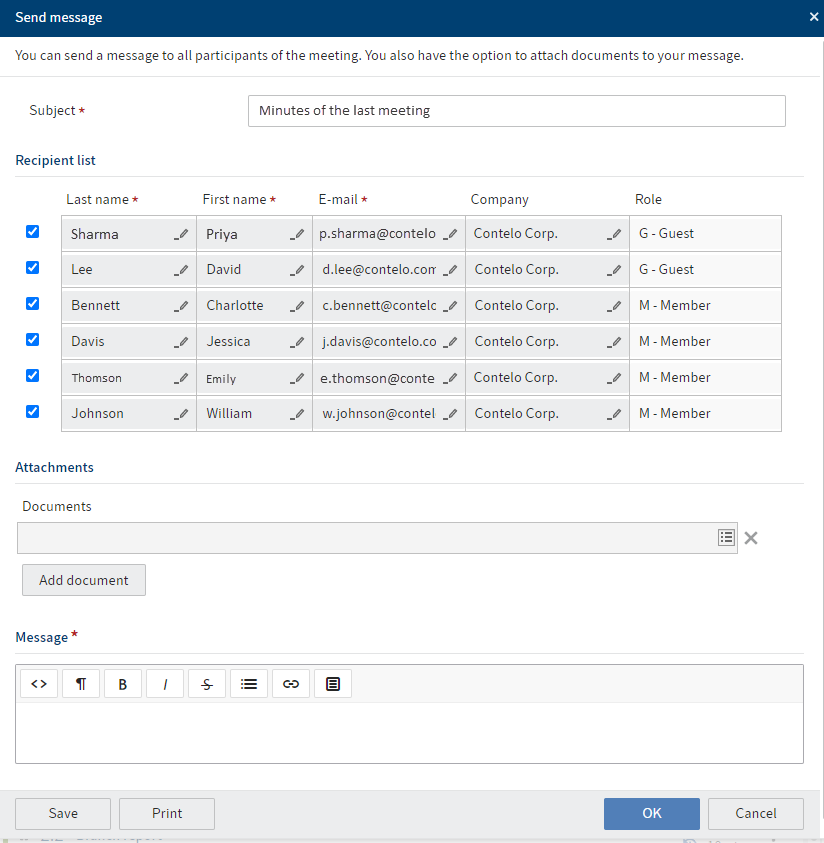
Complete the fields in the Send message dialog box as required.
Field Explanation Recipient list The recipient list automatically contains all meeting participants. You can remove individuals from the list. Attachments You can attach documents that are stored in the meeting folder to your message, e.g. the meeting file or the minutes. Message You can type and format a message. You have the option to use clips to help you write text. They contain information about the meeting (e.g. location) and can be inserted into the text. To use clips, select the position in the text where you want to insert information and click Clips. Select OK.
Result
The participants receive an e-mail with the selected documents attached.