# Prepare item
You can create items to be discussed during a meeting. An item can either be created in a meeting directly or in an item pool.
Information
You can create items for a meeting board even if you are not a member. In this case, you need to create the item in a item pool. Someone with the appropriate permissions must move it to the meeting board for you. For example, if you prepare an item for your supervisor (member of the meeting board), enter this person in the Responsible field. This means that your supervisor is authorized for both the agenda item and the meeting board and can register and submit the agenda item.
You then edit the item by adding documents or a proposal, for example.
If the item is in a item pool, you still have to register it for a meeting and/or submit it. The difference is that only you can view the contents of a registered item. As soon as you submit your item, the contents can be viewed by other members and organizers. This allows you to announce an item of business and schedule it for the agenda.
# Create item pool
An item pool is a folder in which you can create and prepare items.
Item pools inherit the permissions of the folder they were created in. You may have to first create a folder with the necessary permissions using the New folder function (Ribbon > New tab).
Method
Select the location in the repository where you want to create the item pool.
On the ribbon, select New > Meeting > New item pool.
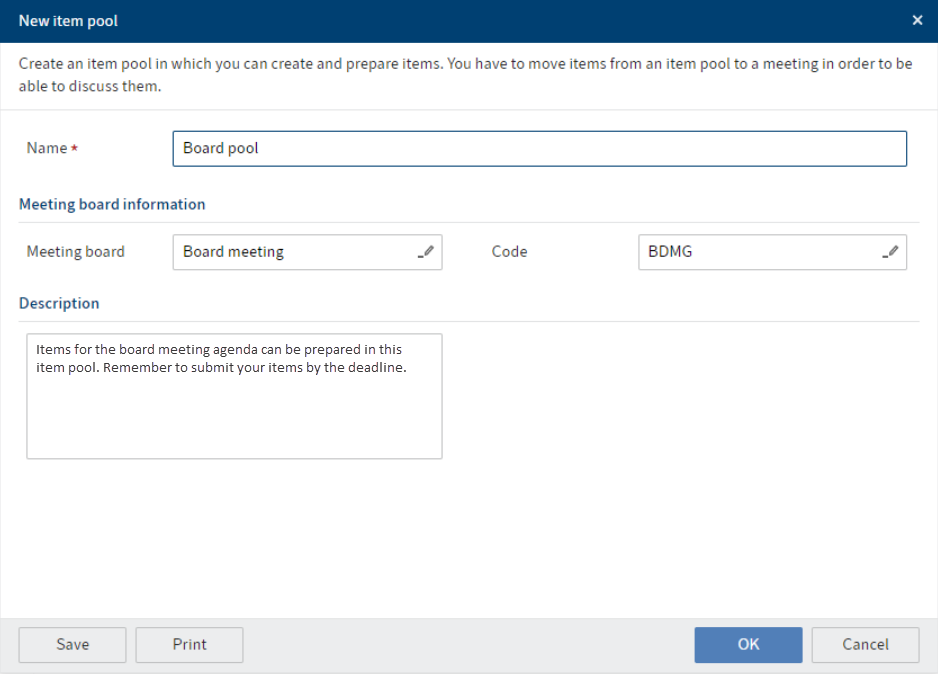
Complete the fields in the New item pool dialog box as required.
Field Explanation Name The name should indicate what the item pool will be used for. Meeting board information If you select a meeting board here, the item pool will be linked to it. This link enables items to use the proposals that were defined for the meeting board. Select OK.
Result
The item pool is created at the selected location. Everyone with permissions can create items in it.
# Create item
You can create an item to prepare it for a meeting.
An item can either be created in a meeting directly or in an item pool.
Method
Select the meeting or item pool in which you want to create the item pool.
Select New > Meeting > New item.
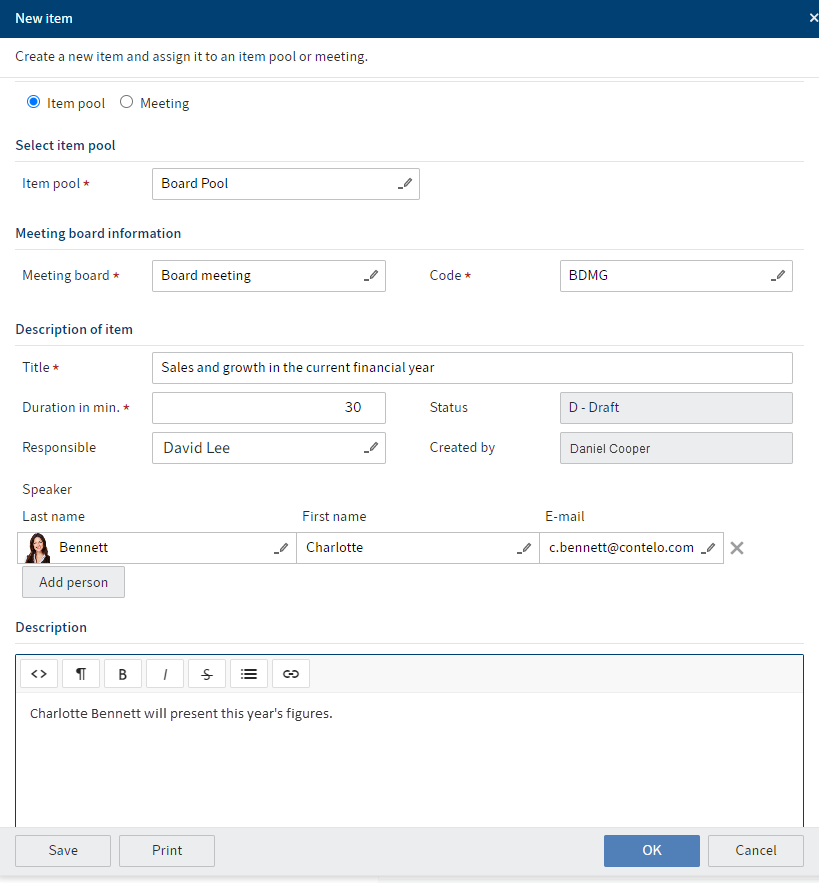
In the New item dialog box, the radio button is already selected to indicate that the item is assigned to an item pool or a meeting. Information about the item pool or the meeting is already entered. However, you can change this setting.
Complete the other fields as required.
Field Explanation Responsible The person responsible is granted advanced permissions and can edit the item. Speaker The speakers are granted advanced permissions and can edit the item. You can select multiple people. Select OK.
Result
The item is created in the meeting directly or in the item pool.
Outlook
- You can now prepare the item on the item detail page and prepare a proposal, for example.
- If the item is in the item pool, you must register it for meeting in good time so that it can be scheduled accordingly. The item then has to be submitted. Alternatively, you can also directly submit the item.
# Prepare proposal
Depending on the meeting board settings, you may need to prepare a proposal before you are able to register the item for a meeting.
Proceed as follows:
- Create the proposal.
- Have the proposal approved.
- Create a proposal PDF.
# Create proposal
You can create a proposal for your item.
Method
Select the item.
On the ribbon, select Meeting > Proposals > Create proposal.
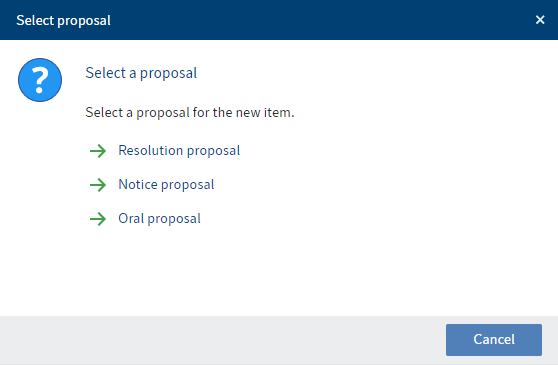
If multiple proposals are available for the meeting board you are creating the item for, select the type of proposal.
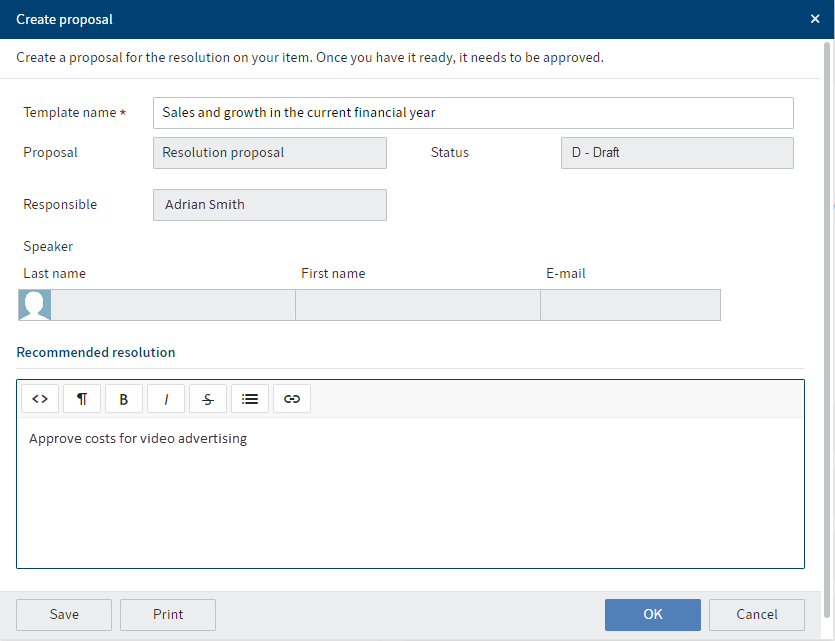
In the Create proposal dialog box, the proposal name is already entered. However, you can change this name.
Enter a recommended resolution. You can also edit this field later using the form.
Select OK.
Result
The Resolution proposal folder is created in the item folder.
The form in this folder contains the data you entered.
Depending on the proposal type, the folder can contain a Word document.
Outlook
- You can edit the Word document with the standard functions (opens new window).
- Once you have finished the proposal, you can submit it for approval.
# Initiate approval
After you have finished preparing the proposal, you still need to have it approved.
Method
Select the Resolution proposal folder.
On the ribbon, select Meeting > Proposals > Initiate approval.
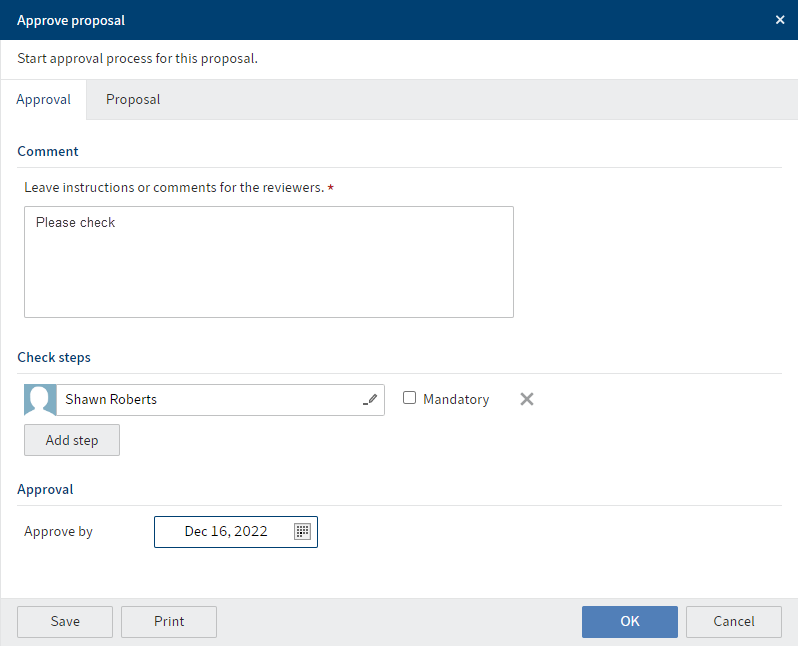
In the Approve proposal dialog box, enter a comment for the people you select to review the proposal.
Under Check steps, select who should approve the proposal.
Optional: Enter a deadline for approval.
The Proposal tab is just for overview purposes and cannot be edited.
Select OK.
Result
The reviewers are assigned a corresponding task.
Outlook
Once the approval has been granted, you will get a notification in your task area that your proposal has been approved. You can see the comment entered by the last reviewer in the Last comment box on the Form tab.
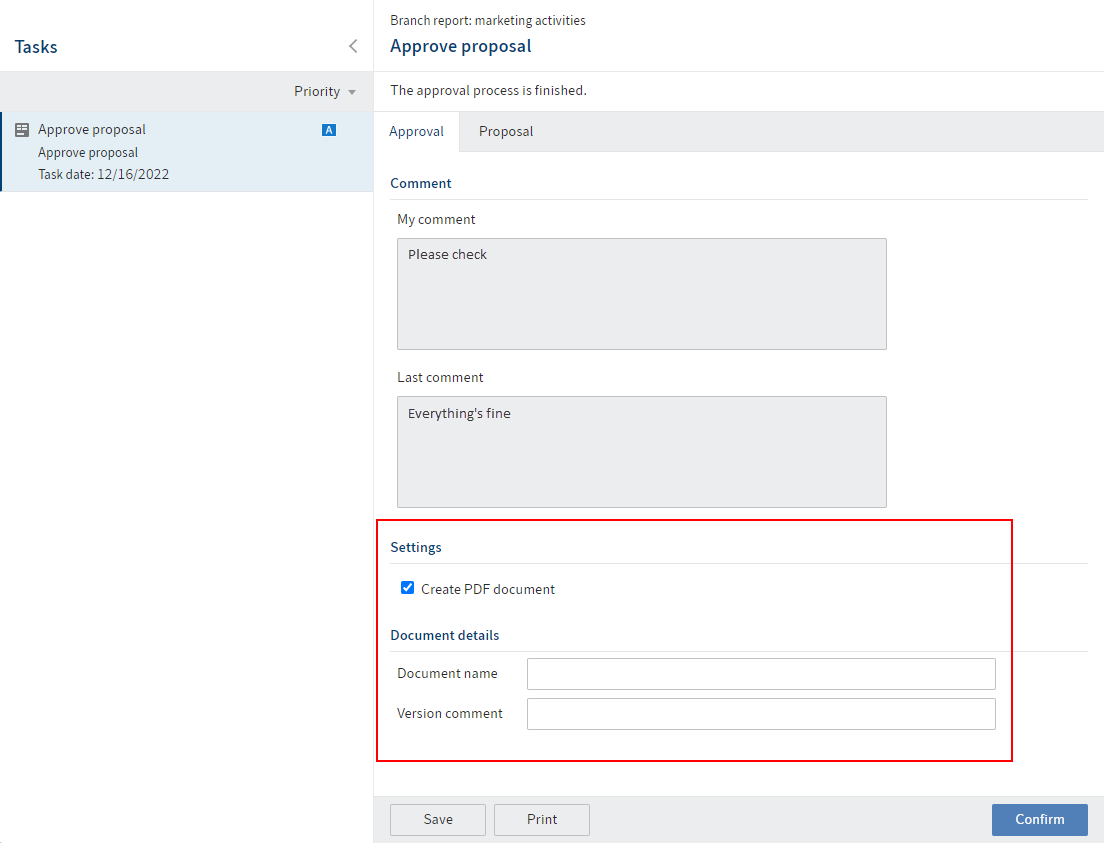
If you leave the Create PDF document option checked, you can immediately create a PDF document of the proposal. Enter a name for the document and an optional version comment. Once you select Confirm, the PDF document is created in the proposal folder.
If the proposal has attachments, a second PDF is created from the attachments.
If you did not create a PDF document, the task disappears from your task area. However, you can create a PDF at any time with the Create proposal PDF function.
# Approve proposal
If you need to approve a proposal, you will find the task in your task area.
Method
Select the Approve proposal task.
Select the Form tab. On this tab, you will see the message from the person who assigned you the approval task.
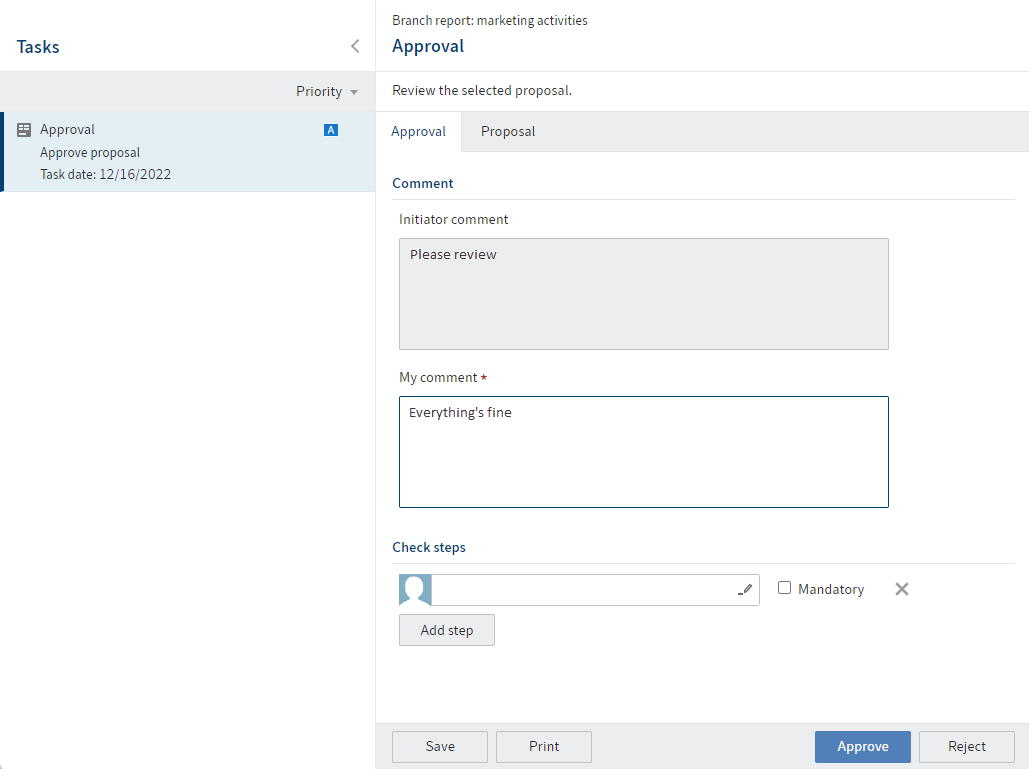
You will find the recommended resolution on the Proposal tab of the form.
On the Contents tab, you will find the additional documents that were created.
As soon as you have finished reviewing the proposal, select Approve.
Result
The task disappears from your task area. The proposal is approved.
The person who triggered the approval process gets confirmation that the proposal has been approved.
# Create proposal PDF
You can create a PDF of a proposal. This PDF is added to the meeting file and can be attached to the minutes.
Method
Select the proposal folder.
On the ribbon, select Meeting > Proposals > Create proposal PDF.

In the Create proposal PDF dialog box, the document name is already entered. However, you can change this name.
You also have the option to enter a version comment.
Select OK.
Result
A PDF is created in the proposal folder.
The PDF consists of the following elements:
- Item metadata and recommended resolution from the form
- Contents of the Word document
If the proposal has attachments, a second PDF is created from the attachments.
Outlook
- You can repeat this step. Each time, a new version of the PDF is created, which becomes the new working version.
- The PDF document is added to the meeting file and can be included in the minutes.
# Register item
You can register an item in advance of a meeting while you continue to edit it. This allows you to schedule the item for agenda consideration. The contents cannot yet be viewed via the meeting.
Information
Be aware of the registration deadline. Once the registration deadline has passed, you can no longer register items for a meeting.
Alternative
Submit item: If the meeting participants are allowed to see the contents of the item, you can submit it directly.
Method
Select the item.
On the ribbon, select Meeting > Item > Register item.
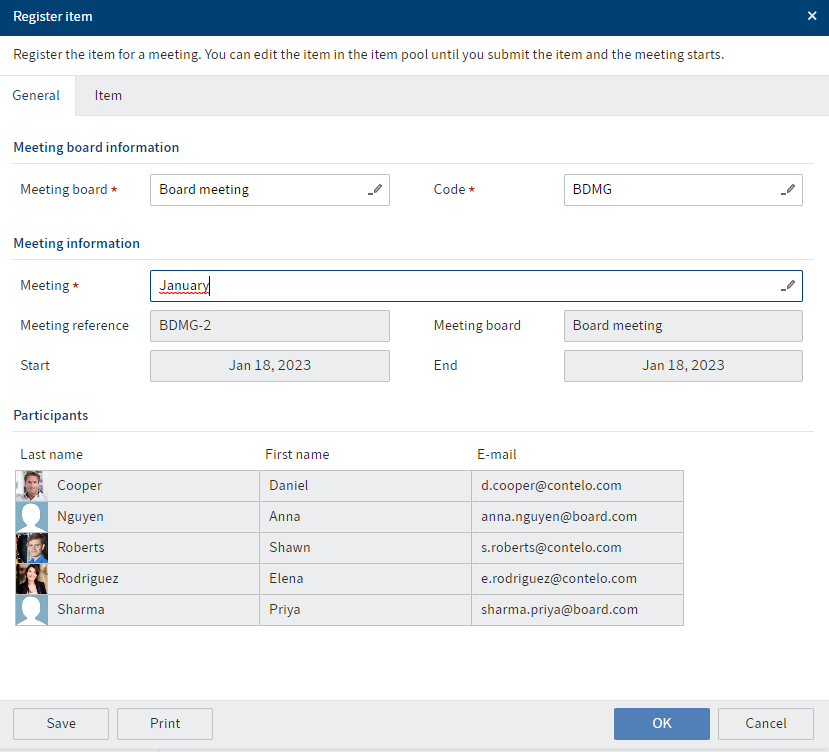
In the Register item dialog box, the meeting board is already selected.
Select the meeting you want to register an item for.
You have the option to make changes to the item on the Item tab if you need to.
Select OK.
Result
The item is now registered for a meeting. The item remains in the item pool. The form for scheduling the item is visible in the meeting.
Outlook
- You can continue to edit the item on the item detail page.
- You can submit the item as soon as you want to share its contents with the meeting participants.
- You can also withdraw the item.
# Submit item
You can submit an item that is in a item pool to a meeting. You can continue to edit the item, but the other meeting participants can already see its contents.
Information
Be aware of the registration deadline. Once the registration deadline has passed, you can no longer submit items to a meeting.
Alternative
Register item: If you don't want the meeting participants to be able to see the contents of the item yet, you can register the item and submit it later.
Method
Select the item.
On the ribbon, select Meeting > Item > Register item.
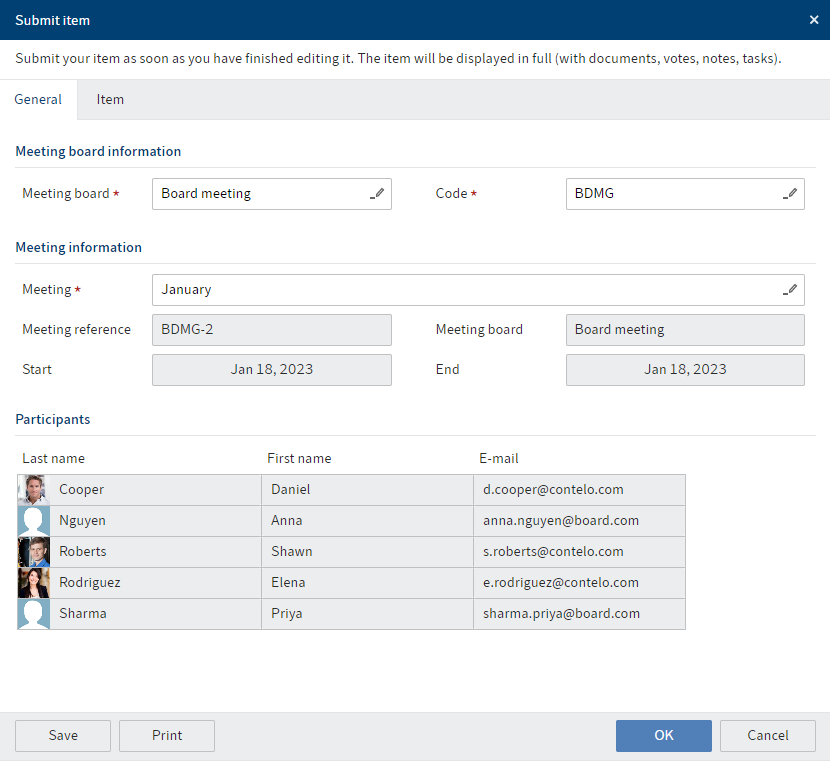
In the Submit item dialog box, the meeting board is already selected.
If the item is already registered, the meeting is also already selected. If not, select the meeting you want to submit your item to.
You have the option to make changes to the item on the Item tab if you need to.
Select OK.
Result
The item has now been submitted to the meeting. All its contents can be viewed by the meeting participants. A reference to the item remains in the item pool.
Outlook
- You can continue to edit the item on the item detail page.
- You can also withdraw the item.
# Withdraw item
You can withdraw an item from a meeting. It makes no difference whether the item was created in the meeting directly or in the item pool.
Method
Select either the item reference in the item pool or the item in the meeting.
On the ribbon, select Meeting > Item > Withdraw item.
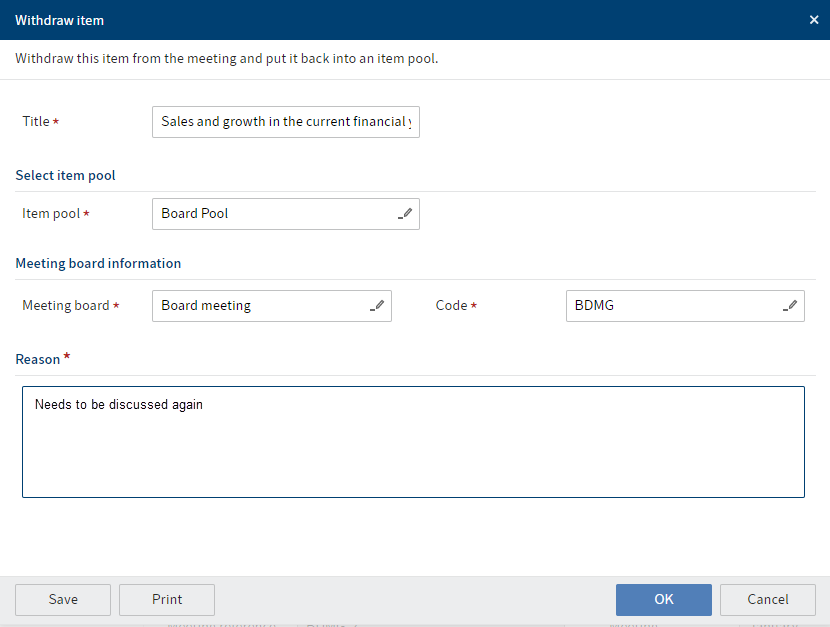
In the Withdraw item dialog box, the item pool that contains the item reference is already selected. You can change this if you need to.
You must specify a reason for withdrawing the item.
Select OK.
Result
The item is in the selected item pool. If this is not the original item pool, there is still a reference in the original item pool.