# Add fields
After an aspect is created, you can add one or more fields to the aspect.
Select the aspect you want to edit.
The settings for the selected aspect open.
Select Add field.

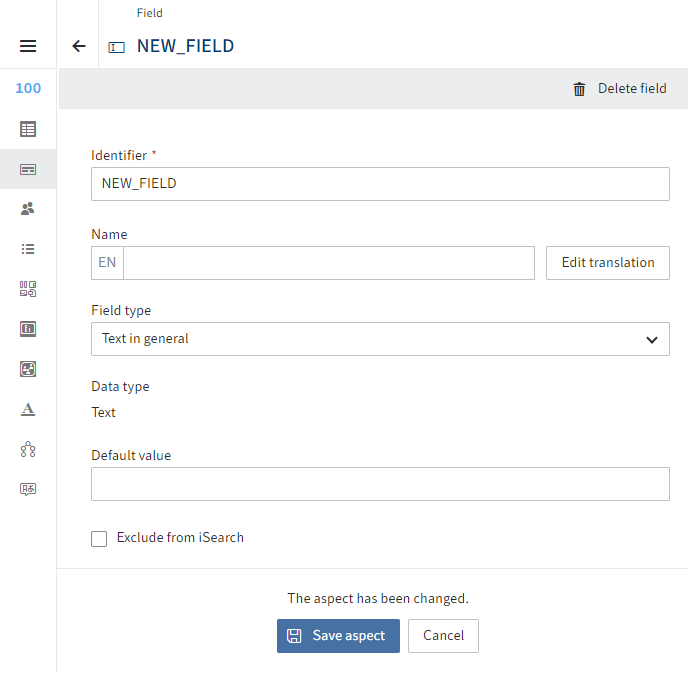
The configuration area for the field opens.
Enter a technical name in the Identifier field.
Information
Only capital letters (without umlauts and special characters), numbers, and underscores are allowed. The first character must be a letter.
Enter a display name in the Name field.
Optional: If you want to offer translated texts, you can configure translated display names via Edit translation. You will find more information under ELO packages > Other topics > Translations > Use translation variables.
Select a field type via the Field type drop-down menu.
Choose from the following options:
General text: In Text type fields, you can enter any characters.
Integer: In Integer type fields, you can enter any whole numbers.
Floating-point number: In Number type fields, you can enter floating-point numbers.
Date: In Date type fields, you can enter a date via a calendar function. The format is based on the settings in the client.
Date with time: In DateTime type fields, you can enter a date and time via the calendar/clock function. The format is based on the settings in the client.
Selection list: Selection list type fields are shown as pick lists, buttons, or radio buttons. A keyword list has to be configured.
Information
If the Selection list (default) display type is selected, the Autofill function is available. The function is limited to a maximum of 40 suggestions for optimized performance.
Relation: Relation type fields are shown in relation to a metadata form. A metadata form has to be configured as a relation target.
User: User type fields are shown with a selection of users.
E-mail address: In E-mail type fields, you can enter an e-mail address. From this field, the user can open a linked window in an e-mail program.
URL: In URL type fields, you can enter a URL. From this field, the user can open a browser window with the website.
Check box: Check boxes save Boolean values (true or false) in the form of an integer value:
- Disabled: 0 (false)
- Enabled: 1 (true)
Long text: For fields with more than 255 characters.
Time: For specifying time in the format HHmmssSSS. Leading zeros are used.
Large decimal: For amounts of money and large numbers.
Optional: If necessary, you can configure additional settings via the following fields and options.
Default value: This value is automatically entered when the metadata form is shown. The value can be changed by the user.
Exclude from iSearch: To not add the content of the field to the ELO iSearch search index, enable this option.
Provide for search in child entries: Use this option to specify whether to also find child entries for these fields when using ELO iSearch.
Example: You have a business object contract 12346789 with the field Contract number and other fields. The child entries do not have these fields. If you want to find the child entries when searching for the contract number, for example, enable the option to provide metadata in child entries.
Please note
For this function to work, the following requirements must be met:
The relevant metadata form must be enabled for use with business objects (Metadata forms > Usage > Business object).
Refer to the section 'Usage' tab > Usage for more information
The Provide for search in child entries option must be enabled for the fields of the respective aspect (see above).
The aspect mappings being provided must be enabled in the relevant metadata form. (Usage tab > Provide metadata in child entries).
Refer to the section 'Usage' tab > Search
The May be created multiple times option MUST BE DISABLED.
Refer to the 'Contents' tab > Assign aspects section for more information.
Translation variable: If necessary, select a translation variable that should apply for the Comment field. Alternative: Enter a new translation variable.
Comment: If necessary, enter additional information in the Comment field. Translations for the comment can be configured in Edit translation.
Dynamic keyword list: Enter the address of a trigger that calls a flow with a dynamic keyword list. The address should follow this convention:
flows-plugin/trigger/<Trigger ID>For more information on setting up dynamic keyword lists with ELO Flows, refer to the documentation Processes and automations > ELO Flows > Components > ELO objects and metadata > 'Dynamic keyword list called' trigger configuration (opens new window).
Please note
This field is only available for General text type fields.
Select Save aspect.
The field is saved and added to the aspect.