# Basics
With the ELO app, you can access your company's ELO repository using a mobile device. The app offers quick access to your documents and all associated details. You can capture and file documents while out of the office and search for information in your ELO repository.
The ELO app does not replace the desktop version of ELO, but is designed to complement it. To get the most out of the ELO app, you should already be familiar with the basic functions of ELO software as well as your device.
The ELO app is optimized for use on an iPad in landscape mode. This documentation explains how to use the app with an iPad. It may look different on your device.
# Installation and getting started
# Requirements
The following requirements apply for the installation and use of the ELO app:
- iOS 14 or higher installed on the mobile device
- ELO Web Client 20.10 or higher installed on the ELO server and configured for use on the Internet. For more information, refer to the ELO Web Client Internet Access developer documentation.
- Active Internet connection for unlimited functionality
Please note
HTTPS is essential for secure communication because sensitive data is sent over the network. Without SSL/TLS encryption, third parties could intercept this data.
# Install app
You will find the ELO app in the App Store.
Method
Tap LOAD.
The installation dialog box opens.
Tap Install to begin installation.
Result
The app is installed on your device automatically.
# Start app
Method
To start the ELO app, tap the app icon on your device's start screen.
Result
The ELO app opens.
# Demo repository
When you start the app for the first time, it opens to a demo repository, which will help you to familiarize yourself with the app. The demo profile has restricted functions without write rights.
# Add profile
To access your company repository, you need to set up a profile. You can find more information in the section Add and activate profile.
# Language
The ELO app automatically uses your device's language settings. If the ELO app does not support your language, it uses English as the default.
# User interface
This documentation describes the user interface in landscape mode on an iPad. It may look different on your device.
The user interface may differ depending on the work area and the function being used.
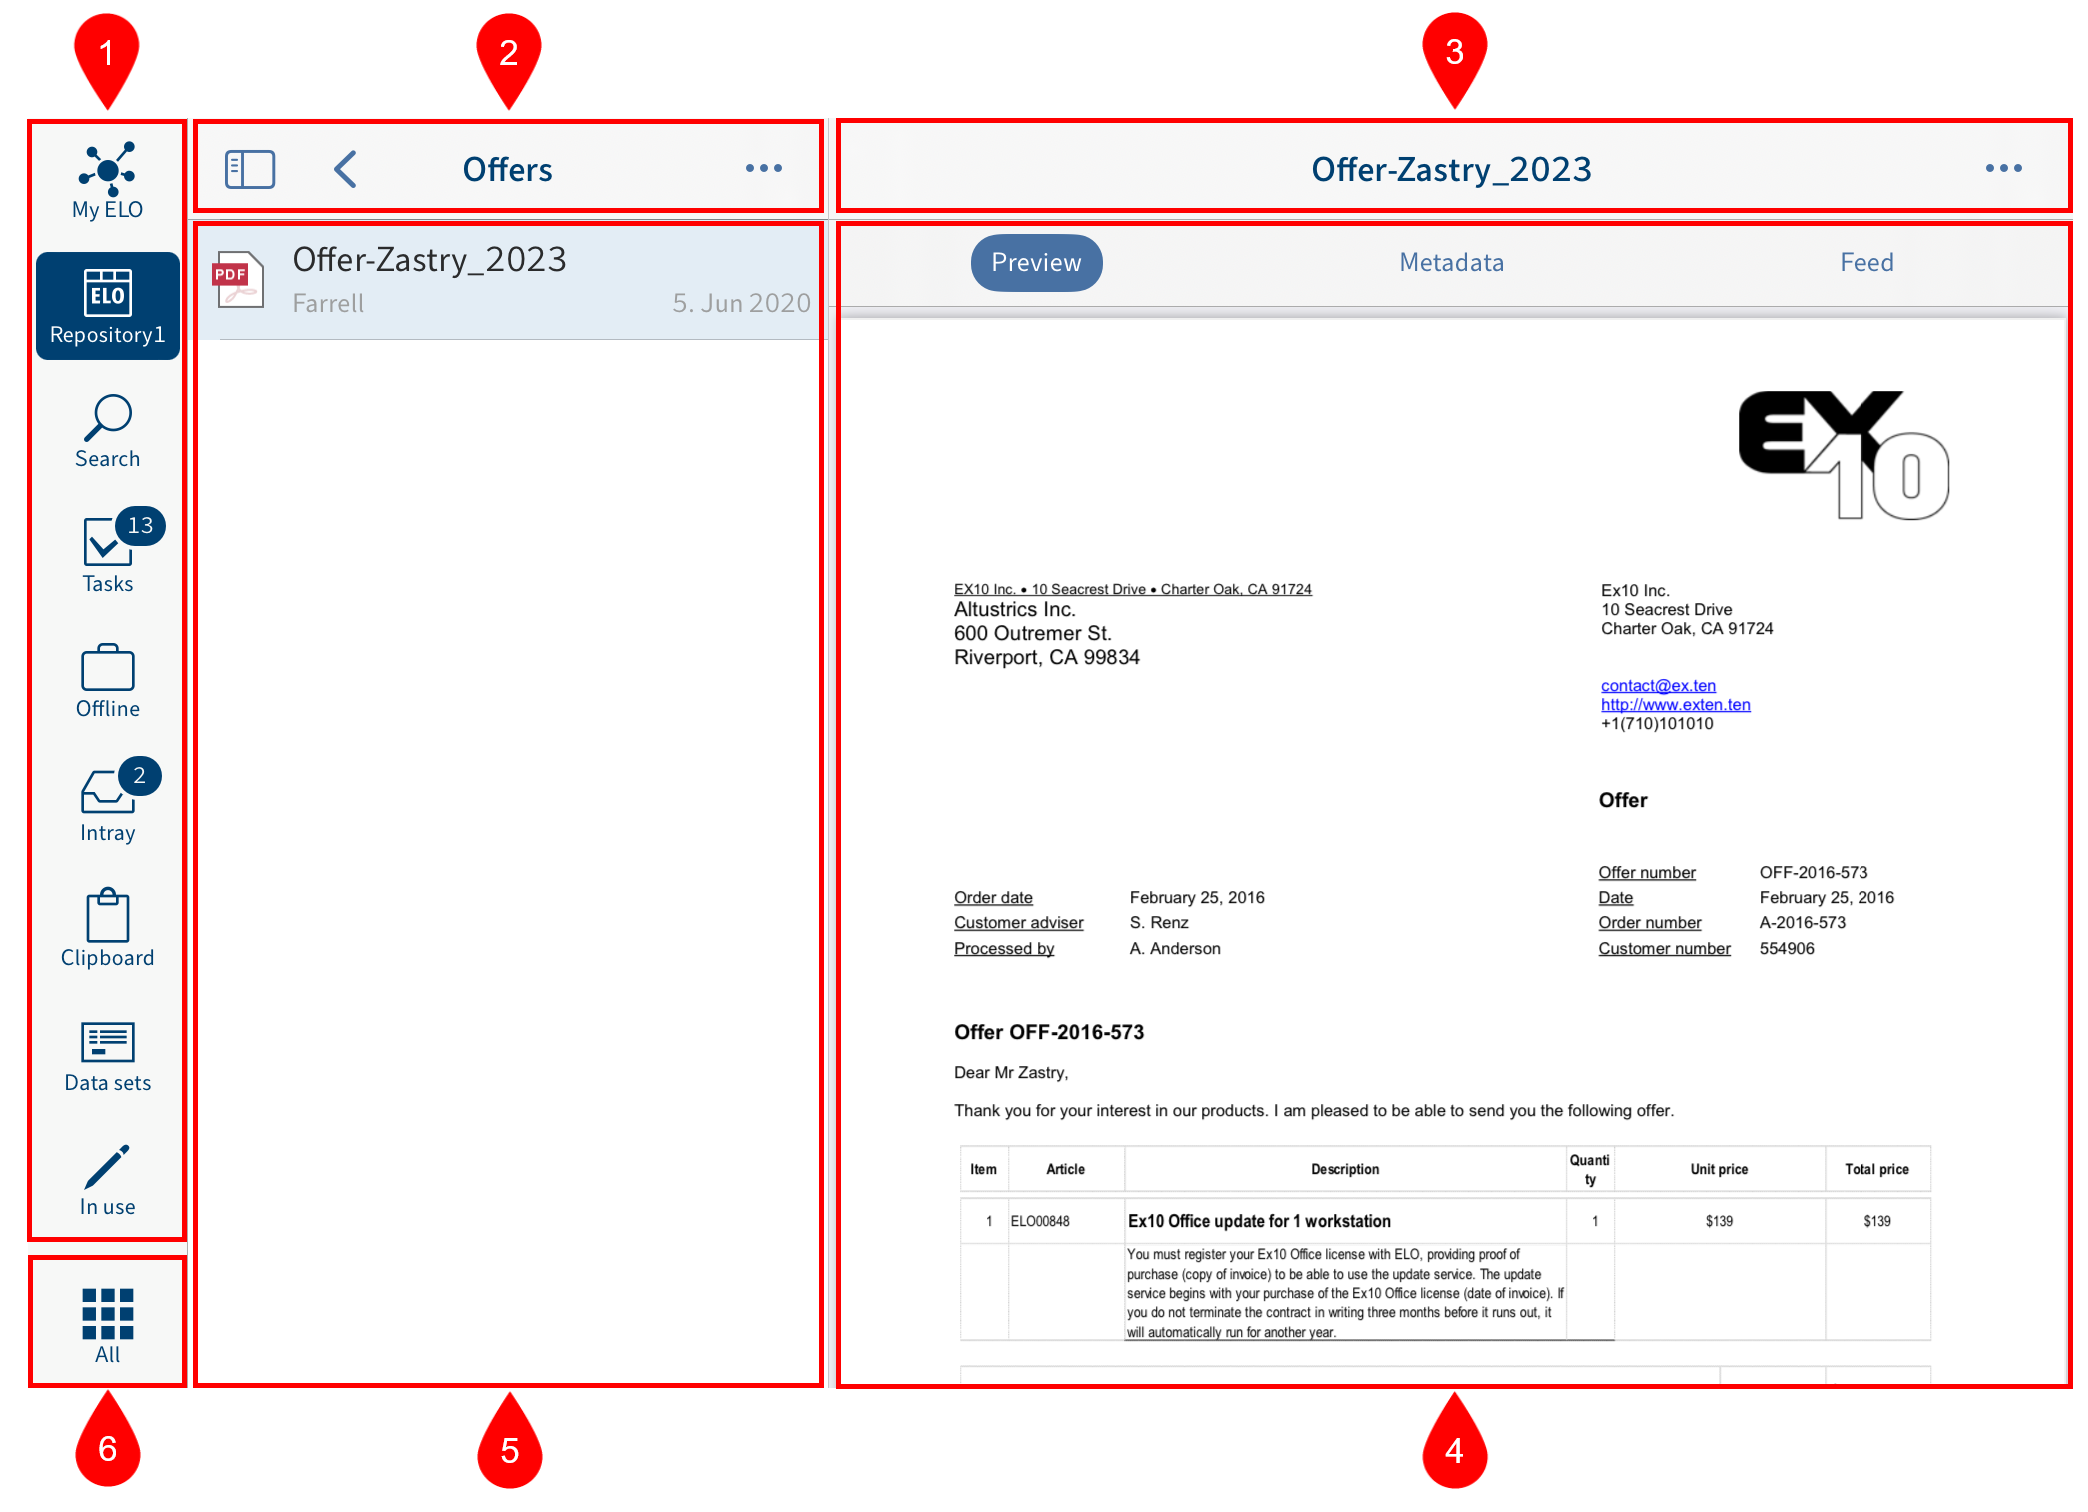
1 Work area toolbar: The work area toolbar gives you access to the most important work areas. You can also open the tile navigation with the Tile navigation button.
2 List view navigation bar: Shows the current work area or level.
3 Navigation bar: Shows different tabs such as Preview, Metadata, or Feed depending on the selected entry and current function. The currently active tab is highlighted in blue.
4 Viewer pane: Shows a preview of the selected entry or detailed information.
If you are using the app on an iPad, you can change the size of the viewer pane. To increase or decrease the size of the viewer pane, tap the Increase/decrease size of viewer pane icon.

5 List view: Shows the documents and folders available at the selected level.
6 Tile navigation: Opens the tile navigation.
# Tile navigation
The ELO app has different work areas. The tile navigation contains an overview of the work areas. From here, you can switch to other work areas and open the Configuration dialog box.
Information
Administrators can restrict which work areas users are able to see via the ELO Administration Console.
You can open the tile navigation with the Tile navigation button on the work area toolbar.
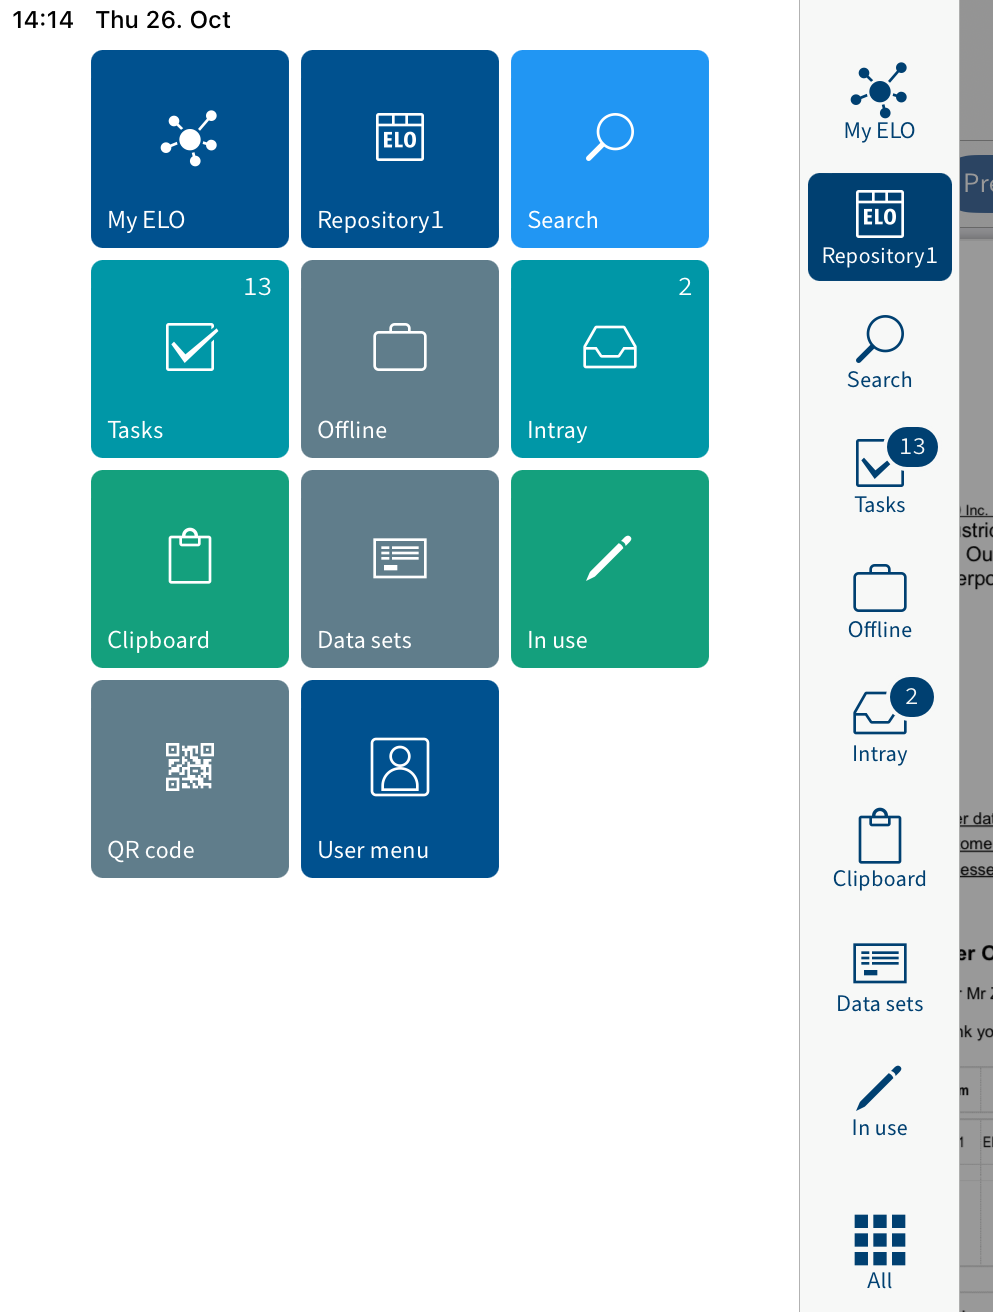
The tile navigation contains the following work areas and functions:
- My ELO: Shows news from subscribed feeds as well as information on tasks and workflows.
- Repository: Contains all folders and documents that you can access.
- Search: Enables you to look for specific entries in ELO.
- Tasks: This work area contains your tasks and workflows.
- Offline: You can download entries to your Offline area to make them available on your device.
- Intray: This is where you manage files that you want to file to the Repository work area.
- Clipboard: The Clipboard work area is where you can temporarily store documents and folders.
- Data sets: Data sets are saved temporarily here. You can transfer data sets to the Repository work area as soon as your device is connected to the Internet.
- QR code: Use the QR code tile to start a QR code scan with your device's camera.
- Configuration: In the Configuration dialog box, you can configure the settings as well as create and edit profiles.
Information
Administrators can add new work areas with embedded web pages to the tile navigation via ELOwf > App Manager > Add Client Info.
# Navigation
When you start the ELO app, the app opens to the Repository work area.
# Change folder
Method
To switch to another folder, tap the folder you want to open in the list view.
The level opens in the list view. In the navigation bar, you see the current level.
You can now access the entries at this level.

To return to the previous level, tap the Back button in the navigation bar.
Alternative: Tap and keep your finger on the navigation bar. This will open your navigation path. Tap an entry to go to that level.
# Scroll
If it is not possible to display all entries at once, you can scroll up and down in the list view, viewer pane, menus, and dialog boxes. Swipe up or down on the screen to scroll.
# 'Go to' function
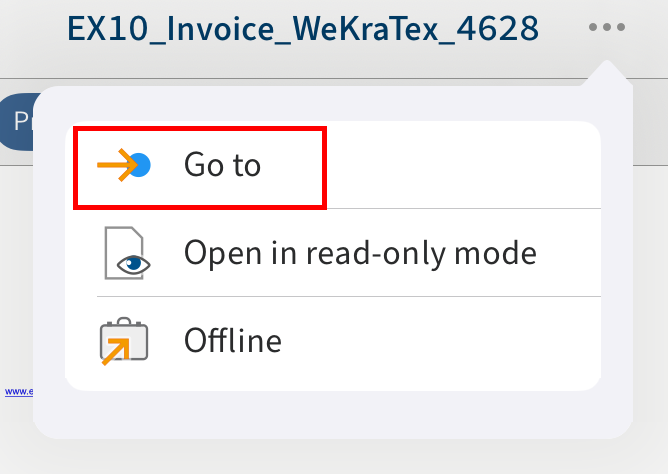
The Go to function takes you straight to the location of a document or folder in the Repository work area.
You will find the Go to function in the menu (button with three dots) of the Search, Tasks, Offline, and Clipboard work areas.
# Show details
You can display detailed information on folders and documents in the viewer pane.
# Show folder details
Method
![]()
To view detailed information about a folder, tap the info icon next to the entry in the list view.
Result
The information about the selected folder appears in the viewer pane.
# Show document details
Method
To view detailed information about a document, tap the info icon next to the entry in the list view.
Result
If available, the preview of the document is displayed in the viewer pane.
# Tabs in the viewer pane
Depending on the selected work area and entry, the viewer pane navigation bar will contains different tabs:
- Preview: This tab contains the preview of the document, provided that one exists.
- Metadata: You will see the metadata for the document here.
- Feed: The feed documents changes to entries. You can create and comment on posts.
- Margin note: Contains any existing margin notes.
- Form: If applicable, you will see the form for an entry.
# Switch between tabs in the viewer pane
You can switch between the different tabs. The currently active tab is highlighted in blue.
Method
Tap the tab you want to open in the viewer pane navigation bar.
Result
The selected tab is highlighted in blue in the navigation bar of the viewer pane.
# Menu (button with three dots)
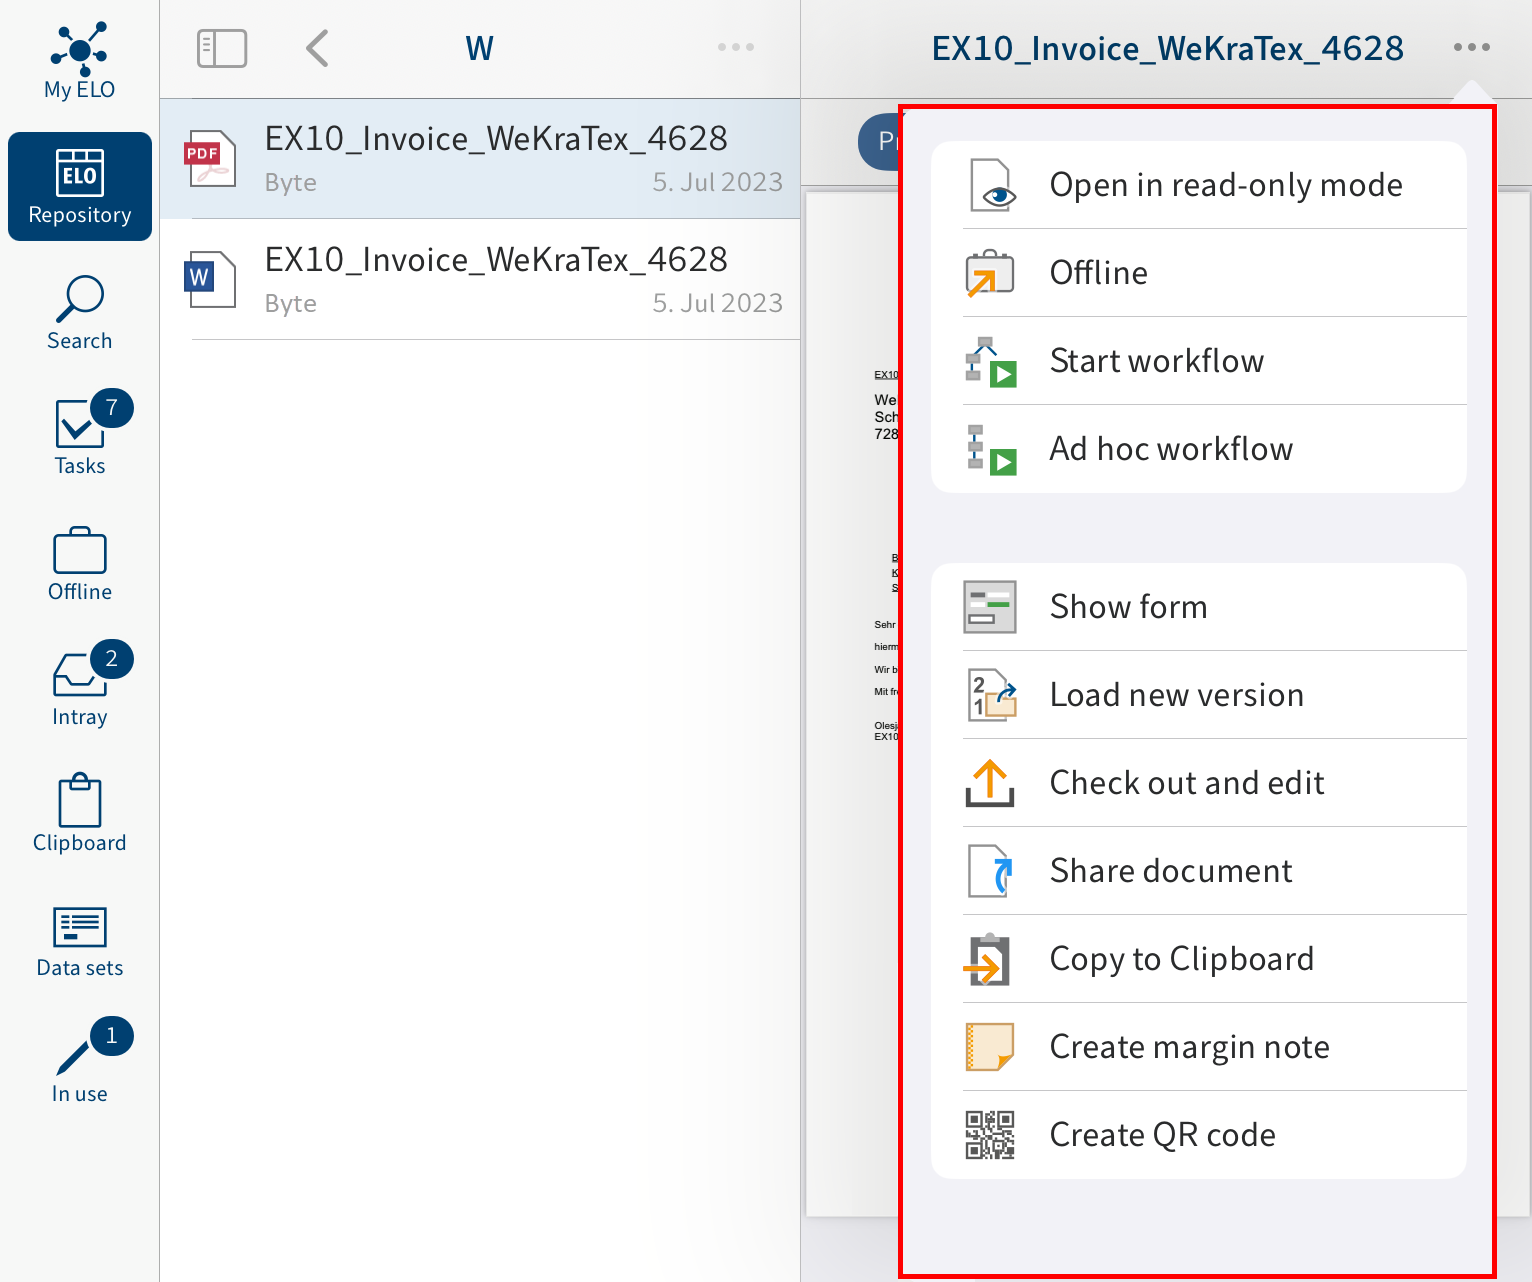
You can call functions for individual documents or folders from the menu (button with three dots). Various functions are available depending on the type of entry and work area.
Information
Administrators can restrict which functions users are able to see via the ELO Administration Console.
You get to the menu using the button with three dots in the navigation bar.

Different functions are available depending on the selected entry.
Information
You can also access the New folder and Insert file functions by tapping the menu (button with three dots) in the list view navigation bar.
# Refresh
Tap the Refresh button to refresh the list view in the selected work area.
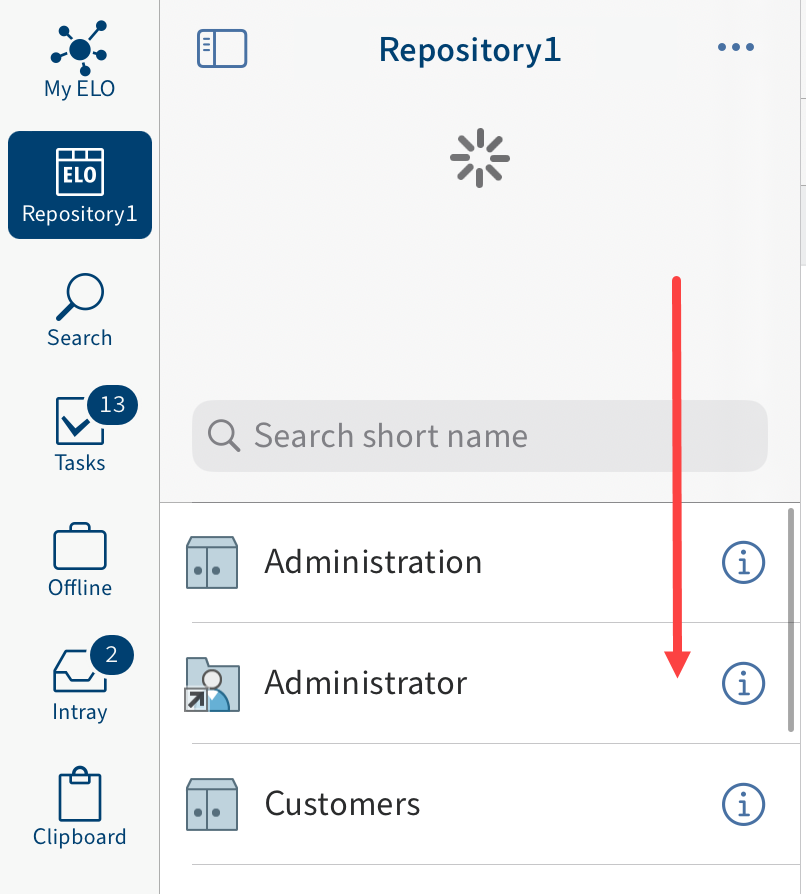
Swipe down in the list view to refresh the list in the current work area.
# User menu
In the User menu dialog box, you can modify the settings for the profiles and their substitutions. Open the configuration via the Tile navigation > User menu.
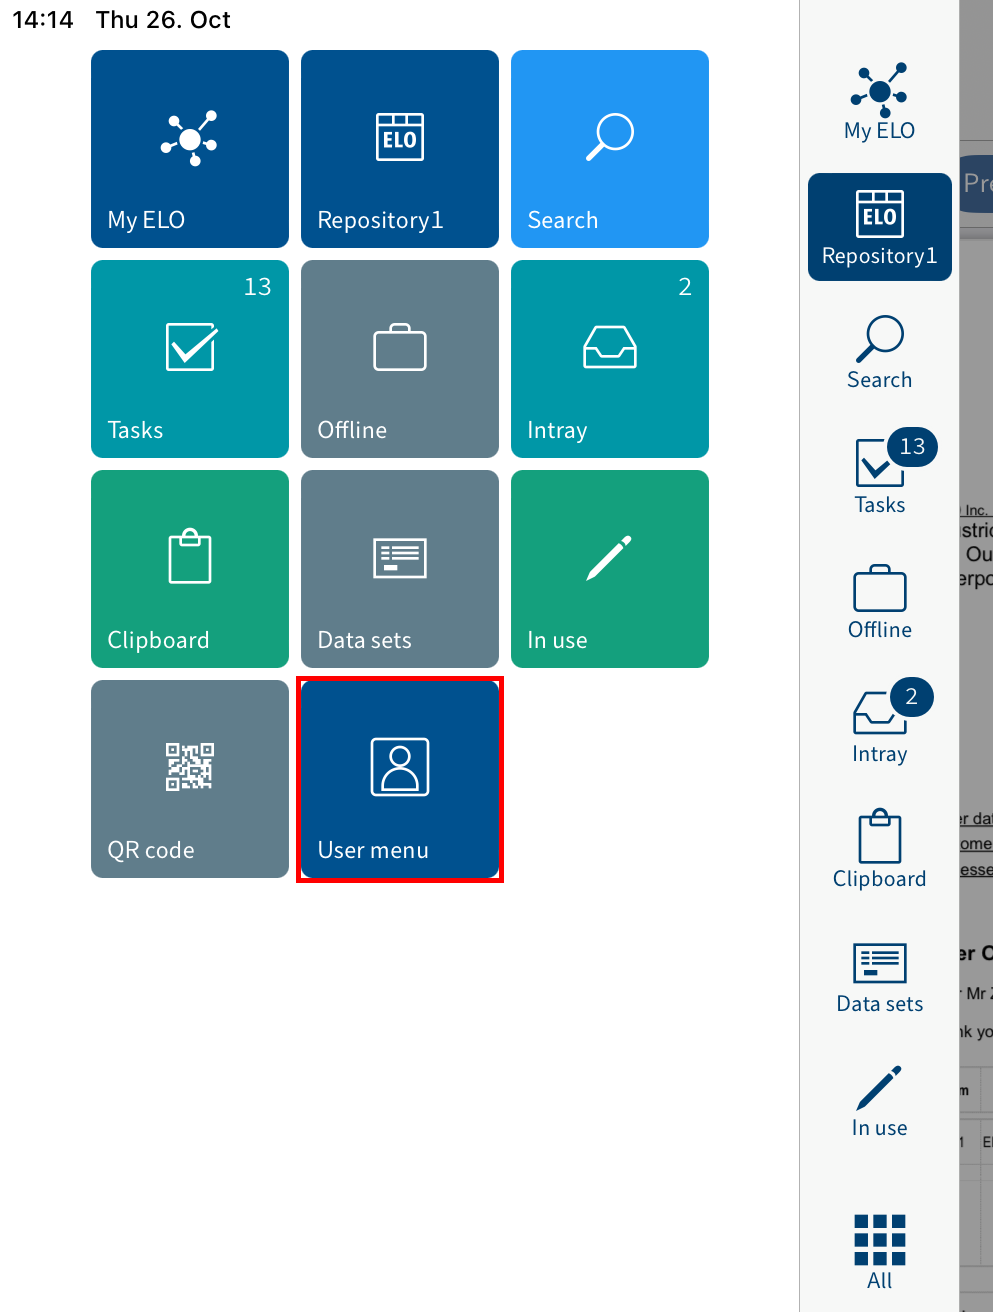
# Configuration
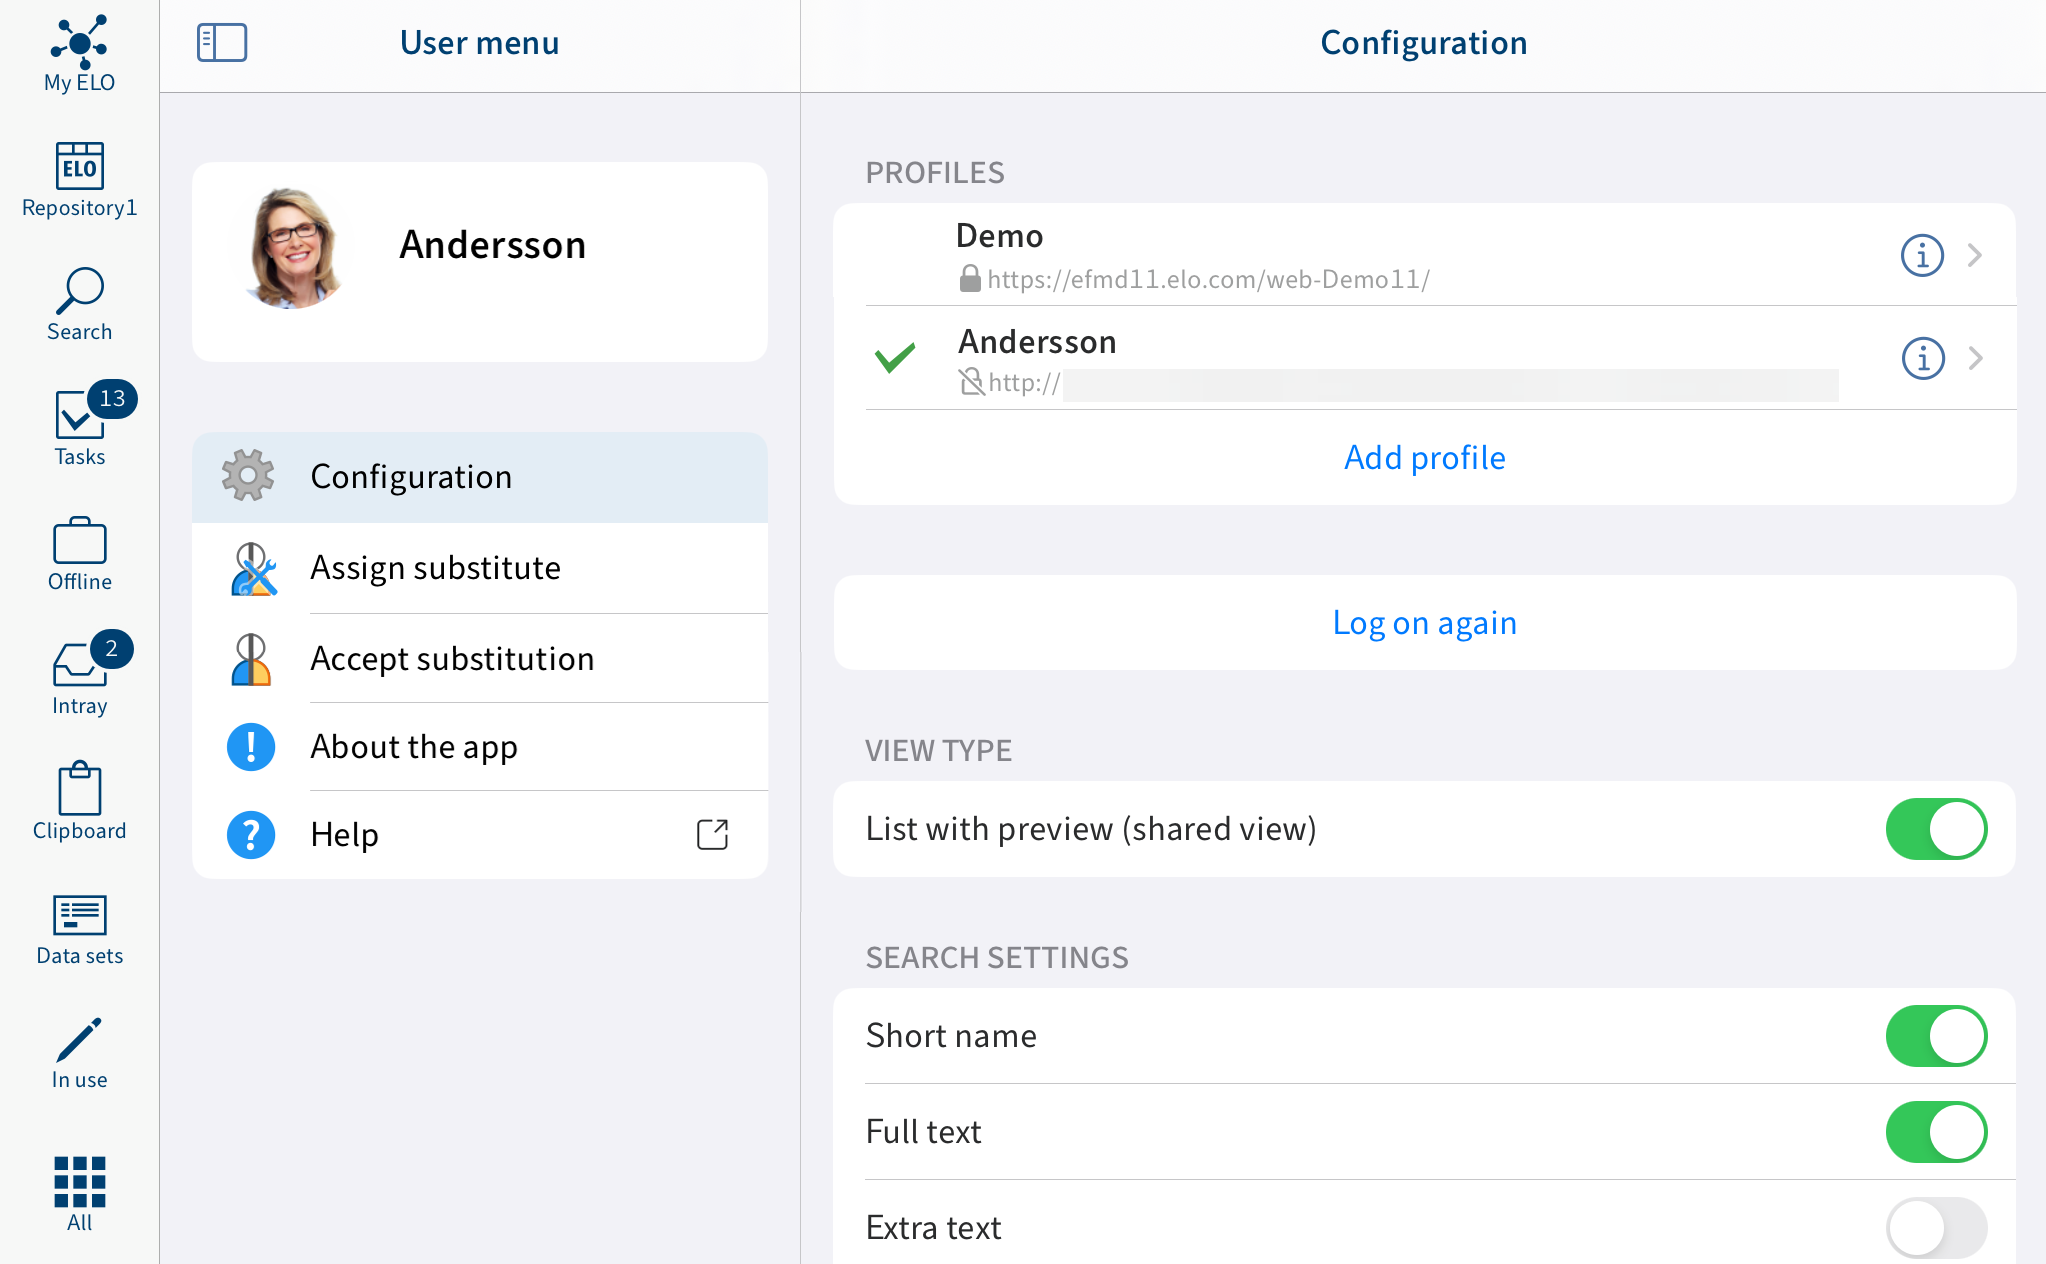
In the Configuration dialog box, you have the following options:
# Notify support
Tap the About button to get information about the ELO app, such as the version number.
Tap the letter icon to send an e-mail to ELO support in an external application.
# Profiles
The PROFILES area lists the available profiles. A check mark indicates that the profile is active.
More information is available in the previous sections Add and activate a profile, Edit profile, and Delete profile.
Log on again: Use the Log on again function to reload the connection to ELO. The cache is automatically deleted, e.g. the icons loaded from the server.
# Security
Information
The ELO app supports Touch ID and Face ID authentication.
# Display mode
List with preview (split view): If this option is enabled, you will see the list view (folders and documents in the repository) and the viewer pane (preview of the selected entry or detailed information), as described in User interface. When this option is disabled, you will either see the list view or the viewer pane depending on your position in the repository.
# Search settings
In the SEARCH SETTINGS area, you specify which fields you want to include during a search. The following fields are available:
- Short name
- Full text
- Fields
- Extra text
- Version comments
# Task settings
In the TASK SETTINGS area, select which types of task you want to be displayed in the Tasks work area. The following types of task are available:
- Escalations
- Substitution tasks
- Group tasks
- Reminders
# Offline
Download via cellular network: If this option is enabled, the ELO app connects to the Internet via a cellular network when there is no Wi-Fi connection available.
# Other
Show delete: If the Show delete option is enabled, the Delete function shows up in the menu (button with three dots).
# Metadata
Before you can enter metadata for new folders or documents in the ELO app, your administrator has to create a form and link it to the metadata form.
Information
If a form has not been assigned to the metadata form, the ELO app loads a default form with the fields Short name, Document date, and Extra text.
Enter metadata on filing: If you create a new folder or add a file, you can enter metadata for the entries directly. There are different options for entering metadata for new folders and documents. Tap to open the following options:
- Always use the form: If this option is enabled, you will always see a metadata dialog box when filing documents. The form assigned to the metadata form is used to enter the metadata. If a form has not been assigned, the system uses the default form with the Short text, Document date, and Extra text fields.
- Only for metadata forms with form: If this option is enabled, the metadata form will only appear if the selected metadata form is linked to a form. If a form has not been assigned, the new entry is automatically filed with the default form. The default form contains the Short text, Document date, and Extra text fields.
- Do not enter metadata: If this option is enabled, no metadata dialog box opens. The new entry is automatically filed with the default form. The default form contains the Short text, Document date, and Extra text fields.
# Advanced
Enable logging: Specify whether you want to create a log file. The log file is deleted automatically once it is more than 14 days old.
Send log file: With this function, you can send the log file by e-mail, for example.
# About
Company Information: This menu item contains information about the company.
Privacy Policy: You will find the Privacy Policy here.
Open source licenses: You will find the open source licenses used in the app here.
# Add and activate profile
To access your company repository, you must connect the ELO app to the repository. First, you need to set up and activate a profile.
Please note
You can only connect a profile to one repository at a time. To access different repositories, you need to create multiple profiles.
# 'Add profile' function
You can choose between the following options:
Method
Open the configuration via the Tile navigation > Configuration.
The Configuration dialog box opens.
Tap Add profile.
The New profile dialog box opens.
Select the ELO logon data option.
The ELO logon data dialog box opens.
Enter a name for the repository in the Name field.
In the Server URL field, enter the server URL as shown in the example:
https://example.com/repository/.You can also enter the ELO Web Client URL for the repository you want to connect to. You must use the following format:
http(s)://<server name>:<port name>/ix-<repository name>/plugin/de.elo.ix.plugin.proxy/web/Please note
If you are accessing the repository via VPN, the server name must not end in
.local. In this case, replace the server name with the server IP address.Enter your ELO user name in the Name field.
Enter your password in the Password field.
Tap Save.
You have now added the profile. To use the profile, you have to enable it.
Tap the profile you want to enable.
Result
A check mark indicates that the profile is active. You are now connected to ELO.
# Create profile with ELOauth
Method
Open the configuration via the Tile navigation > Configuration.
The Configuration dialog box opens.
Tap Add profile.
The New profile dialog box opens.
Select the Identity provider (via ELOauth) option.
Enter a name for the repository in the Name field.
In the URL field, enter the server URL as shown in the example:
https://example.com/repository/.You can also enter the ELO Web Client URL for the repository you want to connect to. You must use the following format:
http(s)://<server name>:<port name>/ix-<repository name>/plugin/de.elo.ix.plugin.proxy/web/Please note
If you are accessing the repository via VPN, the server name must not end in
.local. In this case, replace the server name with the server IP address.Enter the config ID. You configure the config ID in the JSON file in ELOauth under
"azureadproxy".For more information on the config ID, refer to the Manual configuration chapter of the ELOauth plug-in (opens new window) documentation.
Tap Save.
You have now added the profile. To use the profile, you have to enable it.
Tap the profile you want to enable.
Result
A check mark indicates that the profile is active. You are now connected to ELO.
Alternative: You can also add a profile by entering the profile data to an .eloprofile file. This file contains the profile data in JSON format:
{
    "name": "<repository name>",
    "server": "http(s)://<server name>:<port name>/ix-<repository name>/plugin/de.elo.ix.plugin.proxy/web",
    "user": "<user>",
    "password": "<user password>"
}
Create the profile file in JSON format and save the file with the extension ".eloprofile". Send the .eloprofile file to your mobile device, e.g. as an e-mail attachment. To open the file, select the ELO app on your mobile device. The New profile dialog box opens. The fields automatically contain the data from the .eloprofile file. Tap Save to add the profile.
# Create profile with ELO Modern Authentication (Auth 2)
Requirement: You must have the latest version of ELO Modern Authentication (Auth 2) installed. ELO Modern Authentication is set up by an administrator. If you have questions, contact your administrator.
Method
Open the configuration via the Tile navigation > Configuration.
The Configuration dialog box opens.
Tap Add profile.
The New profile dialog box opens.
Select the option ELO Modern Authentication (Auth 2).
Enter a name for the repository in the Name field.
In the URL field, enter the server URL as shown in the example:
https://example.com/repository/.Please note
If you are accessing the repository via VPN, the server name must not end in
.local. In this case, replace the server name with the server IP address.Tap Save.
You have now added the profile. To use the profile, you have to enable it.
Tap the profile you want to enable.
Result
A check mark indicates that the profile is active. You are now connected to ELO.
# Edit profile
If settings on the ELO server or your ELO user data change, you may be required to edit the profile in the ELO app.
Information
You cannot change your password in the ELO app. You can change your password in the ELO Java Client or the ELO Web Client.
Method
Open the configuration via the Tile navigation > Configuration.
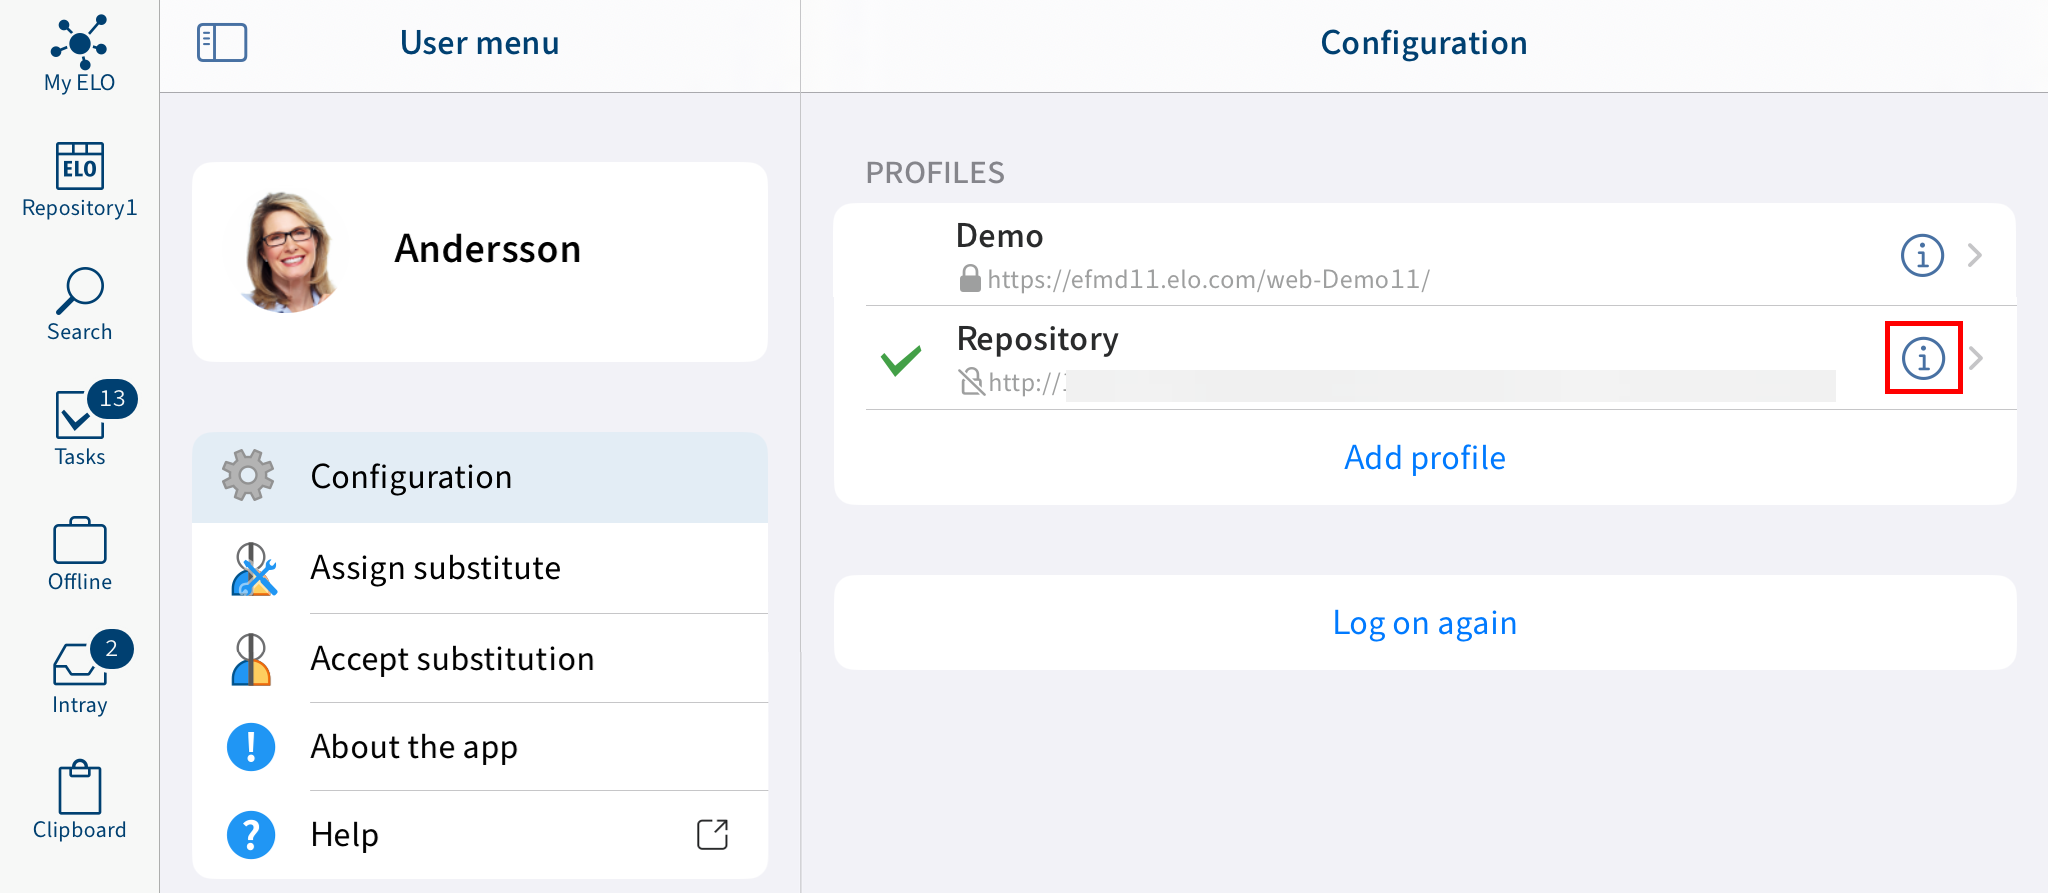
The Configuration dialog box opens.
In the PROFILES area, tap the info icon next to the profile you want to edit.
The Edit dialog box appears.
Make the desired changes.
Tap Save.
Result
The changes are applied in the ELO app. If the logon information is correct, you can access the repository again.
# Delete profile
You can also delete profiles that you no longer need.
Please note
If you delete your profile, you remove all the data, for example, all the documents that you have filed in the Offline and Data sets work areas.
Deleting the app removes all the data. Only the entries in the keychain are retained.
Method
- Open the configuration via the Tile navigation > Configuration.
![]()
The Configuration dialog box opens.
In the PROFILES area, tap the info icon next to the profile you want to delete.
The Edit dialog box appears.
Tap Delete.
The Delete profile? dialog box appears.
Tap Delete to delete the profile.
Result
You have deleted the profile.