# Manual installation of ELOas
This document describes the manual installation of ELO Automation Services (ELOas). Under ELOprofessional, the module is created automatically by with the server installation. When installing later, or in a distributed environment, however, it must be installed manually.
Like almost all modules in the ELOenterprise server line, ELOas is programmed as a servlet and requires a Java Runtime Environment and an application server to run, such as Tomcat 9.0. Java version 11 or higher is required.
The configuration is stored in the XML file config.xml in the default ELO configuration directory. This allows updates to be performed without difficulty while retaining the original configuration. The default language for ELOas is automatically set during the ELO Server server setup based on the installation language selected and entered in the file config.xml in the language parameter. In the following example, it is "en" for English:
<entry key="language">en</entry>
The execution instructions of ELOas with the rulesets, translation lists, and basic scripts are located in a folder in the repository. You need to define the connection to the ELO Indexserver and this base folder in the configuration.
# Required files
You will find the following files in the ZIP archive for the manual installation:
| ELOas.war |
| ELOas.xml |
| logback.xml |
| config.xml |
| ELO Automation Services Konfiguration.zip |
| Installation.pdf |
| JavaScriptCode.pdf |
| Regeldefinition.pdf |
# Preparing for installation
Running ELOas requires the standard ELOas libraries in the "JavaScript" folder. Newer ELOas versions automatically install the standard ELOas libraries on program start-up if they are not already installed. The latest standard ELOas libraries can be downloaded and installed at any time from the official scripting site (opens new window):
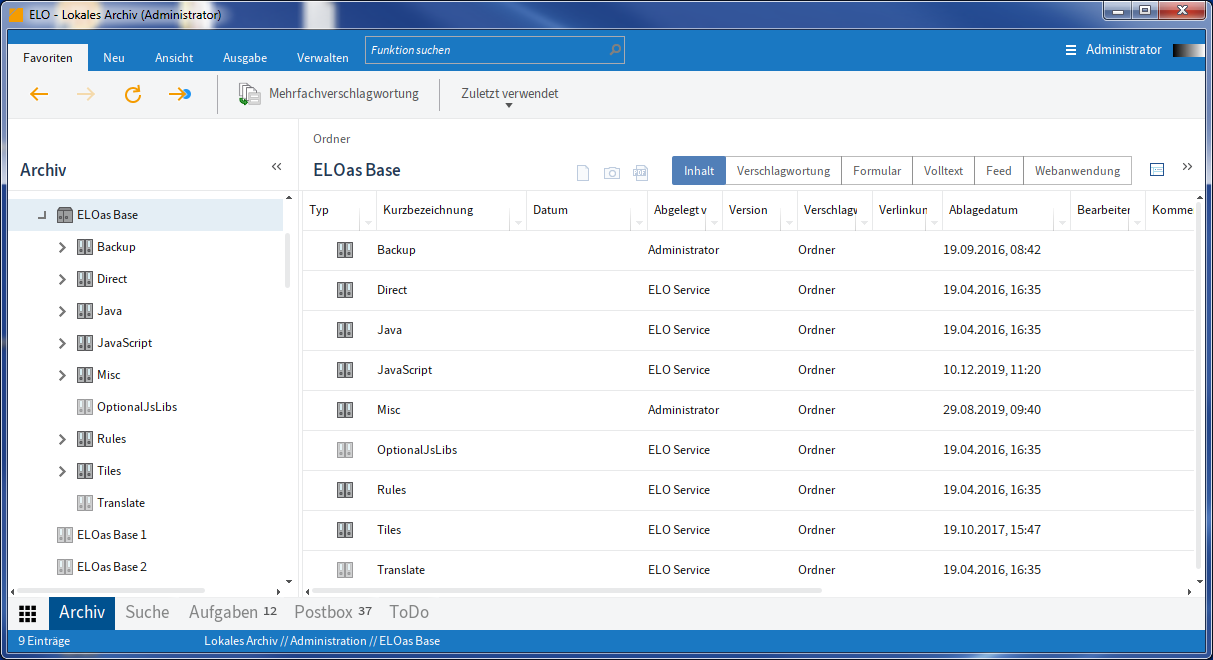
Fig.: Rules folder in ELO
The Rules child folder contains the user-defined rulesets. A sample has been placed here that can be used as a template for custom solutions.
The files ELOas.war and ELOas.xml should be renamed according to the repository name and the ELO standard convention for service names, into as-<Name of repository>.war and as-<Name of repository>.xml.
- Thus, for the repository "elo20", they should be renamed "as-elo20.war" and "as-elo20.xml". Pay attention to capitalization here, as this is important for later access. Both of these files are copied to a temporary directory on the computer running the application server (such as C:\TEMP).
In the ELOas.xml file, the path must be entered for the configuration directory of your ELO environment:
<?xml version='1.0' encoding='UTF-8'?>
<Context path="/as-elo20">
    <Environment name="webappconfigdir"
                 value="G:\ELOprofessional\config\as-elo20"
                 type="java.lang.String" override="false"/>
</Context>
For the files logback.xml and config.xml, a child directory is created in the ELO configuration directory for this ELOas configuration, and both of these files are copied there.
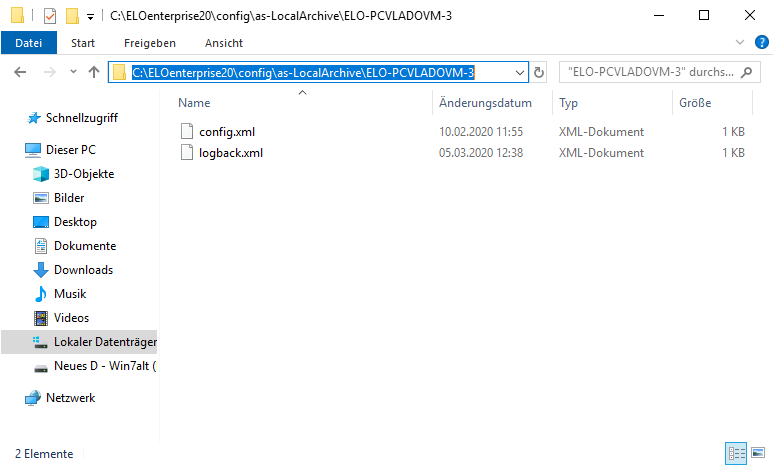
Fig.: ELOas configuration directory
The name of the configuration directory should start with "as-" and then contain the repository name. Thus, for the repository "elo20", it should have the name "as-elo20". In the logback.xml file, the path for the output directory must be adjusted for the local installation.
<file>C:/Programs/Tomcat 9.0/logs/as-elo20.log</file>
In the config.xml file, the parameters for Indexserver access must be adjusted:
<?xml version="1.0" encoding="UTF-8"?>
<!DOCTYPE properties SYSTEM "http://java.sun.com/dtd/properties.dtd">
<properties>
<comment>parameters for this web application</comment>
<entry key="url">http://testserver:8080/ix-elo20/ix</entry>
<entry key="user">Services</entry>
<entry key="password">130-167-2-31-129-121-203-174-234-167-21-87-88-80-78-122</entry>
<entry key="rootguid">(F6C173D7-3F71-4559-91E5-4886139B12CF)</entry>
</properties>
The url key contains the access path to the ELO Indexserver. Once again, pay attention to capitalization, as the ELO Indexserver will not be found if entered incorrectly.
The user key contains the ELO login name for ELOas on the ELO Indexserver. Normally, you should create a separate account for additional services. This account should not be used by interactive users.
The password key contains the ELO password. You can make this entry in plain text for testing purposes. After starting the service, the report will then contain a notice of how the corresponding encryption will appear. You can then apply this text from the log report to the configuration by using cut and paste.
The rootguid key contains the GUID of the home folder of ELOas. The default value is the GUID of the sample folder from the import data set. If you created your own folder for this data, you can easily get the GUID by running the following script in the ELO Windows Client (GetGuid.vsb file in the ZIP archive):
Set Elo=CreateObject("ELO.professional")
if Elo.SelectView(0)=1 then
    Id=Elo.GetEntryId(-1)
    if Id>1 then
        if Elo.PrepareObjectEx( Id, 0, 0 ) > 0 then
            call Elo.ToClipboard(Elo.ObjGuid)
            MsgBox Elo.ObjGuid
        end if
    end if
end if
This script finds the GUID of the currently selected entry and copies the GUID to the Windows Clipboard. From there, you can apply it to the configuration by opening it in a text editor and pressing CTRL-V.
The rootguid key is also used to configure several ELOas instances. You can run up to ten ELOas instances. For each instance, create an "ELOas Base" folder in the repository under <Name of repository> // Administration. For each individual "ELOas Base" folder in the config.xml file, create separate rootguid parameters as in the following example:
<entry key="rootguid">(F6C173D7-3F71-4559-91E5-4886139B12CF)</entry>
<entry key="rootguid1">(D6EF1F0B-ADE4-C3E2-74F9-3658ED55449A)</entry>
<entry key="rootguid2">(2CFDEA54-3DA9-E567-F335-6F3D223C9BAF)</entry>
The ELOas rules in the individual "ELOas Base" folders are then executed separately. If you are running multiple instances, the logs are also written to a log file. The path of the log file is defined in the configuration file logback.xml.
The tempdir key contains an optional directory for temporarily downloading the text files if the XML and JavaScript data has been placed in text files instead of the extra text. If tempdir is empty or does not exist, the extra text version is used; otherwise the text file version is preferred.
<entry key="tempdir">C:\Temp\ELOas</entry>
Please note
When creating a new user for this service, the ELO Indexserver does not respond to the change immediately. To ensure that it works, you can clear the user cache on the status page of the ELO Indexserver to force an immediate update.
# Deploying the files
In the Application Server, now enter the parameters for the deployment. The context path (which is not optional, even if it says so in the Tomcat configuration) contains the name of the web application. The two file paths point to the configuration and program file. Clicking Install will install the application.
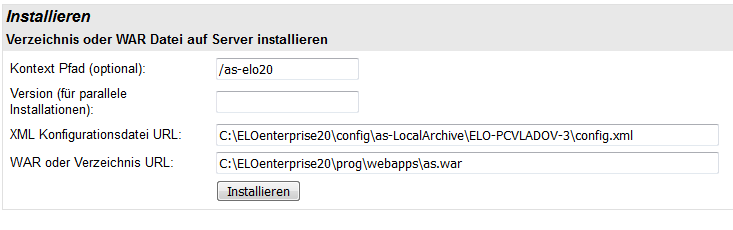
Fig.: Entering parameters for the deployment
The "ELOas.war" file in the current ELOas version contains a text file named "version.txt". This file contains extensions for the individual ELOas versions.
# Displaying the status page
ELOas has its own status page, which can be reached via the following URL:
http://<SERVERNAME>:9070/as-<NAME OF REPOSITORY>/as?cmd=status
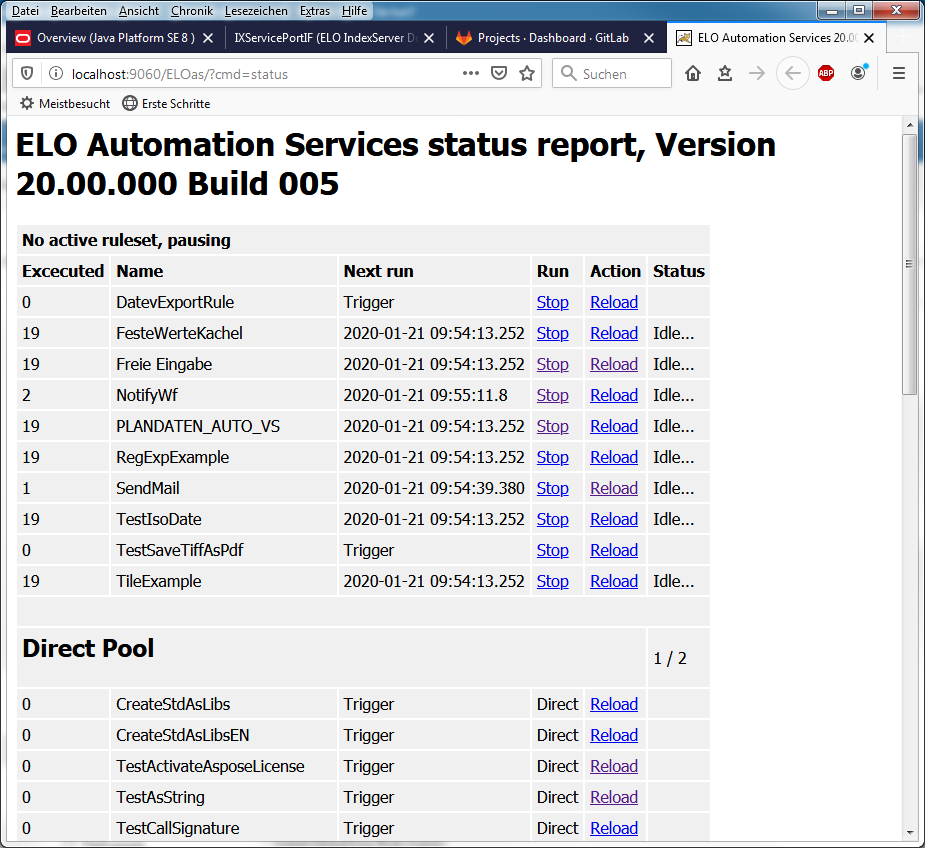
Fig.: ELOas status page with active rules
The status page lists all active rulesets together with information about how often they have already been run and when the next planned run takes place.
If a JavaScript error occurs, it will be displayed on the status page as well, together with the line number of the error and the program code in this area.
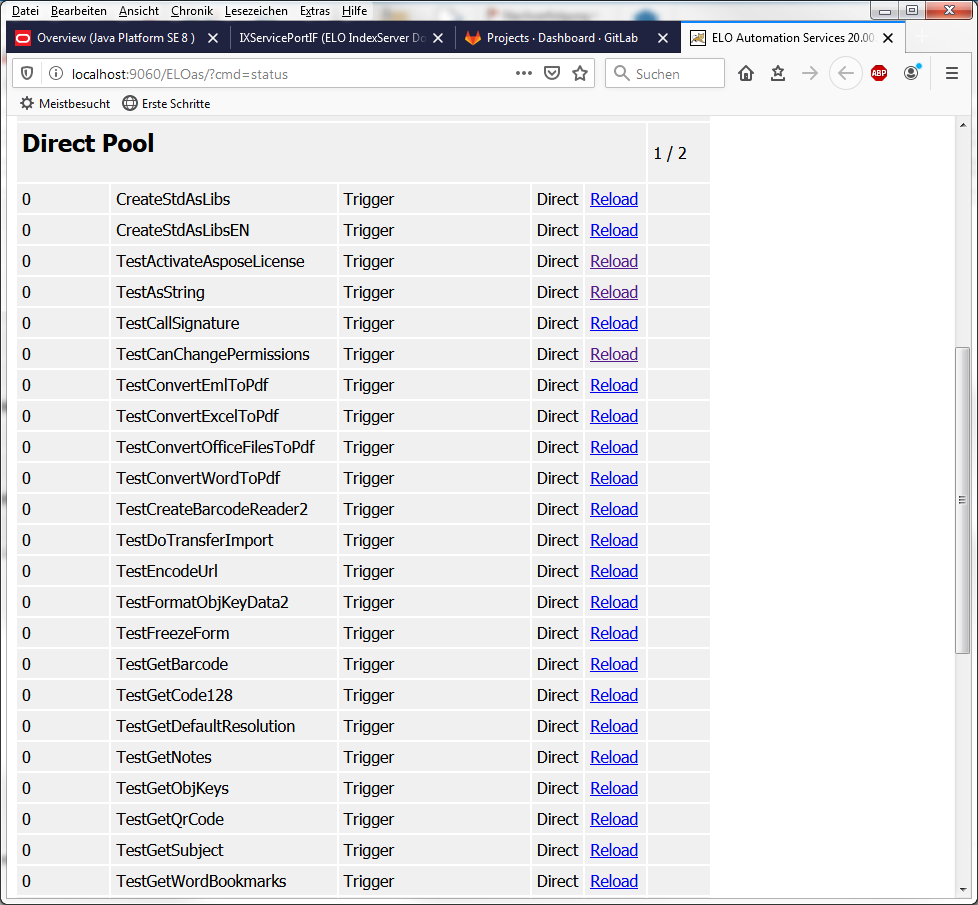
Fig.: Applying changes with 'Reload'
Changes to rules or enclosure scripts in the repository can be applied by clicking Reload without restarting the server.

Fig.: ELO Automation Services reload report
Clicking Back to Status Page returns to the normal status display.
On the Insert tab, the catalogs contain elements that should be coordinated with the general document layout. With the help of these catalogs, you can insert tables, headers, footers, lists, cover sheets, and miscellaneous other document boilerplates.