# Basics
With the ELO app, you can access your company's ELO repository using a mobile device. The app offers quick access to your documents and all associated details. You can capture and file documents while out of the office and search for information in ELO.
The ELO app does not replace the desktop version of ELO, but is designed to complement it. To get the most out of the ELO app, you should already be familiar with the basic functions of ELO software as well as your device.
The ELO app is optimized for use on tablets in landscape mode. This manual explains how to use the app with a tablet. It may look different on your device.
# Installation and getting started
# Requirements
The following requirements apply for the installation and use of the ELO app:
- Android 8.1 or higher installed on the mobile device
- ELO Indexserver 20.10 or higher
- Active Internet connection for unlimited functionality
Please note
HTTPS is essential for secure communication because sensitive data is sent over the network. Without SSL/TLS encryption, third parties could intercept this data.
# Install app
You will find the ELO app in the Google Play Store.
Method
Tap Install to begin installation.
Result
The app is installed on your device automatically.
# Start app
Method
To start the ELO app, tap the app icon on your device's start screen.
Result
The ELO app starts.
# Create profile
When starting the app the first time, you will be asked whether you want to create a demo profile or log on with an existing profile.
You can use the demo profile to familiarize yourself with the app. The demo profile has restricted functions without write rights. To create a demo profile at a later point in time, tap the CREATE PROFILE button in the action bar of the Configuration dialog box.
To access your company repository, you need to set up your ELO account in the ELO app. Tap Log on with existing account. You can find more information in the section Add profile.
# Language
The ELO app automatically uses your device's language settings. If the ELO app does not support your language, it uses English as the default.
# User interface
This documentation describes the user interface in landscape mode on a tablet. It may look different on your device.
The user interface may differ depending on the work area and the function being used.
# Layout
The user interface is divided into two main areas: the list view and the viewer pane.
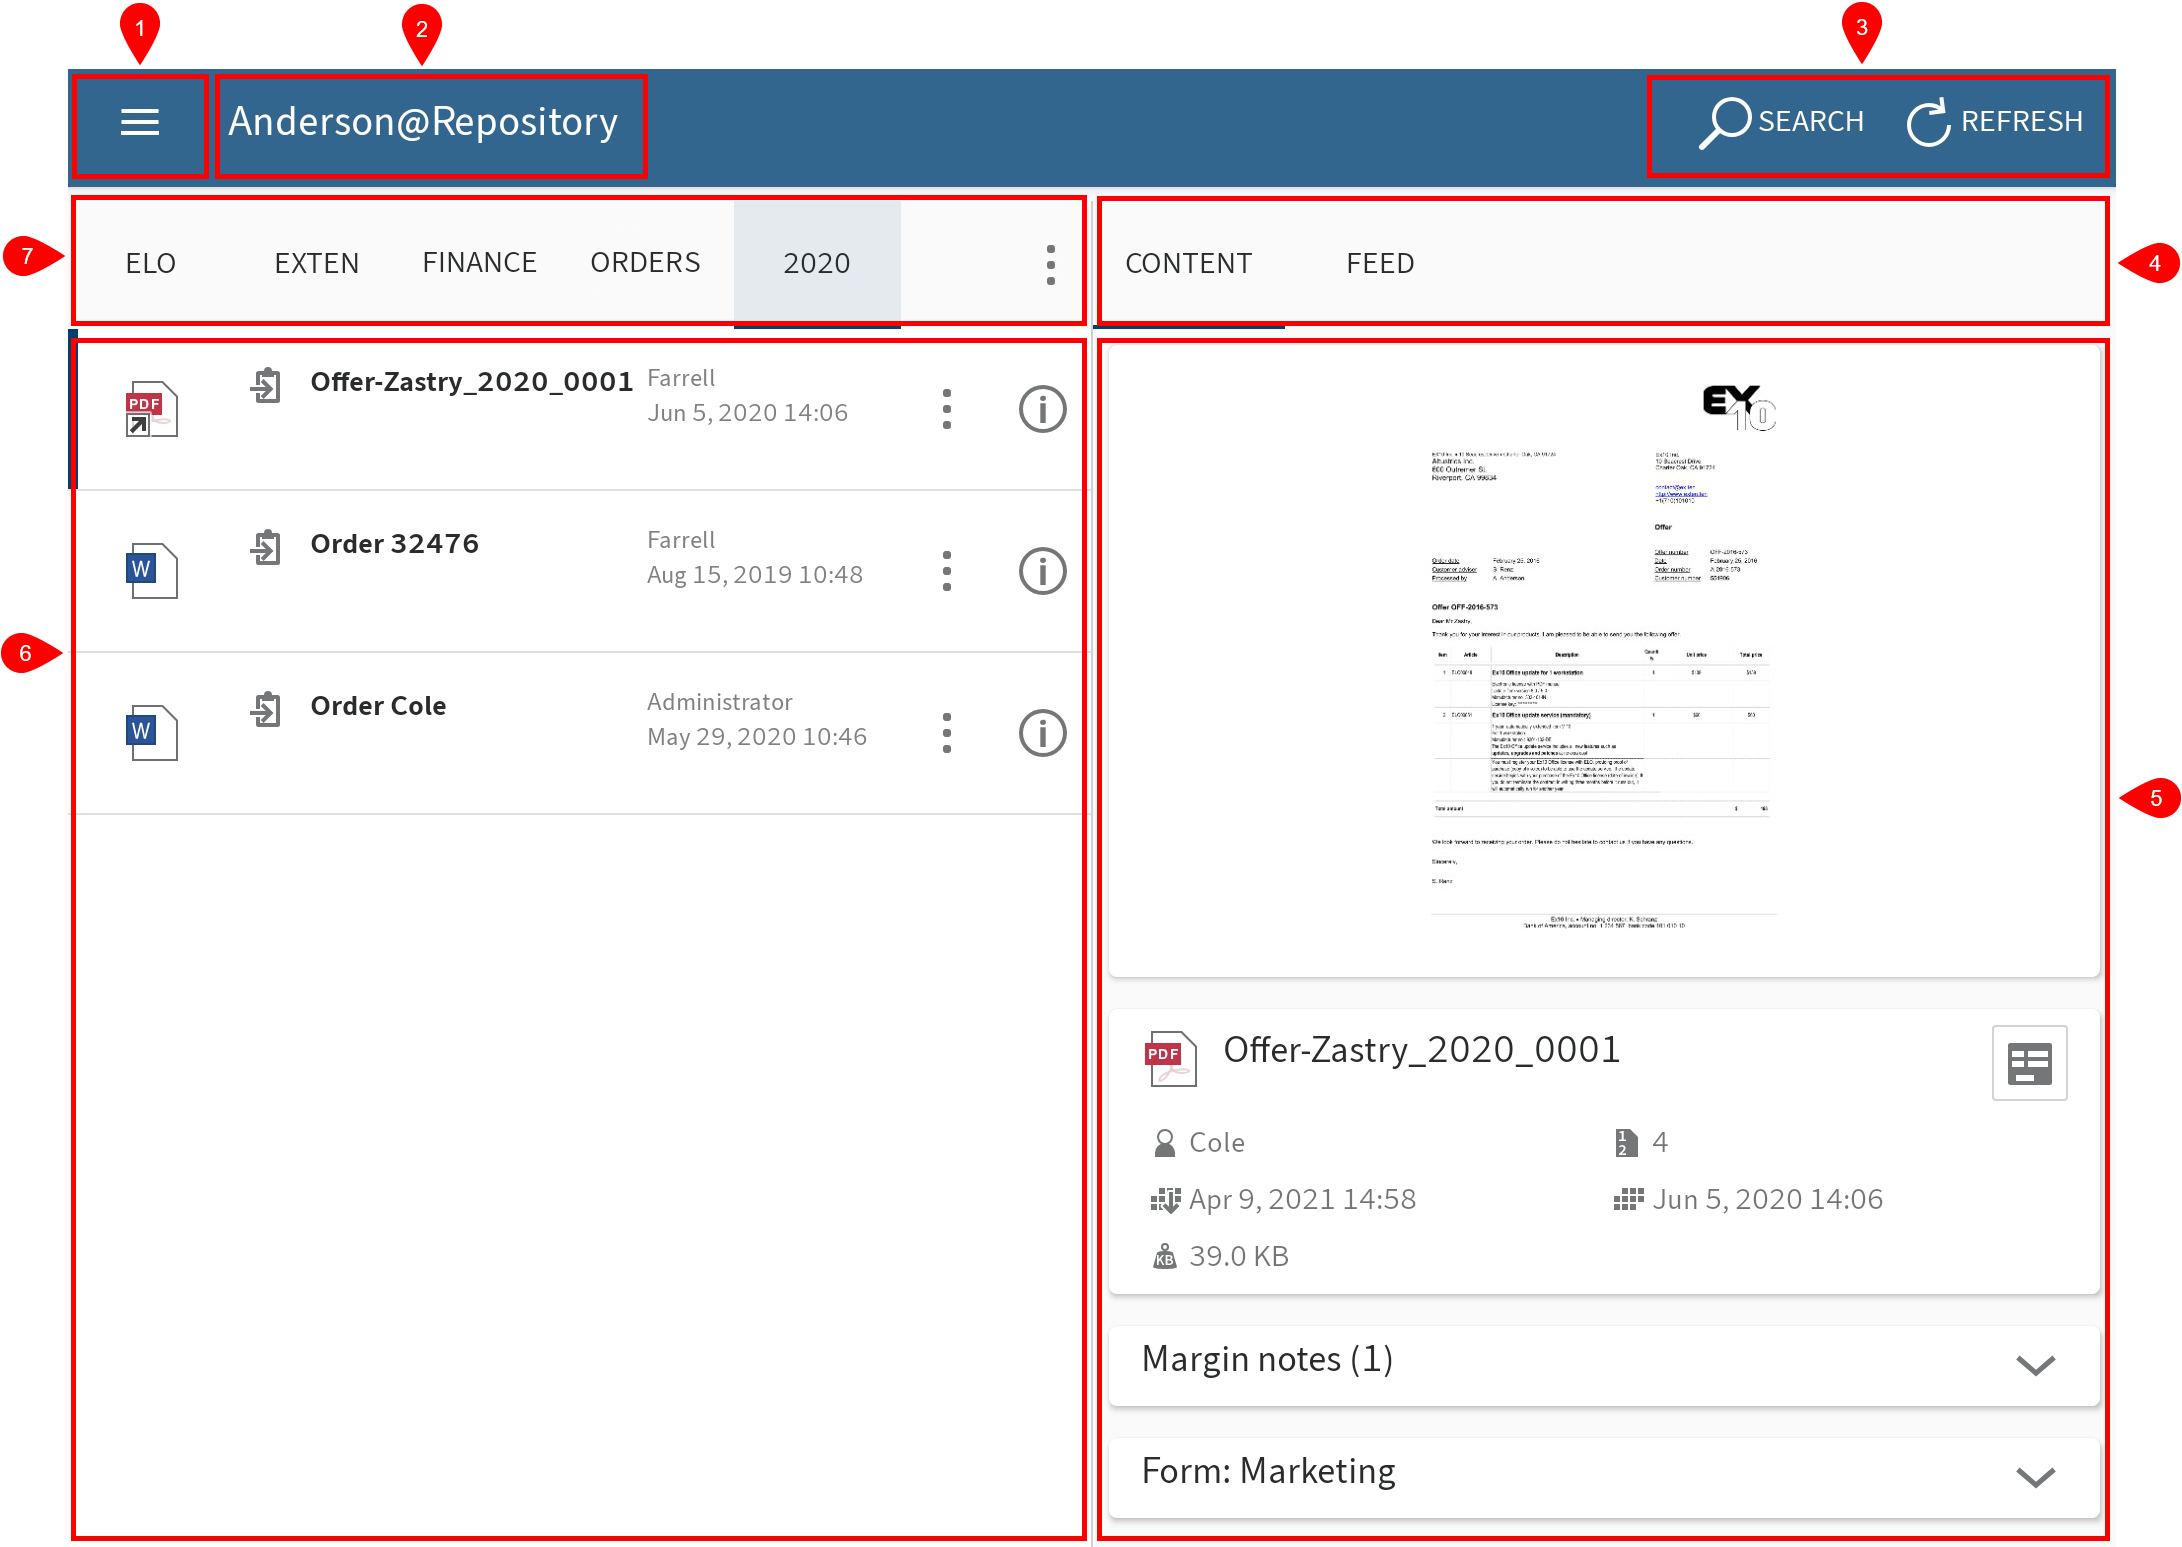
1 Menu (button with three dots): Opens the tile navigation.
2 Menu bar: Depending on the context, it shows the active profile, the selected document, or a search field.
3 Action bar: In this area, you can call various functions.
4 Viewer pane navigation bar: Shows different tabs such as Content, Feed, or Search settings depending on the entry selected and function performed. The current tab is highlighted in blue.
5 Viewer pane: Shows a preview of the selected entry and detailed information.
6 List view: Shows the documents and folders available at the selected level.
7 List view navigation bar: The tabs show the levels of the Repository work area. The current level is highlighted in blue.
# Tile navigation
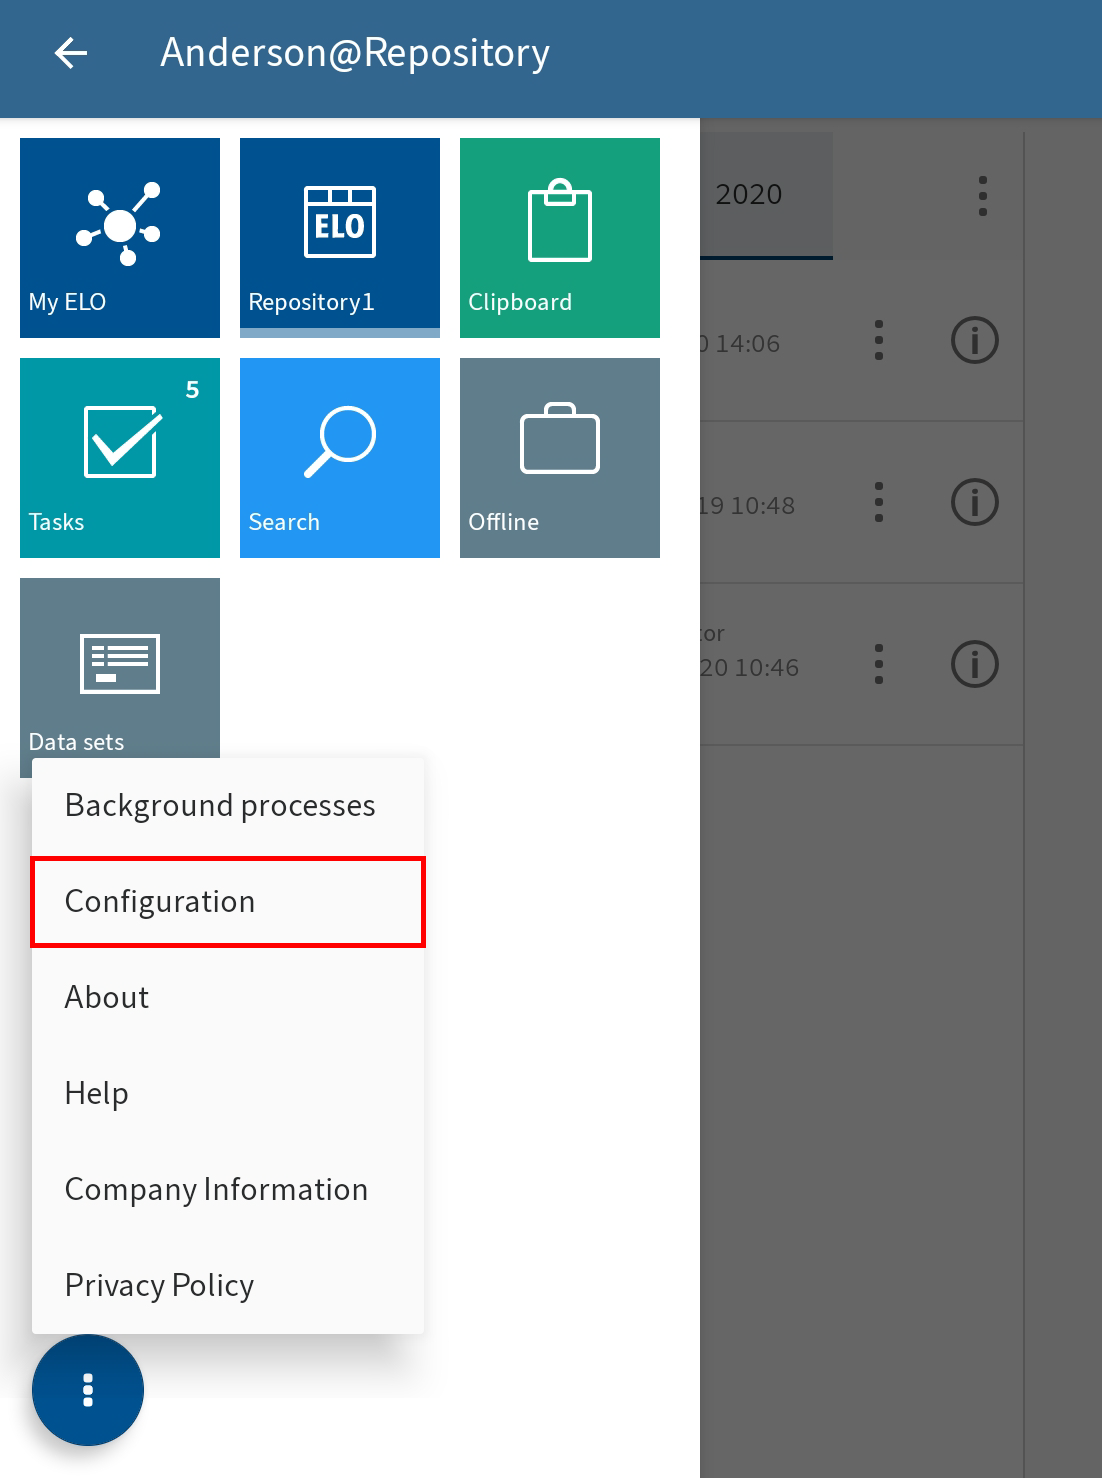
The ELO app has different work areas. The tile navigation contains an overview of the work areas. From here, you can switch to other work areas and open the Configuration dialog box.
Information
Administrators can restrict which work areas users are able to see via the ELO Administration Console.
You can access the tile navigation from the menu (button with three dots) or by swiping your finger from the left towards the right edge of your screen.
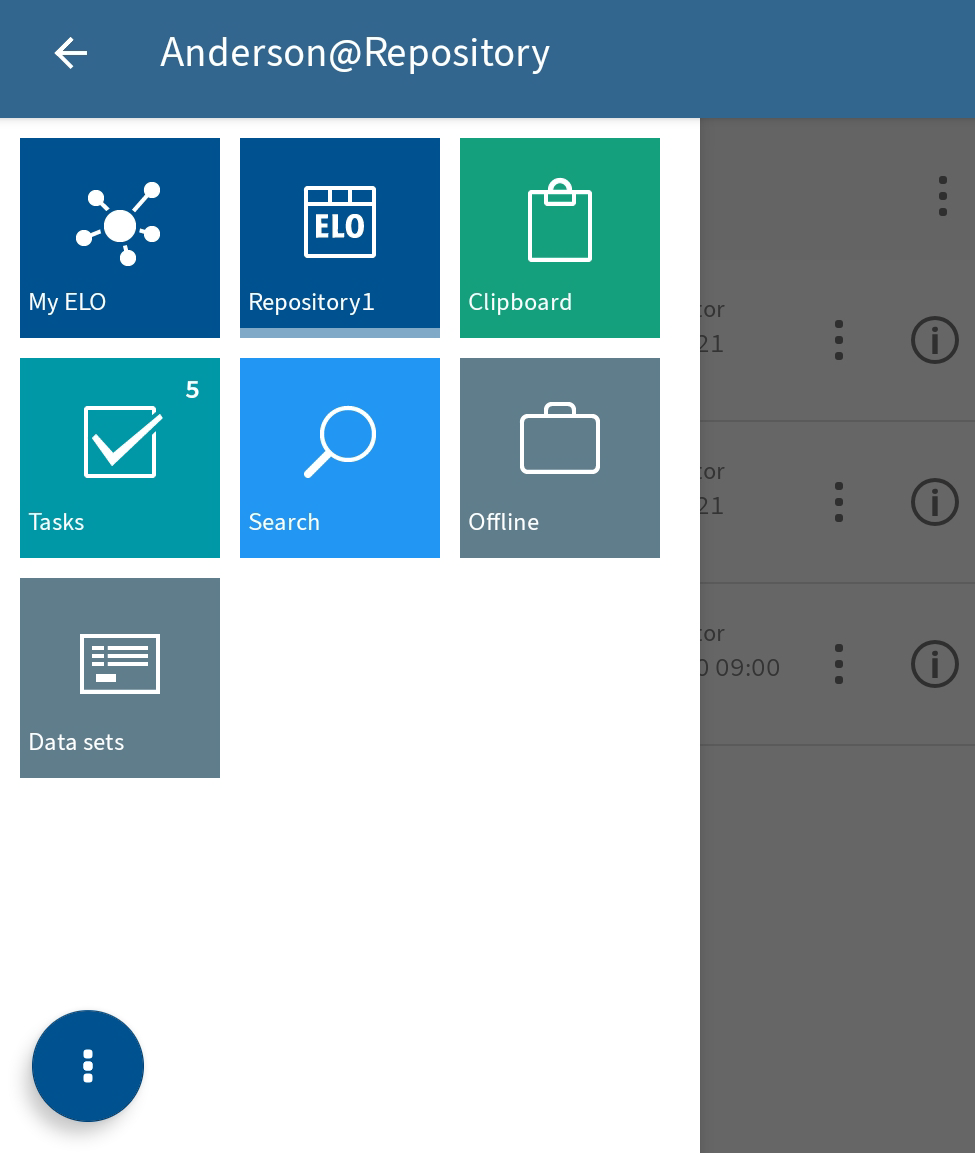
The tile navigation contains the following work areas:
- My ELO: Shows news from subscribed feeds as well as information on tasks and workflows.
- Repository: Contains all folders and documents that you can access.
- Clipboard: The Clipboard work area is a temporary list of documents and folders.
- Tasks: This work area contains your tasks and workflows.
- Search: Enables you to look for specific entries in ELO.
- Offline: You can download entries to your Offline area to make them available on your device.
- Data sets: Data sets are saved temporarily here. Depending on your settings, they are uploaded to the Repository work area as soon as your device is connected to the Internet.
Information
Administrators can add new work areas with embedded web pages to the tile navigation via ELOwf > App Manager > Add Client Info.
# Tile navigation context menu
From the tile navigation context menu (button with three dots), you can go straight to the configuration or the ELO in-program help .
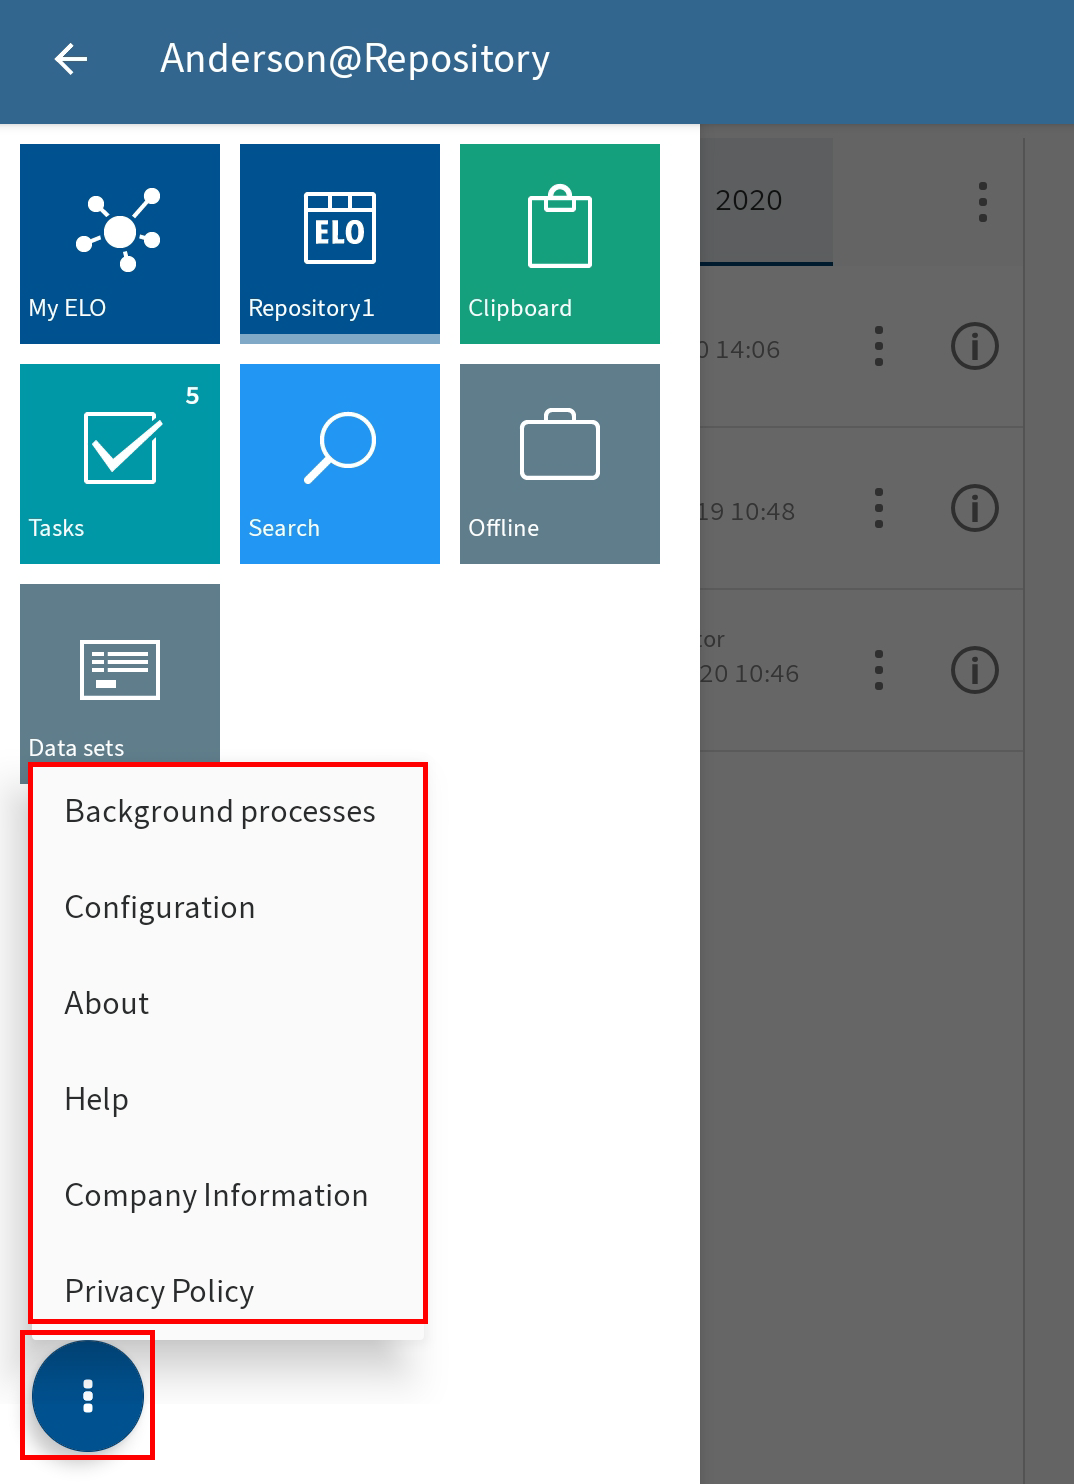
The tile navigation context menu contains the following items:
- Background processes: Here, you will find an overview of running background processes. Background processes are started when forms are loaded or data is copied, for example.
- Configuration: In the Configuration dialog box, you can adjust the settings for the ELO app.
- About: Here, you will find information about the ELO app, such as the version number.
- Help: Tap the Help button to open the ELO in-program help in an external browser.
- Company Information: This button opens the Company Information.
- Privacy Policy: You will find the Privacy Policy here.
# Navigation
When you first start the app, you will be in the Repository work area.
# Change folder
Method
To switch to another folder, tap the folder you want to open in the list view.
A new tab appears in the list view navigation bar with the folder you opened. The tab of the current folder is marked in blue.
You can now access the entries in this folder.
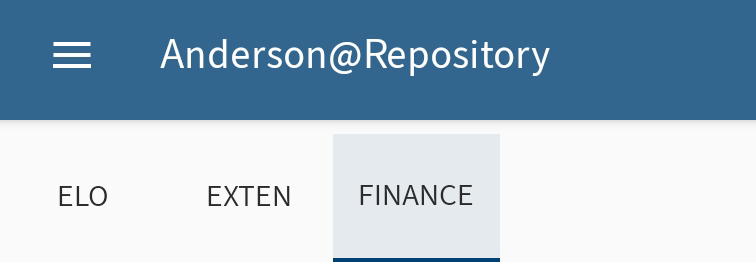
To switch between the folders, tap a tab in the list view navigation bar.
Alternative: Swipe left or right to switch between the folders.
# Scroll
If it is not possible to display all entries at once, you can scroll up and down in the list view, viewer pane, menus, and dialog boxes. Swipe up or down on the screen to scroll.
# Go to
The GO TO function takes you straight to the location of a document or folder in the Repository work area. The folder that contains the entry opens.
You will find the GO TO button in the context menu for all work areas except for Data sets.

# Show details
You can display detailed information on folders and documents in the viewer pane.
![]()
To view detailed information about folders or documents, tap the information icon next to the entry in the list view.
Alternative: To show the detailed information for documents, tap the entry in the list view.
The detailed information is then displayed in the viewer pane, along with any margin notes and attachments.
# Tabs in the viewer pane
Depending on the selected work area, the viewer pane navigation bar will contain different tabs:
- Content: In this tab, you will see a preview of PDFs, scans, and image documents. You will also see the metadata for the selected folder or document as well as margin notes and options.
- Feed: The feed documents changes made to entries. You can create and comment on posts. You can also open the entry's metadata.
- Search settings (only in the Search work area): You can customize your search here.
- Saved values (only in the Data sets work area): Shows information on a data set.
# Switch between tabs in the viewer pane
You can switch between the different tabs. The current tab is underlined in blue.
Method
Tap the tab you want to open in the viewer pane navigation bar.
Alternative: Swipe left or right to switch between the tabs.
Result
The selected tab is underlined in blue in the navigation bar of the viewer pane.
# Show/hide additional detail areas
On some tabs of the viewer pane, the detail areas are hidden for optimized display. Initially, you only see the names of the available detail areas (e. g. Form and Options). You will recognize detail areas you can hide or show based on the up or down arrow icon. To show or hide details, tap the detail area.
# Show e-mails
In the Message detail area in the viewer pane, you will see a text preview of filed e-mails.
If an e-mail filed to the repository contains attachments, you will find them in the Attachments detail area.
Method
To open an attachment, tap the eye icon to the right of the attachment.
Information
An application for opening the attached files must be installed on your Android device.
Result
The attachment is opened in an external application.
Use the Android Back button to return to the ELO app.
# Context menu
You can call up additional functions for individual documents or folders via the context menu. Various functions are available depending on the type of entry and work area.
Information
Administrators can restrict which functions users are able to see via the ELO Administration Console.
# Open context menu
Method
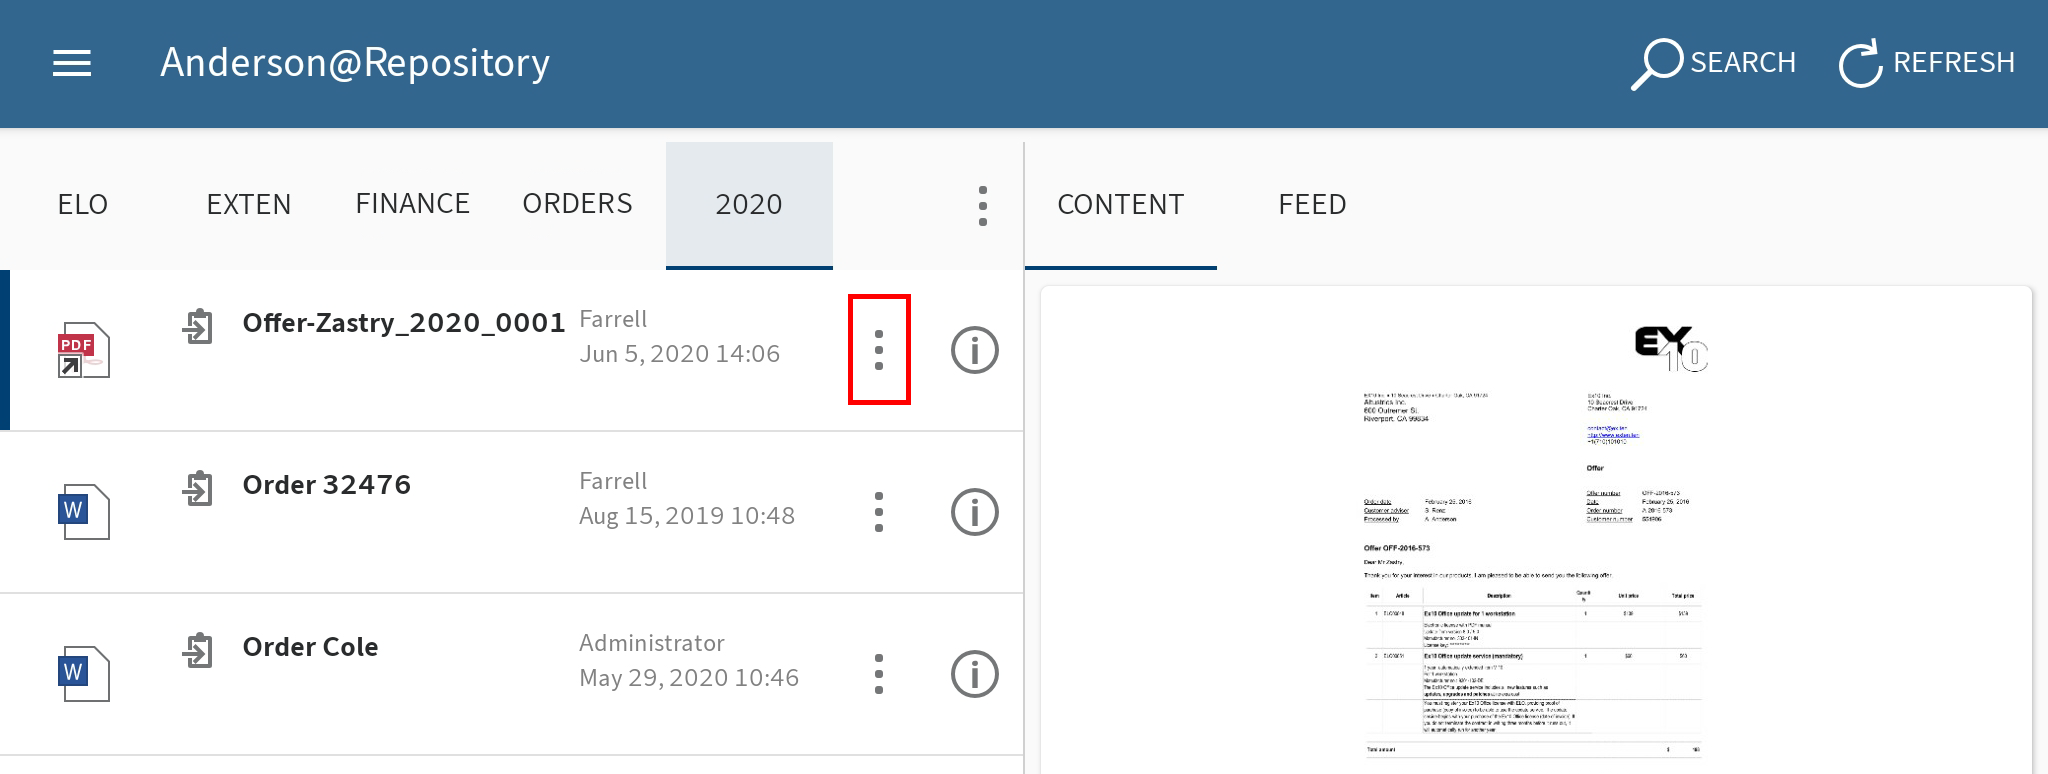
Tap the context menu (button with three dots) next to an entry in the list view.
Alternative: Long tap the desired entry and until the context menu appears.
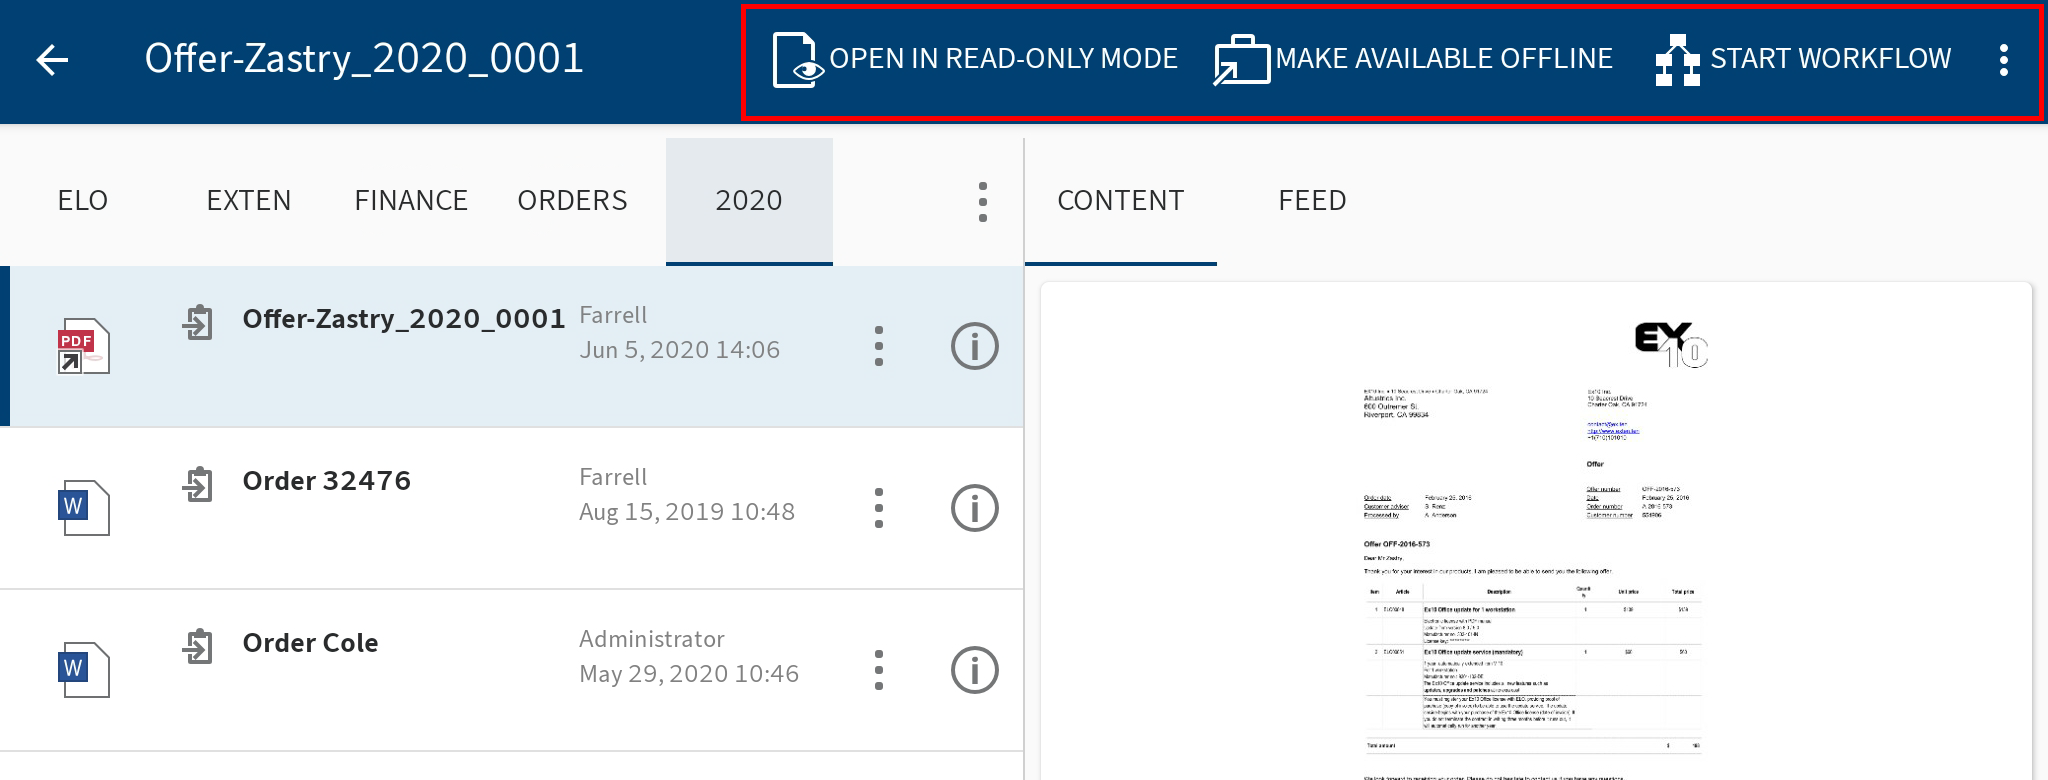
The selected entry is highlighted in blue. The context menu appears in the menu bar.
Tap the function you want to use.
Result
The function is performed.
# Call additional functions
Buttons from the main action bar may be moved to a drop-down menu depending on the width and orientation of the screen used. You can open them from the menu (button with three dots).
Method
Open the context menu for an entry (button with three dots).
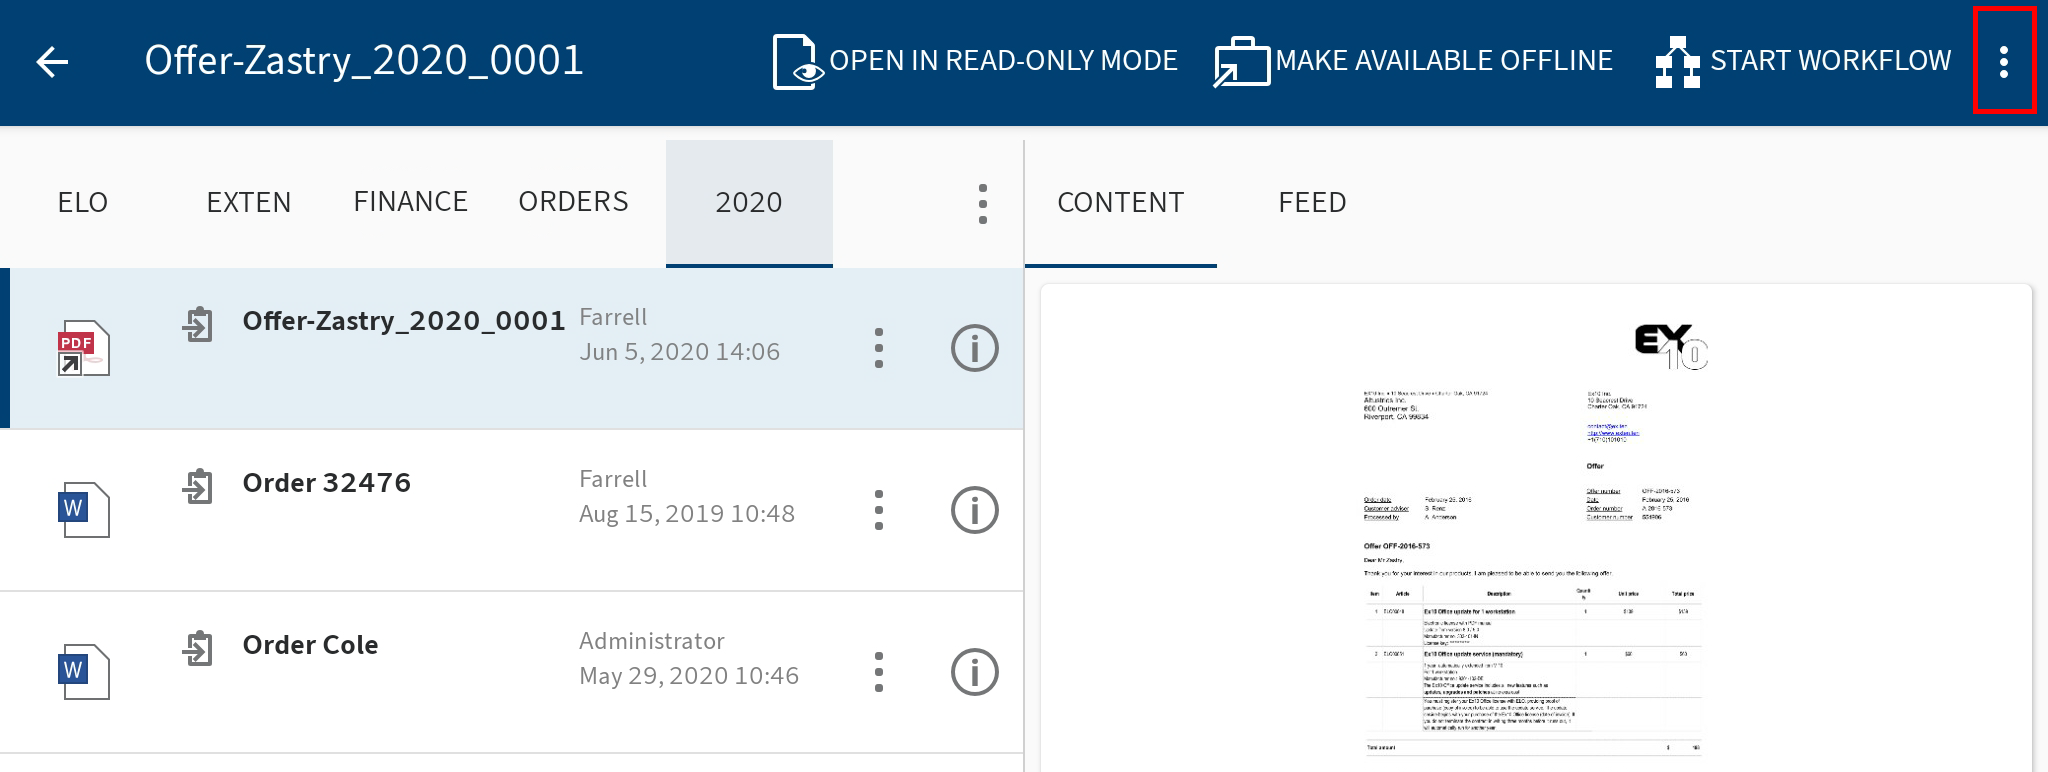
In the context menu, tap the menu (button with three dots).
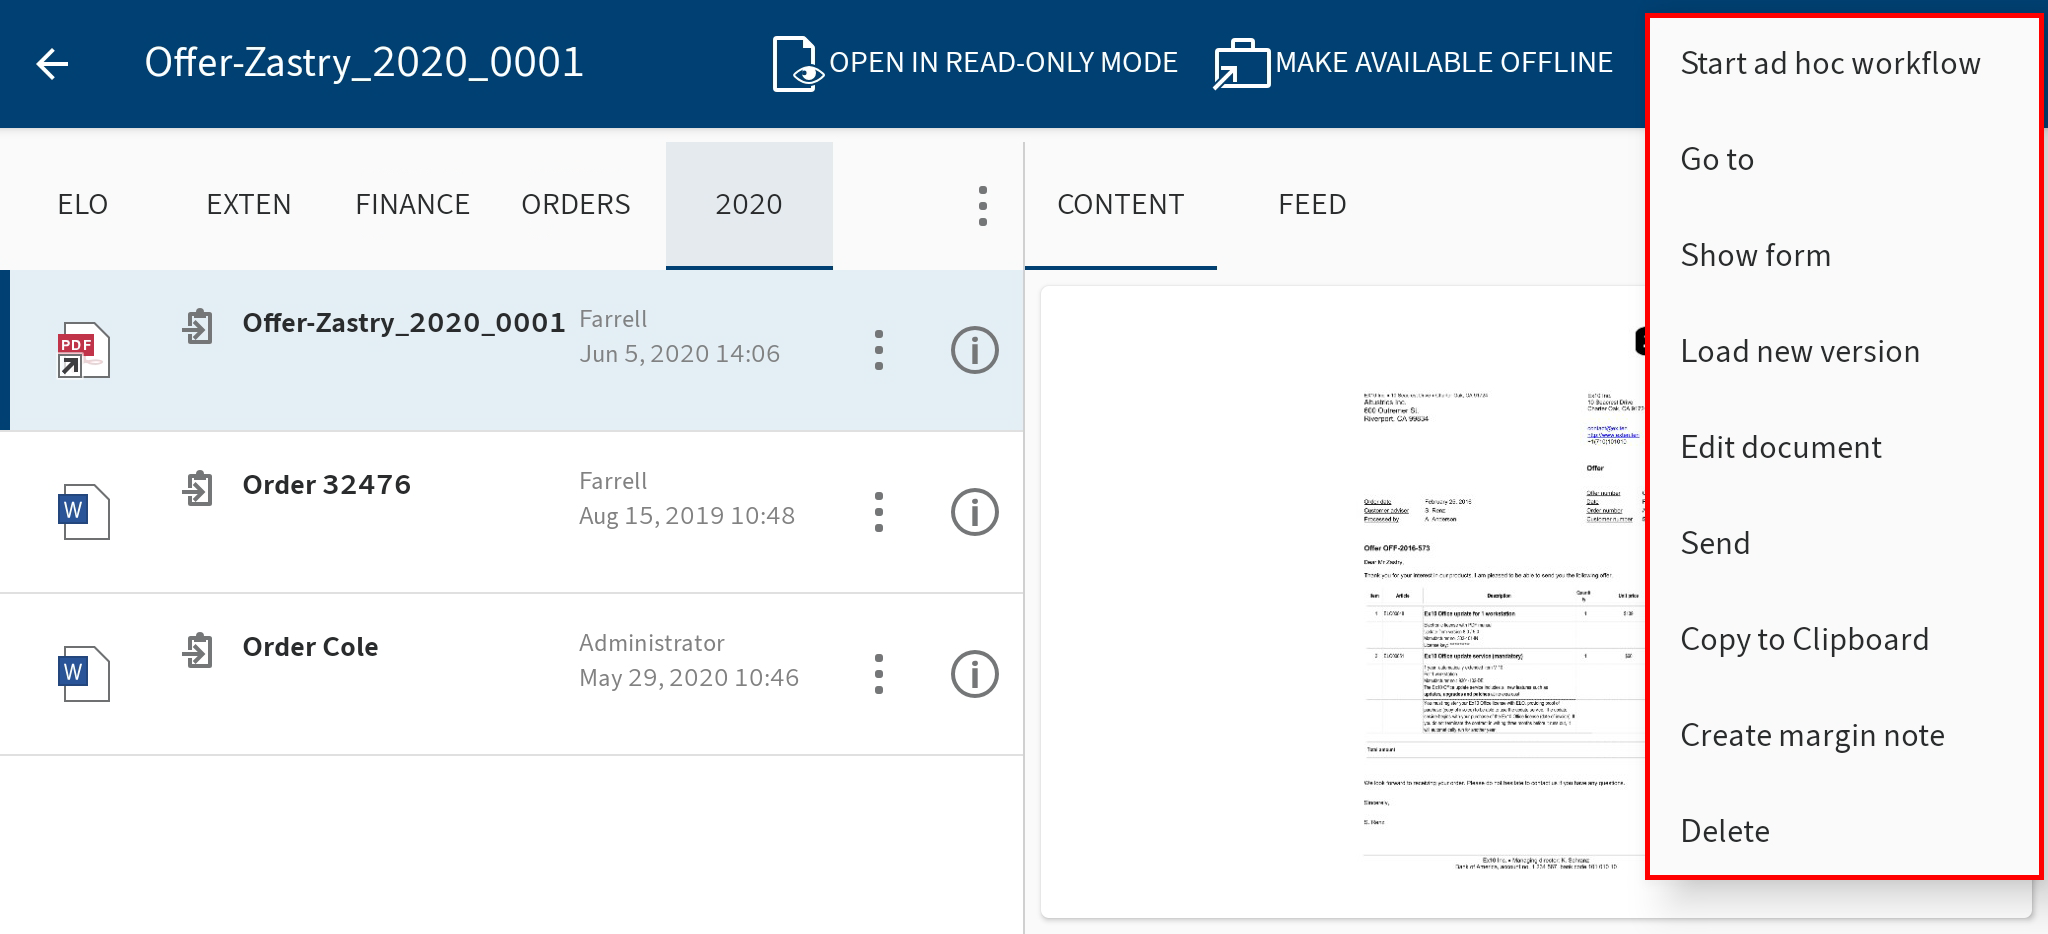
A drop-down menu appears.
Tap the desired function.
Information
Some Android devices have a menu key. In this case, the menu (button with three dots) is not displayed, but replaced by the menu key on your device.
# Multiple selection
In the list view, you can select multiple entries at once.
Method
Open the context menu for an entry (button with three dots).
In the list view, tap the entries you want to select.
Result
The selected entries are marked in blue.
In the menu bar, you will see how many entries you have selected and what functions are available for selection.
# Refresh view
Tap the REFRESH button to refresh the list view in the selected work area.
You will find the REFRESH function in the context menu.

# Configuration
In the Configuration dialog box, you can change the general settings for all profiles as well as individual settings for each individual profile. You can open the configuration from the context menu for the tile navigation.
# General: Configuration for all profiles
When you open the configuration, you will see the area General: Configuration for all profiles. This is where you define settings that apply for all profiles.

You can make the following settings:
- Log file: If this option is enabled, a log file is created on the device's external storage.
- View log file: To open an existing log file, tap View log file.
- Notify support: To send an e-mail to ELO support in an external application, tap Notify support. If a log file is available, it will be attached.
- Delete log file: Tap Delete log file to delete an existing log file.
# Individual profile settings
In addition to the general settings, which apply to all profiles, you can also apply settings for an individual profile.
Method
Tap the profile you want to make the settings for.
Result
The submenu for the selected profile appears. The selected profile is highlighted in blue. You can make the following settings:
# Local storage
Use external storage: Choose whether local files should be saved to an external storage medium, such as an SD card, or to the internal storage of the device. Externally saved files are available to other programs and users.
Please note
All local data is deleted when changing the storage location. This includes entries in the Offline and Clipboard work areas and data sets that have not yet been transferred to the repository.
Storage location for local data: If the Use external storage option is enabled, you can select a storage location (e.g. an SD card) for the local data.
Delete local data: Tap Delete local data to remove all data stored on the device or the external storage.
# Cache
Delete cache directory: Tap Delete cache directory to delete all cache files of the active profile.
# Network
Automatic data set filing: Decide when data sets are automatically filed to ELO. Tap to open the following options:
- With any connection: The data sets are transferred as long as the device is connected to the Internet.
- Only over Wi-Fi: The data sets are only transferred if a Wi-Fi connection is established.
- No automatic filing: The data sets are not filed automatically.
# Metadata
Before you can enter metadata for new folders or documents in the ELO app, your administrator has to create a form and link it to the metadata form.
Information
If a form has not been assigned to the metadata form, the ELO app loads a default form with the fields Short name, Document date, and Extra text. If a metadata form contains mandatory fields, your administrator will have to create a form and link it to the metadata form so it can be selected in the ELO app.
Enter metadata on filing: If you create a new folder or add a file, you can enter metadata for the entries directly. There are different options for entering metadata for new folders and documents. Tap to open the following options:
- Always use the form: If this option is enabled, you will always see a metadata dialog box when filing documents. The form assigned to the metadata form is used to enter the metadata. If a form has not been assigned, the system uses the default form with the Short text, Document date, and Extra text fields.
- Only for metadata forms with form: If this option is enabled, the metadata form will only appear if the selected metadata form is linked to a form. If a form has not been assigned, the new entry is automatically filed with the default form. The default form contains the Short text, Document date, and Extra text fields.
- Do not enter metadata: If this option is enabled, no metadata dialog box opens. The new entry is automatically filed with the default form. The default form contains the Short text, Document date, and Extra text fields.
Enter metadata on serial filing: There are different options for entering metadata when filing multiple documents. Tap to open the following options:
- Always use the form: If this option is enabled, you will always see a metadata dialog box when filing documents. The form assigned to the metadata form is used to enter the metadata. If a form has not been assigned, the system uses the default form with the Short text, Document date, and Extra text fields.
- Only for metadata forms with form: If this option is enabled, the metadata form will only appear if the selected metadata form is linked to a form. If a form has not been assigned, the new entry is automatically filed with the default form. The default form contains the Short text, Document date, and Extra text fields.
- Do not enter metadata: If this option is enabled, no metadata dialog box opens. The new entry is automatically filed with the default form. The default form contains the Short text, Document date, and Extra text fields.
# Task settings
Sort order of the tasks lists: Choose how your tasks should be sorted. Tap to open the following options:
- Date/Priority/Name
- Name/Priority/Date
- Priority/Date/Name
Show group tasks: Choose whether group tasks should be displayed.
Show substitution tasks: Choose whether substitution tasks should be displayed.
Show escalations: Choose whether to display escalations for tasks.
# Search settings
Specify which fields to include during a search. The following fields are available:
- Short name
- Extra text
- Fields
- Full text
# Add profile
To access your company repository, you must connect the ELO app to the repository. You need to set up a profile for this.
Please note
You can only connect a profile to one repository at a time. To access different repositories, you need to create multiple profiles.
The following options are available for setting up a profile:
- If you want to create a profile for yourself, use the ADD PROFILE function.
- If you want to create a profile for another person as the administrator, use:
- either an eloprofile file
- or Mobile device management.
# 'ADD PROFILE' function

If you want to create a profile for yourself, use the ADD PROFILE function.
You can choose between the following options:
- ELO login data
- Identity provider (via ELOauth)
- ELO Modern Authentication (Auth 2)
- MSAL identity provider (via ELOauth)
Please note
With app version 01.00.010, the Server URL field is identical for all profiles and contains the repository URL. It is no longer necessary to enter the full ELO Web Client URL to authenticate with ELO login data.
When logging in with ELOauth, the ELOauth URL field is replaced by the Server URL and the config ID is specified separately.
Old profiles continue to be supported and do not need to be changed.
# ELO login data
Open the configuration via the Tile navigation > Context menu.
Tap ADD PROFILE to create a new profile.
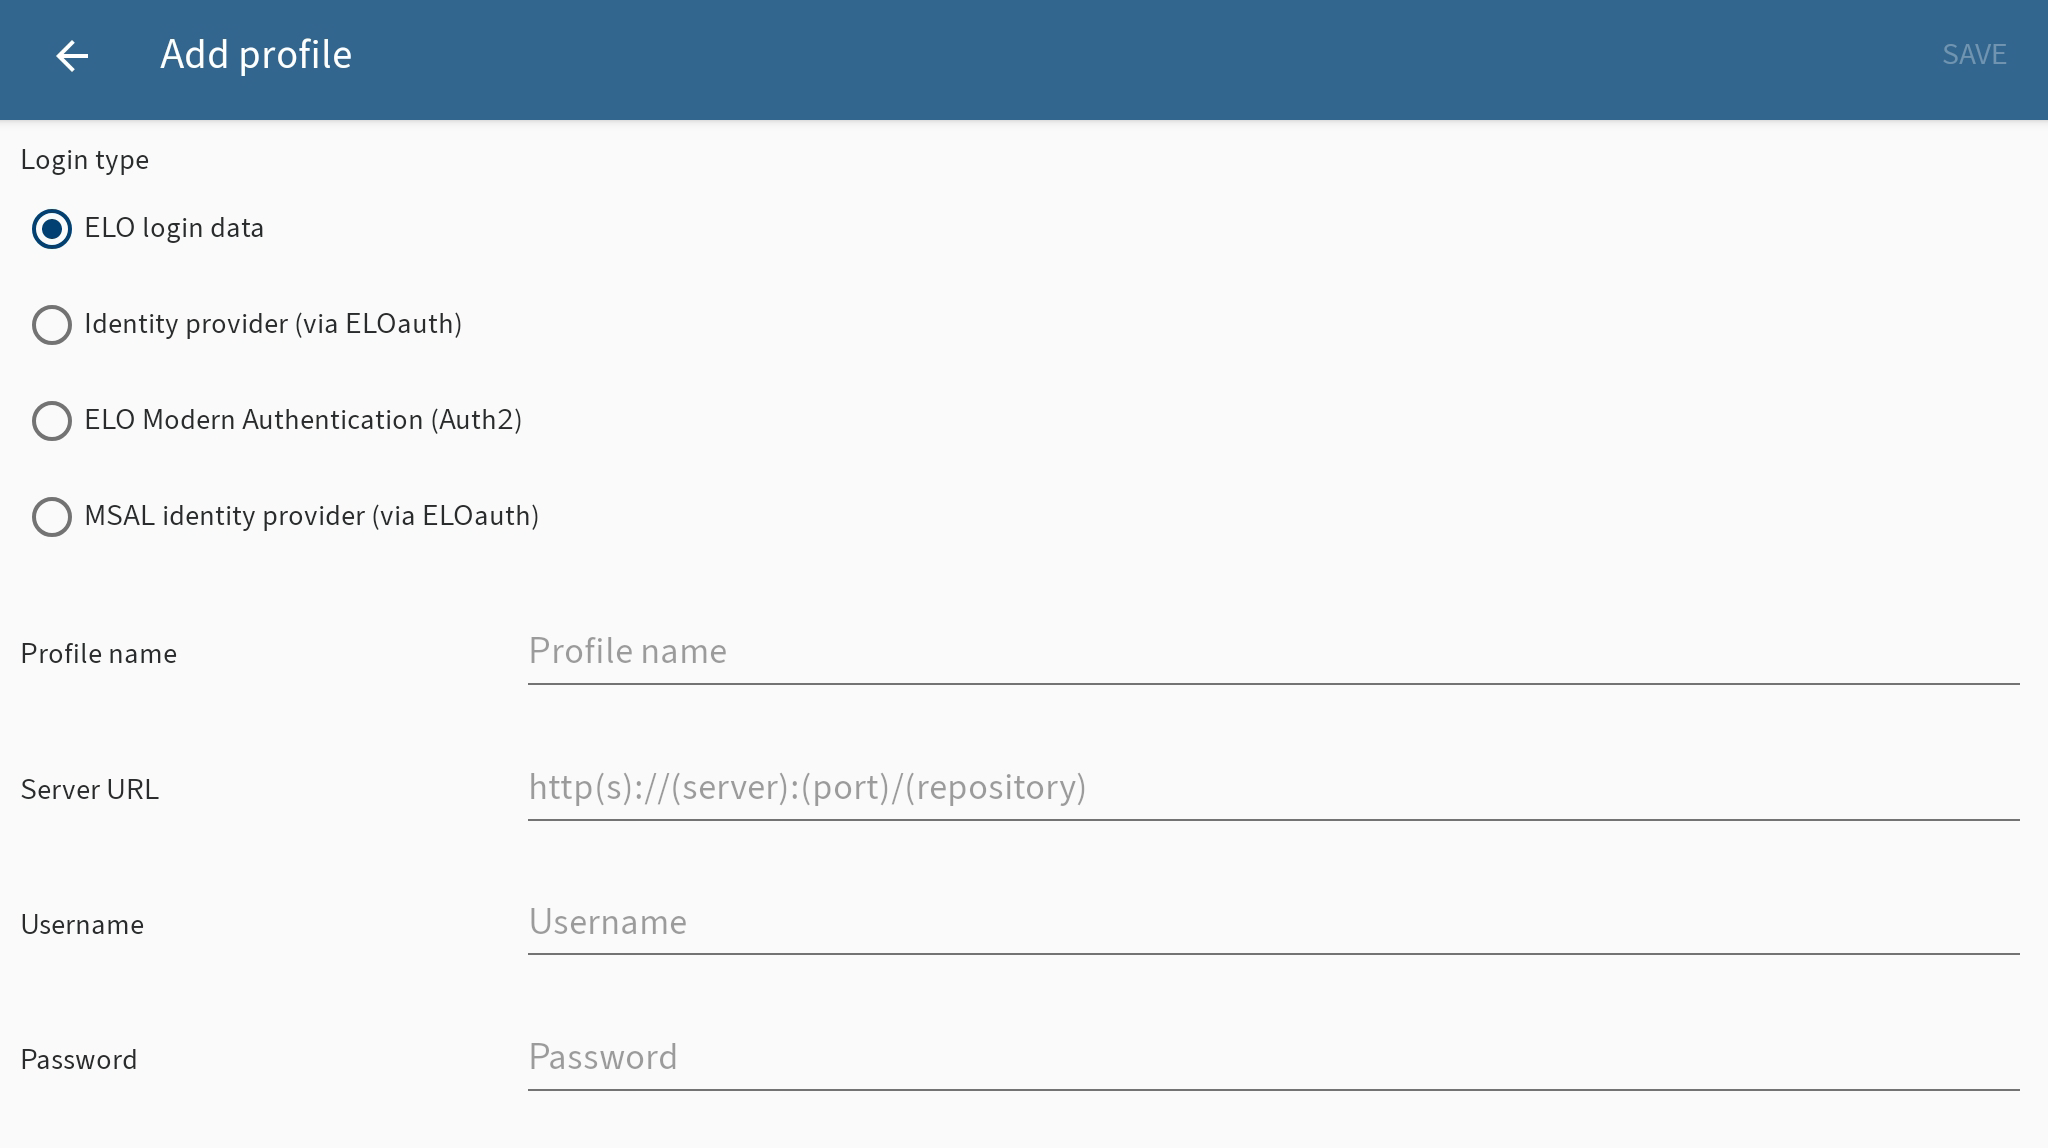
The Add profile dialog box opens.
Select the ELO login data option.
Enter a name for the repository in the Profile name field. You can choose any name you like.
Enter the URL for the repository you want to connect to into the Server URL field. You must use the following format:
http(s)://<server name>:<port>/<repository name>Enter your ELO user name to the Username field.
Enter your password to the Password field.
Tap SAVE.
Result
The new profile is now connected to the ELO repository. You can tell that the profile is active by the orange person icon. If you want to use another profile, you have to activate it first.
Alternative
You can also create a profile with an .eloprofile file. This file contains the profile data in JSON format:
{
  "name": "LoginWithManualExample",
  "server": "https://example.com/repository",
  "user": "user name",
  "password": "<password> (Optional; if not specified, the user will be prompted to complete the profile in the app.)"
}
Send the eloprofile file to your mobile device, e. g. as an e-mail attachment. Select the ELO app to open the profile file. The profile is created automatically. To use the profile, you have to enable it. You can tell that the profile is active by the orange person icon.
# Identity provider (via ELOauth)
Open the configuration via the Tile navigation > Context menu.
Tap ADD PROFILE to create a new profile.
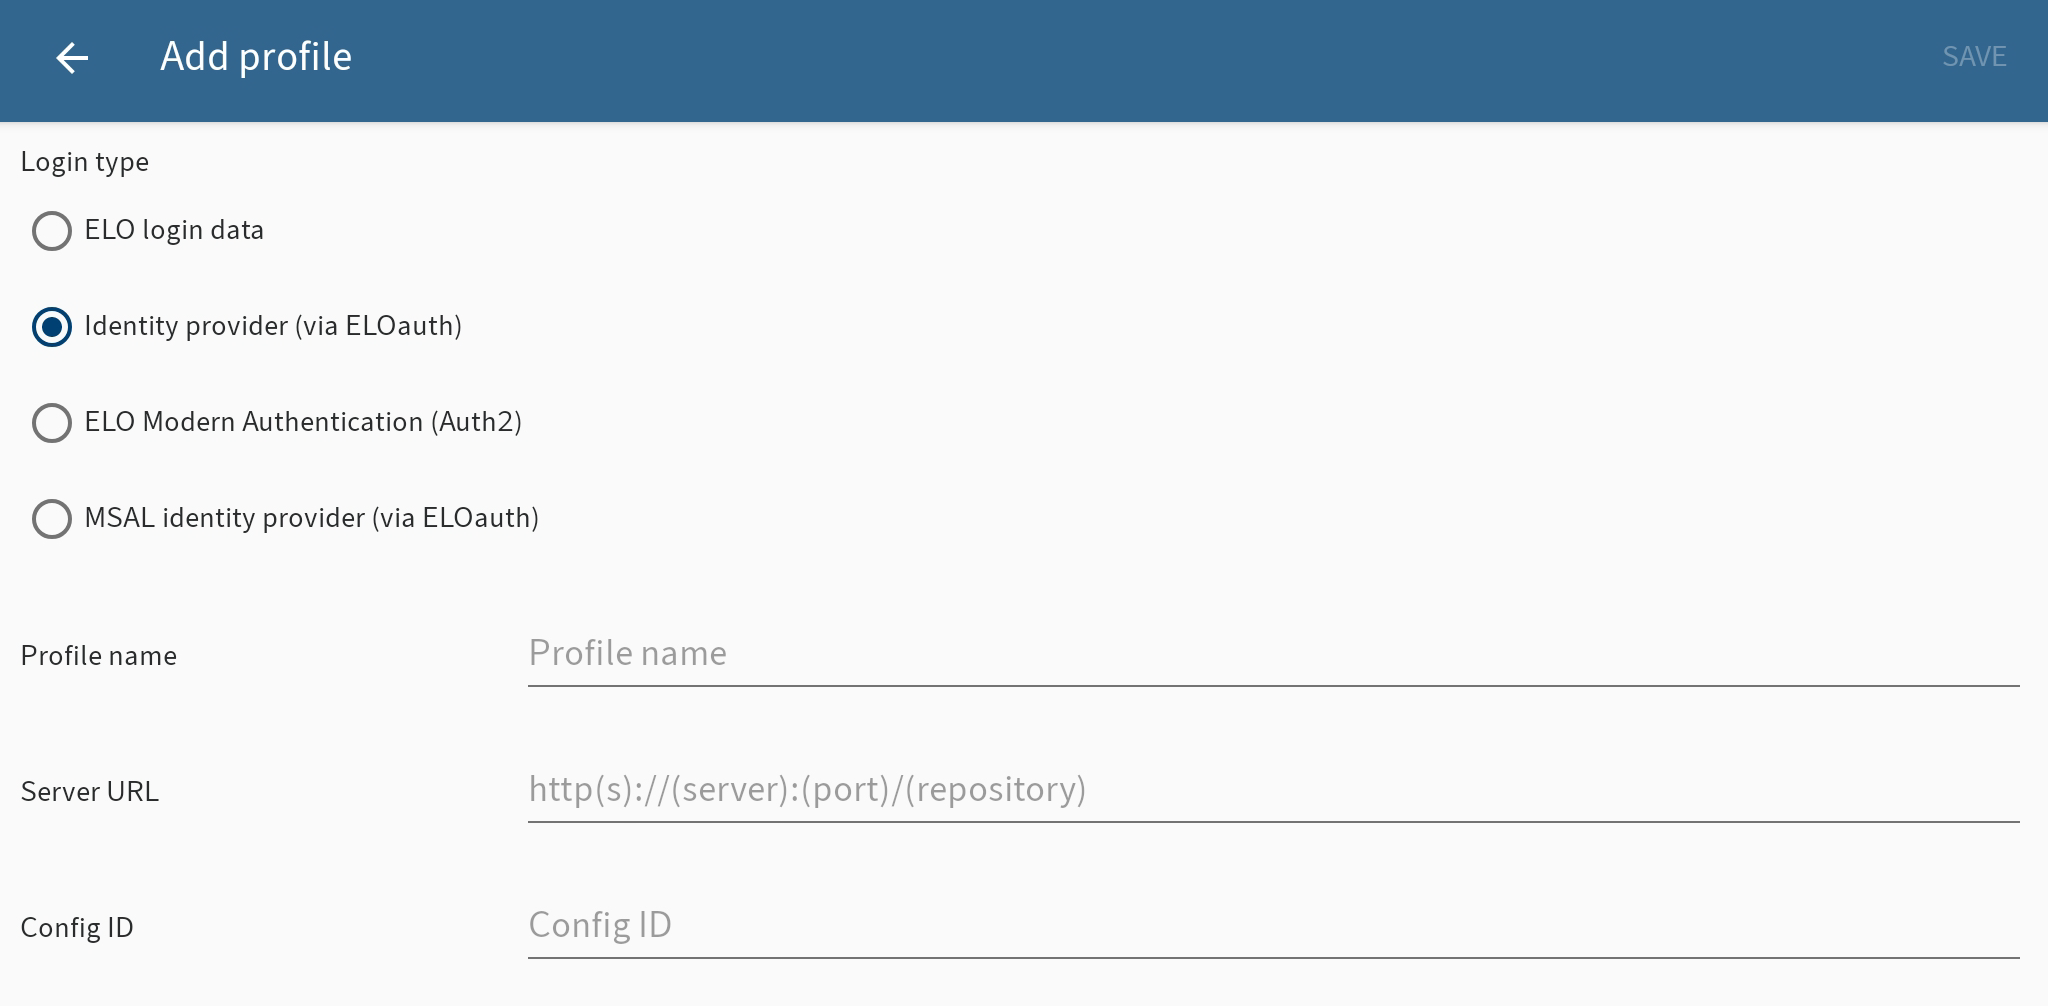
The Add profile dialog box opens.
Select the Identity provider (via ELOauth) option.
Enter a name for the repository in the Profile name field. You can choose any name you like.
Enter the URL for the repository you want to connect to into the Server URL field. You must use the following format:
http(s)://<server name>:<port>/<repository name>Enter the ConfigId.
ConfigId is the ID of the configuration that should be used. You can read further information about ELOauth in the documentation ELOauth Plug-in (opens new window).
Tap SAVE.
The browser will open, allowing you to complete the authentication process.
Result
The new profile is now connected to the ELO repository. You can tell that the profile is active by the orange person icon. If you want to use another profile, you have to activate it first.
Alternative
You can also create a profile with an .eloprofile file. This file contains the profile data in JSON format:
{
  "name": "LoginWithELOauthExample",
  "server": "https://example.com/repository",
  "config_id": "<ELOauth config ID>"
}
Send the eloprofile file to your mobile device, e. g. as an e-mail attachment. Select the ELO app to open the profile file. The profile is created automatically. To use the profile, you have to enable it. You can tell that the profile is active by the orange person icon.
# ELO Modern Authentication (Auth 2)
Please note
ELO 25 LTS introduces ELO Modern Authentication (Auth 2) as a new, standardized login method.
Requirement: You must have the latest version of ELO Modern Authentication (Auth 2) installed. ELO Modern Authentication is set up by an administrator. If you have questions, contact your administrator.
Method
Open the configuration via the Tile navigation > Context menu.
Tap ADD PROFILE to create a new profile.
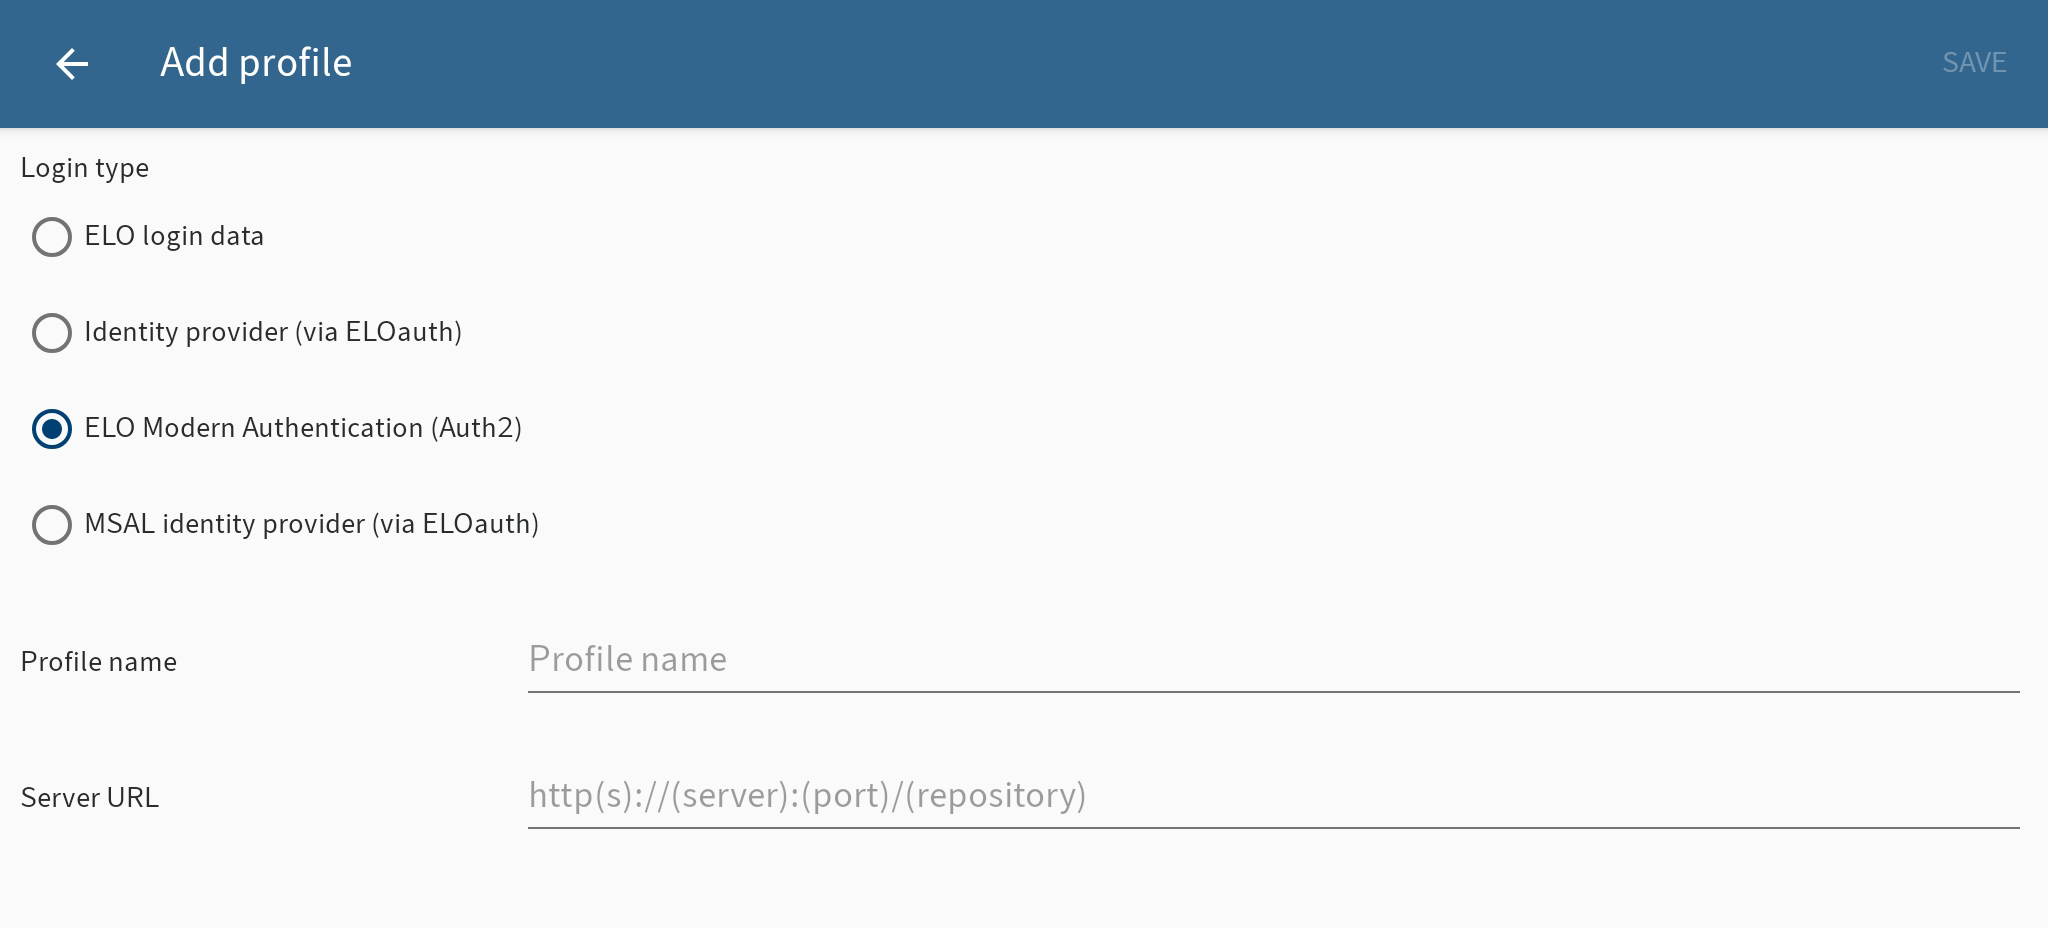
The Add profile dialog box opens.
Select the option ELO Modern Authentication (Auth 2).
Enter a name for the repository in the Profile name field.
Enter the URL for the repository you want to connect to into the Server URL field. You must use the following format:
http(s)://<server name>:<port>/<repository name>Tap SAVE.
The browser will open, allowing you to complete the authentication process.
Result
The new profile is now connected to the ELO repository. You can tell that the profile is active by the orange person icon. If you want to use another profile, you have to activate it first.
Alternative
You can also create a profile with an .eloprofile file. This file contains the profile data in JSON format:
{
  "name": "LoginWithELOauthExample",
  "server": "https://example.com/repository"
}
Send the eloprofile file to your mobile device, e. g. as an e-mail attachment. Select the ELO app to open the profile file. The profile is created automatically. To use the profile, you have to enable it. You can tell that the profile is active by the orange person icon.
# MSAL identity provider (via ELOauth)
Open the configuration via the Tile navigation > Context menu.
Tap ADD PROFILE to create a new profile.
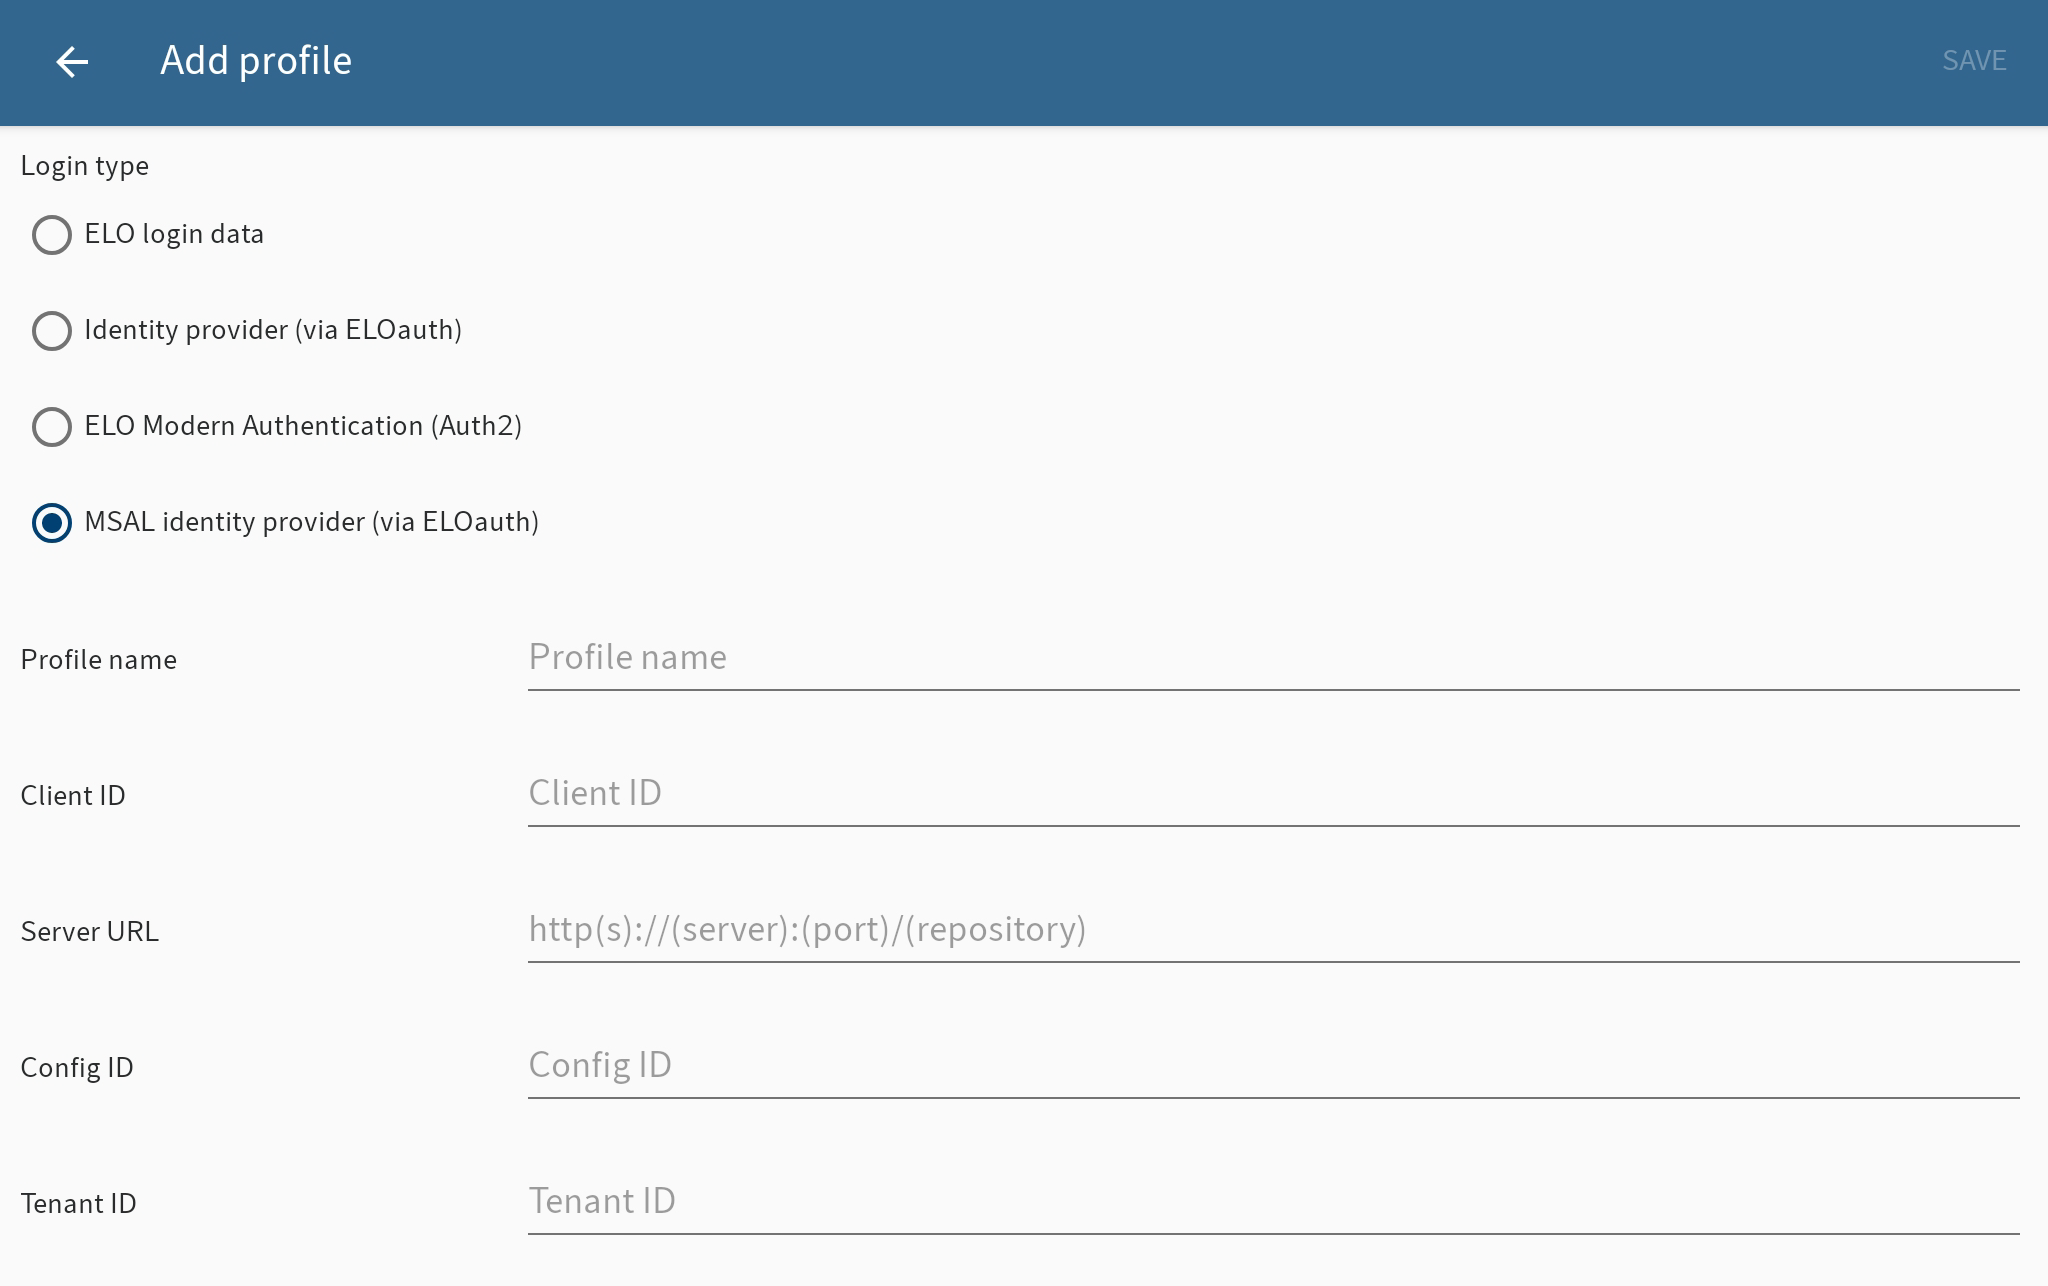
The Add profile dialog box opens.
Select the MSAL identity provider (via ELOauth) option.
Enter the following values:
- Profile name: Name for the repository. You can use any name.
- Client ID: You will find this in the Azure Portal under the app registration (Overview > Application (client) ID).
- Server URL: Server URL of the repository. Example: https://example.com/repository
- Config ID: Config ID that you used in the ELOauth configuration. This ELOauth config also has to be entered in the Microsoft Azure app registration.
- Tenant ID: You will find this in the Azure Portal under the app registration (Overview > Directory (tenant) ID).
Tap SAVE.
The Microsoft Authenticator app opens, allowing you to complete the authentication process. If the Microsoft Authenticator app is unavailable, the browser will open so you can complete the authentication process there.
Alternative
You can also create a profile with an .eloprofile file. This file contains the profile data in JSON format:
{
  "name": "LoginWithMicrosoftExample",
  "server": "https://example.com/repository",
  "tenant": "<TENANT ID> (Optional. If not required, do not enter!)",
  "client_id": "c[...]c",
  "config_id": "<config ID>"
}
You'll find the values for client_id and tenant in the Microsoft Azure app registration.
Send the eloprofile file to your mobile device, e. g. as an e-mail attachment. Select the ELO app to open the profile file. The profile is created automatically. To use the profile, you have to enable it. You can tell that the profile is active by the orange person icon.
Result
The new profile is now connected to the ELO repository. You can tell that the profile is active by the orange person icon. If you want to use another profile, you have to activate it first.
Outlook
After creating the profile, a dialog box appears to log on to the app. Tap the button to log on. You will be forwarded to a browser window from which you can log on to ELOauth.
After successfully logging in, the profile appears in the list of profiles in the ELO app. This profile has the user name of the user who is logged in and the profile name that was specified when creating the profile.
If the ELO session has expired, log in again using the button. If you specify that you want to stay logged in, you don't have to enter your data again.
# Edit profile
If settings on the ELO server or your user data change, you may be required to edit the profile.
Please note
Making changes to a profile deletes all local data on the mobile device. This includes entries in the Offline area, the Clipboard, forms, and form data sets that have not been transferred to the repository.
Information
You cannot change your password in the ELO app. You can change your password in the ELO Java Client or the ELO Web Client.
Method
Open the configuration via the Tile navigation > Context menu (button with three dots).

The Configuration dialog box opens.
Tap the context menu (button with three dots) for the profile you want to edit.

The context menu opens.
Tap EDIT in the context menu.
The Add profile dialog box opens. The fields show the data for the selected profile.
Make the desired changes.
Tap SAVE.
Result
The changes are applied in the ELO app. If the login information is correct, you can access the repository again.
# Change profile
You can create multiple profiles in the ELO app. You can tell that the profile is active by the orange person icon. If you want to use another profile, you have to activate the profile first.
Method
Open the configuration via the Tile navigation > Context menu.

The Configuration dialog box opens.
Tap the context menu (button with three dots) for the profile you want to activate.

The selected profile is highlighted in blue.
Tap SET PROFILE TO ACTIVE.
Result
The selected profile is assigned the icon for the active profile (orange person icon). The profile is now active.
# Delete profile
You can also delete profiles that you no longer need.
Method
Open the configuration via the Tile navigation > Context menu.

The Configuration dialog box opens.
Tap the context menu (button with three dots) for the profile you want to delete.

The context menu opens.
Tap DELETE PROFILE in the context menu.
The Delete profile dialog box appears.
To delete the profile, tap YES.
Result
You have deleted the profile.
# Reconnect profile
To reconnect the active profile to the repository, use the RECONNECT PROFILE function. This function establishes a new connection to the repository and reloads all caches and data set forms.
Method
Open the configuration via the Tile navigation > Context menu.

The Configuration dialog box opens.
Tap the context menu (button with three dots) for the profile you want to reconnect.

The context menu opens.
Tap RECONNECT PROFILE in the context menu.
Result
This reloads the connection.