# Program interface
This chapter contains information on the ELO interface. It will help you orient yourself in your client.
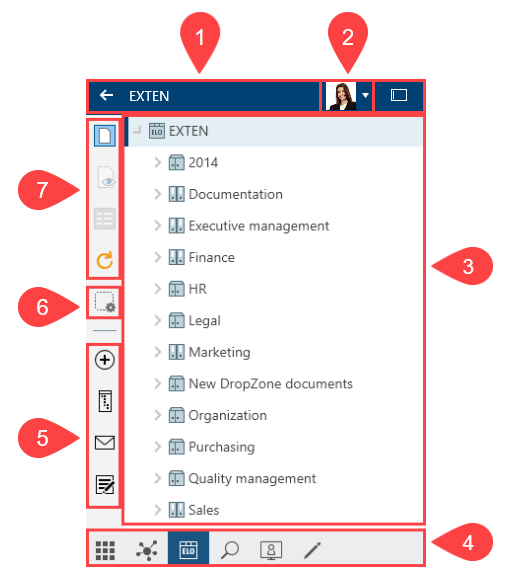
The program interface is divided into the following areas:
1 Header: The header indicates which work area you are currently in.
2 User menu [your name]: Here, you will find various functions mainly for your personal settings.
3 Viewer pane: You see news, search results, the tree view, or the tile navigation, depending on which work area you are in.
4 Navigation bar: This toolbar provides access to the tile navigation, as well as to the My ELO, Repository, Search, Desktop, and In use, work areas and the Tasks work area (only ELO Desktop Client Plus).
5 Toolbar: The toolbar contains all functions you can use in the respective work area. These vary depending on the work area.
# What is a work area?
ELO contains different work areas. Each work area is used to complete specific tasks. Accordingly, not all functions are available in every work area.
ELO contains the following work areas:
- My ELO: In this work area, you will find your news and most recently used entries.
- Repository: This area contains all folders and documents that you are authorized to access. This is also where you create additional folders and documents.
- Search: This area is where you search for folders and documents that are stored in the Repository work area.
- Tasks: If you are assigned tasks, you will find them here. Tasks are always related to entries (folders or documents) in the Repository work area. The Tasks work area is only available in ELO Desktop Client Plus.
- Desktop: This work area acts as an interface between ELO and Windows. In this area, you will see an overview of entries currently selected at the file system level.
- In use: When you edit a document, it automatically appears in the In use work area.
# My ELO
In the My ELO work area, you will find your news and most recently used entries.
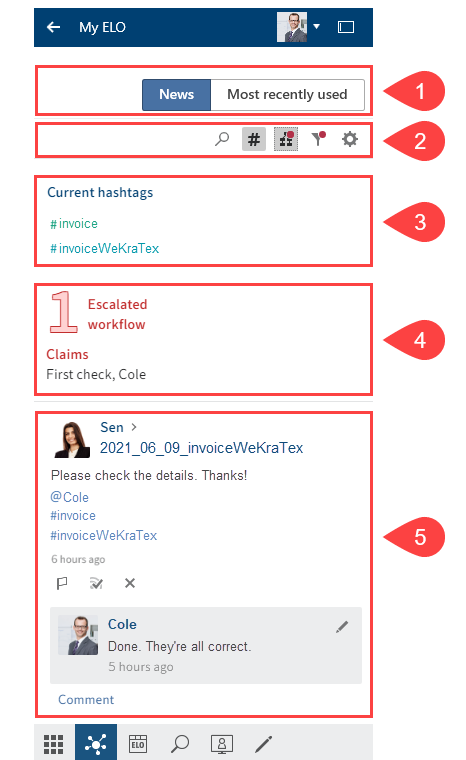
2 Toolbar: The preview in My ELO is not large enough to show all areas. For this reason, buttons appear in the toolbar for the respective areas.
3 Hashtags: Trending hashtags in ELO are listed here. Clicking a hashtag opens the overview for the selected hashtag, where all posts marked with the hashtag are shown.
4 Workflows: You can see all the workflows you are involved in here. Workflows with passed deadlines are highlighted in red.
5 Feed
# News
The News area helps you keep track of changes in ELO.
You will see feed posts from different entries here. Some examples include feeds you have subscribed to or in which you have been mentioned by another user. In addition, a hashtag cloud, escalated workflows, and recently started workflows that are relevant for you are also shown in this work area.
Information
Most functions in the My ELO work area are feed functions. For more information, refer to the Feed chapter.
The News tab contains the following areas and functions:
Settings (gearwheel icon): You can edit the following settings here:
- My ELO
- Subscribed hashtags
- Polls started
- Profile (person icon)
Current hashtags: Select a hashtag to show all posts marked with the hashtag.
Substitution: If you have any active substitutions, you can see who you are substituting for here and who is currently substituting for you.
Workflows: Under Workflows, you can see all workflows you are involved in. Workflows with passed deadlines are highlighted in red. Select a workflow name to go to the respective workflow in the Tasks work area.
Information
If the preview in my ELO is not large enough to show all areas, buttons appear in the toolbar for the respective areas.
# Feed functions in My ELO
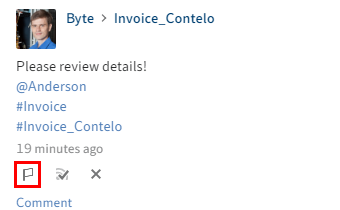
Posts older than one month are removed from My ELO. The Mark as important button (flag icon) lets you pin a post to the My ELO work area or remove it again. The post remains in the My ELO area even if it is more than a month old.
# Hide post
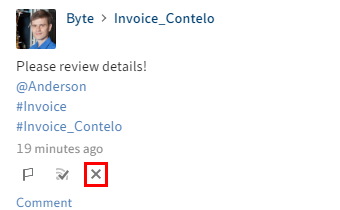
You can hide the post from My ELO. Select the X icon below the post.
Information
The Remove from My ELO function only hides posts in your My ELO work area. The post is not deleted. It stays in the feed for the corresponding entry.
If you hide a post, the Undo function is displayed. Select this button to show the post again.
The Undo function is only displayed for 5 seconds by default. You can change the length of time it is displayed in My ELO > Settings > My ELO settings.
Alternative: To hide all posts in My ELO, use the Remove all posts from My ELO function. You will find this function in My ELO > Settings > My ELO settings.
Information
Posts marked as important are not removed.
# Filters
You can search the feed in My ELO for specific terms (magnifying glass icon) and filter it by specific criteria. You can select the following filters:
- New since
- Space
- Metadata form
- Post author
- Post type: You can filter by two post types: Automatically created posts (e.g. document version created) and posts created by users (user posts).
- Hashtag
- Additional filters: Depending on the settings, additional filters are available, such as filtering by posts you are mentioned in.
Information
In the default settings, all filters are applied in is mode. You can also set the filters to is not mode. To change this mode, select is/is not next to the filter category.
Reset filters: To reset all filters, select the Reset filters button (arrow icon).
# Most recently used
The Most recently used area contains a list of entries that you recently viewed or edited.
You can pin entries you need regularly by clicking the pin icon.
Under User menu [your name] > Configuration > Display > List of recently used entries, you can configure how many entries the list should contain.
# Tile navigation
The tile navigation is the ELO start screen. Tiles can be used to represent work areas, views, and ELO apps. Clicking a tile takes you straight to the corresponding area.
You can open the tile navigation from the navigation bar or with CTRL + 0.
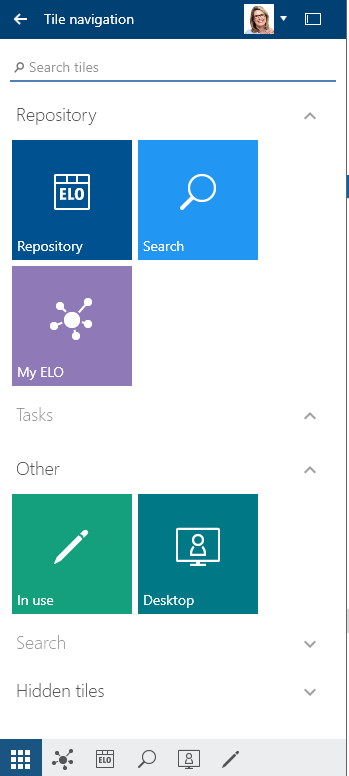
Search tiles: While entering a search term, the results are narrowed down to the appropriate tiles thanks to the search-as-you-type function. The matches are highlighted in the tiles.
You can create tiles for quick access to folders, tasks, and searches. Use the function New view (available in: 'View' group > View).
You can edit, group, and hide tiles using the context menu (right-click).
ELO Desktop Client Plus also has a Tasks tile.
# Edit tile
You can edit the following settings within the group context menu.
- Settings: You can set the color and size of the tile and choose an icon.
- Pin to the navigation bar or Unpin from the navigation bar: This function places the tile on the navigation bar or removes it. Pinning tiles makes it easier for you to switch between the work areas.
- Shrink tile
- Hide: When you hide tiles, they are moved to the Hidden tiles area. To restore the tile, drag it to the desired location in the tile navigation.
# Groups
You can change the order of the tiles and their allocation to groups via drag-and-drop.
- Add group
- Rename group: This function is only available for your own groups. You can also access the Rename group dialog box by pressing the F2 key.
- Delete group: All tiles in the deleted group are moved to the Hidden tiles group.
- Restore default settings: This option enables you to revert changes to tiles and groups in the tile navigation area and restore the default values.
# Repository
You can manage all folders and documents filed in ELO in the Repository work area.
You can open the Repository work area from the navigation bar or with CTRL + 1.

You can use the functions in the toolbars to manage the entries.
For a detailed description of each component, refer to the Important components chapter.
If there are a lot of documents in your repository, it can be helpful to create an additional view. You can learn how to create a view in the Create tiles chapter.
# Search
In the Search work area, you can search through folders and documents in the Repository work area.
Different filters are available. For searches you need regularly, you can create search favorites, which enable fast searches.
You can open the Search work area from the navigation bar or with CTRL + 6.
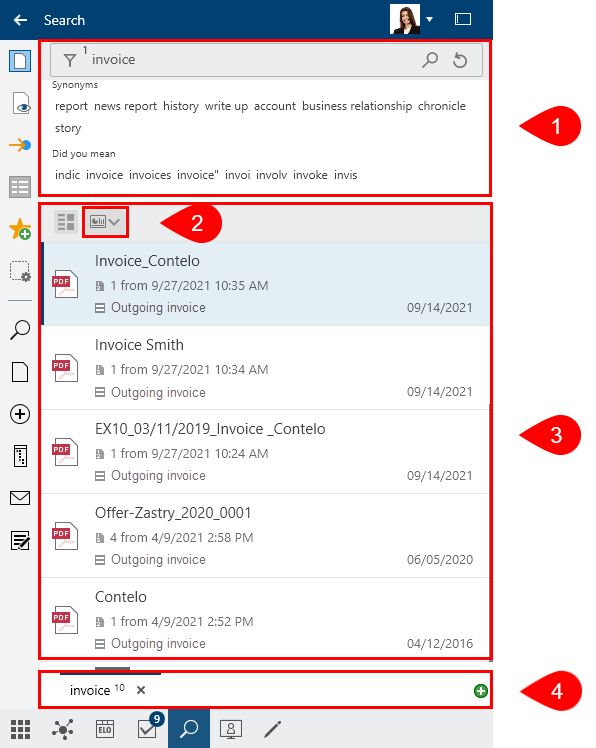
1 Search field with search options: When you enter a search term, suggestions and synonyms are shown below the search field. To add search filters, select Search options (filter icon).
2 Dashboards: A button is available in the search results that allows you to launch dashboards after conducting a search with a metadata form filter. This button is only displayed if dashboards have been configured for the corresponding metadata form. Dashboards can only be created with generation 2 metadata.
3 Results list: You can either view the results in a table or detailed view (list view). By selecting Filter, you can narrow down the results in the list. The search field next to the magnifying glass icon also allows you to narrow down the results.
4 Search views: Search requests are temporarily saved as search views. Clicking the plus icon creates a new search view. Search views are deleted when you close ELO.
The Narrow down a search request chapter explains each of the search elements and how to perform a search.
# Dashboards

Dashboards are created by the administrator. They can only be created with generation 2 metadata.
The dashboards allow you to visualize metadata of entries filed with the same metadata form in different ways. You can use bar charts, line charts, and doughnut charts.

Move the cursor over the charts on the dashboard to view details.
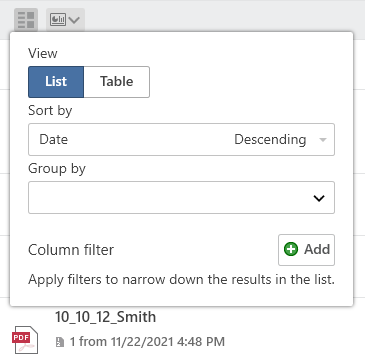
# Results list
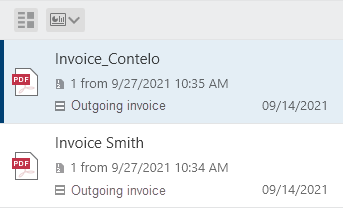
The Sort, group, and filter button provides different options for organizing the results list.
# Input
Enter one or more search terms into the search field. While entering a search term, the search-as-you-type function provides search suggestions in a drop-down menu.

Select the Reset search button to restore the default search settings.
AND search: If you enter two terms into the search field, the system will search for entries that contain both terms.
OR search: If you enter two terms into the search field and separate them with a comma (e.g., order, invoice), the system searches for entries that include at least one of the terms.
Exclude term: To exclude a term from your search, enter it in the search field and put a minus sign in front of the term. For example, a search for -document excludes entries that contain the term document. You can combine the negated term with other terms that you do not negate.
Phrase search: To search for multiple related terms, enter the terms in the search field with quotation marks, e.g., "social media". Only entries that contain all the terms in the order entered will be found. The search is not case sensitive.
Please note
If you search for NOT, OR, or AND via the search field or filters, you may encounter issues during your search.
# Search options

The Search options button provides the following options to narrow down your search:
To automatically open the search options when performing a new search, check the box in Configuration > Display > Search.
# Search areas
You can limit your search to specific areas.
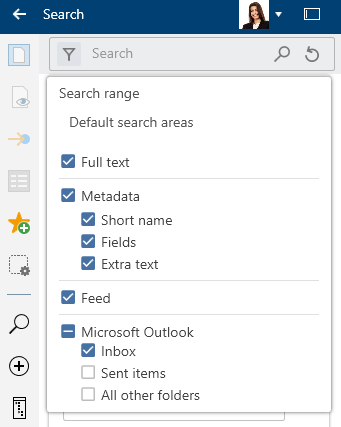
Use the Search range menu (filter icon) to make your settings.
With the Default search areas settings, only the Microsoft Outlook Inbox is searched. Refer to the Manage e-mails section to learn how to perform a combined search in ELO and Microsoft Outlook.
# Search filters
Filters allow you to narrow down your search using metadata, such as the filing date.
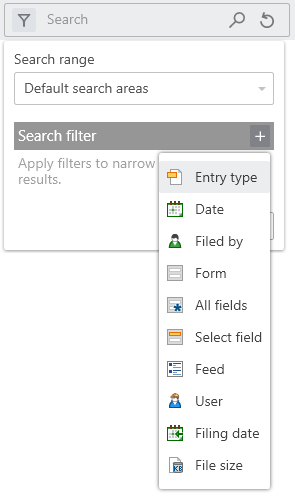
To apply a filter, select Search options > Search filters > Plus icon. Select the required filter from the list. Specify the filter via the drop-down menu.
To remove a selected filter, select the X icon.
You can add multiple filters of the same type.
Negate filters
You can apply reverse filters. For example, if you select a user in the Filed by filter and set the filter to does not contain, only entries that were not processed by this user are shown. It is not possible to only negate individual filters or facets.
To negate a selected filter, right-click the filter and then click does not contain.
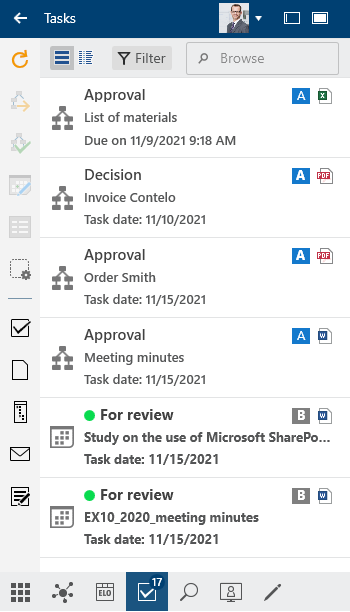
# Tasks (only ELO Desktop Client Plus)
In the Tasks work area, you will find a list of your tasks.
You can open the Tasks work area from the navigation bar or with CTRL + 4.
To learn how to process tasks, refer to the Process workflow section.
For more information about the Tasks work area, refer to the chapter ELO Desktop Client Plus.
# Desktop
The Desktop work area acts as an interface between ELO and Windows. In this area, you will see an overview of entries currently selected at the file system level. The client indicates if the document is filed to the repository. The functions available depend on the status of the document.
You can open the Desktop work area from the navigation bar or with CTRL + 8.
# Not connected to ELO
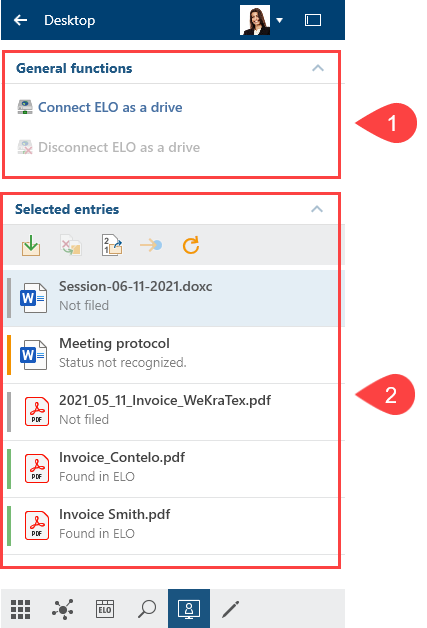
1 General functions: When the Windows Explorer is open, the general functions Connect ELO as a drive and Disconnect ELO as a drive are offered. To connect a WebDAV network address, select Connect ELO as a drive.
- Connect ELO as a drive: You can integrate the entire ELO repository into your local file system. You can then access documents without logging on to ELO. Additional information, such as the metadata or feed, is only available after logging on.
- Disconnect ELO as a drive: You can disconnect the drive connected to the local file system.
2 Selected entries: Shows the selected entries in the Windows Explorer or Windows Desktop. Depending on the status of the selected entry, various functions are available: File, Replace with ELO link, File as a new version, Go to, and Refresh. A bar before the entry indicates the status: Filed to ELO (green), In use (yellow), or Not filed (gray).
# With ELO connection
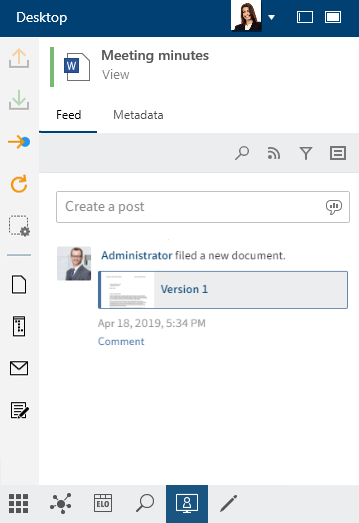
The example shows the Desktop work area with the Windows Explorer open and ELO integrated in the local file system. Unlike the normal Windows Explorer view, the toolbar and favorites bar are both available.
Information
The toolbar and favorites bar are also available when selecting an ELO link in the Windows Explorer or Windows Desktop.
The short name of the entry is displayed in the viewer pane. The Feed tab contains posts, polls, and comments on the entry. You can create a feed post or a comment. All fields are shown in list form on the Metadata tab.
# In use
The In use work area displays documents you have checked out for editing. Documents in the In use work area are locked for all other users.
You can open the In use work area from the navigation bar or with CTRL + 5.
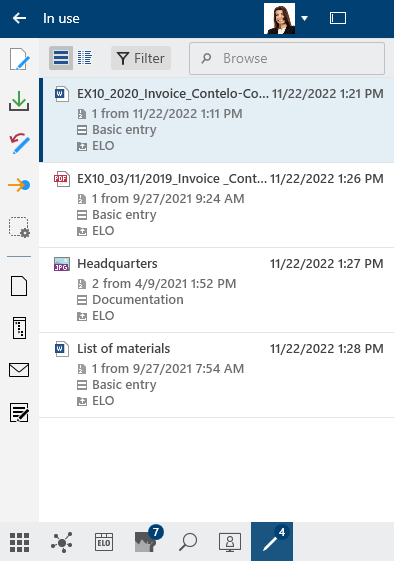
In the list of documents checked out for editing, you see the documents currently checked out or being edited. You can switch between the list view and table view using the two buttons at the top left. By selecting Filter, you can sort, group, and filter to narrow down the list. The search field next to the magnifying glass icon also allows you to narrow down the results with its search-as-you-type function.
# Header
The header is shown in all work areas.

The header indicates the work area you are currently in. The left arrow takes you back to the last work area you were in. You can open the User menu by selecting your profile picture. This menu takes you to areas where you can configure settings for your account. You will find the following here: Configuration, Help, Enable roles (optional), About, Log off, and Close. For more information, refer to the chapter User menu [your name].
With the buttons next to the user menu, you can switch between the default view and the lean view. The desktop adapts to the view dynamically.
An additional button is available in ELO Desktop Client Plus that allows you to open ELO in full-screen mode.

You can use the buttons in the lean view to reach the user menu and the work areas, as well as to switch views.
To expand the work area, select the relevant button.

When expanding a work area in the lean view, the desktop does not adapt and may be covered. To ensure smooth interaction between the desktop and ELO, we recommend the default view. The two arrows collapse ELO again.
# Toolbars
Various toolbars are available in ELO. These toolbars give you access to functions or work areas.
The following toolbars are available:
# Navigation bar

The navigation bar is located at the bottom of ELO. This toolbar is always available, no matter which work area you are in.
This toolbar gives you access to the following areas:
- Tile navigation
- My ELO work area
- Repository work area
- Search work area
- Desktop work area
- In use work area
- Tasks work area (only ELO Desktop Client Plus)
# Toolbar

The favorites bar is on the left edge of ELO. This bar is only available in the Repository, Search, and In use work areas as well as the Tasks work area (only ELO Desktop Client Plus).
This toolbar contains all functions you can use in the respective work area. These vary depending on the work area.
The toolbar is organized in groups. Some groups are always shown (default groups), while others only appear when the group functions can be used (contextual groups).
The default groups are:
- New
- View
- Output
- Organize
The contextual groups are:
- Document: This group appears when you select a document.
- Search: This group is only available in the Search work area.
- Tasks: This group is only available in the Tasks work area (only ELO Desktop Client Plus).
The functions available depend on your selection. You will see a star icon next to each function. Clicking this star adds the function to your favorites bar. You can also add other buttons, such as for an ELO Business Solution, to the toolbar via the ELO App Manager.
# Favorites bar

The favorites bar is on the left edge of ELO. This bar is only available in the Repository, Search, and In use work areas as well as the Tasks work area (only ELO Desktop Client Plus).
This bar contains all functions you have favorited. To perform a function, select the button in the favorites bar. Functions may be grayed out in the bar depending on your selection.
Manage favorites

Select Manage favorites to organize your favorites. All functions of the area are listed here, sorted by function groups. Select the functions you want to have in your favorites list.
For more information on configuring your favorites bar, refer to the Favorites bar chapter.
# User menu [your name]
![User menu [your name]](/user/elo-desktop-client/assets/img/user-menu-your-name.927df9ad.png)
Selecting the User menu [your name] button opens a drop-down menu. This menu takes you to areas where you can configure settings for your account. You can also log off at the end of your session and close ELO.
# Profile
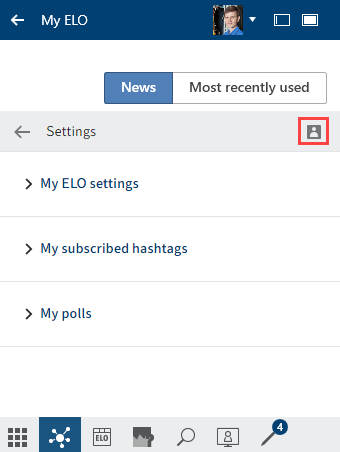
In your profile, you can enter information on your professional background, your contact details, and upload a profile picture.
Method
To view and edit your profile, go to the My ELO settings and select the My profile button (person icon).
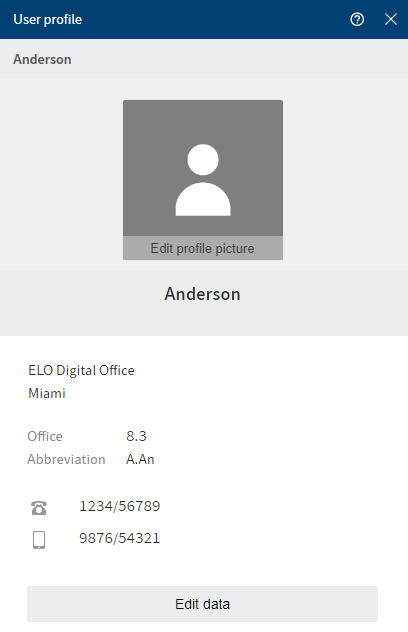
The User profile dialog box opens.
Select Edit profile picture.
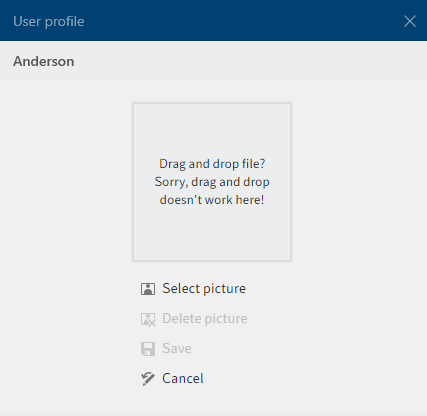
The dialog box for editing your profile picture opens.
Select Select picture.
A Windows dialog box for selecting a file appears.
Information
Use PNG, JPG, or GIF image files with a minimum of size of 280 x 280 pixels.
Select the desired image file.
Select Open.
The file is uploaded.
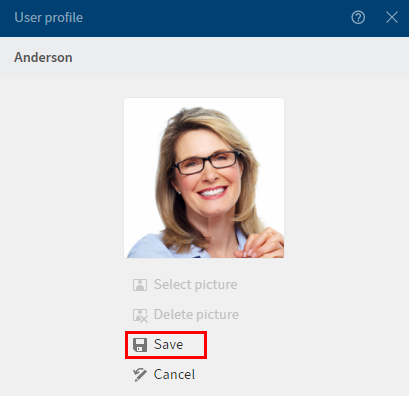
The user profile with the selected profile picture appears.
To apply the profile picture, select Save.
To edit your profile, select Edit data.
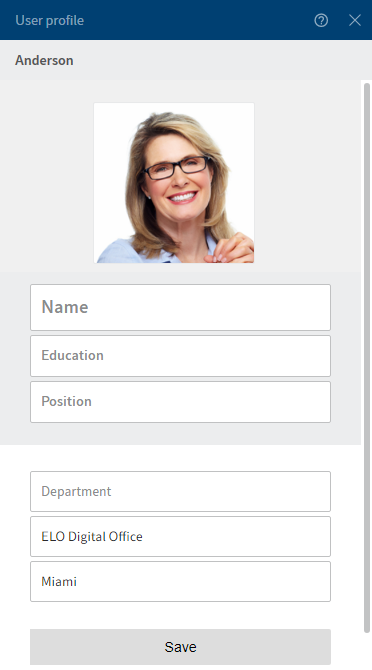
The Edit data dialog box opens.
Enter the respective data in the input fields.
Select Save.
Result
The user profile has been updated.
# 'My ELO' button

Use the My ELO button to open the My ELO work area.
Keyboard shortcut: CTRL + 7
This area contains your news and most recently used entries.

If My ELO is highlighted in green, you have news in My ELO.