# Important components
# Repository structure
Navigate between entries in the repository structure.
You have the following navigation options:
- Mouse: Click an entry using the mouse. If you click a folder, you will see the contents of the folder in the viewer pane. Clicking the arrow next to the folder expands the contents of the folder in the tree.
- Keyboard: You can navigate up and down the tree using the UP and DOWN arrow keys. Pressing the right arrow key opens a folder. Pressing the left arrow key closes the folder.
Minimize/maximize navigation
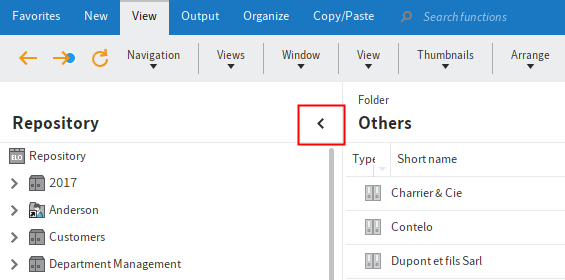
This function minimizes or maximizes the tree structure, or the tree structure and table view depending on the layout you have selected.
# Change layout
You can change the layout of the repository structure in the Repository work area.
You will find the layout settings on the Ribbon > User menu > Configuration > Display > Layout options.
You see which layout is currently selected under Layout options. Select the corresponding radio button to switch to a different layout. To apply the change, select OK.
The following layouts are available for displaying folders and documents in the Repository work area:
- Tree only
- Tree and table
Information
With the Expand branch function (available in: Ribbon > View > Arrange), you can open the child entries of a selected folder. All existing child entries are displayed.
# Tree only
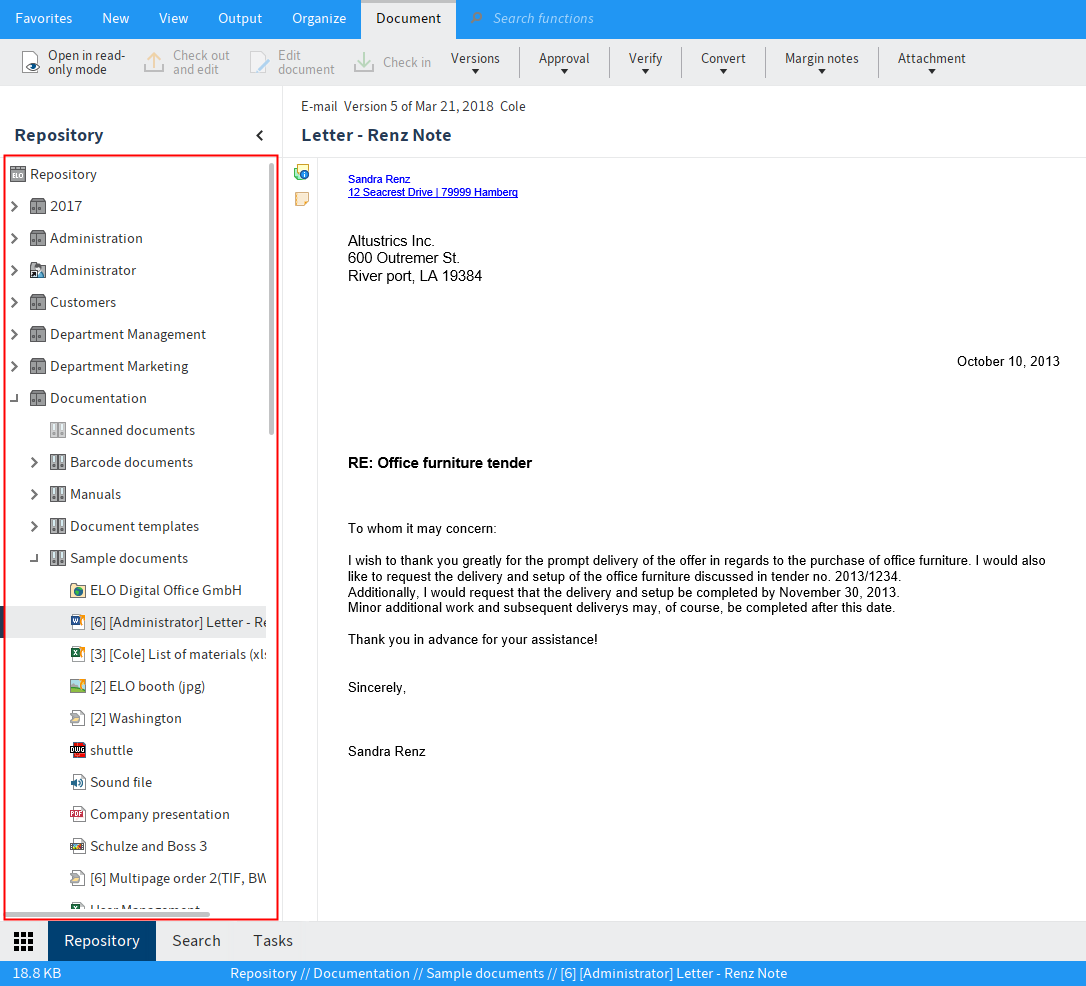
If the Tree only option is selected, the repository or selected view is displayed as a tree structure on the left-hand side of the screen. The selected document or content of the selected folder is displayed in the viewer pane.
# Tree and table
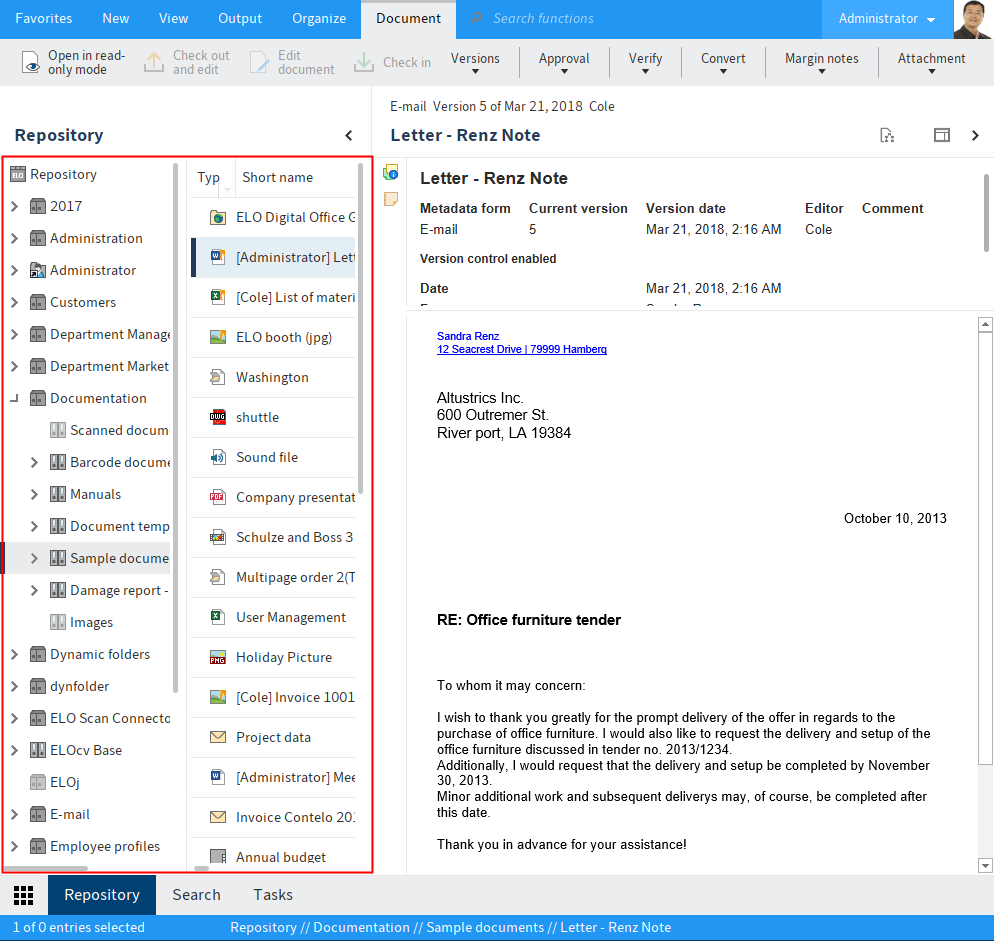
If you enable the Tree and table option, you will only see folders in the tree structure. The content of the selected folder is displayed in a separate table on the right. The document selected in the table is shown in the viewer pane.
# Reference

Entries (folders or documents) with an arrow icon are references. A reference is a link between a copy of an original document. The document only exists once physically in ELO. Clicking the function Go to (available in: Ribbon > View) takes you to the original entry.
# Checked out document

Documents with a yellow arrow next to the document icon and a name in brackets are checked out by the corresponding user. They can be viewed (Document > Open in read-only mode) but not edited.
You can learn how to check out and edit documents in the chapter Edit entry.
# Folders
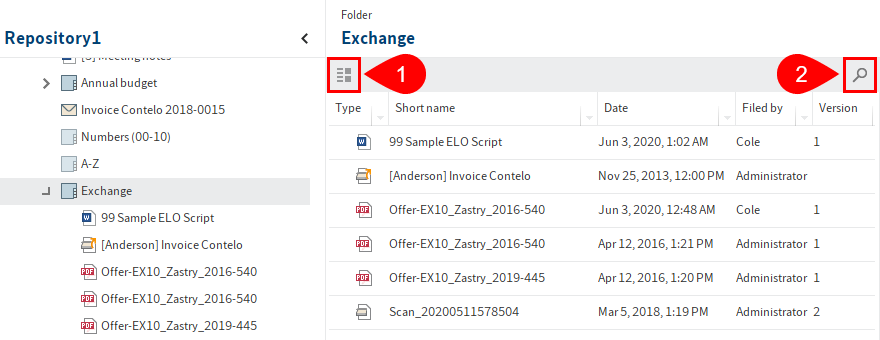
If you have selected a folder, you will see the child folders and documents within it. You have the following options:
- You can change how the folder is displayed and the sort order (1), or browse the folder by short name (2). You will find more information about the display options in the chapter Toolbar.
- Press the CTRL or SHIFT key and click the entries to select multiple entries. This is not possible in the tree.
# Document
If you have selected a document, the document will be displayed on the Content tab, if this is possible.
If the document cannot be displayed, you have the following options:
- Save document: Ribbon > Output > Save as
- Open document in an external program: Ribbon > Document > Open in read-only mode or Ribbon > Document > Open with. The file is not checked out.
- Switch to different viewing options as described below.
You have the following options for showing the contents of a document:
- Original document: Automatic if no other option is selected.
- Image preview: Image preview for formats, e. g. JPG, TIFF, PNG
- Full text: If available via the Full text tab
# Text view ('Full text' tab)
The ELO Java Client offers additional control elements in the viewer pane for displaying images (formats: JPG, TIFF, PNG, etc.) and text files (formats: TXT, HTML, JS, etc.) or the full text contents of documents. The text view is used to display the full text information of documents that have been added to the full text database. You can also configure this view for documents with specific file extensions.
The text view/full text view has a menu bar with the following functions, which are displayed depending on the file format:

Decrease or increase font size: Decreases or increases the size of the displayed text.

Fixed font width: Switches the display to a non-proportional font so that all characters are displayed with the same spacing. This improves readability, e.g. of code.

Automatic word wrap: Lines are wrapped automatically.

Search document: Search for a term in the full text. The matches are highlighted. Select the X icon to reset the search.

Show previous or next hit: Jumps to the previous or next highlighted entry in the text.
Information
Full text view in the search results: If you have selected a document in the search, the parts of the documents that match the search text are automatically highlighted in the full text preview. The search field is not displayed.
Use the arrow icons to display the next or previous match in the text.
Information
You can add the function Show full text database content to the Favorites tab and the context menus via: Ribbon > User menu > Configuration > Quick access to functions. This function allows you to see the full text information of a selected document. You can learn how to add the function in the Customize the ribbon chapter.
# Image preview ('Content' tab)
The ELO Java Client offers additional control elements in the viewer pane for displaying images (formats: JPG, TIFF, PNG, etc.) and PDF documents. You can also set this as the display mode for documents with specific file extensions.
Information
The Switch PDF preview function (available in: Ribbon > View > Display) enables you to switch to a different PDF preview mode. There are different modes for viewing PDFs. One mode includes the ELO viewer toolbar, which allows you to place annotations on the document. The other mode includes typical PDF functions and may be more suitable for viewing specific documents.

Next or previous page: The next or previous page of a multi-page document is displayed.
Information
You can change the order of pages in a TIFF document with multiple pages. You will find more information here: Move pages.

Show thumbnails of pages: If you select this option, the pages of documents with multiple pages are displayed as thumbnails. Click on a thumbnail to go to the page.

Zoom in or zoom out: Increases or decreases the size of the image shown.

Zoom to 100%: The image is displayed in the original size.

Fit image width to the frame: The image size fits the width of the viewer pane.

Fit image size to the frame: The image is adjusted to the height of the viewer pane so that the entire page of the document is displayed.

Rotate document: Rotates the document 90 degrees or 180 degrees. You can save the rotated document as a new version.

Show annotations: You can see the annotations that have been applied to the document. Annotations can be sticky notes, text notes, stamps, or markers.

Add annotations: You can attach sticky or text notes to the document, mark text passages, or apply stamps. For detailed information on how to apply annotations, see the chapter Add annotations.

Text selection with OCR: This function allows you to select multiple words or lines of text that you can transfer to a field in the Metadata dialog box. For more information, refer to the Metadata > Enter metadata with ELO Click OCR chapter.

Search document: Search the contents of a document. ELO begins to search as soon as you start typing and highlights any matches in green.
If the document contains multiple matches, use the arrow icons next to the search field to skip through the matches. In this case, the currently selected match is highlighted in red.
Select the X icon to the right of the search field to reset the search.
# Move pages
You can change the order of pages in a TIFF document with multiple pages.
In the viewer pane, go to the page that you want to move.

Select the Edit pages button (pencil icon, 1).
Select the Open editing menu button (icon with three dots, 2).
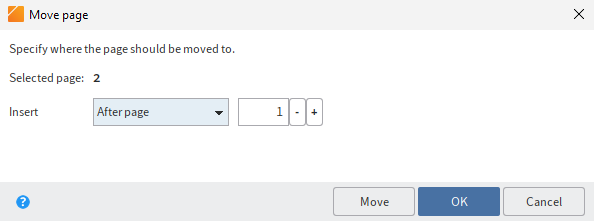
The Move page dialog box opens.
In the drop-down menu, select where in the document you want to move the selected page to. Choose from the following options:
After page or Before page: Use the spin box to specify after or before which page you want to insert the selected page.
As first page or As last page: The selected page is moved to the beginning or end of the document.
Move: To move the selected page without closing the dialog box, select Move.
Select OK to move the selected page and close the dialog box.
# Business object
A business object is a special type of folder that helps organize contents into regions. A region is an area encompassing all entries within a business object. This enables you to find related entries faster, e.g. all documents related to a file.
The same options are available in a business object as in a folder.
The Search a business object section explains how to search a business object.
# Viewer pane
In the viewer pane, you will see the most recently selected entry (folder, document, or business object).
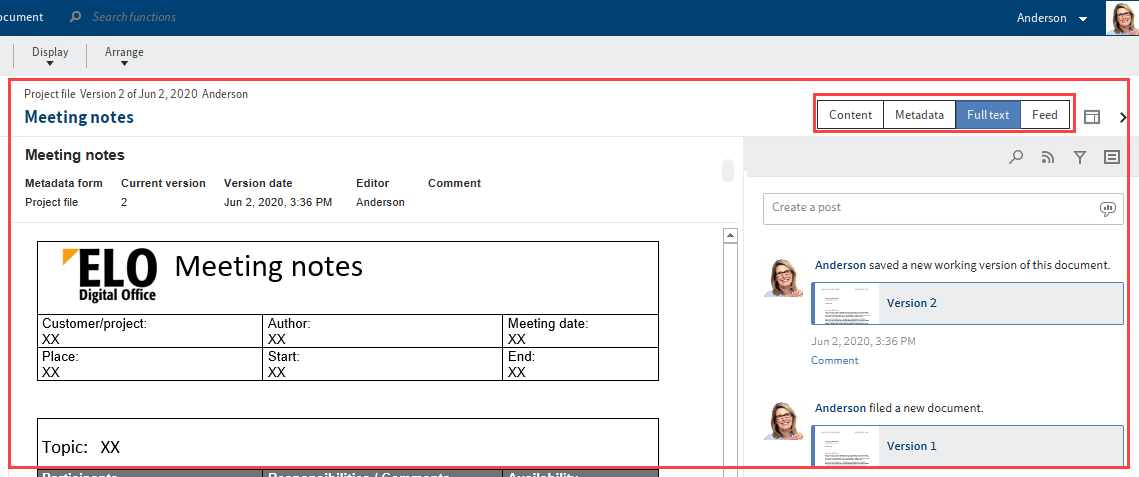
Each entry is made up of different elements. Use the tabs to switch between the elements. The most important elements are:
Content: If you have selected a folder, you will see the child folders and documents within it. If you have selected a document, the document will be displayed, if this is possible.
Metadata/Form: Displays either the metadata or the form associated with the entry.
Information
If the entry was stored with a gen. 2 metadata form, you can edit the entry directly in the viewer pane.
Depending on the configuration, some parts of the form may appear collapsed. To expand a part of the form, click the arrow to the left of the header.
Feed: The feed is used to share information on an entry in ELO (document or folder) and track changes.
Information
An additional tab with the name of the metadata form linked to the business object appears in the viewer pane for entries within a business object. You can view and edit metadata for the parent business object here.

Maximize/minimize viewer pane
This function minimizes or maximizes the viewer pane.
With the default settings, content and metadata are shown on the left, while the feed is located on the right. You can change the layout arrangement by creating new view profiles.
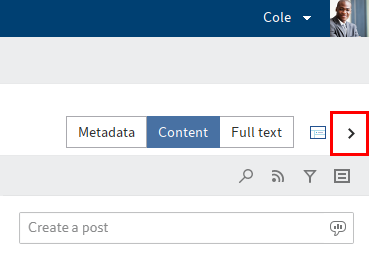
# View profiles
To define the settings for the viewer pane, you need to define a view profile. The button for opening the Select and configure view profiles menu is located directly below the ribbon on the right-hand side of the screen.
# Create view profile
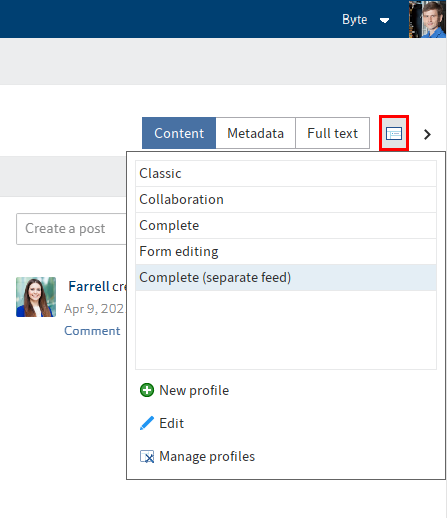
Select the Select and configure view profiles.
A drop-down menu appears.
Select New profile.
The client switches to the mode for creating a new view profile.
In the viewer pane, you see the view elements and four panes which you can assign view elements to. The following elements are available:
- Web application
- Full text
- Metadata/Form
- Feed
- Content
Drag a view element to any pane and release the mouse button.
The view element is assigned to the pane.
Information
Try out the different viewing options. The size of the panes is adjusted automatically.
Optional: You can also assign multiple view elements to a subpane. In this case, the individual view elements are displayed as tabs. You can change the order of the tabs.

Enter the name of the view profile in the Edit view profile field.
Optional: Select the Additional window button to open the Viewer pane dialog box. In this dialog box, you can see what the view elements would look like. To do so, drag the desired view element onto the Preview dialog box.
Please note
The settings you make in the Preview dialog box are not applied to the view profile.
Select OK to save the view profile.
The new view profile is created.
# Manage view profiles
The Manage profiles function enables you to edit and delete existing view profiles, and assign them to individual work areas. You can access the function via Select and configure view profiles > Manage profiles.
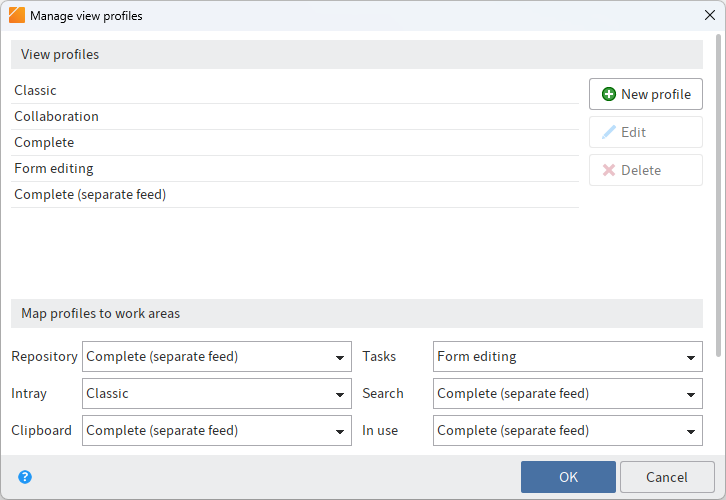
The Manage view profiles dialog box opens.
The settings for managing the existing view profiles are in the top part of the dialog box.
New profile: This opens a dialog box for creating a new profile. Arrange the viewer panes by dragging the rectangular preview modes (full text, form, content, feed, web application).
Edit: Open a selected view profile for editing in the View profiles list.
Delete: Select Delete to remove the selected view profile. The view profile is initially marked red. The view profile is deleted once you select OK, closing the dialog box. If you close the dialog box with the Cancel button, the delete action is reversed.
# Map profiles to work areas
You can map a view profile to a work area. Select a view profile for each work area in the drop-down menus.
# Map profiles to metadata forms
You can map a view profile to a metadata form. Select a metadata form in the drop-down menu on the left and map it to a view profile in the drop-down menu on the right.
New: Select New to add a new metadata form.
Delete: Select Delete (X icon) to remove the metadata form.
# Metadata
Before you can file documents to ELO or create new folders, you must enter metadata for the entries. This is done by using metadata forms, which contain corresponding input fields (called fields).
The Metadata dialog box is used to enter and edit the metadata. Unless you have a different configuration, the dialog box appears automatically when you file a document or create a folder.
For detailed information, refer to the Edit metadata chapter.
# Feed
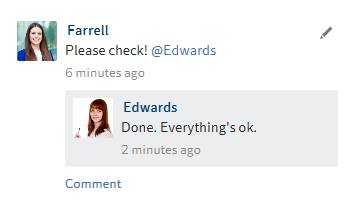
The feed is used to share information on an entry in ELO (document or folder) and record changes to the entry. New feed posts are indicated by a green dot.
The following message types are shown in the feed:
- Posts (written by a user)
- Comments (on a post)
- Polls
- Events (e.g. when a new version of a document is filed or changes are made to the working version)
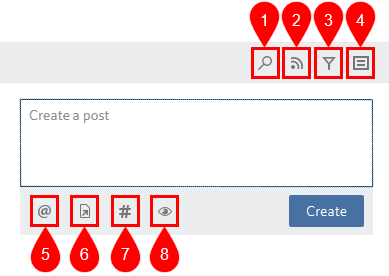
1 Search feed
2 Subscribe to feed: When you subscribe to a feed for an entry, any new posts in the feed are also shown in My ELO. Users automatically subscribe to a feed when they file a document, or create a folder, new document version, feed post, or comment. You can change the settings for subscriptions in the configuration or via the settings in My ELO.
3 Show filter options: Filters work in the same way as My ELO > News.
4 Show metadata for the entry: The metadata form associated with the entry is always displayed. The fields of the form are only displayed if they contain data. In gen, 2 metadata forms, only the form associated with the entry is displayed, even if you have completed other fields.
5 Mention users or groups: Alternatively, enter @ in the feed post to insert a mention. The users mentioned can see the corresponding feed post in My ELO.
6 Reference entry: Alternatively, enter > in the feed post to insert a reference. Users can automatically jump to the filing location of the linked entry via a reference.
7 Hashtag: Alternatively, enter # in the feed post to insert a hashtag. To be notified of new posts related to a specific topic, you can subscribe to hashtags. Select a hashtag and then select Subscribe (antenna icon).
8 Visibility: You can use this to restrict who can read your post. The feed post shows which groups can view it. With Remember selected visibility, you can save the visibility settings as the default for future feed posts. The visibility settings of the post you are commenting on apply for comments. They cannot be changed.
# Create post/comment
The feed enables you to write posts related to entries in ELO and comment on posts uploaded by other users. Select Create or CTRL+ENTER to upload the post.
You can bold text in posts, polls, and comments. Place an asterisk (*) at the beginning and end of the text section.
Information
If you want the asterisk to appear as a character in the text, enter a backslash (\) before the asterisk. The asterisk does not have a formatting function.
Please note
Do not enter any words that can act as search operators (NOT, OR, AND) in feed posts or hashtags. Otherwise, you may encounter issues when searching for these words.
# Edit post
Select Edit (pencil icon) to edit your own feed posts and comments.
Edited entries are marked as edited below the entry. Select edited to open the editing history.
# Create poll

Selecting the Create poll button opens a new area in the ELO feed. In this area, you can start a user poll.
You can select a duration for the poll from the drop-down menu and also enter a specific number of days. For example, enter 14 for two weeks.
The Show more settings drop-down menu opens an area with additional settings.
- Allow multiple choice
- Show user names of participants in results: The names are visible to all users participating in the poll. If this option is disabled, the poll is anonymous for you as well.
- Allow participants to add answers
Select Create to start the poll.
Once a user has taken a poll, it can no longer be modified.
Select the X icon to delete a poll that has already started. You cannot undo this.
# Margin notes, links, attachments
If available for the selected document, you will see the following additional elements:
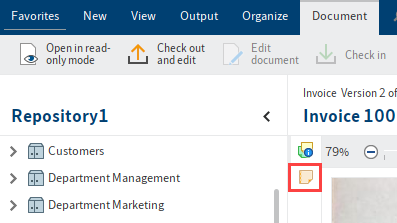
Margin notes: You will see margin notes for an entry on the split bar. Select the icon to open the margin note.
You can learn how to create a margin note in the chapter Add margin note.
![]()
Links: The chain icon represents a link. With this icon you can open an overview of links. You can also create additional entries as links.
To learn how to create a link, refer to the chapter Link.

Attachment: The paper clip icon represents an attachment that was filed along with the selected document. You can open the attachment with this icon.
You can learn how to create an attachment in the chapter Add attachment.
# Save as
Keyboard shortcut: CTRL + S
Use this function to store the currently selected document outside of ELO.