# Edit entries
# Edit entry
You can edit the content of documents in ELO. To do so, you must check out the document, and check it back into ELO when you have finished working on it. You can Check out and edit a single document or an entire folder. When an entry is checked out (folder or document), it is locked and cannot be edited by other users.
# Check out and edit document
You want to edit a document and file the new version to ELO.
Method
Open the Repository work area.
Select the document you want to edit.
The preview of the document is displayed in the viewer pane.
On the ribbon, select Document > Check out and edit.
Keyboard shortcut: ALT + O

The document is opened in the corresponding application and can be edited.
In ELO, the name of the user who currently has the entry checked out is shown in square brackets before the document name. The document cannot be edited by other users as long as it is checked out.
Edit the document in the external application.
Save the document in the external application.
Close the external application.
Information
You can file the edited document to ELO via the Repository work area or the In use work area. Select the Check in function on the Document tab.
Select the document in ELO.
Select the Check in function on the Document tab to transfer the document back to ELO.
Keyboard shortcut: ALT + I
Alternative: Right-click a document in the repository and select Check in from the context menu.
Information
If you do not change a document and select the Check in function, the Check in document dialog opens. In this dialog box, you can cancel editing or file the document as a new version anyway.
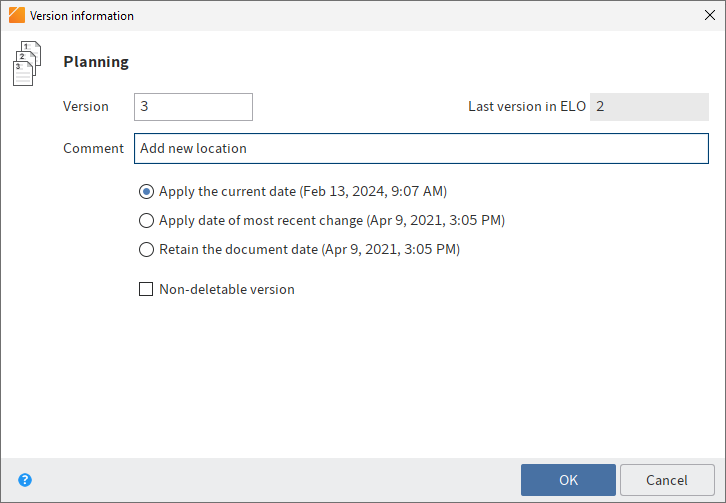
The Version information dialog box appears.
Optional: Enter a version number and version comment.
If you want to update the document date in ELO to the current date, select the Apply the current date option. The document date is the date that is saved along with the document version. In contrast, the filing date is the date on which a document was filed to ELO.
Users with the appropriate permissions can delete versions of a version-controlled document. If you do not want your version to be deleted, select the Non-deletable version option.
Select OK.
Result
The document is checked back into the Repository work area with a new version number.
Related functions
- Load new version: With this function, you can also load a new version without checking out and editing the current version of a document filed to ELO.
- Check out to OneDrive: Use this function to check out a Microsoft Office document in ELO to Microsoft OneDrive for editing. The document is stored in your OneDrive folder until you check it back into ELO.
# Check out and edit folder
ELO also lets you check out entire folders and edit their contents. This allows you to lock multiple documents at once.
Please note
If you check out a folder with all the references, you cannot check in the references separately. Instead, you need to check in the entire folder. In addition, you cannot check in the original documents that are linked to the references until you have checked in the entire folder.
Method
Open the Repository work area.
Select the folder you want to check out.
Right-click the folder to open the context menu.
In the context menu, select the Check out and edit function.
The folder is temporarily stored in a checkout directory on your file system. You can open and edit the individual documents from here.
Information
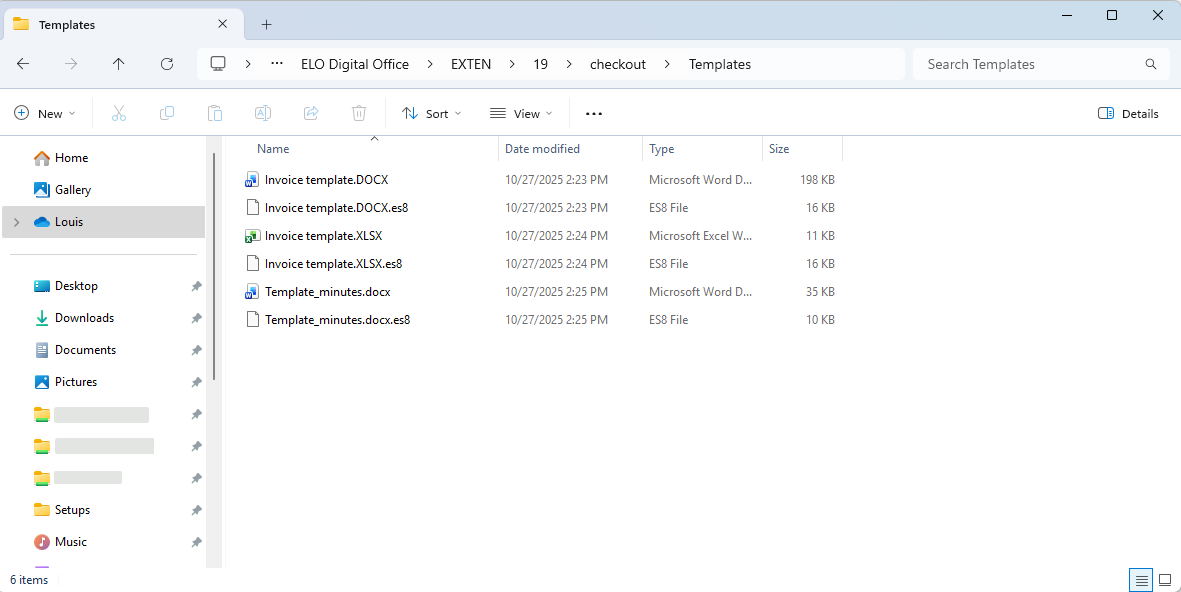
Child folders are not checked out. A file in ES8 format is created for each document. Files in ES8 format are used for saving metadata. The Windows Explorer default settings hide ES8 files.
The entire folder appears as checked out in the In use work area.
Check in
When you have finished editing the documents, you can check the folder back into ELO.
Select the checked out folder in ELO.
Right-click the folder to open the context menu.
Choose the Check in function in the context menu.
During check-in, ELO recognizes which documents have been changed. With the default settings, the Version information dialog box appears for every changed document.
Result
The folder was checked in. The changed documents were filed as new versions.
# Load new version
Available in: Ribbon > Document > Versions
You can also load a new version if you did not check out and edit the current version of a document filed to ELO.
The Load new version function enables you to load a file from your local file system and store it as a new version of a document in the Repository work area. Using this option on version-controlled documents creates a new entry in the version history and makes this new version the current working version. In the case of documents that are not version controlled, the previous version is overwritten.
The following options are available for loading a new version:
- Load new version function
- Drag-and-drop (left-click and hold the mouse to drag a new document to a document in ELO and release the mouse button)
# Document versions
Available in: Ribbon > Document > Versions
Use this function to open an overview of the existing document versions for the selected entry. The current working version is displayed in bold type. The current working version is the version with the pen icon in the Working version column.
Among other things, you can open document versions in read-only mode, compare versions, set them as the working version, and delete them.
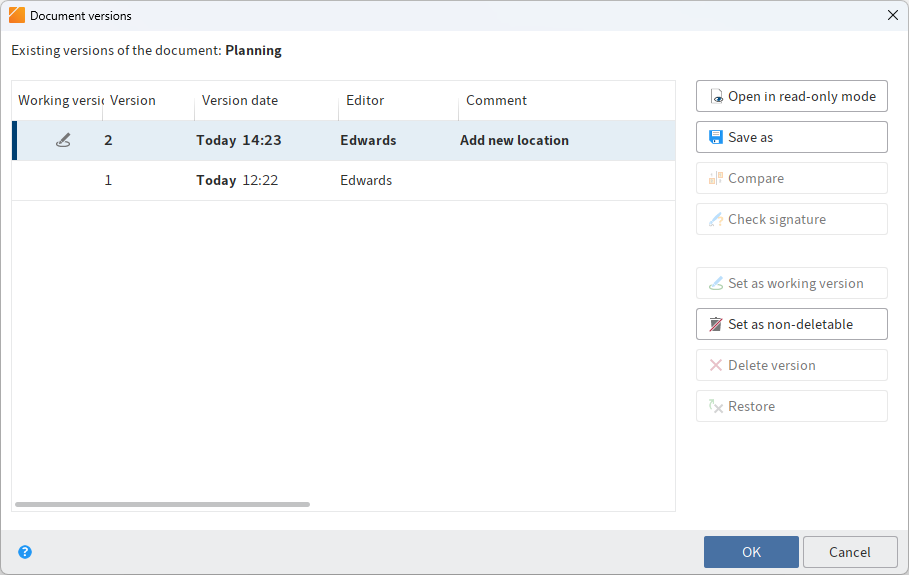
The following functions are available:
Open in read-only mode: Opens the selected version in an external application.
Save as: Use this function to save versions to your local file system.
Compare: Select two versions by holding down the CTRL key and select Compare. The versions are shown next to each other in a new window.
Check signature: Checks the signature of a selected version. The signature module must be installed.
Set as working version: This option sets the selected version as the working version. A working version is the currently used version.
Set as non-deletable: The selected version is set as non-deletable.
Delete version: Deletes the selected version. The version is initially assigned a deletion marker and can be restored (as long as it has not been permanently deleted).
Information
To view deleted versions, enable the Show deleted entries function (Ribbon > Organize > Delete).
Restore: Removes the deletion marker from a deleted version.
Edit comment: To edit the comment for a version, double-click the corresponding comment field.
# Edit document
Keyboard shortcut: CTRL + E
Use this function to open a document that is in the In use work area but is not currently open in the corresponding external application.
Save your changes in the external application and then transfer the document to ELO using the Check in function (available in: Ribbon > Document).
# Discard document changes
Available in: Ribbon > Document > Versions
Use this function to delete the current working version of a document and restore the original version.
This function is only available for documents that you have checked out.
# Compare documents
Available in: Ribbon > Document > Verify
Use this function to open two documents next to each other in a new window. This allows you to compare the two documents directly.
To use this function, select two documents in the Content tab of an ELO folder while holding down the CTRL key.
# Convert documents
# Create preview document
Available in: Ribbon > Document > Convert
Use this function to create a preview document in TIFF or PDF format for the currently selected document. The preview document is a special image document that is stored separately in ELO. Use this function to display documents if there is no viewer for the original format. You can use this for CAD files, for example.
Use the Show preview document option to view the preview document. You will find the Show preview document function under Ribbon > View > Display.
# Show preview document
Available in: Ribbon > View > Display
The preview document is a special image document that is stored separately in ELO. Use this function to display documents if there is no viewer for the original format. You can use this for CAD files, for example.
You will find more information here: Create preview document.
# PDF conversion
Available in: Ribbon > Document > Convert
Requirement: An ELO PDF Printer must be installed.
Use this function to convert a document selected in ELO into a PDF document. The document is filed to the repository as a new version.
# TIFF conversion
Available in: Ribbon > Document > Convert
Requirement: An ELO TIFF Printer must be installed.
Use this function to convert a document selected in ELO into a TIFF document. The document is then filed as a new version of the original document.
# Add attachment
Available in: Ribbon > Document > Attachment
This function enables you to transfer a file from your local file system and attach it to an ELO document. The local file is copied to ELO and linked to the document stored in ELO.
You will recognize an attachment by the paper clip icon of the Open attachment button.
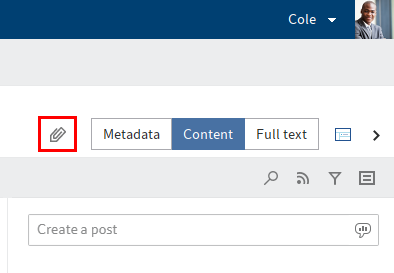
To open the attachment, select the Open attachment button.
Information
If you add a second attachment to a document, you can only access the first attachment using the Attachment versions function.
Related functions
- Open attachment in read-only mode: Opens an attachment in the corresponding external application, such as Microsoft Word.
- Attachment versions: Opens an overview of the versions of an attachment.
- Save attachment as: Saves the attachment outside of ELO in your local file system or on an external storage medium.
- Delete attachment
# Attachment versions
Available in: Ribbon > Document > Attachment
Use this function to open an overview of the attachment versions. You can open, store, compare, or delete individual attachments. In addition, you can check the signature of an attachment and restore a deleted attachment.
The following options are available:
Open in read-only mode
Save as: Saves versions of the attachment selected in a list of versions outside of ELO.
Compare: To compare two versions, select two entries in the versions overview list and then select Compare.
Check signature: If you have signed attachment, you can check the signature with this function.
Set as working version: This option sets the selected version as the working version. A working version is the currently used version.
Set as non-deletable: The selected version is set as non-deletable.
Delete version: Deletes a version selected in the list.
The version is highlighted in red after deletion.
Restore: Restores a deleted version (marked red).
The version is restored to the list and is no longer highlighted.
OK: Saves any changes and closes the dialog box
# Add and search annotations
# Add annotations
Annotations include sticky notes, text notes, and stamps. Annotations are affixed to a single page of a document. You can only place annotations, text notes, and sticky notes on documents that can be displayed in the document viewer (PDF, TIFF, JPEG, ...).
The following example shows how to do this using a sticky note. The method is similar for other types of annotations.
Information
To use stamps, you must have been assigned at least one stamp by the administrator.
You can also create custom stamps that only you can use.
Information
You can use the Create margin note function if you want to add a note on an entire document or on a document in another format.
Requirements
- You need a document that can be displayed with the document viewer, e.g. a PDF or image file.
Method
Select the document that you want to place an annotation on.
The document is shown in the viewer pane.
Information
You can assign permissions so that not all users can see or edit annotations. You will find the permissions settings for sticky notes and text notes under Ribbon > User menu > Configuration > Annotations.
You define the permission settings for stamps in the Stamps overview dialog box. You will find more information in the Add stamps section.

The document viewer toolbar is displayed above the document in the document viewer.
Apply a sticky note
Select the sticky note icon on the document viewer toolbar to enable the Sticky note function.
Information
To use an annotation function multiple times in succession, hold down the CTRL key or the ALT GR key as you click the function. To return to normal mode, choose the Select function (cursor icon).
Optional: To change the color, click the triangle next to the sticky note icon and select a different color from the drop-down menu.
The cursor turns into a sticky note in the color you selected.
Click the part of the document you want to place the sticky note on.
The sticky note is created. The dotted border indicates that the sticky note can be edited. The editor and the current date are displayed below the sticky note.
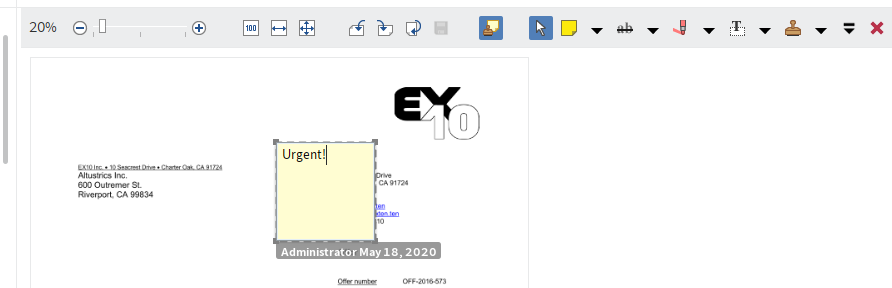
Enter text.
Click the area outside of the sticky note.
Result
The text you entered is saved. The sticky note is displayed on the document.
Information
You can use the context menu to open e-mail addresses, ELO links, and web pages in a sticky note (Available in: Right-click > Open links).
Outlook
Double-click the sticky note to edit it. To delete a sticky note, select the sticky note with the selection tool and then select Delete in the document viewer toolbar.
# Add stamps
You can create new stamps or edit existing ones.
Information
Default stamps cannot be edited or deleted.
Method
In the viewer toolbar, select the triangle icon next to the stamp icon.
In the drop-down menu, select the Stamps overview button.
The Stamps overview dialog box opens.
Select Add.
The Add stamp dialog box opens.
In this dialog box, select the name as well as the text or image for a stamp. The following settings are available:
Date: The current date is added to the stamp text. Appears in the text field as
%d{dd.MM.y}.- Other usable formats: Select the triangle icon to open examples of other time and date formats.
Time: The current time is added to the stamp text. Appears in the text field as
%X.User: The name of the user is added to the stamp text. Appears in the text field as
%u.Font
Permissions: You can set who can see the stamps here.
Please note
These permissions do not define who is allowed to use the stamp.
Select OK to save the stamp.
Result
The stamp appears in the drop-down menu that you open using the triangle icon next to the stamp icon.
Outlook
You can select the stamp you want to use from the drop-down menu.
To edit stamps of your own, select a stamp in the Stamps overview dialog box and choose Edit.
# Search annotations
The Search metadata function can be used to search for margin notes and annotations.
Requirements
- There must be at least one document in ELO that contains an annotation or margin note.
Method
Open the Search work area.
On the ribbon, select Search > Search logic > Search metadata.
Keyboard shortcut: CTRL + F
The Search metadata dialog box opens. The default search form is selected.
Optional: Select a different search form if required.
Select the Options tab.
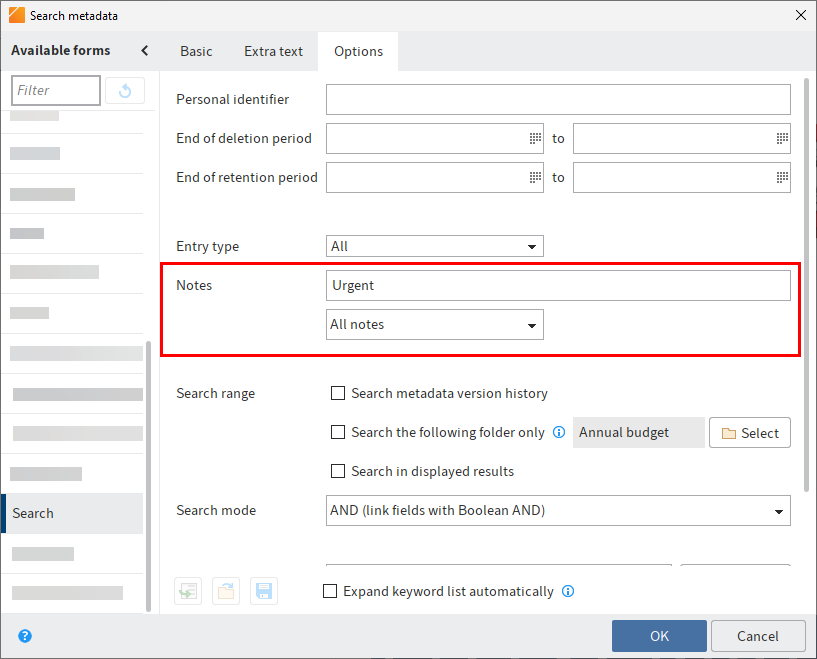
Enter a search term in the Notes search field.
Information
If you want the search to include annotations that do not contain any text, enter an asterisk (*) in the search field.
Optional: You can select the type of notes you want to search for from the drop-down menu under the Notes field.
Select OK.
Result
The search starts. The search results appear in the Search work area.
# Add margin note
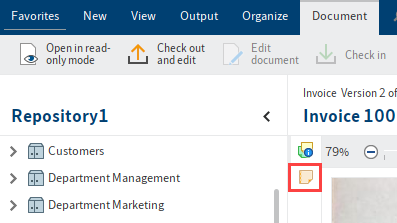
You can create margin notes for a document or a folder under Ribbon > Document > Margin note.
Margin notes are displayed on the split bar. If you hover over the margin note with the mouse pointer, the text, the creation date, and the editor are displayed.
There are three types of margin notes:
- General margin note (yellow): Can be seen and edited by all users.
- Personal margin note (green): Only the creator can read and edit this type of margin note.
- Permanent margin note (red): Can be read by everyone, but cannot be edited or deleted.
You can use the margin note icon to open the margin note and read it or edit it again.
You can use the context menu to open e-mail addresses, ELO links, and web pages in a margin note (Right-click > Open links).
A margin note applies to the entire entry and not just the current version.
# Create signature
Available in: Ribbon > Document > Verify
Use this function to digitally sign documents.
Requirement: Suitable third-party software and hardware must be installed.
# Check signature
Available in: Ribbon > Document > Verify
Use this function to check the digital signature of a document. The function is only available if the document has a digital signature.
# Test checksum
Available in: Ribbon > Document > Verify
This function verifies the checksum of the selected document. The checksum indicates whether the document has been transferred correctly to ELO. This function creates a hash value of the document. This value is checked for changes to guarantee that the document has not been changed.