# Organize entries
# Move
Available in: Repository work area
You can link entries (folders or documents) within the tree structure.
The following options are available for moving entries:
# 'Move' function
Method
Select the entry you want to move.
On the ribbon, select Organize > Move.

The Move tab opens. The selected entry is displayed in the Original field.
Select the target folder in the tree structure.
The selected folder is displayed in the Target folder field.
Select Move entry.
If the permissions of the entry do not match the permissions at the target location, the Move entries dialog box opens. You can modify the permissions of the moved entries in this dialog box.
Optional: You can also save your selection so that the dialog box doesn't appear the next time you run the function. You can change your selection in the configuration (available in: User menu > Configuration > Dialog boxes > Inherit permissions when moving entries).
Result
The entry is moved to the target folder.
# Drag-and-drop
Method
Click the entry you want to move and drag it to the target folder holding down the mouse button.
The Drag-and-drop dialog box opens.
Choose whether you want to move or reference the entry. A reference ascribes to an entry.
Optional: You can also save your selection so that the dialog box doesn't appear the next time you run the function. You can change your selection in the configuration (available in: User menu > Configuration > Dialog boxes > Drag-and-drop).
# Reference
Available in: Ribbon > Organize > Structure
Use this function to create a reference to a document or folder selected in ELO. A reference is a link between a copy of an original document. The document only exists once physically in ELO. All changes to the document automatically apply to the references. This prevents duplicates.
The following options are available for referencing entries:
Information
You can automatically store entries in dynamic folders or reference them. For more information, refer to the File entries chapter.
# 'Reference' function
Method
Open the Repository work area.
Select a document or a folder.
On the ribbon, select Organize > Structure > Reference.

The Reference tab opens.
The name of the selected document or folder is displayed in the Original field. You will be asked to select a target folder in ELO.
Select the folder in ELO that you want to create the reference in.
The folder is displayed in the Target folder field.
Select Insert reference.
Result
The Reference tab closes. The reference is created in the selected target folder.

An arrow icon indicates that it is a reference.
# Drag-and-drop
Method
Click the entry you want to reference and drag it to the target folder holding down the mouse button.
The Drag-and-drop dialog box opens.
Choose whether you want to reference or move the entry.
Optional: You can also save your selection so that the dialog box doesn't appear the next time you run the function. You can change your selection in the configuration (available in: User menu > Configuration > Dialog boxes > Drag-and-drop).
# Copy
Available in: Ribbon > Organize > Structure
Use this function to copy the currently selected entry to the clipboard. You can copy an individual document, a folder or a folder structure with child folders. The Insert copy function enables you to insert an entry at the desired location in ELO.
Method
Select the entry in ELO that you want to copy.
Select Organize > Structure > Copy.

The Copy/Paste tab opens.
Select the target folder in ELO.
The target folder is entered in the Target folder input field.
Select Insert copy.
Depending on whether you have copied a document or a folder, the corresponding Insert copy dialog box opens.
When copying documents or folders, you can choose from various options. For example, you can specify whether you want to keep the notes, the references, or the permissions.
Select OK.
Result
The copy is inserted in the target folder.
# 'Insert copy' dialog box
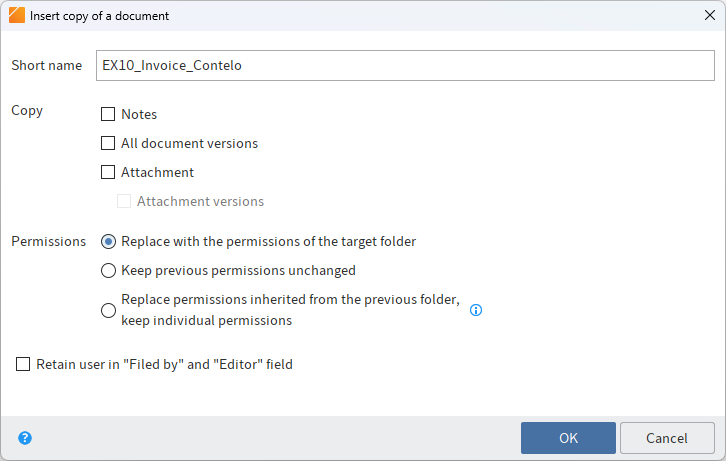
# Insert copy of a document
If you want to insert the copy of a document, you have the following options under Copy.
Notes: If this option is enabled, notes are copied as well.
All document versions: If this option is enabled, the version history of the documents is copied as well. Otherwise, the current working version is copied.
Attachments: If this option is enabled, the current attachments are copied as well.
Attachment versions: If this option is enabled, the version history of the attachments is copied as well. Otherwise, the current attachment is copied.
# Insert copy of a folder
If you want to insert the copy of a folder, you have the following options under Copy.
Basic entry only: If this option is enabled, only the selected folder without child entries is copied.
Folder structure only: If this option is enabled, the folder structure is copied without documents.
Folder structure with documents: If this option with documents is enabled, the folder structure and the documents in it will be copied.
References: If this option is enabled, references are copied as well.
Notes: If this option is enabled, notes are copied as well.
All document versions: If this option is enabled, the version history of the documents is copied as well. Otherwise, the current working version is copied.
Attachments: If this option is enabled, the current attachments are copied as well.
Attachment versions: If this option is enabled, the version history of the attachments is copied as well. Otherwise, the current attachment is copied.
# Permissions
You can make the following settings for documents as well as folders:
Replace with the permissions of the target folder: The permissions of the copied entries are ignored and replaced by the permissions of the target folder.
Keep previous permissions unchanged: The copied entries keep the existing permissions.
Replace permissions inherited from the previous folder, keep individual permissions: The permissions of the copied entries are replaced with the permissions that apply for the target folder. Permissions that were not inherited from the original folder are retained.
Retain user in "Filed by" and "Editor" field: The users entered in the Filed by and Editor fields are copied from the original entries.
# Monitor changes
Available in: Ribbon > New > Create task
This function enables you to keep track of changes to a document or folder. If another user creates a new version of the document being monitored or if another user adds an entry to the folder being monitored, you will be notified in the Tasks work area.
Information
If you are monitoring a folder, you will be notified as soon as another user has created a new document or new child folder within this folder. When you monitor folders, you are not notified of changes to their child folders. To monitor changes to a child folder, you have to monitor the child folder specifically.
You can make the following settings:
- Name: Enter a name for the entry being monitored. The name of the selected entry is entered by default.
- Priority: Set the importance of the monitoring instance: A (= high), B (= medium), and C (= low). You can sort and filter the task list according to priorities.
- Note: Enter a note that appears in your Tasks work area.

You can recognize notifications by the camera icon.
To remove the notification from your task view, select the notification, then select Organize > Delete on the ribbon.
# Monitoring overview
You can open an overview of entries you are monitoring under Ribbon > Organize > Overviews. You can edit or end monitoring actions here.
To start monitoring on an entry, use the Monitor changes function (available in: Ribbon > New > Create task).
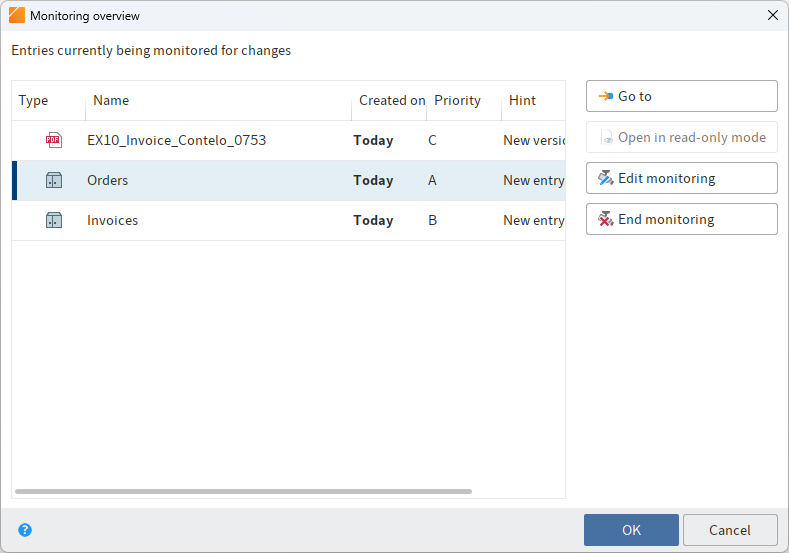
The following functions are available in the Monitoring overview dialog box:
Go to: Opens the filing location of the selected entry.
Open in read-only mode: Opens the respective document in an external application
Edit monitoring: This opens the Edit monitoring dialog box. In this dialog box, you can change the name, priority level, and notification settings of a monitoring action that appears in your tasks area.
End monitoring: Ends monitoring of the current entry. The entry being monitored is initially marked red. When you select OK, the dialog box closes and the entry is no longer monitored. If you close the dialog box with the Cancel button, the delete action is reversed.
# Link
You can link entries (folders or documents) that are related. This enables you to access an entry from another entry using the link. If two entries are linked, the Link icon is displayed.
![]()
Information
In the Tree and table layout mode, you can show the Link column in the table. A link icon is also displayed in this column if a link exists for an entry.
Method
Select a document in the Repository work area.
Select View > Navigation > Link.
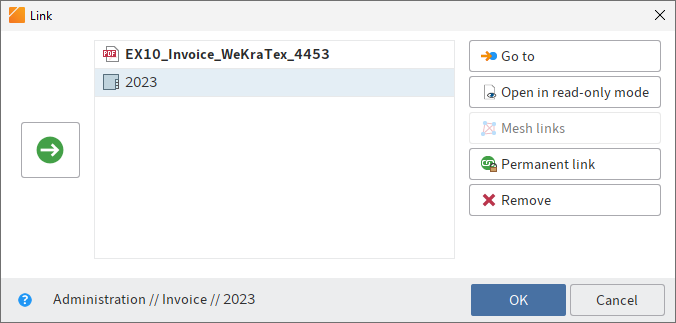
The Link dialog box opens.
Select a second document in the Repository work area. In the Link dialog box, select the Add the selected entries as links button (arrow facing right).
The second document is added as a link.
The following functions are available in the Link dialog box:
Go to: Jump straight to the respective entry in the Repository work area.
Open in read-only mode: Open the respective document for viewing in an external application.
Mesh links: If an entry is linked with multiple other entries, you can link all of the entries with this function.
Permanent link: The link to the selected entry is permanent. Permanent links cannot be deleted.
Remove: Deletes a selected entry from the list of links. The links to the entries are removed.
OK: Select OK to link the entries and close the dialog box.
To edit an existing link, click the Link icon.
# Move document files
Available in: Ribbon > Organize > System
The Move document files function enables you to move files, file versions, attachments, and/or attachment versions to another medium (i. e. to a different document path). The repository structure remains the same.
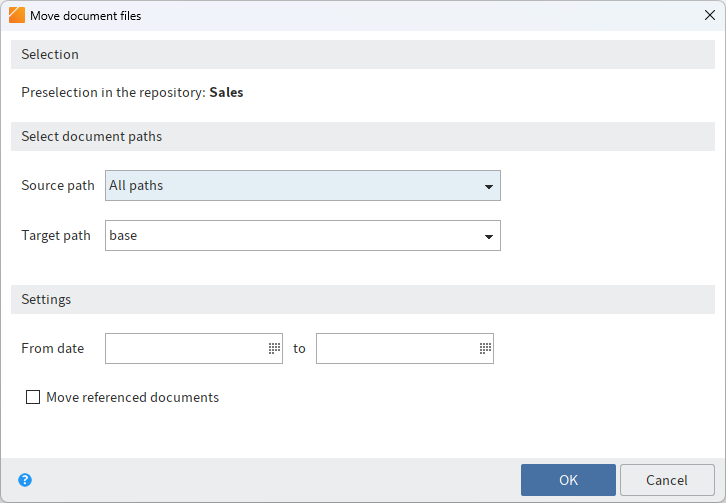
# Selection
Preselection in the repository: Indicates which folder was selected in the Repository work area.
# Select document paths
Source path: Select the source path if you only want to move files from a specific path.
Target path: Define the target path. If the desired target path does not exist, it needs to be created in the ELO Administration Console.
# Settings
From date: Enter the date on which you want to start moving files.
to: Enter the date on which you want to end moving files.
Move referenced documents as well: If this option is enabled, documents for which references exist in ELO are also moved to another path.
OK: To move the document files, select OK.
# Font color
Available in: Ribbon > Organize > Properties
Use this function to change the font color of a selected document or folder.
# Sort order
Available in: Repository work area > Ribbon > Organize > Properties
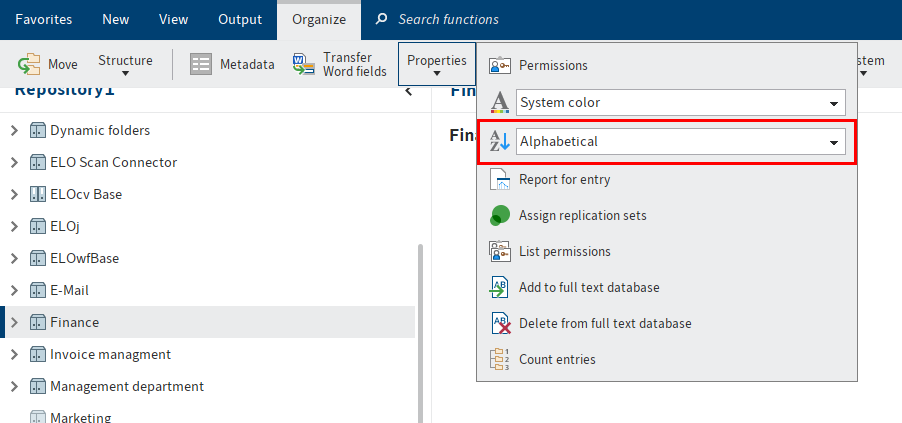
Use this function to change the sort order within a selected folder. You can choose between different sort orders in a drop-down menu:
# Sort manually
If you select the option Manual, you can sort the child entries in the folders later on.
Select a view profile that includes the Content view element.
Click the folder that you want to sort manually.
Optional: If you have not already done so, open the Content view element.
In the Content view element, click the entry (folder or document) that you want to move.
Drag and drop the entry to the selected location.
The sort order is changed.
Information
You will find other options for sorting entries in the list and tile view on the toolbar.
# Delete
Keyboard shortcut: CTRL + DEL
This function enables you to delete
entries in the Repository work area
Warning
The entries (folders or documents) are not deleted permanently. They are hidden and marked for deletion. This tells the administrator that the documents need to be removed from ELO permanently. To delete entries permanently, use the functions Show deleted entries and Delete permanently. They can be restored until the point at which they are permanently deleted.
workflows, monitoring actions, and reminders in the Tasks work area
Only the task is deleted. The corresponding entry remains in the repository.
Please note
Documents in the Intray that have not yet been filed to ELO are permanently deleted with the Delete function.
Outlook
The function Delete expired documents enables you to delete entries whose retention period has passed. You can enter the retention period in the metadata when you file the entry.
# Show deleted entries
Available in: Ribbon > Organize > Delete
Use this function to show deleted entries. Deleted entries are entries that have been removed with the Delete function and that have a deletion marker. Entries with a deletion marker are hidden in ELO.
If you show deleted entries, [deleted] is displayed after the name of the deleted entry. The Restore function enables you to revert the deletion process and remove the deletion marker. Use the Delete permanently function to permanently erase deleted entries.

# Restore
Available in: Ribbon > Organize > Delete
Use this function to remove the deletion marker from an entry in ELO. This allows you to undo the deletion of an entry. This option is only available if the entry has not been deleted permanently.
To restore deleted entries, you must first show the entries again in ELO. Use the Show deleted entries function to do this. The entries are marked with [deleted] before the short name. Select an entry marked with [deleted] and select Restore. The deletion marker is removed.
If you restore a deleted folder, you can use the Restore entries deleted on or after option to define a date limit from which the documents included and deleted in the folder are restored.
# Delete expired documents
Available in: Ribbon > Organize > System
Use this function to delete entries whose retention period has passed.
Warning
The entries (folders or documents) are not deleted permanently. They are hidden and marked for deletion. This tells the administrator that the documents need to be removed from ELO permanently. To delete entries permanently, use the functions Show deleted entries and Delete permanently. They can be restored until the point at which they are permanently deleted.
Information
You define the retention period in the metadata on the Options tab. Your administrator can set a retention period in the ELO Administration Console (Metadata forms and fields > Entry options > Lifetime).
Documents only: If you select this option, only documents whose retention period has passed are marked for deletion.
Documents and folders: If you select this option, documents and folders whose retention period has passed are marked for deletion.
OK: After clicking the OK button, the deletion markers are set according to the selected options.
# Delete permanently
Available in: Ribbon > Organize > System
Important
This function permanently deletes entries with a deletion marker from ELO. Permanently removed entries cannot be restored. You should be aware that even a differentiated backup concept only offers a limited option for restoring deleted entries.
In the Delete permanently dialog box, you can specify which entries with a deletion marker you want to permanently remove from ELO.
Remove deleted entries: All deleted documents and folders are removed from ELO.
Remove deleted document versions and versions of the attachment: All deleted document versions and deleted attachment versions are permanently removed from ELO.
Deletion date until: Enter a date here. All entries that were deleted before the specified date are permanently removed from ELO.
# Report for entry
Available in: Ribbon > Organize > Properties
Use this function to open an overview with information on the currently selected entry. Use the Configure report dialog box to specify which information to include in the overview. For example, you can define which actions will be reported or which period the report should refer to.
Choose from the following options:
Number of entries: Specify the maximum number of entries the report should contain.
Date: Enter the period which you want to create the report for.
User: With the User field, you can search for users and groups. As soon as you start typing, a drop-down menu with possible matches appears. Select the user/group for the report.
Actions: Select the actions you want to be recorded in the report.
Select all: Use this to Select all actions.
Select none: Use this to disable all actions.
OK: Select OK to create the report with the new settings.
The Report dialog box opens.
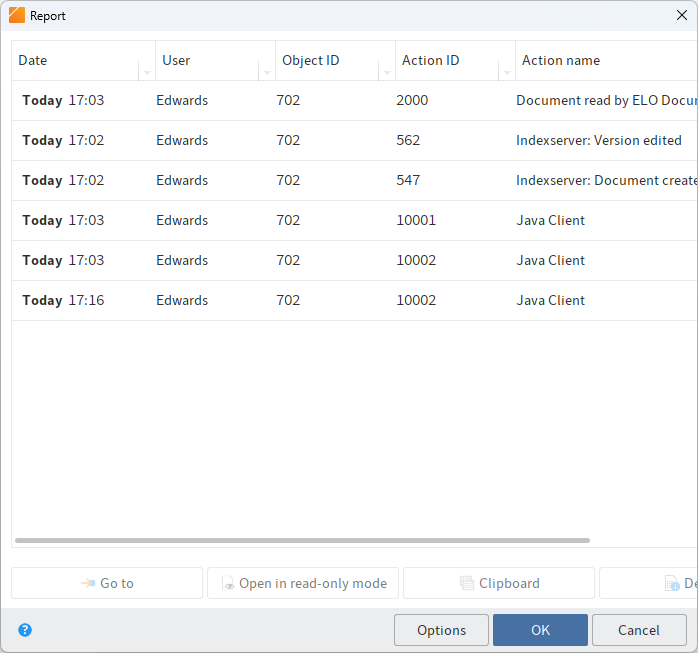
This dialog box contains an overview of the actions that were executed for an entry. The name of the executed action is displayed in the Action name column. You will also see what action was performed by whom and when.
Go to: The Go to button takes you straight to the respective entry.
Open in read-only mode: Select Open in read-only mode to open the respective document in an external application.
Clipboard: Use the Clipboard button to copy a selected area in the Report dialog box to the clipboard. This allows you to save parts of the report in an external document, for example.
Details: Select the Details button to open the Details of dialog box. The Details of dialog box lists the permissions and group membership of the user who has triggered the respective report entry.
Information
The Details of dialog box is only available for report entries with the action name Indexserver: Login or the action ID 501, as well as for actions related to substitutions. This action is only evaluated when you execute a report for the top repository level and the report settings (Open ELO action) have been configured accordingly.
Options: Use the Options button to open the Configure report dialog box. Make the changes for the report in the Configure report dialog box.
# Assign replication sets
Available in: Ribbon > Organize > Properties
The replication set is a characteristic that you assign to individual repositories in order to replicate them in another repository. Each replication set stands for one repository. Replication sets enable you to synchronize data between multiple locations. The replication sets must have already been mapped to the entries using the ELO Replication module.
You will find detailed information in the ELO Replication (opens new window) documentation.

In the Replication sets field, you can see which replication sets have already been mapped to the entry. To add a new replication set, click Add and select a new replication set.
Please note
Replication sets are inherited upward to parent folders in the repository structure. To prevent inheritance, select the Start point for replication option in the Metadata dialog box of the folder you want to replicate.
# Add to full text database
Available in: Ribbon > Organize > Properties
Use this function to add the contents of a document to the full text database. The document must contain full text information. The full text information is written to the full text database and will be used when searching for documents.

You can view the document content in full text mode in the viewer pane. This enables you to search the text for specific terms.
# Delete from full text database
Available in: Repository work area > Ribbon > Organize > Properties
Use this function to remove a document including its text contents from the full text database. This means that you cannot find the document with the full text search.
Please note
This function is also available even if the selected document does not contain any full text information.
# Count entries
Available in: Ribbon > Organize > Properties
Use this function to count entries in the currently selected folder. You can also see the amount of memory that the entries in the selected folder are using.
You can specify which entries you want to count. In addition, you can save the result as a PDF.
# Remove lock
Available in: Ribbon > Organize > Delete
If a user has checked out an entry, it is locked and cannot be edited by other users. Use this function to remove the lock from a document or folder. Normal users can only remove their own locks. Administrators can also remove locks from documents set by other users.
Important
Removing a lock may lead to loss of data or changes being overwritten if the entry or metadata is being edited by another user. To unlock a document for all users, you should use the Cancel editing function in the Check in dialog box.
For more information on editing an entry, refer to the chapter Edit entry.