# Configuration
Create sites and add repositories in the web-based configuration. Using the ELO Indexserver URL, specify which repositories data is replicated from. A replication set is created automatically in the configuration when you add a new repository. Each replication set stands for one repository. The replication set is a characteristic that you assign to individual repositories in order to replicate them in another repository. The individual entries (folders, documents) to be replicated are selected in the ELO Java Client or ELO Web Client using the "Assign replication sets" function. With this function, you select the repository you want to export the entries to. This means you select a repository the entries are replicated to.
Important
Replication sets and their assignments in the repository that were created in a version older than ELO Replication 12 will be deleted when migrating to ELO Replication 23/25. Before performing a migration, create an overview of replication sets and their assignments so you can reconfigure them in version 23/25.
To configure ELO Replication for the first time, log in at any site and configure the settings as desired. These settings are saved in a configuration file. You can send the configuration file to other sites. This means you only have to configure replication manually at one site.
# Overview
To configure ELO Replication at at least two sites, perform the following steps. For more information on the individual steps, refer to the chapters Installation and the following sections.
Install at site 1 and site 2.
Configure site 1.
Publish replication at site 1.
Send configuration file to site 2.
Insert configuration file at site 2.
Publish replication at site 2.
Assign replication sets at site 1 and/or site 2.
Information
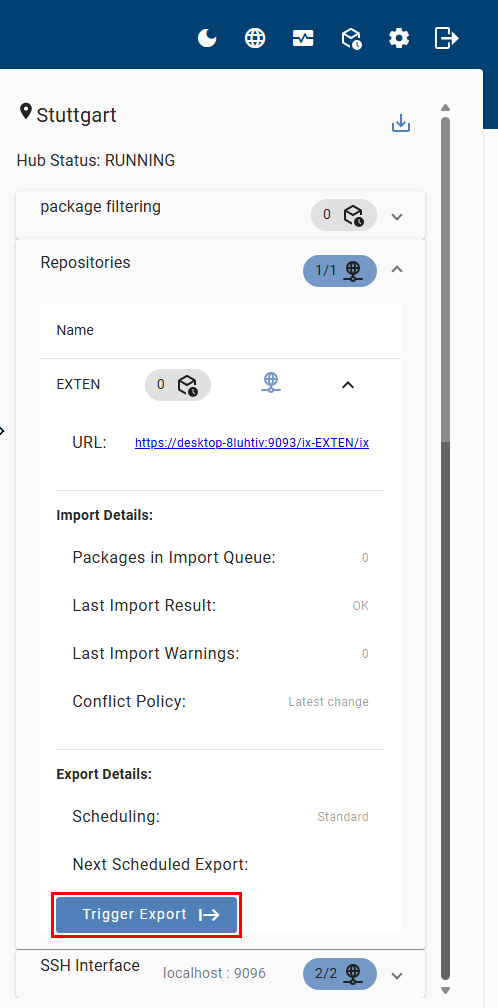
Once you have performed steps 1 - 7, you can manually start an export from the local repository for test purposes. The export starts immediately, regardless of the configured schedule. Select Trigger export on the site overview page.
# Initial login
Once you have installed ELO Replication, after you have logged in the first time, you can set up a replication network in the configuration.
Method
Open your browser and go to the ELO Application Server overview page.
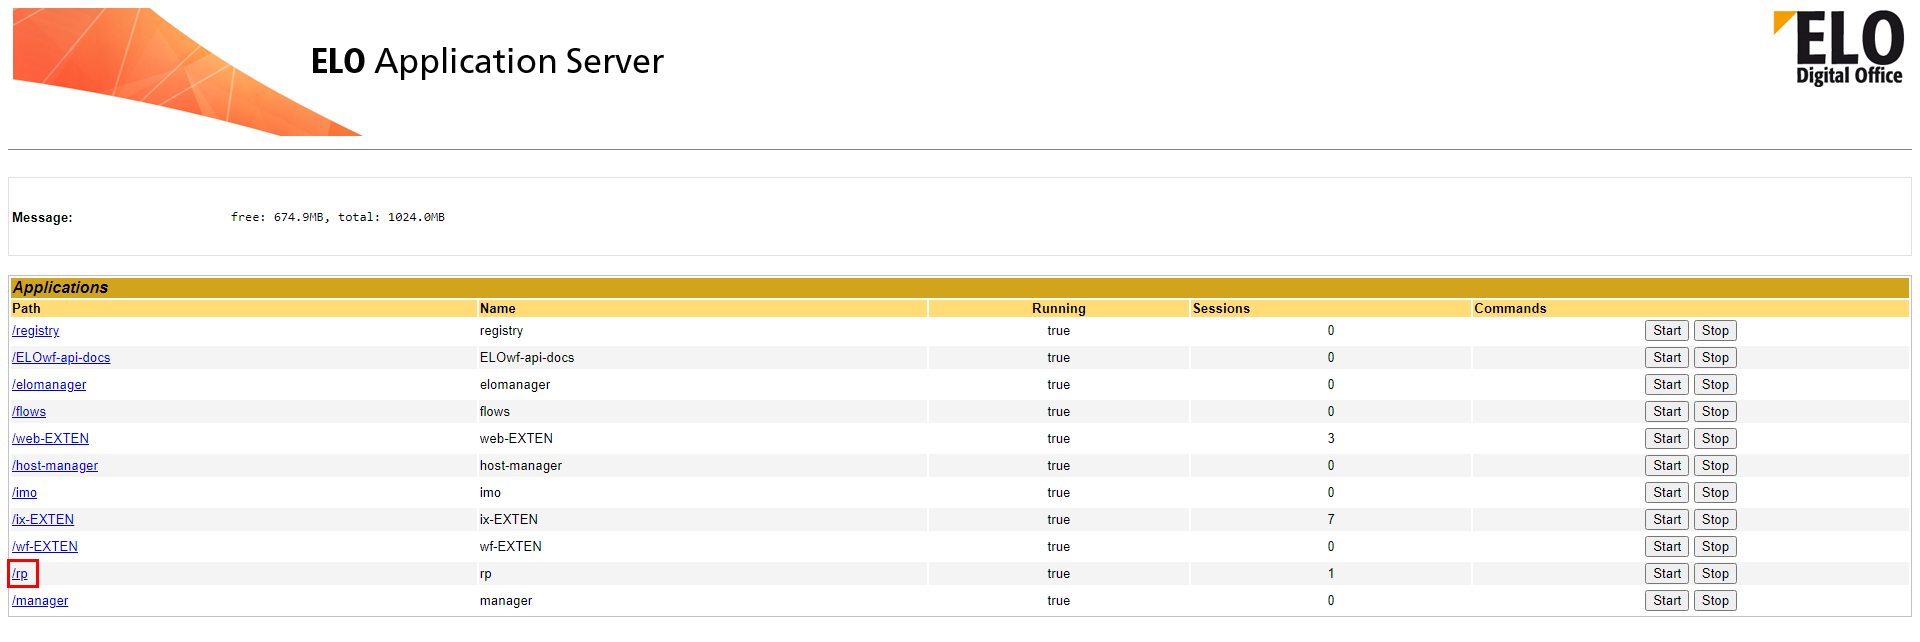
To open the configuration, select /rp.
Log in to ELO Replication with your Apache Tomcat administrator account.
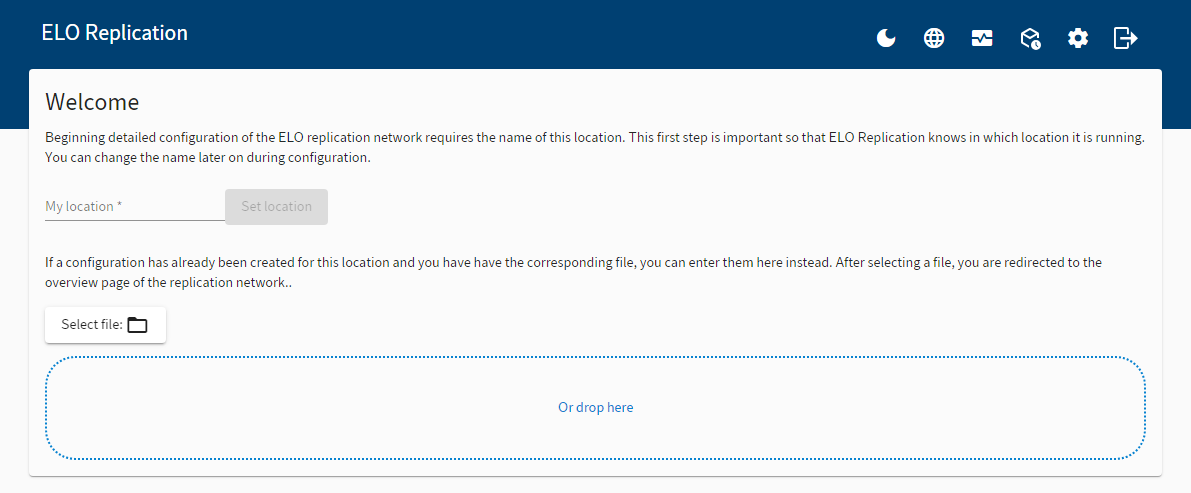
The first time you log in, you will have to set a site name. If you already have a configuration file for ELO Replication, you can select it here.
Information
For more detailed information on inserting a configuration file, refer to the chapter Create/insert a configuration for other sites.
Result
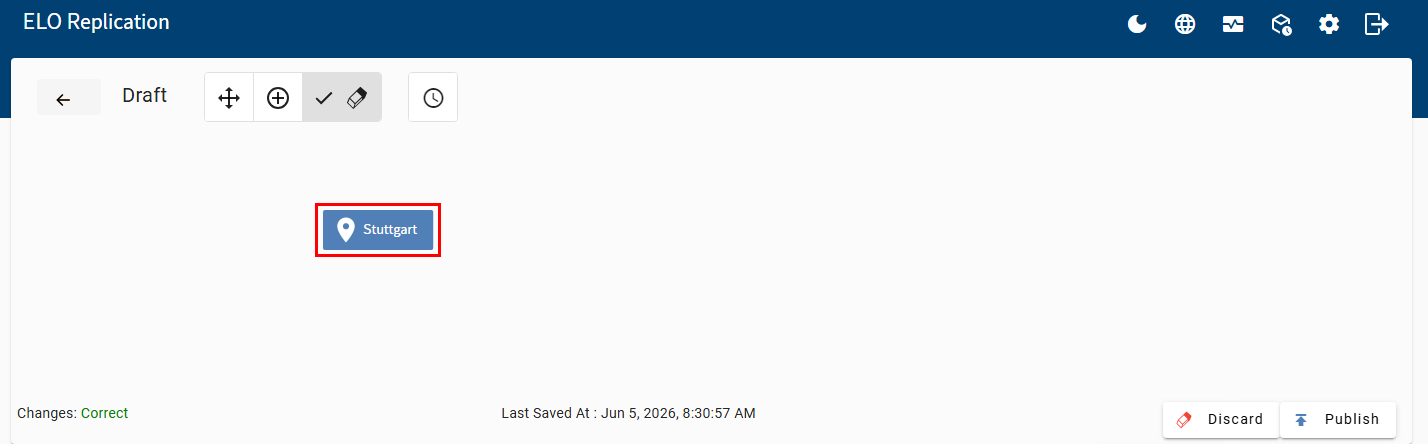
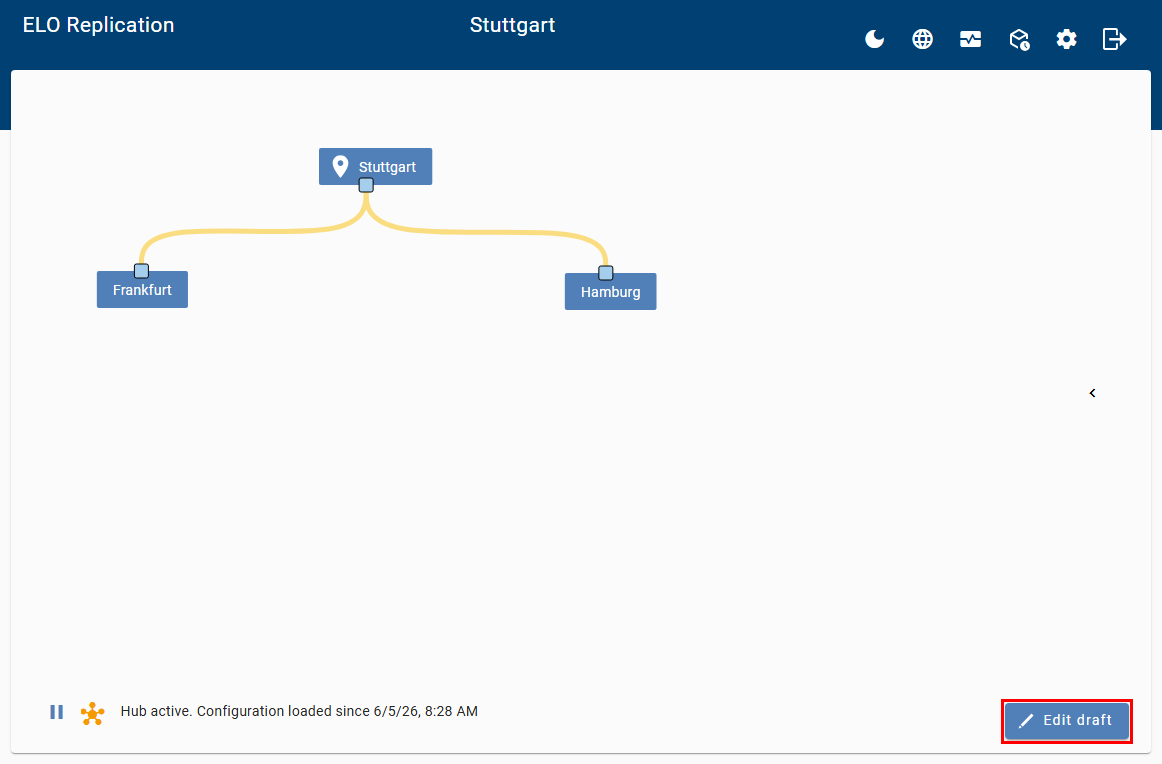
Once you have set your site, draft mode opens. Here, you can configure and edit a new replication as well as publish drafts.
Outlook
To show the setting options, select the site.
Information
For more detailed information on setting up a replication network, refer to the additional sections in the chapter Configuration.
# Draft mode
In draft mode, you can configure and edit a new replication as well as publish drafts.
Please note
Bi-directional replication is possible between two sites. Serial replication between multiple sites in a loop is not possible.
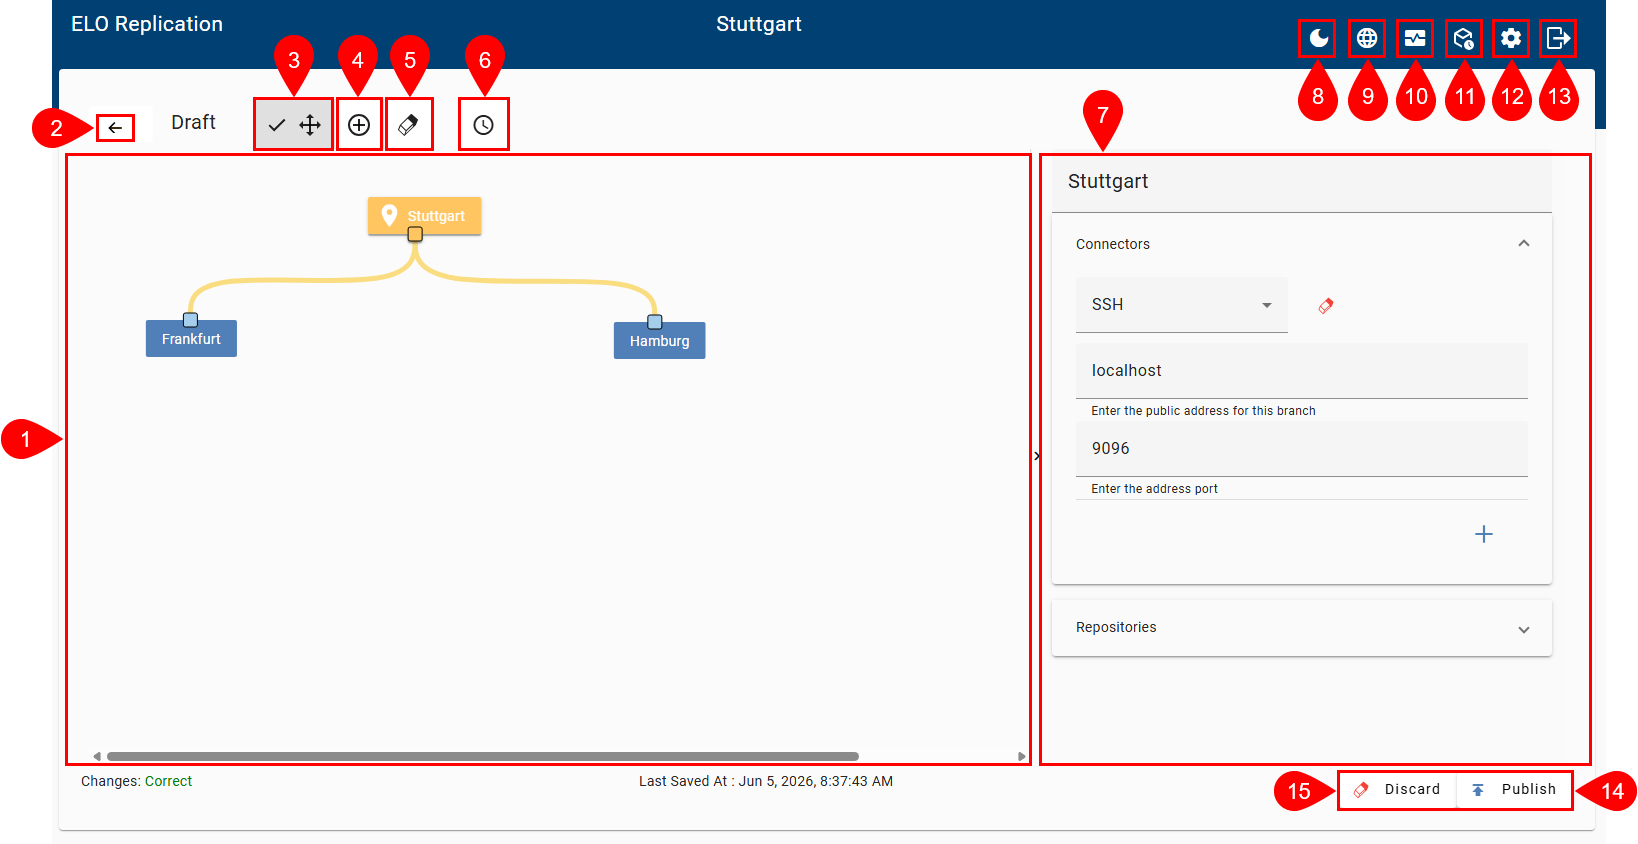
1 Viewer pane: Here, you will see the sites and connections in the replication network. Your local site is marked with a pin icon. The site currently selected that you are changing the settings for is shown in yellow.
2 Back: If you don't want to publish a draft yet or want to continue editing it at a later point in time, exit draft mode by clicking the back arrow. The draft is saved. You return to the overview page.
3 Selection: If this button is enabled, you can select a site with the mouse in the viewer pane and move it. A dialog box appears on the right for each selected site where you can enter the data for the site.
4 New site/new connection: If this button is enabled, you can add new sites and connections.
To add a new site, click anywhere in the viewer pane.
Before you add a connection, you need to set up an interface in the site settings. For more information, refer to the Site settings chapter. To add a new connection, place the mouse on a site. The connection icon appears. Press and hold down the left mouse button and drag the connection to another site.
5 Delete: If this button is enabled, you can delete sites and connections.
6 Schedule: This button opens the Schedule. For more information, refer to Schedule chapter.
7 Site settings: If you select a site in the viewer pane, the setting options for the site appear here. Your entries are saved automatically as soon as you leave an input field. For more information on these settings, refer to the chapters Location settings and Schedule.
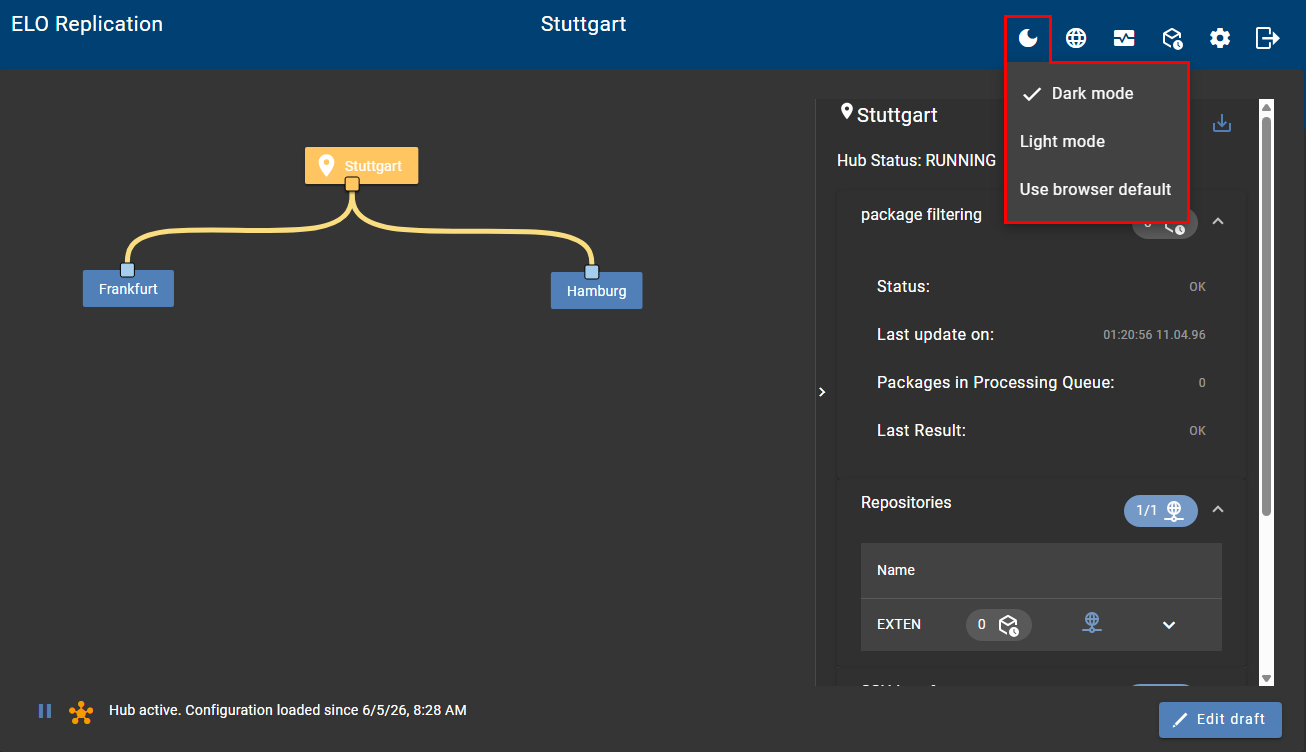
8 Dark mode/light mode: You can choose between a dark or light screen background or use the browser default.
9 Language: Select the display language here You can choose between German and English.
10 Status information: This area contains information about monitoring the replication process. The package processing status is displayed as well as the number of data packages currently in the processing queue. The status when forwarding to the ELO Indexserver and to other sites is also displayed. This includes the number of data packages in the transmission queue.
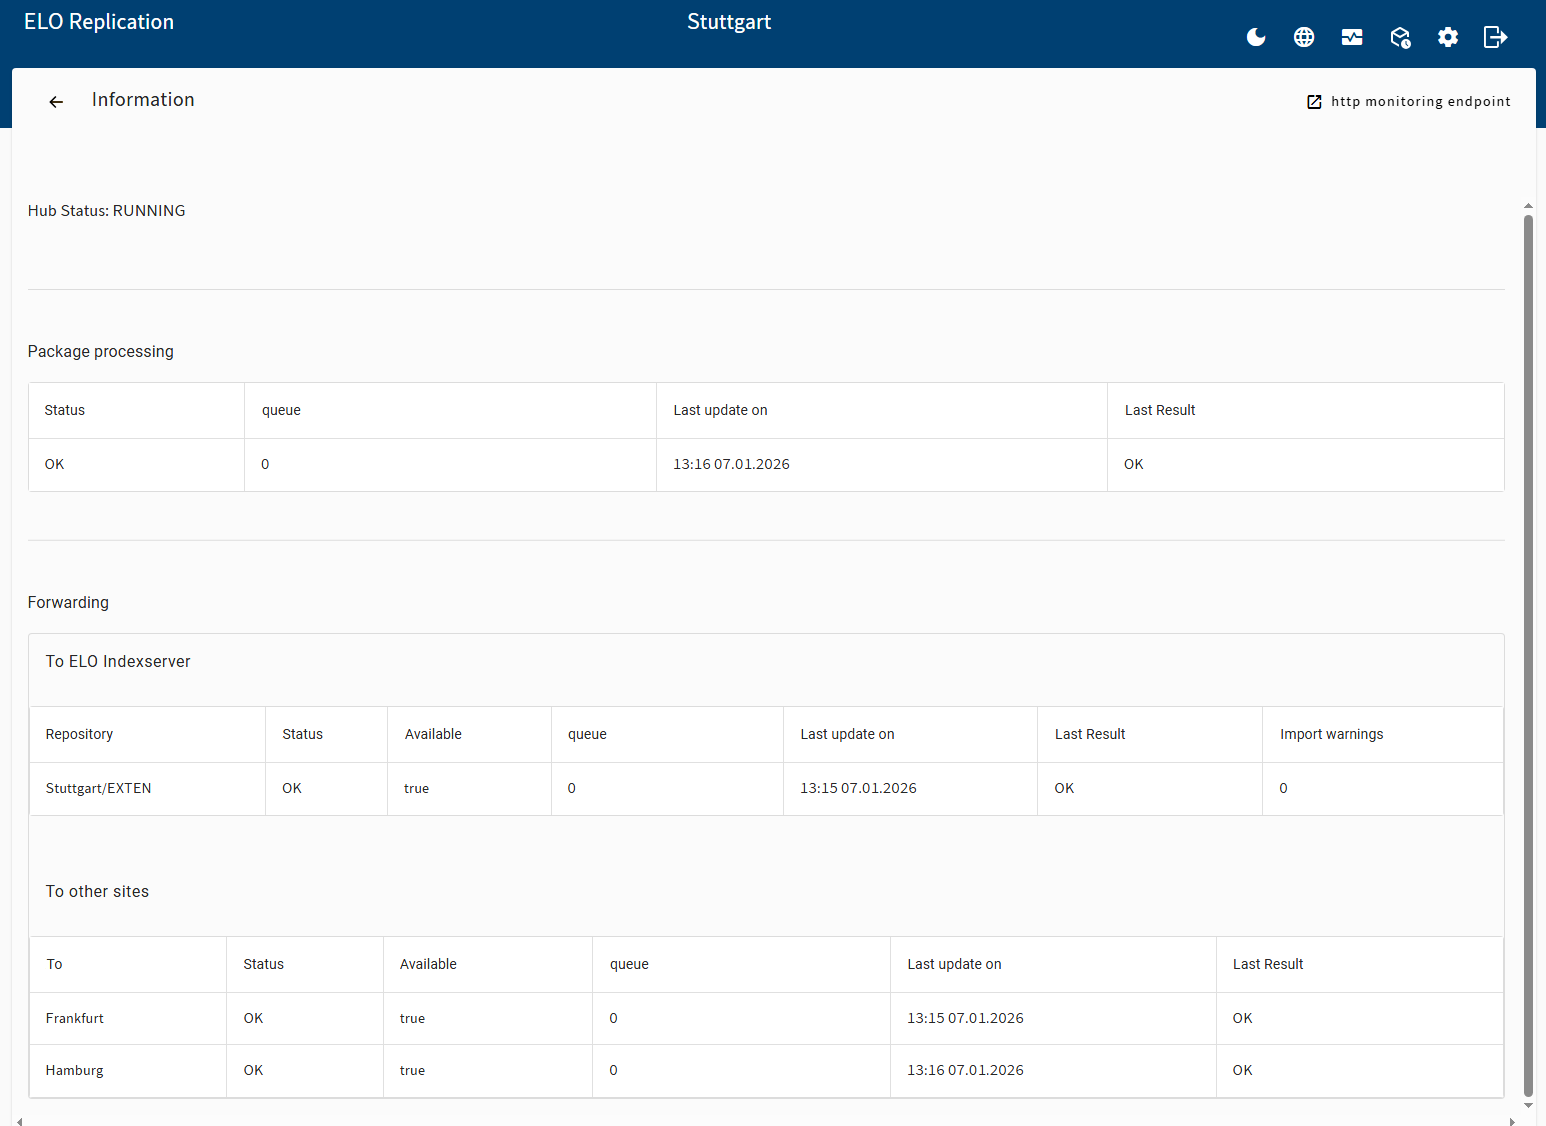
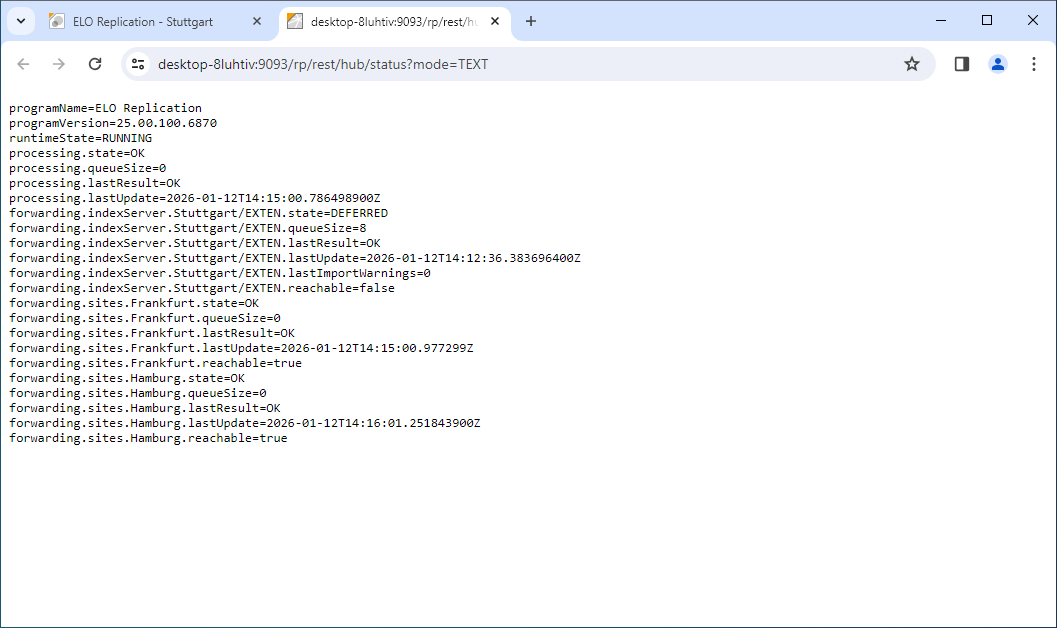
The link to http monitoring endpoint contains machine-readable information about the status page. This can be used for automatic monitoring.
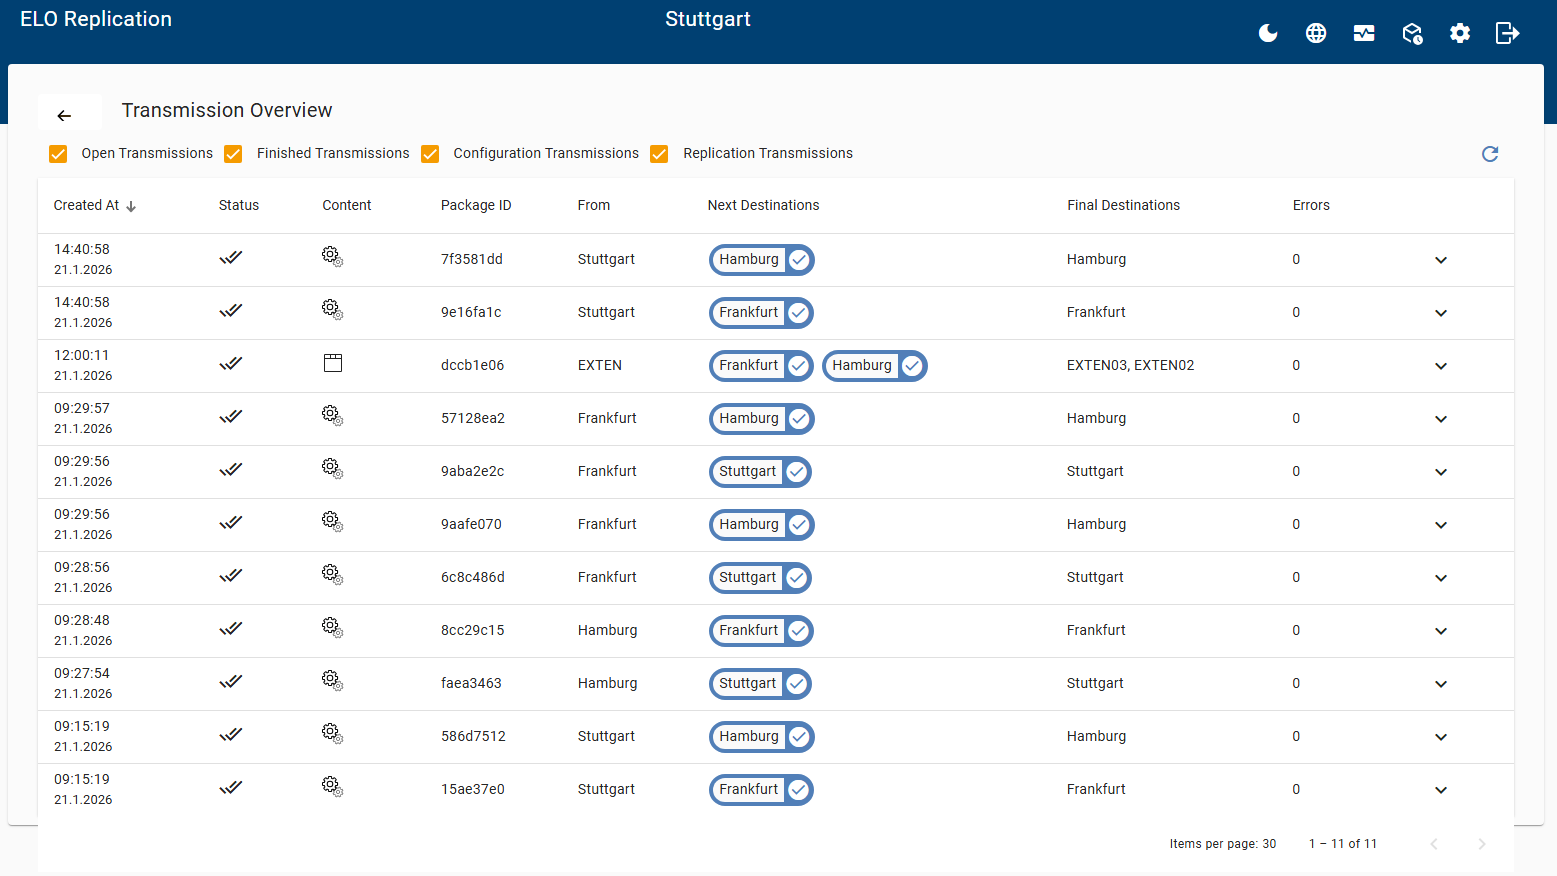
11 Transfer overview: You can monitor an active replication using the transfer overview. You can choose between open and closed transfers as well as between configuration transfers and replication transfers. For more information, refer to the chapter Monitoring.
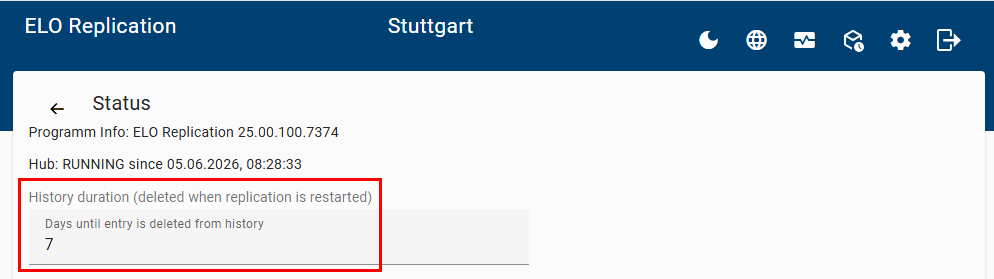
12 Settings: This contains the version number and runtime details for ELO Replication. You can also select a period of time after which the saved transfer protocol files from the TransmissionDetailsHistory folder in the ELO directory.
13 Log out: Select this button to log out of ELO Replication.
14 Publish: To enable a replication, select Publish. For more information, refer to the chapter Publish replication.
15 Discard: To delete a draft or discard your changes, select Discard.
# Site settings
# Overview
In the configuration, you can add sites. A dialog box appears for each site where you can enter the data for the site. Your entries are saved automatically as soon as you leave an input field.
You can enter the configuration settings for all participating sites from your site. A configuration file with your settings is created automatically for each site. Download the configuration file by selecting Download configuration on the overview page. Send the configuration file to the relevant site. There, the administrator logs on to ELO Replication and uploads the configuration file. You can find more information in the section Create/insert a configuration for other sites.
Name: Enter the name of the site.
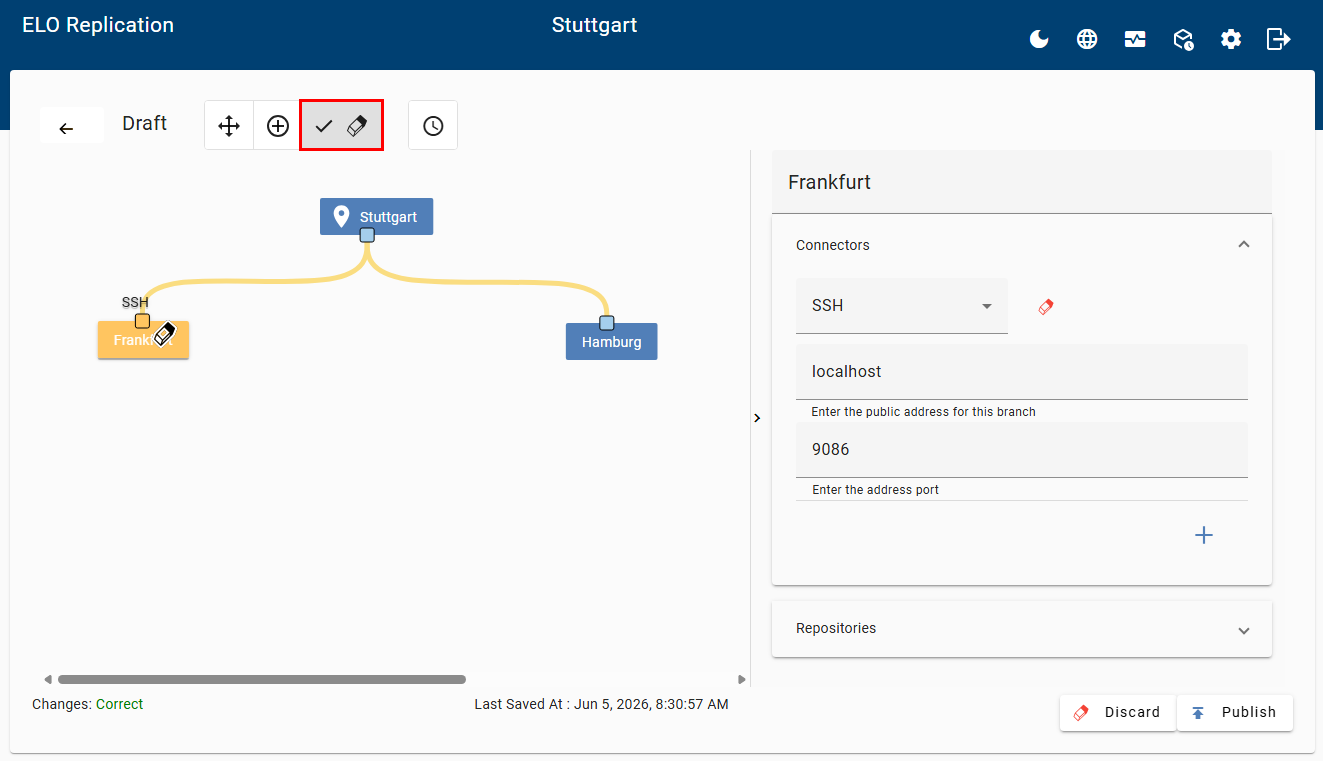
# Interfaces
Click the plus icon to add an interface.
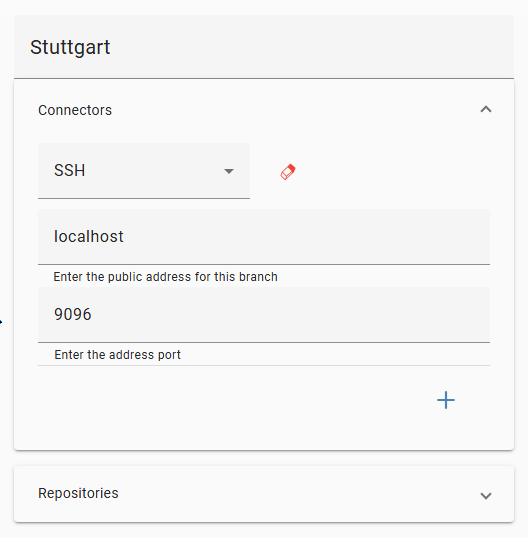
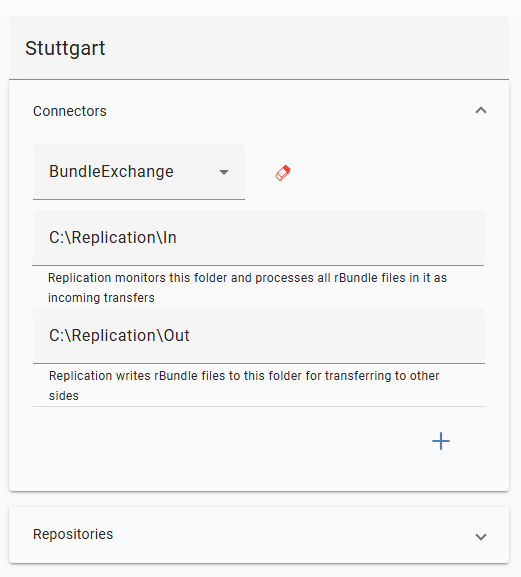
Schema: Select SSH or BundleExchange.
Once you have made a selection, a rectangle appears over the site in the viewer pane. You can move the rectangle with the mouse to connect two sites. To add a new connection, enable the New connection button and place the mouse on a site. The connection icon appears. Press and hold down the left mouse button and drag the connection to a rectangle of another site. You can only connect interfaces of the same schema. You can only place one rectangle per schema for a single site. This rectangle can be used to add connections to multiple sites. To delete a rectangle, enable the Delete button and click on the rectangle.
SSH schema
IP address or server name: Enter the IP address or the name of the server ELO Replication is installed on.
Port: Enter the port for establishing the connection.
Please note
Do not change the firewall rules created by the ELO Server Setup in Microsoft Windows by adding the ELO Replication port. The ELO Server Setup may overwrite the rule in the future. You have to create a new rule for ELO Replication in the firewall settings.
The port must be enabled for ELO Replication.
BundleExchange schema

BundleExchange enables data transmission between sites that do not share a network connection. In the configuration, specify a source folder and a target folder for file transfer. Enter the full folder path, e.g. C:\Replication\Target. ELO Replication writes files to the target folder in rBundle format for transferring to other sites. The target folder is monitored by ELO Replication. All rBundle files in this folder are processed as incoming file transfers. Data is transferred between the source and target folders using a third-party application that you must install yourself.
Information
You can add additional options for transferring data by creating and integrating plug-ins and by selecting them from the drop-down menu.
# Repositories
Click the plus icon to add repositories. A replication set is automatically created for each repository, which you can assign to an entry in the ELO Java Client or the ELO Web Client.
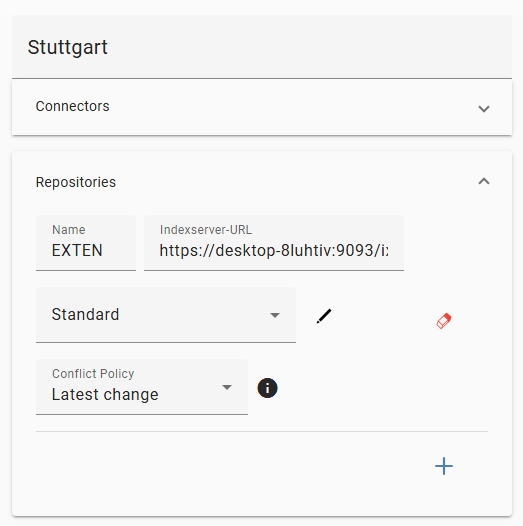
Name: Enter the name of the repository.
Indexserver URL: Enter the URL to the ELO Indexserver.
Schedule: Define when data is exported from the repository. In the drop-down menu you will find the preconfigured intervals Default and No automatic export, as well as all intervals you have created. To create new intervals or change existing ones, select the pencil icon. For detailed information, refer to the chapter Schedule.
Information
With Schedule, you can control the export of data. If you do not want to export data from the selected repository, select the No automatic import schedule. In this case, there is no scheduled data export from the repository; instead, data will only be automatically imported into the repository. If necessary, you can trigger data export manually.
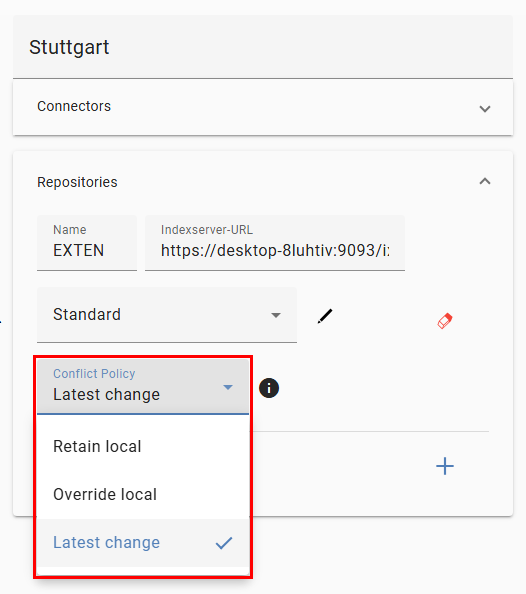
Conflict handling: To prevent conflicts during the replication process, you can choose from three different options:
- Retain local: If changes are made at both sites, the local changes are retained and changes imported during the replication process are discarded.
- Override local: If changes are made at both sites, the local changes are discarded and changes imported during the replication process are applied.
- Latest change: This is the default setting. If changes are made at both sites, the most recent changes are always applied.
# Schedule
The Schedule allows you to define when data is exported from the repository. In the drop-down menu you will find the preconfigured intervals Default and No automatic export, as well as all intervals you have created.
Please note
The specified interval time refers to the local time of the respective server. All servers hosting repositories involved in replication must be in sync in terms of time for the comparison via timestamp to work.
Please note
The schedule deals in hours. For example, if you enter a time from 8:00 a.m. to 6:00 p.m., replication begins at 8:00 a.m. and ends at 6:59 p.m.
# 'Default' interval
In the Default interval, data is exported from the repository: every 60 minutes, from 8 a.m. to 6 p.m., from Monday to Friday.
# 'No automatic export' interval
With Schedule, you can control the export of data. If you do not want to export data from the selected repository, select the No automatic import schedule. In this case, there is no scheduled data export from the repository; instead, data will only be automatically imported into the repository. If necessary, you can trigger data export manually.
# 'Schedule' menu
To create new intervals or change existing ones, select the pencil icon.
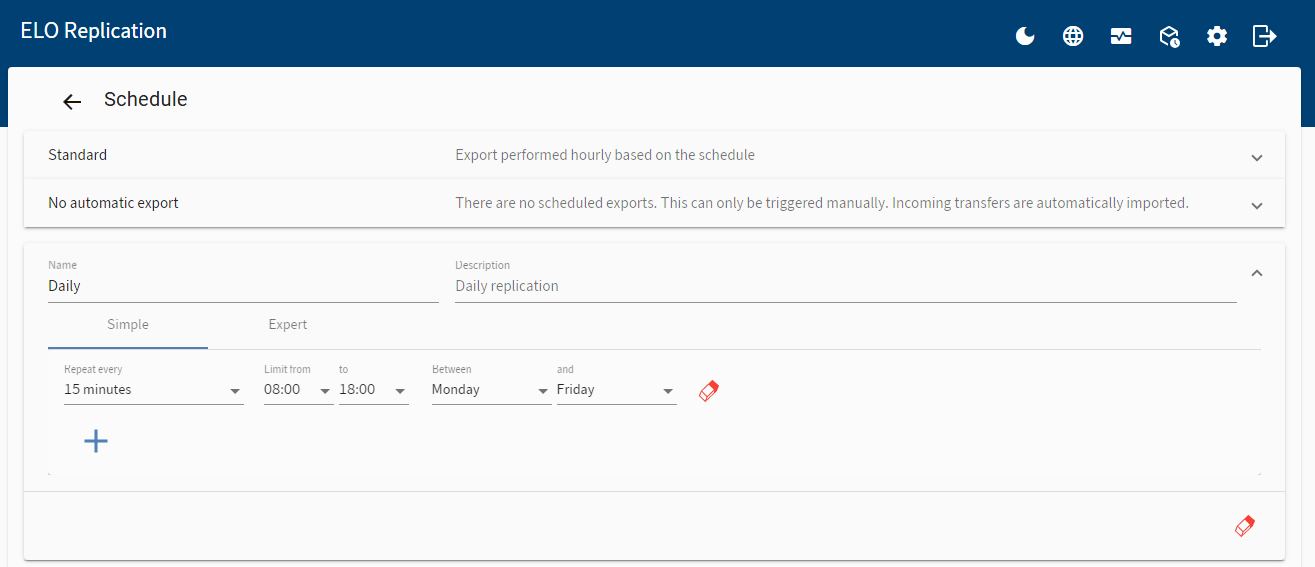
The Schedule menu opens. Clicking the plus icon adds a new schedule. Clicking the eraser icon deletes a schedule.
The input options Simple and Expert are available for the Schedule. With the input option Simple, you can choose from default intervals and customize them. With the input option Expert, you can control the Schedule more precisely using variables.
Only one of the two options can be enabled. To use the expert input option, go to the Expert tab and check the Use expert mode box.
# 'Simple' input option
Add a new schedule with the plus icon.

In the Repeat every field, set an interval for exporting data.
In the fields Limit from … to …, you specify during which hours replication should take place. In the example above, replication takes place in the morning at 8:00, 8:15, 8:30, and 8:45.
In the fields Between ... and ..., set the days of the week to repeat replication.
# 'Expert' input option
With the input option Expert, you can control the Schedule more precisely using variables.
Add a new schedule with the plus icon.

# Syntax
| Field | Input |
|---|---|
| Minute | 0-59 |
| Hour | 0-23 |
| Day of the month | 1-31 |
| Weekday | 1-7 (1 is Sunday) |
| Month | 1-12 |
Please note
You can set the days in two fields: Day of the month or Weekday. To avoid competing entries, set the days in either the Day of the month or Weekday field. In the other field, enter the variable ?. The field with the variable ? is not run.
# Variables
| Variable | Meaning |
|---|---|
| * | Always run (every...) |
| */n | Run every n |
| n,x,y | Run at/on n, x, and y |
| n-x | Run from n to x (x included) |
| ? | Field is not run; only applies to Day of the month and Weekday |
The following presents two examples of expert scheduling:
# Example 1

In this example, replication takes place:
- Every 15 minutes
- From 6:00 a.m. to 8:45 p.m.
- From Sunday to Thursday
- Every month
The field Day of the month is not evaluated as it contains the variable ?.
# Example 2

In this example, replication takes place:
- In minute 0 and 30
- From 8 a.m.
- From the 1st to the 10th day of the month
- In February
The field Weekday is not evaluated as it contains the variable ?.
# Time display of the next data export
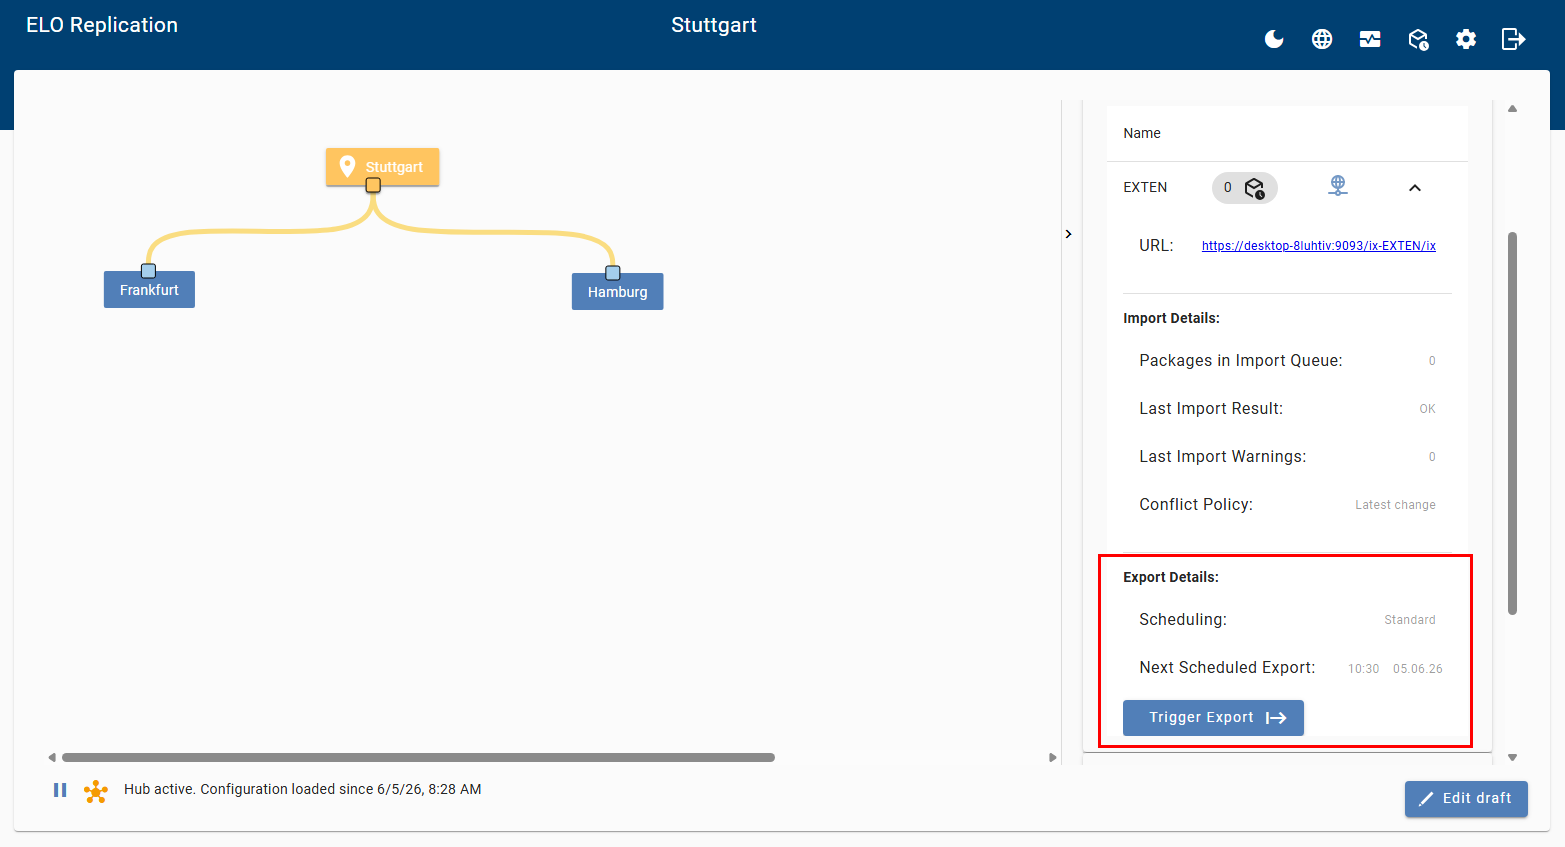
After creating the schedule and publishing the replication, you can see when the time of the next data export is scheduled in the overview page of each site.
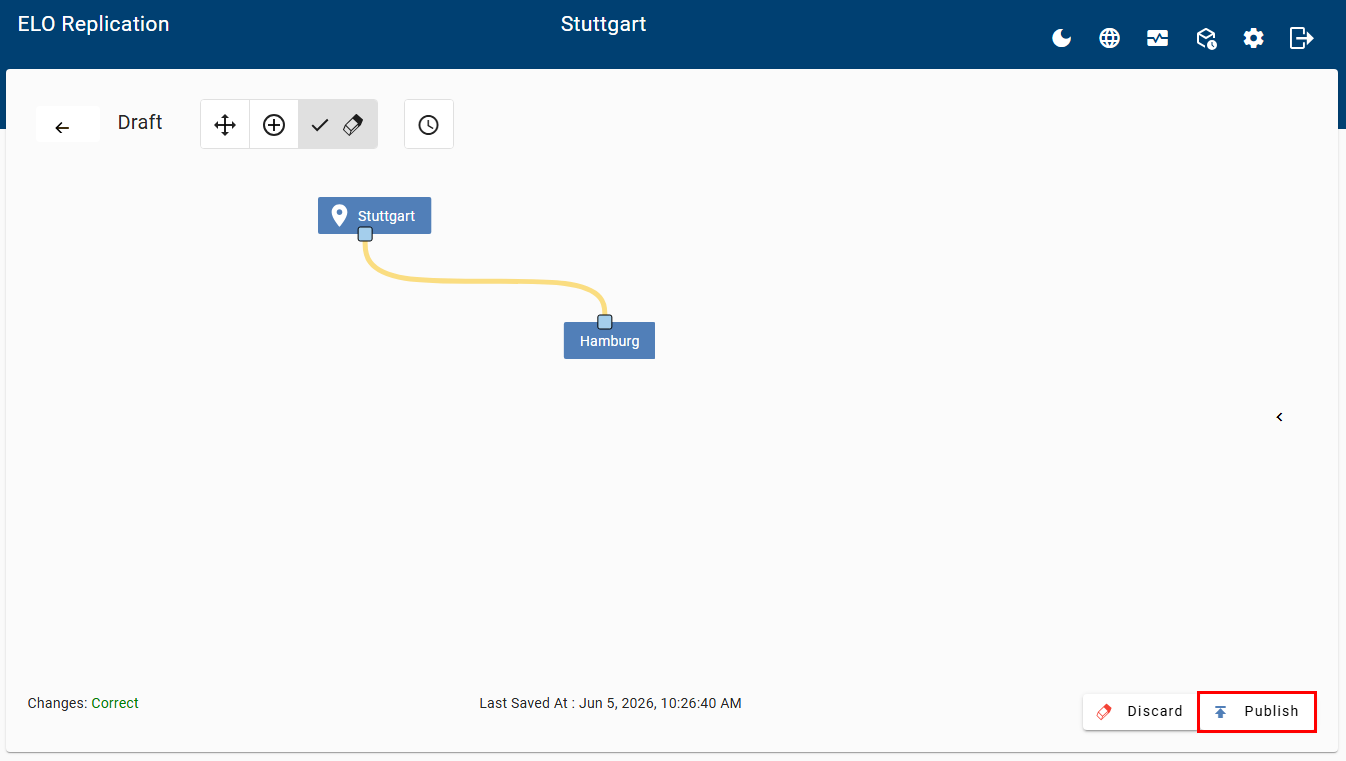
# Publish replication
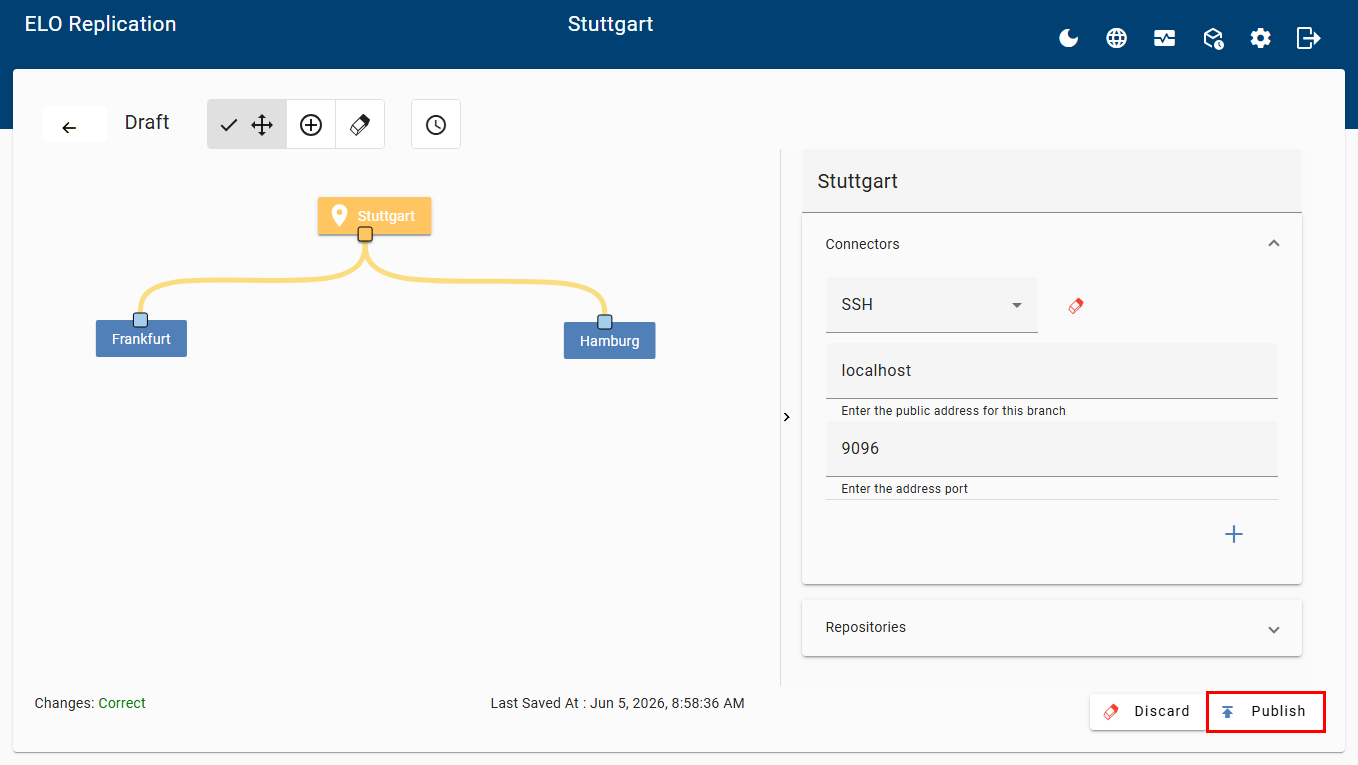
To enable a replication, you have to publish your draft. In draft mode, select Publish.
Please note
During initial configuration, you will have to publish the replication at all participating sites. In case of later changes, you only have to publish the new draft at one site. The changes are automatically applied to all sites.
If you add a new site for an active replication, you will have to upload the configuration file at the new site and publish the replication there.
Please note
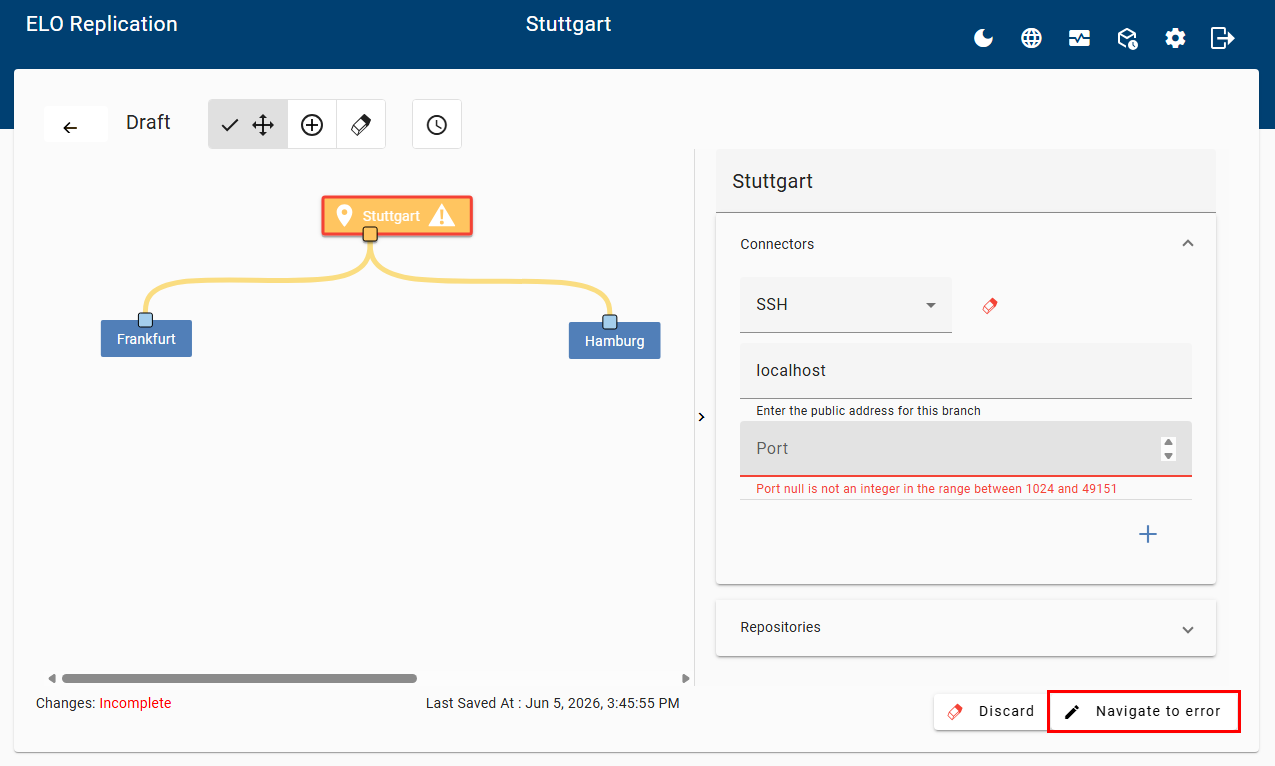
You cannot publish a draft until you have completed all entries. You can check this with the status message that is displayed at the bottom of the window.
Changes: Correct: Your entries are complete. You can publish the draft.
Changes: Incomplete: You still need to make entries. An error message is displayed in the corresponding section and you can select Navigate to error to go straight to the incomplete input field.
# Create/insert a configuration for other sites
You can enter the configuration settings for all participating sites from your site. A configuration file with your settings is created automatically for each site. Download the configuration file by selecting Download configuration on the overview page. Send the configuration file to the relevant site. There, the administrator logs on to ELO Replication and uploads the configuration file.
Please note
During initial configuration, you will have to upload a configuration file at all sites. In case of later changes, you only have to publish the new draft at one site. The changes are automatically applied to all sites. For more information, refer to the chapter Edit configuration.
If you add a new site for an active replication, you will have to upload the configuration file at the new site and publish the replication there.
# Site 1: Download configuration file
Requirement: You have completed site configuration and published the replication at site 1.
Method
On the overview page, select an external site you have already configured.

Select the Load configuration button.
The configuration is downloaded as a JSON file. The site name is used as the file name.
Send the configuration file to the administrator at the other site.
# Site 2: Upload configuration file
Method
Log in to ELO Replication with your Apache Tomcat administrator account.
Information
You do not have to enter a site name. The site name from the configuration file is automatically applied.
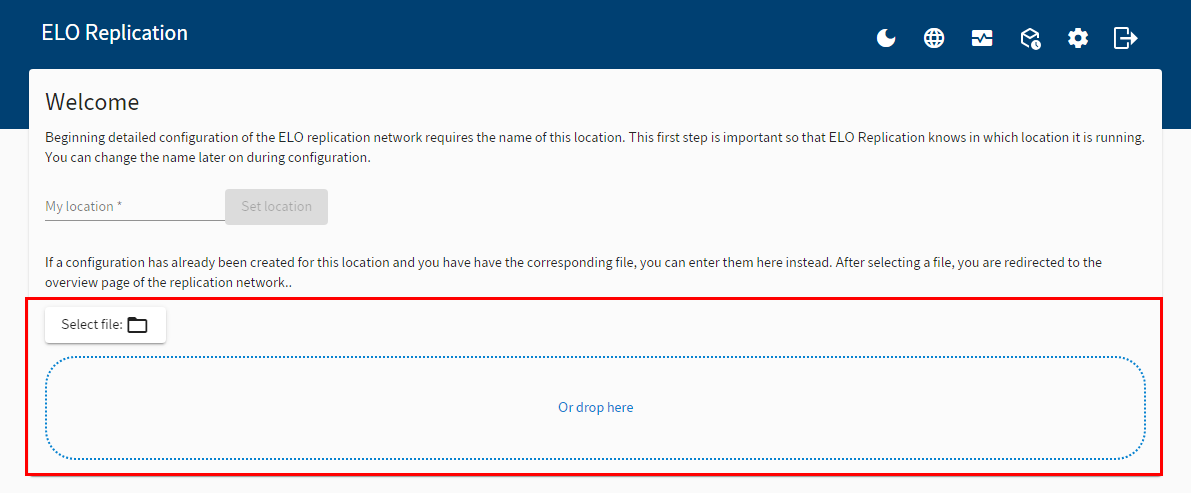
Insert the configuration file.
Confirm the site.
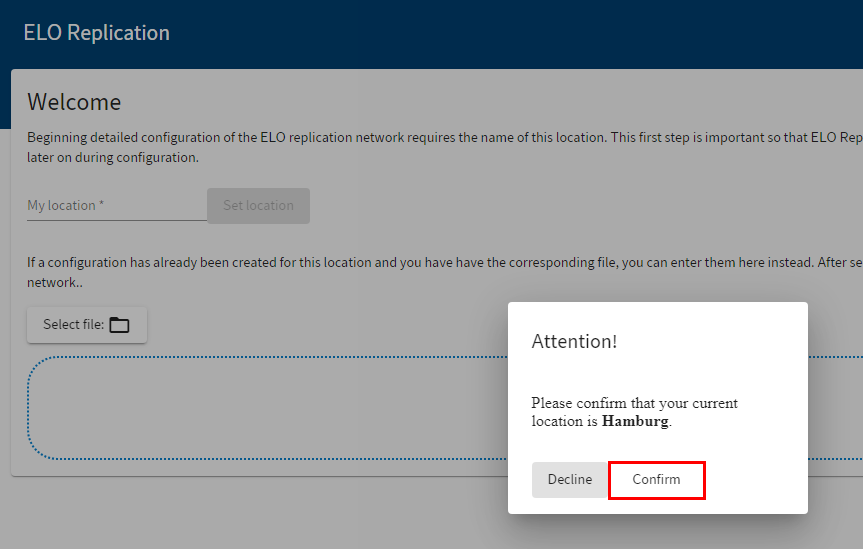
Once you have confirmed the configuration file, draft mode opens. You will see the sites in the replication network. The settings from the configuration file were applied.
To enable the replication for your site, select Publish.
Result
The replication sets are created. The SSH port is started.
# Next step
Once you have published the replication at the participating sites, you have to assign the individual entries replication sets. This means you determine what entries are replicated and where. For more detailed information, refer to the chapters Assign replication sets and Replication set inheritance.
# Remove site
To remove a site from the replication cluster, you have to edit the current configuration on the side of the main site.
Method
Select Edit draft.
Select the Delete button and remove the desired site node.
Then, publish the new configuration draft.
Result
The remaining sites are assigned the new configuration and restart to apply the changes.
Once the update is active, the removed location is excluded from current and future transfers. The replication set is removed from the repositories, though previously replicated items will remain in all repositories.
Please note
Only perform this update if no or only a few replications transfers are pending. While updating the configuration, the replication module has to query and update all open transfers. This can be time-consuming and cause issues if the queues are full.
# Replication set inheritance
Replication sets are automatically created in the configuration when you add a new repository. Each replication set stands for one repository. The replication set is a characteristic that you assign to individual repositories in order to replicate them in another repository. The individual entries (folders, documents) to be replicated are selected in the ELO Java Client or ELO Web Client using the Assign replication sets function.
Information
You only have to assign replication sets at one site. The assigned replication sets are also configured at the other sites through replication.
# Default: Inheritance to parent folder
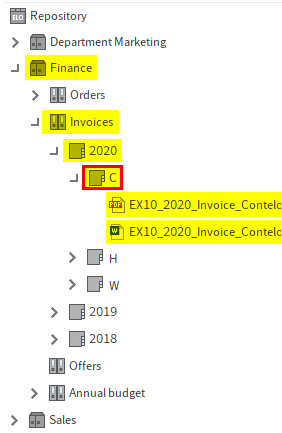
Replication sets are inherited upward to parent folders in the repository structure.
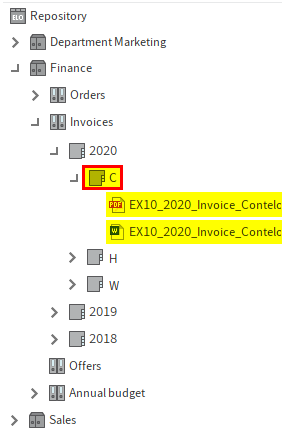
Example: If you assign the folder C including its child entries a replication set, the entries marked in yellow are replicated. The replication set is inherited to the parent folders.
# 'Start point for replication' option
To prevent the replication sets from being inherited to the parent folders, select the Start point for replication option in the Metadata dialog box of the entry you want to replicate. The Start point for replication option allows you to replicate parts of repositories that are not filed to identical repository structures.
Please note
In the ELO Java Client, this function is only available for folders.
Please note
Enable the Start point for replication option before assigning the entry a replication set.

Example: You have enabled the Start point for replication option for the C folder. If you then assign the C folder including its child entries a replicated sets, only the folder C and its child entries are replicated (marked yellow). The replication set is not inherited to the parent folders.
During the next replication process, the C folder is filed to the following path in the target repository: // Administration // Replication Base. From there, the administrator moves the folder to the desired site in the target repository. This only has to be performed during the initial replication process. The replication remembers the repository structure.
# Assign replication sets
Replication sets are automatically created in the configuration when you add a new repository. Each replication set stands for one repository. The replication set is a characteristic that you assign to individual repositories in order to replicate them in another repository. The individual entries (folders, documents) to be replicated are selected in the ELO Java Client or ELO Web Client using the Assign replication sets function. This means you select a repository the entries are replicated to. The name of a replication set in the ELO client is made up of the site name and the name of the repository.
Information
The following uses screenshots of the ELO Java Client.
Information
You only have to assign replication sets at one site. The assigned replication sets are configured at the other sites through replication.
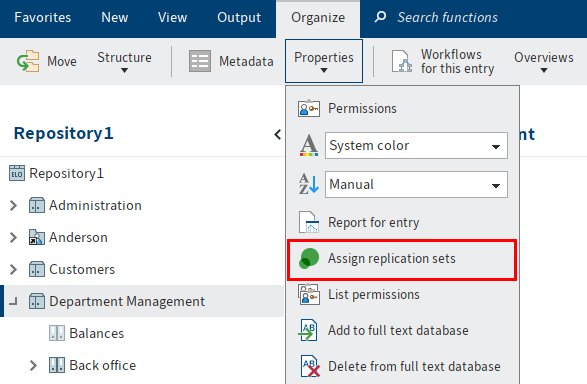
You will find the Assign replication sets functions in Ribbon > Organize > Properties.
Requirements
You need the right Assign replication sets. This right is enabled in the ELO Administration Console.
Please note
You should log which entries you assign which replication sets.
Please note
Documents with the status Version control disabled cannot be replicated. You will find the document status at Ribbon > Organize > Metadata > 'Options' tab.
Method
In the ELO client, select the entry you want to assign a replication set to.
On the ribbon, select Organize > Properties > Assign replication sets.
The Assign replication sets dialog box opens.
Select Add.
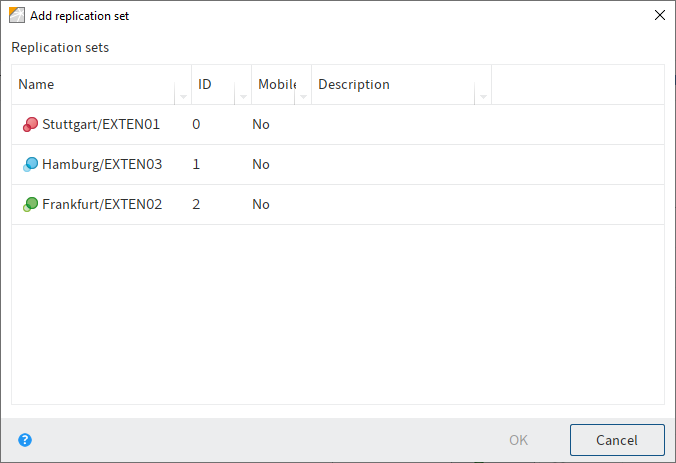
The Add replication set dialog box opens.
You will see all the replication sets defined in the configuration. The name of the replication set is made up of the site name and the name of the repository.
Information
The local replication set, that is the replication set where the entries are located, is assigned automatically. You do not have to add it manually.
Select one or more replication sets and confirm with OK.
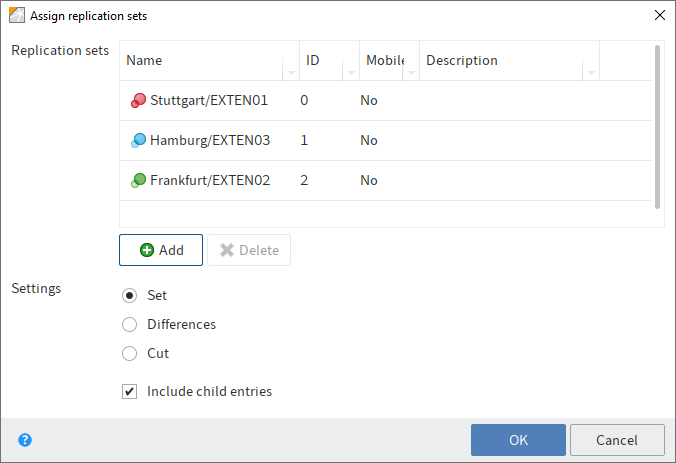
The replication sets appear in the Assign replication sets dialog box.
Please note
Replication sets are inherited upward to parent folders in the repository structure. To prevent inheritance, select the Start point for replication option in the Metadata dialog box of the entry you want to replicate. In the ELO Java Client, this function is only available for folders. You will find more information in the chapter Replication set inheritance.
The following options are available:
Including child entries: If this option is enabled, the replication set is also assigned to the child entries of the selected entry.
Set: All the listed replication sets are assigned to the entry.
Differences: This option should only be used in combination with the Include child entries option. Differences: If you removed replication sets from the list and/or added replication sets to the list, this change is passed on to the entries. Replication sets from the list that were not changed are not passed on. The replication sets of the entries that were not changed are retained.
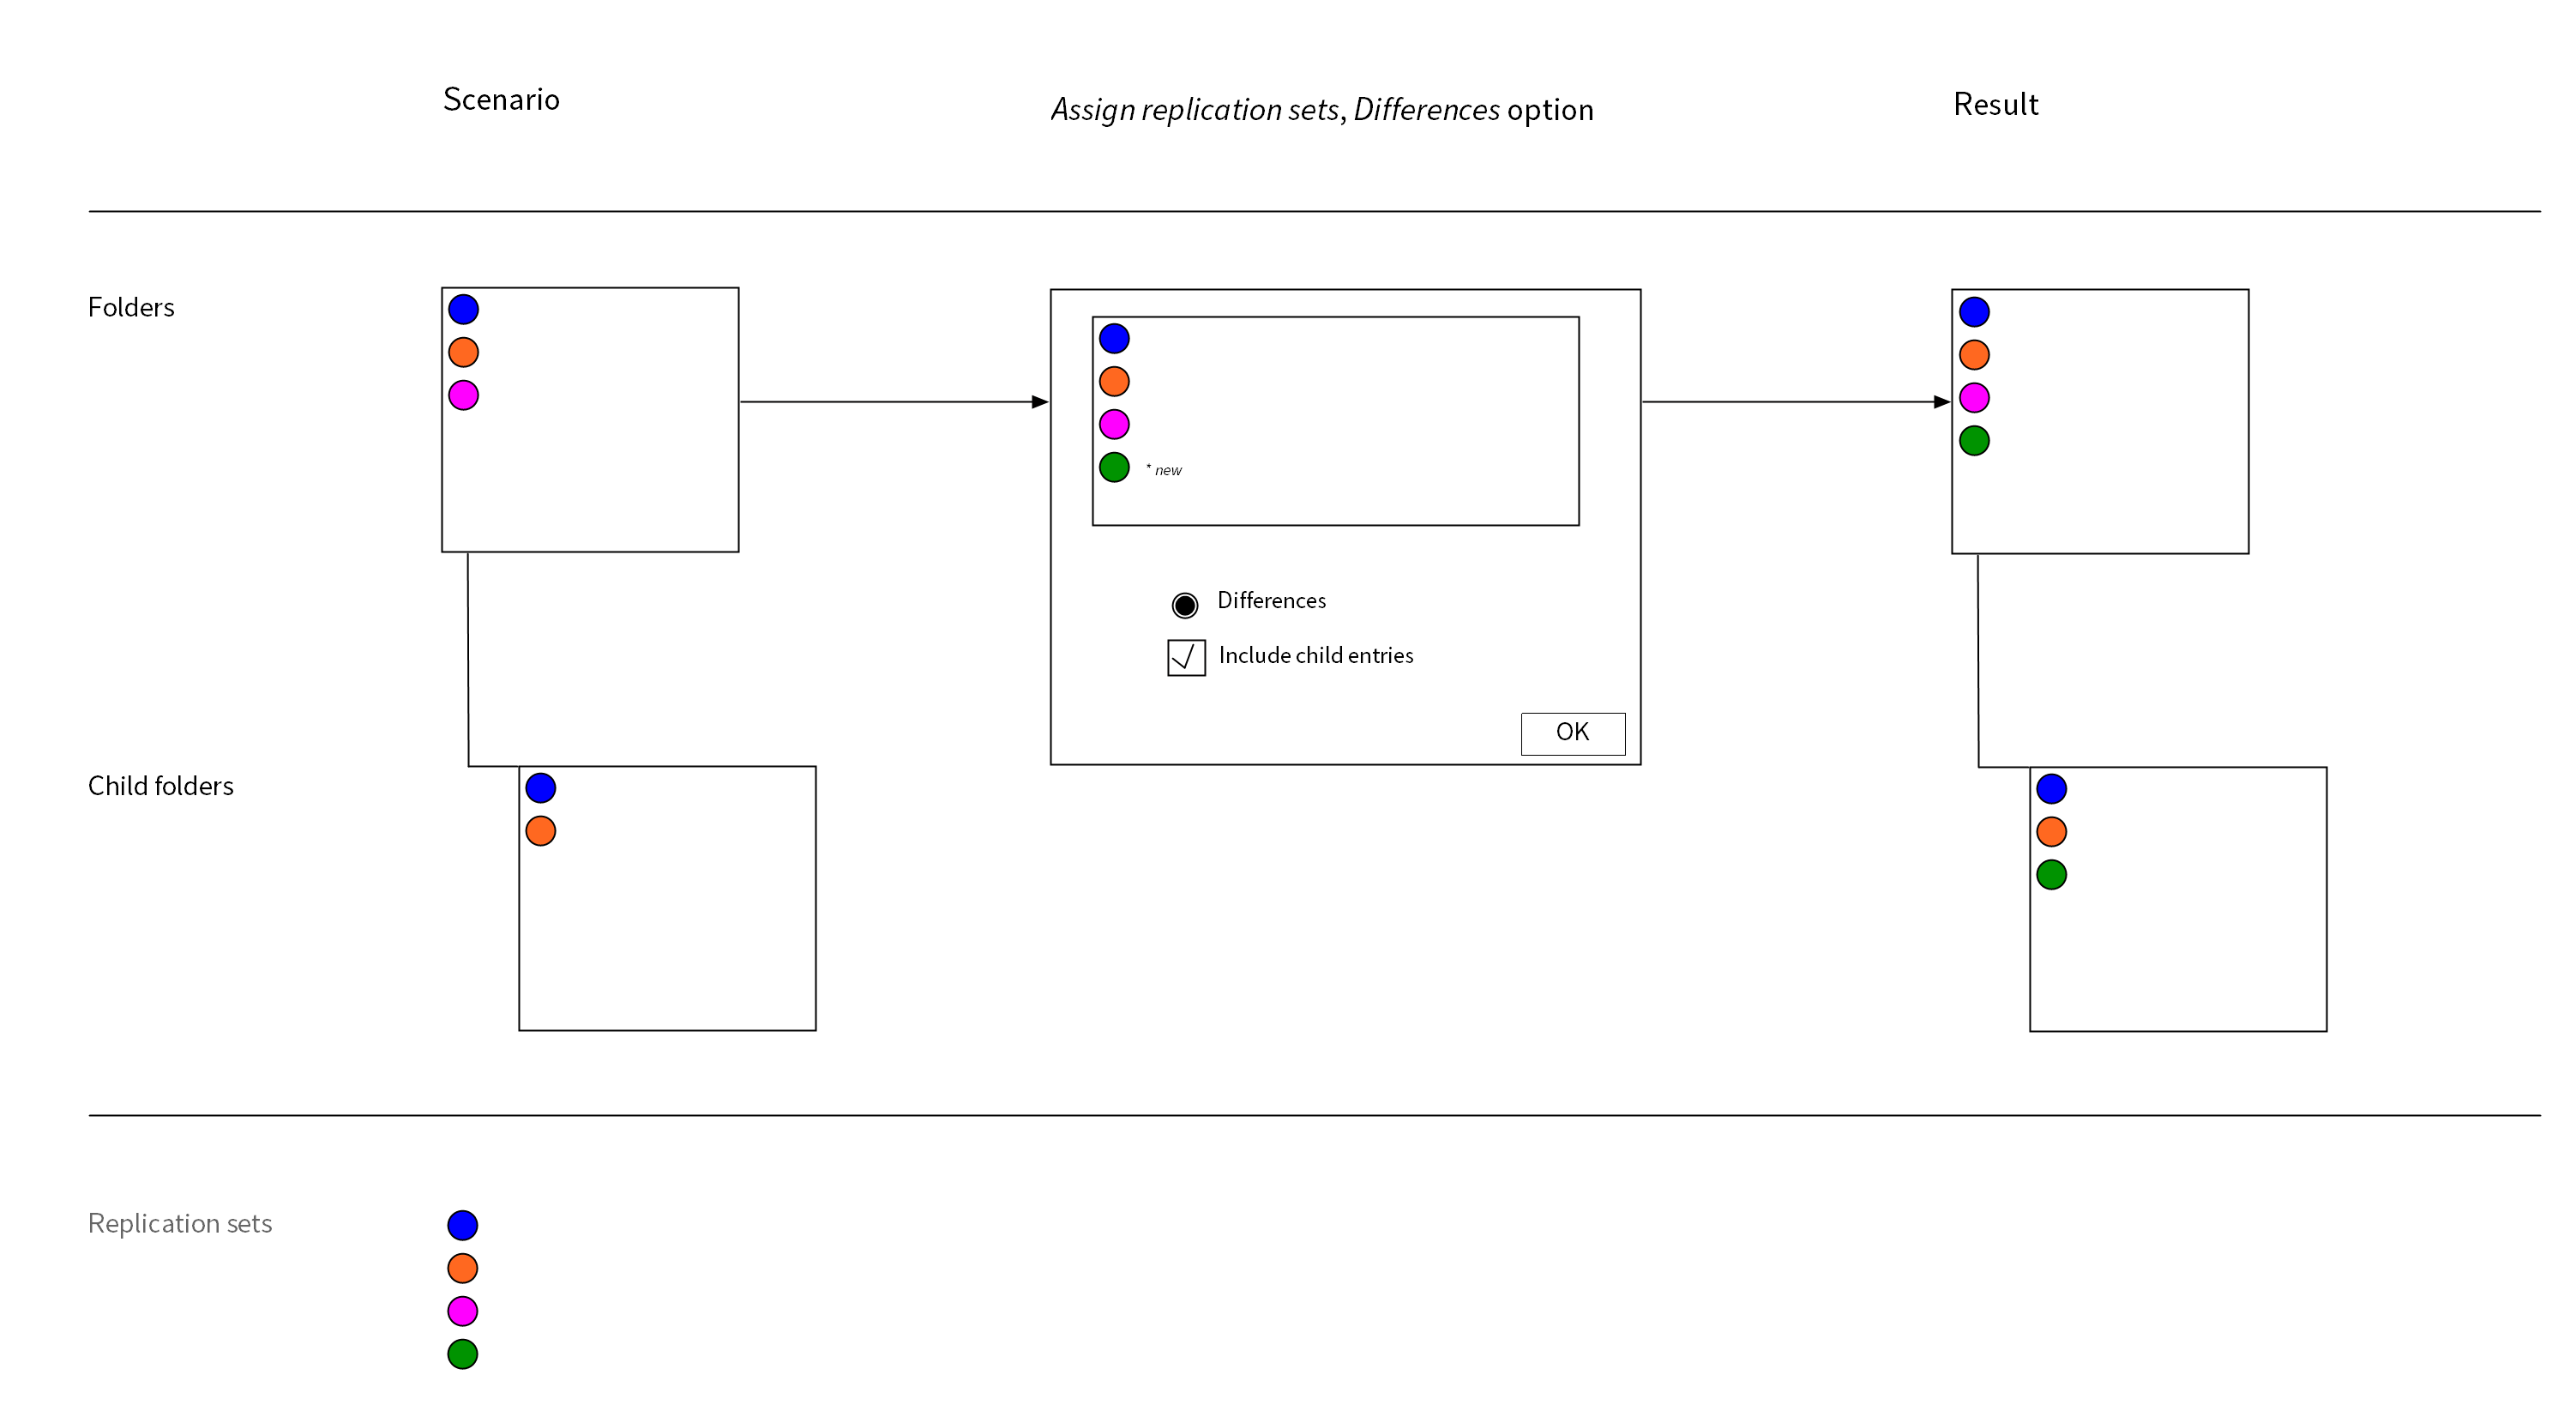
In the example above, a folder and its child folders have different replication sets. The Assign replication sets dialog box opens for the folder. The Include child entries option is enabled. The Blue, Orange, and Pink replication sets are already assigned to the folder. The Green replication set is added. The Differences option is selected. The Green replication set is added to the list again. This change is passed on to the folder and its child folders. Replication sets from the list that were not changed are not passed on. The Blue, Orange, and Pink replication sets are not assigned again. This means the child folder is not assigned the Pink replication set. The replication sets of the entries that were not changed are retained. Folders and child folders retain their original replication sets and are additionally assigned the Green replication set.
Cut: The replication sets are assigned to the entry. The replication sets that are not within this intersection are removed. This option should only be used in combination with the Include child entries option. Use the Cut option if, for example, it is unclear due to the set Start point for replication which replication sets are assigned to the child entries and you only want to inherit the replication sets selected in the dialog box. In contrast to the Set option, with the Cut option you cannot assign any new replication sets. With the Cut function, you can delete replication sets from child entries that are not contained in the parent entry.
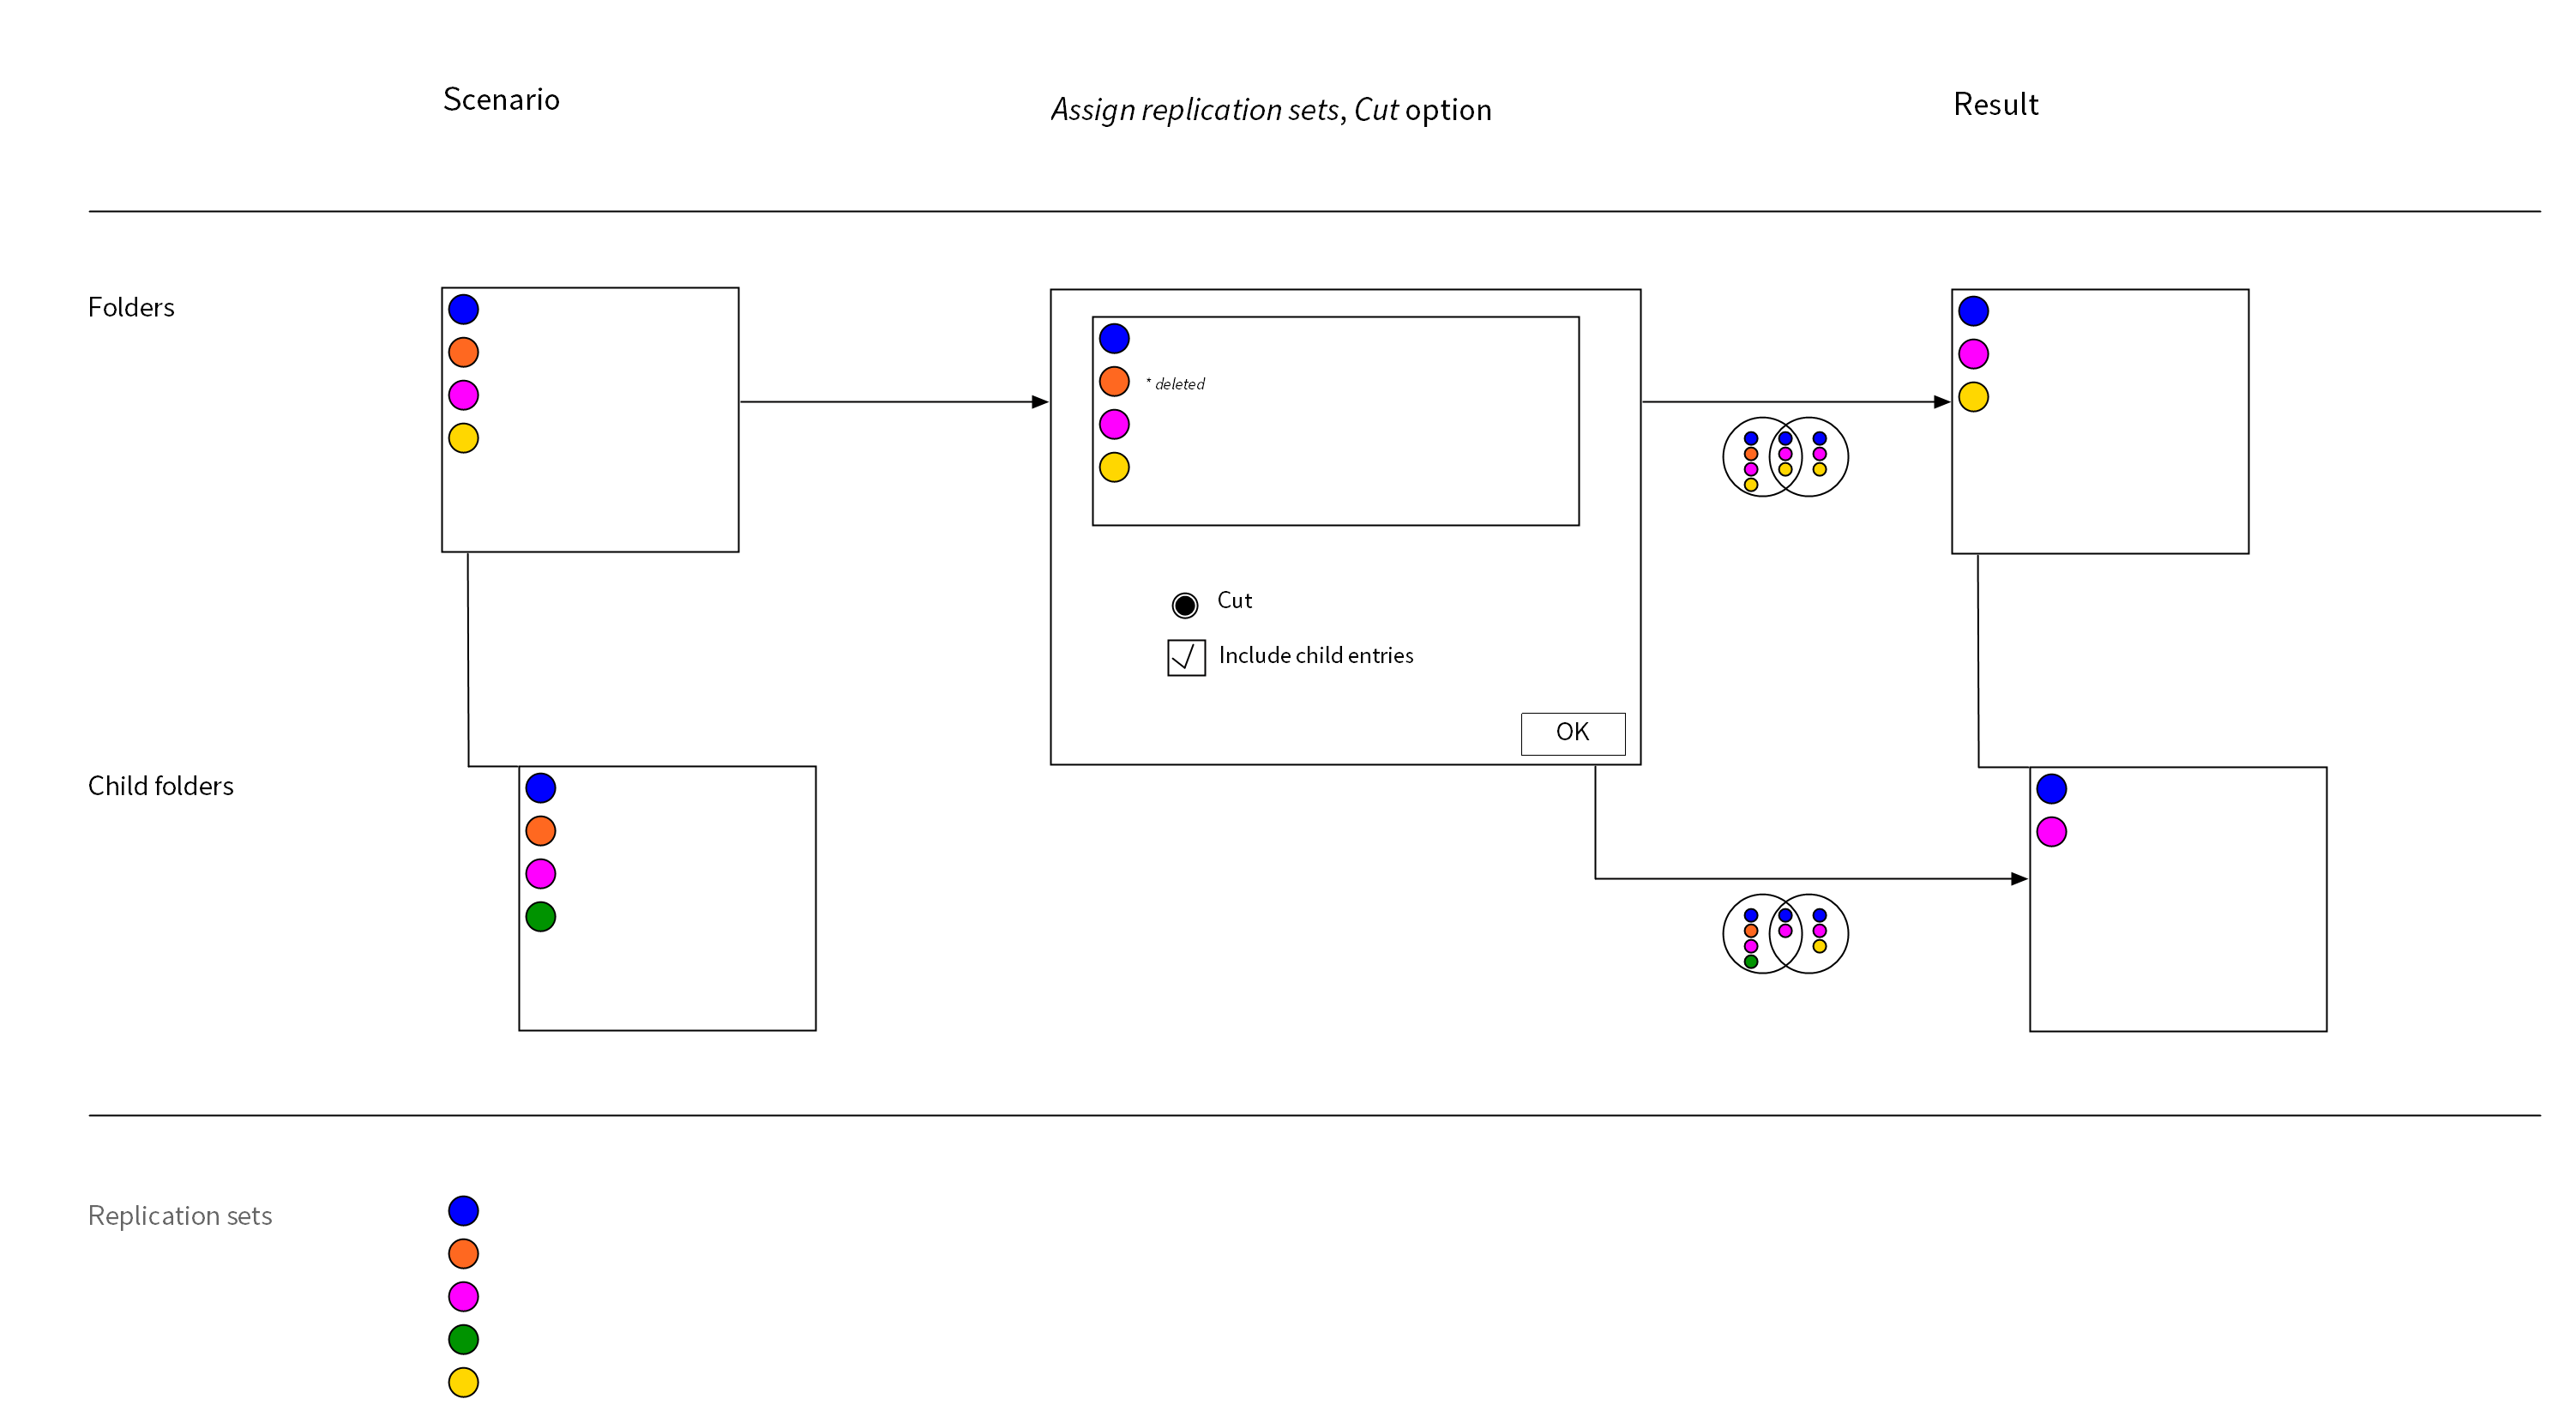
In the example above, a folder and its child folders have different replication sets. The Assign replication sets dialog box opens for the folder. The Include child entries option is enabled. The Blue, Orange, Pink, and Yellow replication sets are already assigned to the folder. The Orange replication set is deleted. The Cut option is selected. The replication sets are assigned. The replication sets that do not overlap between the initial status and the reassignment are removed. Only the Orange replication set is removed from the folder. With the child folder, the Orange, Green, and Yellow replication sets do not overlap between the initial status and the reassignment. For this reason, the child folder is not assigned the Yellow replication set. The Orange and Green replication sets are removed from the child folder.
Make the desired changes to the settings and confirm with OK.
Result
You have assigned the selected replication sets. During the next replication process, the selected entry will be replicated.
Outlook
You can check the transfer status in the site transfer overview.
![]()
On the ribbon, select Transfer overview. You will recognize a replication based on the repository icon in the Type column. Successful transfer is indicated by two check marks in the Status column. For more information, refer to the chapter Monitoring.