# Search entries
You can search for entries (folders or documents) in ELO.
There are different ways to find documents in ELO. You can either use ELO iSearch or the metadata search.
For general information about the search, refer to the Program interface > Search chapter.
# Input
Enter one or more search terms into the input field.
Matching search terms are suggested as you type. To accept a suggestion, double-click on the term.
Information
You will find tips for entering search terms by selecting more under the input field.
Select Start search to search for the term.

Select the Reset search button to restore the default search settings.
# Narrow down search
The following options are available for narrowing down your search:
# Narrow down areas
You can limit your search to specific areas.
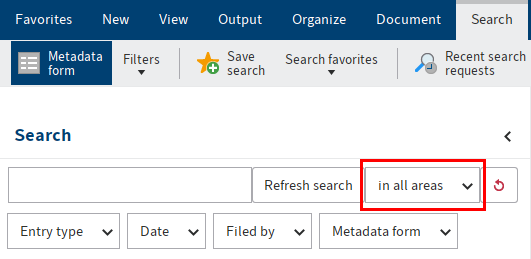
Do this by selecting in all areas and choosing the areas.
If you have selected multiple areas, the search behaves as follows:
One search term:
- If you enter one search term, entries containing the search term in one of the areas are shown.
Multiple search terms:
- AND search: With an AND search (entering terms without a connecting element, e. g.
dog cat), all entries that contain all search terms in one of the searched areas are shown. - OR search: With an OR search (entering terms with a comma, e. g.
dog, cat), all entries that contain at least one search term in one of the searched areas are shown.
Information
For technical reasons and to improve ELO iSearch performance, these areas cannot be searched in combination in the AND search.
Example
You search for two terms in different areas: One of the terms is in the full text of a document, and the other is in the short name. ELO iSearch does not return any matches. In this case, it only lists results that include all search terms in the same area.
If you search for just one of the terms and restrict the search using filters, you will get better results.
# Narrow down folders
You can narrow down the search to a single folder.
Information
For technical reasons, this option may cause the search results to take a long time to load.
- In the Repository work area, select the folder you want to search.
- Switch to the Search work area.
- On the ribbon, select Search > Search logic > Current folder only.
- Make additional settings as required.
You need to select Start search again for the restrictions for a previously performed search to take effect. If you select the Current folder only option, the searched folder is displayed in a tooltip.
# Display search results
In the Search work area, you can use the same functions on entries as in the Repository work area, for example edit documents, create tasks, or send entries.
To go to the filing location of the selected entry, select View > Go to on the ribbon.
The search results are shown in multiple columns when the default settings are used. The table columns correspond to the fields of the metadata forms. The results can be filtered within the columns. By clicking the column headers, the results can be sorted in ascending or descending order.
# Context menu
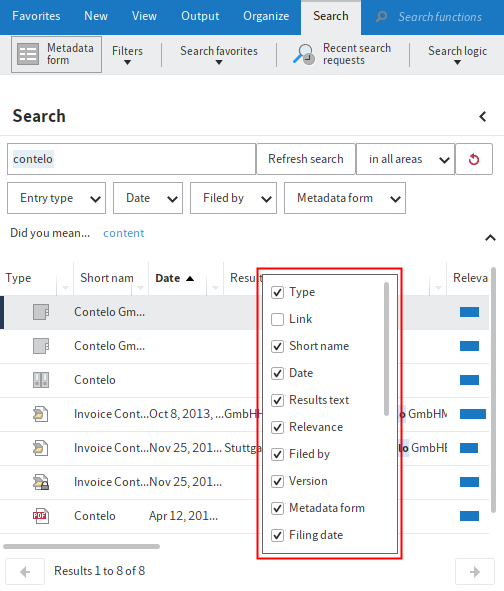
Right-click a column header to open a context menu. Select the columns that you want to display.
# Numeric values
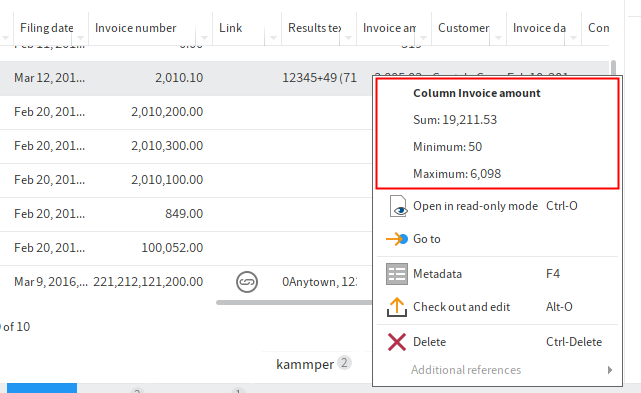
ELO provides the following additional information in the context menu for columns that only contains numeric values.
- Sum: Calculates the column sum.
- Minimum: Returns the lowest value in a column.
- Maximum: Returns the highest value in a column.
# Filters
You can apply filters to the columns of the search results.
![]()
You can access the filters via the arrow icon next to the column label.
# Highlighted full text matches
Matches are highlighted in the full text preview. Switch to the Full text option in the viewer pane.
![]()
If the document contains more than one match, you can jump back and forth between the matches in the full text using the Show next hit (arrow pointing downwards) and Show previous hit (arrow pointing upwards) buttons.
You can also display the hits in the Results text table column. Enable the Results text option under Ribbon > User menu > Configuration > Display > Search.
# Display mode for search results
With the default settings, the search results are displayed as a list. You can also view search results as a tile, table, or tree structure. You can access the settings via Toolbar > Display options.

Outlook
You will find more information on the search here:
- Program interface > Search: General use, wildcard search, phrase search
# Search a business object

For business objects, you start a search within the region of a business object via the search field in the viewer pane. The system then searches for the entered short name. The search is restricted to the region of the business object, including the associated child folders.
# Filters
ELO iSearch offers the option of adding filters. These filters can be used to refine the search.
You can access the filters under Ribbon > Search.
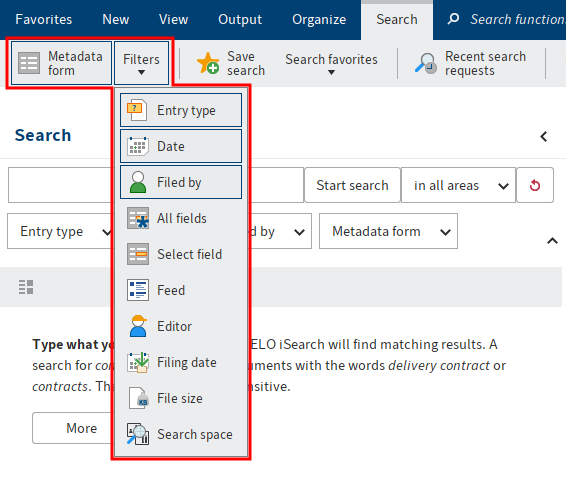
ELO iSearch provides the following filters:
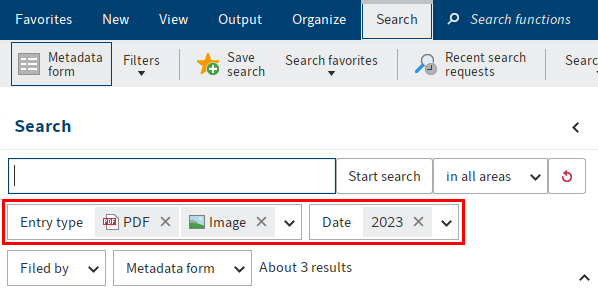
- Metadata form: Filters the search by the selected metadata form.
- Entry type: Filters the search by the selected entry type (e.g. folder, image document, Word document).
- Date: Filters the search by the selected document date.
- Filed by: Filters the search by the user that filed the entries.
- All fields: Enables the user to search in all fields.
- Select field: Enables the user to search a field in a metadata form. You can select multiple fields in a form by holding down the CTRL key.
- Feed: Enables the user to search posts and hashtags within the ELO feed.
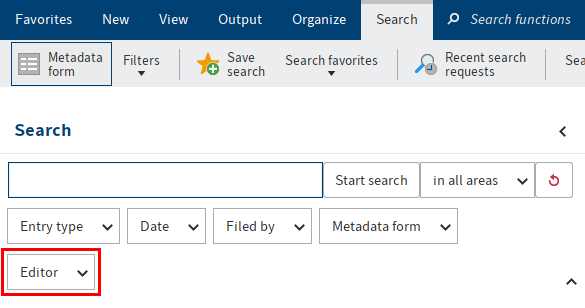
- Editor: Filters the search by the user entered as the editor in the Metadata dialog box.
- Filing date: Filters the search by the selected filing date.
- File size: Filters the search by the selected file size.
- Search spaces: Enables you to run a search in a selected space.
Please note
If you search for NOT, OR, or AND via the search field or filters, you may encounter issues during your search.
# Enable/disable filter
Click to enable or disable the filter. You will recognize an active filter based on the button's darker color. As soon as you have enabled a filter, the corresponding field appears below the search field.
Click the arrow icon to the right of the field to open a drop-down menu for selecting options.
The selection options vary depending on the filter.
The selected setting appears in the filter field.
The filter becomes active when you start a search.
Alternative: Select Reset search to filter the search results for a search that has already run.
# Combine filters
You can combine filters.
- Multiple filters: By combining different filters, you can narrow down the search results based on multiple criteria. This allows you to create precise search requests.
- Multiple filters of one type: Use multiple filters of the same type to set more advanced filters. For example, multiple Entry type filters allow you to perform a search filtered by multiple entry types.
# Negate filters

You can set filters to exclude specific values.
Right-click the filter field to open the context menu. In the context menu, enable the option does not contain.
The filter is now in is not mode.
# Remove filters
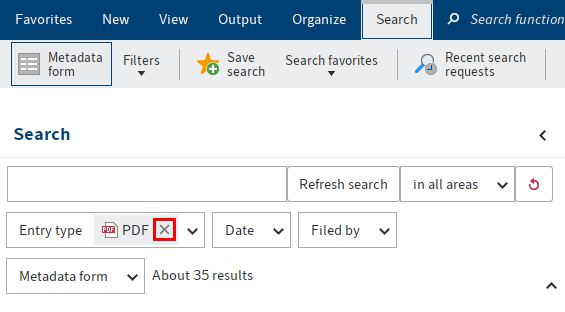
Use the X icon next to the selected filter value to remove it.
# Filter with date
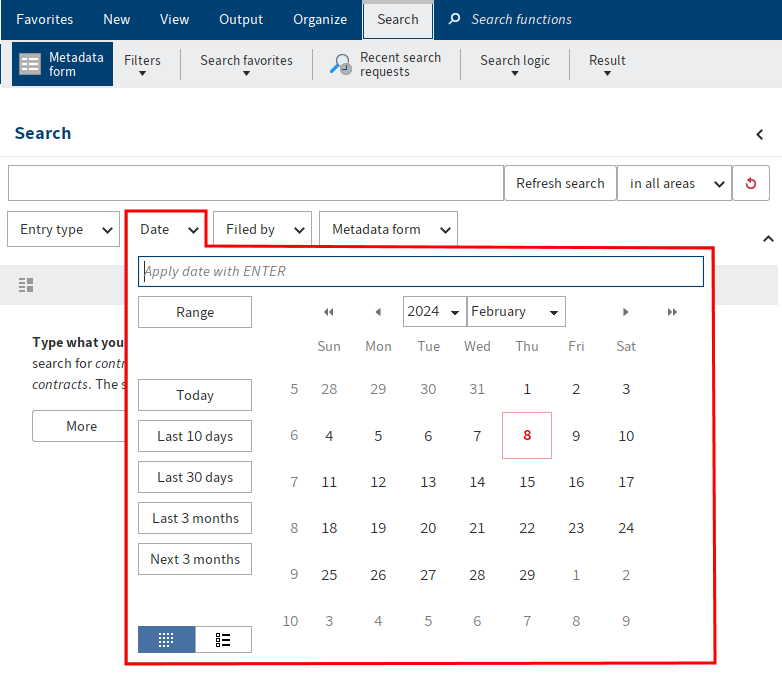
Use the Date and Filing date filters to filter your search by a specific date or period. Both filters apply the same principle.
This type of filter offers the following options:
Input field: To select a specific date, click the corresponding date in the calendar.
Alternative 1: Enter the date manually in the input field. The following pattern is recommended: MM/DD/YYYY.
Alternative 2: Enter the period manually in the input field. The following rules apply:
Past: If you enter a minus sign and a number, the corresponding period in the past is selected.
Future: If you enter a plus sign and a number, the corresponding period in the future is selected.
Months: If you add an
mto the number value, the period is calculated in months instead of days.Examples
For example, if you enter the value
-14, the filter applies the setting Last 14 days.In contrast, if you enter the value
-6m, the Last 6 months setting is applied.
Range: Selecting Range opens two additional input fields (from and to). Use these fields to define a period of time. Manually enter the start and end date or select them using the calendar.
Today: Select Today to automatically select the current date.
Last 10 days: Selecting Last 10 days automatically sets the period to the last 10 days.
Last 30 days: Selecting Last 30 days automatically sets the period to the last 30 days.
Last 3 months: Selecting Last 3 months automatically sets the period to the last 3 months.
Show calendar (small calendar icon): Selecting Show calendar opens a calendar in the middle of the drop-down menu.
Show list of years (list icon): Selecting the Show list of years button opens a list of years in the middle of the drop-down menu. To select one or more years as a date range, enable the corresponding check boxes.
# Filter: Numeric
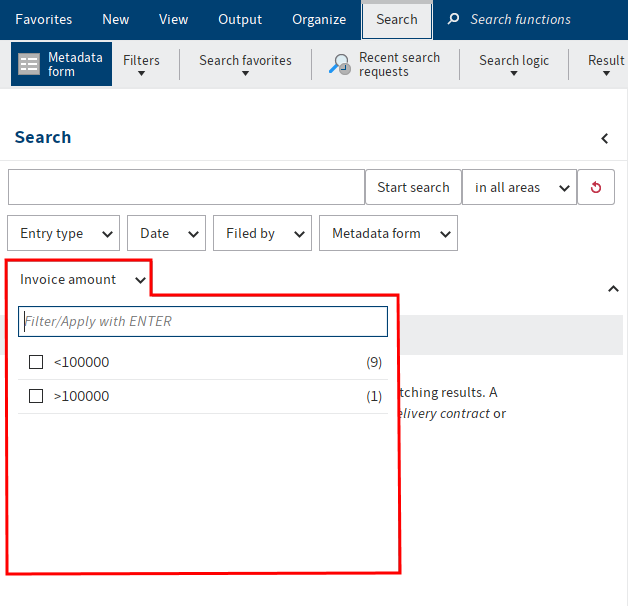
Metadata fields with the file type Number can be filtered by number values and number ranges.
Enter the desired number value or number range in the filter input field.
To enter a number range, you have the following options:
- <: To enter a number range less than a specific number, enter the less-than symbol (
<) and the number. - >: To enter a number range greater than a specific number, enter the greater-than symbol (
>) and the number. - ...: To enter a range between two numbers, separate these numbers with three periods (
...).
# Save search
You can also save searches as favorites. There are two ways to start a new search with a search favorite:
- From the Search favorites drop-down menu on the Search tab
- From the search favorite tile in My ELO
Search favorites are automatically saved in the Search favorites drop-down menu and as a tile. You can find the tile in the tile navigation of My ELO under Hidden tiles.
If you click a search favorite, the search term is applied to the search field. You can start a new search with the search favorite.
# Manage search favorites
Available in: Search work area > Ribbon > Search > Search favorites
Use this function to rename or delete a search favorite.
Use the arrow icons to change the order of the favorites in the drop-down menu.
Select the Delete button to delete the selected favorite. The favorite is initially marked red. The favorite is deleted once you select OK, closing the dialog box. If you close the dialog box with the Cancel button, the delete action is reversed.
# Search metadata
Available in: Search work area > Ribbon > Search > Search logic
Keyboard shortcut: CTRL + F
This function enables you to search the fields of metadata forms.
In addition to using the ELO iSearch, ELO enables you to search the metadata using metadata forms. The metadata search allows you to search for specific metadata.
Information
If you want to use a metadata form for the search, your administrator first has to enable the corresponding setting.
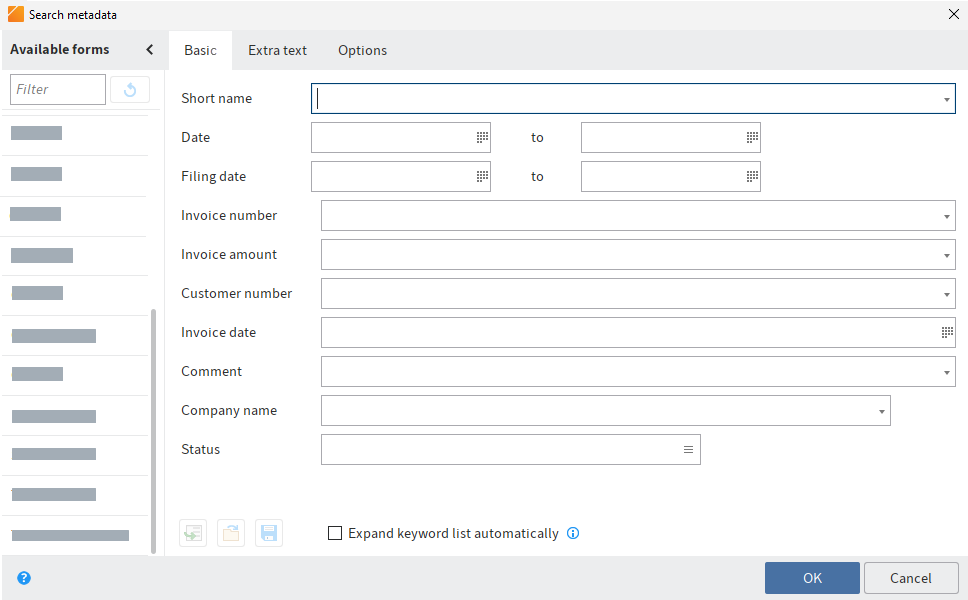
The following options are available in the Search metadata dialog box:
# Form selection
All metadata forms that can be used as a search form are displayed in the Available forms area. Select the metadata form that you used to file the document you are searching for, e. g. Invoice. This limits the search to documents that have been assigned this metadata form.
Information
The Filter field enables the user to browse or filter the Available forms area.
# Dashboards
In the Search work area, buttons are available that allow you to launch dashboards after conducting a search with a form filter. These buttons are only displayed if dashboards have been configured for the corresponding metadata form.
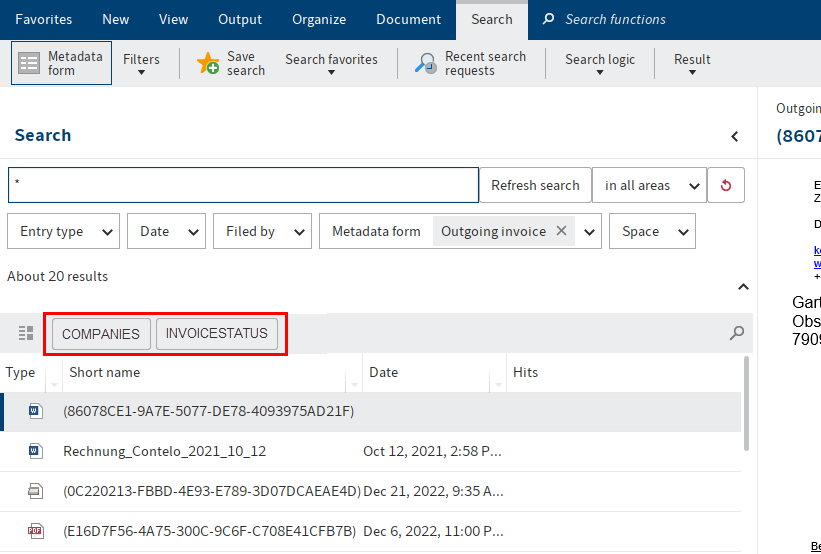
Dashboards are created by the administrator. They can only be created with generation 2 metadata.
The dashboards allow you to visualize metadata of entries filed with the same metadata form in different ways. You can use bar charts, line charts, doughnut charts, and key figures.
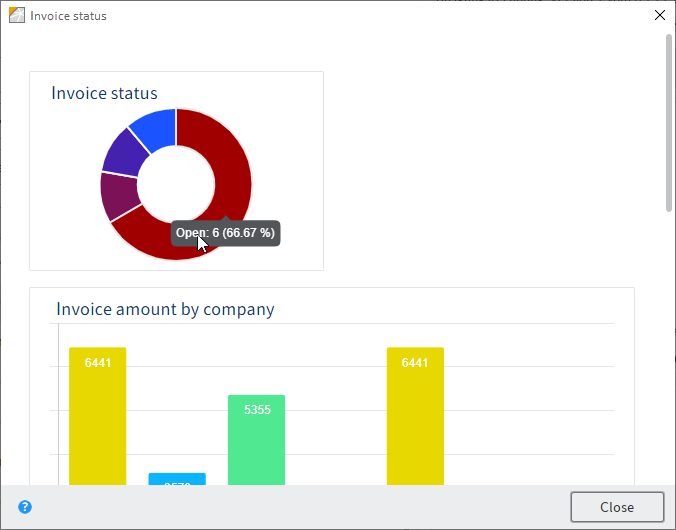
Move the cursor over the charts on the dashboard to view details.
# Search fields
The search fields of the metadata form are shown on the corresponding tab. They correspond to the fields on a metadata form. The tabs and search fields that appear depend on the settings for the corresponding search form.
You can use the search fields to search specifically for the entries in these fields, such as for the Invoice number or the Filing date.
Information
When searching the metadata, it is possible to make entries to multiple fields of a search form. This allows you to create complex search queries.
For example, enter the status Unpaid in the Status field. ELO then searches exclusively in the Status input field of the documents that were filed with the Invoice metadata form.
Information
You can use keyword lists for entering search terms.
# Options
The Options tab provides additional options to restrict the search to specific criteria.
Personal identifier: Use this field to search the contents of the Personal identifier field. Enter the term you entered in the metadata. If you want to search all entries with a personal identifier, enter * to the search field.
End of deletion period: These two fields enable you to restrict the search to entries with a specific deletion period.
End of retention period: These two fields enable you to restrict the search to entries with a specific retention period.
Entry type: This enables you to restrict the search to specific entry types (e. g. folders, PDF, Word document).
Notes: Allows users to search for notes. Select the note type from the drop-down menu.
Search range: The options in the Search range define what is to be searched.
Search mode: The search mode is important when you use multiple fields for the search. Use the Search mode drop-down menu to specify whether the fields are linked with Boolean AND or with Boolean OR.
- AND: Only matches meeting all criteria are returned.
- OR: All matches meeting at least one of the criteria are returned.
Filed by: Allows users to restrict the search to entries by specific users.
File name: Allows users to restrict the search to entries with a specific file name.
# Start search
Select the OK button when you have completed the search form.
# Previous searches

If you have already carried out multiple search requests, selecting Enter metadata using the most recently saved/displayed entries [F3] (icon with green arrow) will open a list of previous search requests. Both the search term and the field used are displayed.
Select one of the listed entries followed by OK. The terms will then be transferred to the search form.
# AND/OR search in fields

To search fields using AND/OR links, the search terms must be placed in quotation marks. One of the operators (AND or OR) must be placed between the search terms.
# Remove from search results
Available in: Search work area > Ribbon > Search > Result
Use this function to remove individual entries from the list of search results. The entries remain unchanged in ELO. If you perform the same search again, then all matches will be displayed.
# Recent search requests
Available in: Search work area > Ribbon > Search
ELO saves the ten most recent search requests. Click the search request to run the search again.
The search requests are saved when you close ELO.
The menu contains previous ELO iSearch requests and metadata search requests.
# Current folder only
Available in: Search work area > Ribbon > Search > Search logic
Use this function to restrict the search to the folder selected last in the Repository work area. You need to select Start search again for the restrictions for a previously performed search to take effect. If you select the Current folder only option, the searched folder is displayed in a tooltip.
Please note
If the Current folder only option is enabled, the search can take a lot longer.
# Show deleted entries
Available in: Search work area > Ribbon > Search > Search logic
To search exclusively for deleted entries, enable the function Show deleted entries. If the Show deleted entries option is enabled (highlighted yellow), you will ONLY see deleted entries in the search results.