# Edit course
Once you have created a course, you need to edit the release settings.
All courses can be released on the learning platform, regardless of whether the course will take place on the learning platform. This allows participants to enroll in all course types via the learning platform, provided you have released the course there.
This chapter addresses the following topics:
- Add course information
- Create learning path
- Add course photos
- Create course material
- Insert e-learning
- Insert video file
- Embed YouTube or Vimeo video
# Add course information
Information
Once you have created a course, you can enter additional information in the course form. Some of this information is shown on the learning platform as the course description.
Information
For a course to be able to appear on the learning platform, the Settings tab has to be edited.
Depending on which fields you complete, a confirmation dialog box is generated.
Method
Select the course whose form you want to edit.

Fig.: 'Form' button
Optional: If the content of the course is shown, click Form.
Change or complete the fields on the Course data, Contents, Requirements, and Settings tabs as required.
'Course data' tab
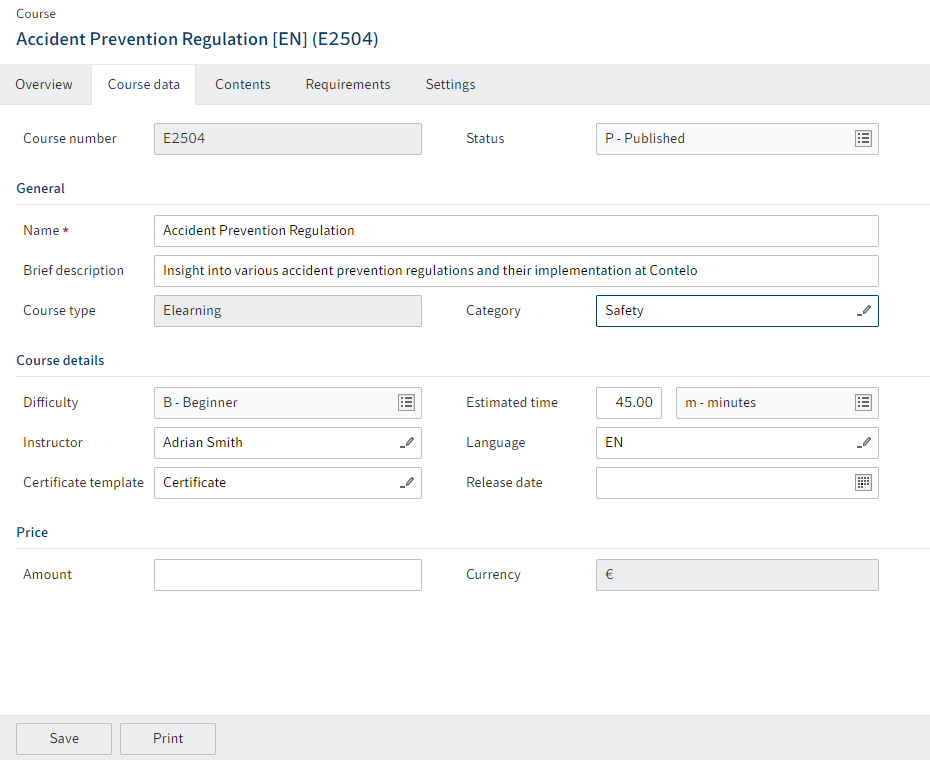
Fig: 'Course data' tab
Status: You can change the status of the course via the drop-down menu.
Status Use D – Draft Do not change this status as long as you do not want the course to be visible on the learning platform. T – Preview Use this status if a course is still being edited, but you want to announce it on the learning platform. Courses with this status cannot be booked or completed yet. You can use the Course description field to configure an announcement text. P – Released Use this status so that a course can be booked and/or completed on the learning platform. Information
For the course to be visible on the learning platform, you also have to edit the view in the Settings.
Field Meaning Instructor In the course form, enter an instructor if this person is carrying out all sessions. Otherwise, configure the instructor in the individual sessions. If you enter an instructor for the course, they are given access to the course and can create course materials and course contents. Certificate template If you configure a certificate template here, participants receive a certificate after completing the course. With e-learning courses, the certificates are created automatically once the course is completed. For courses with sessions, the certificates are automatically created when the session has been closed with the Close session function. Release date If you enter a release date here, the status of the course automatically changes to P – Released on this date. Price You can set a price for the course. This is shown on the learning platform. If a price is set, a confirmation dialog box always appears when booking a course. Thousands separators are automatically added on the learning platform. The price of a learning path is not automatically calculated based on the total price of the courses in the learning path. This way, a learning path can be offered at a lower price than booking the courses separately. 'Contents' tab
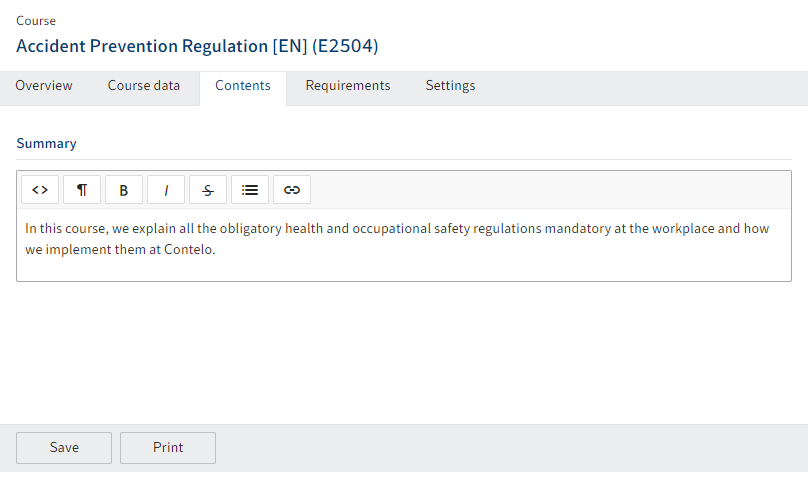
Fig: 'Contents' tab
Field Meaning Summary The text appears on the learning platform on the start page for the course. 'Requirements' tab
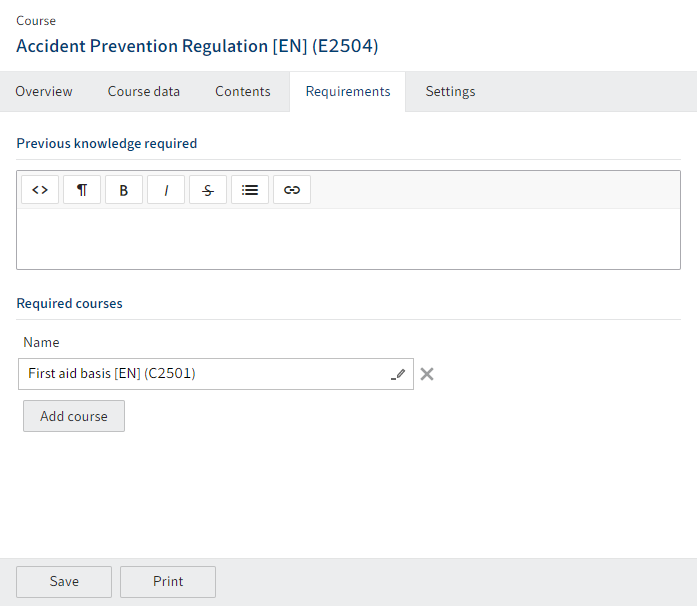
Fig.: 'Requirements' tab
Field Meaning Required courses If you select courses here, participants can only begin the course if they have already completed the required courses. Until then, the button to enroll in the course is locked. 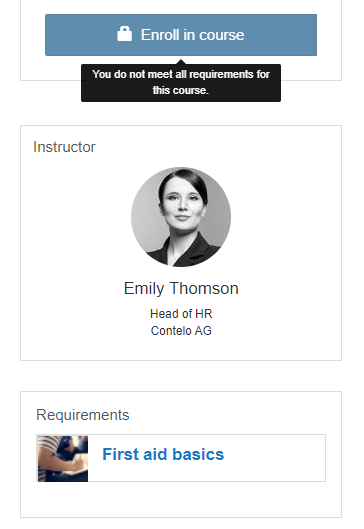
Fig.: Locked course on the learning platform
'Settings' tab
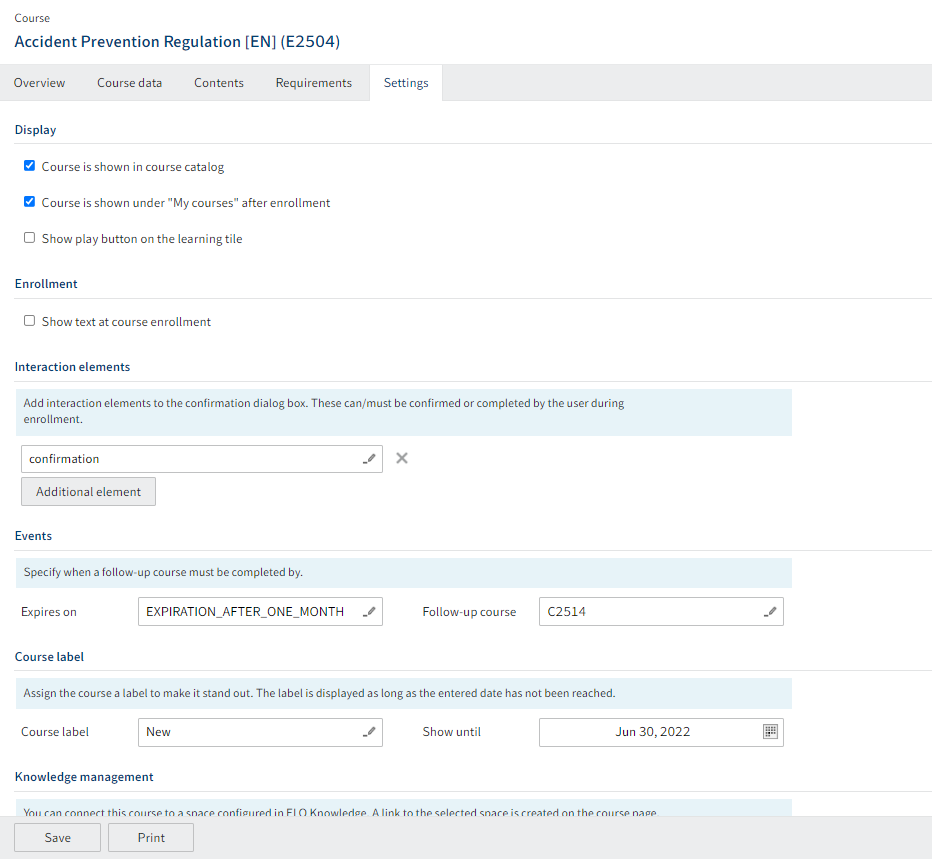
Fig.: 'Settings' tab
Visibility: With these options, you can control where the courses are shown on the learning platform.
Option Meaning Course can be found in the course catalog The course is released on the learning platform on the Course catalog tab. With this option, participants can book courses themselves via the course catalog. By checking this box, you can also determine whether a course that is part of a learning path also appears as a separate course in the course catalog. Course is shown under "My courses" The course appears for enrolled users on the My courses tab on the learning platform. With this option, participants can be assigned courses they are unable to book themselves via the course catalog. Once a course administrator has enrolled participants using the Enroll participants function, the course is visible to the participants. Visibility on the My courses tab is also a quick way to access enrolled or started courses and to get an overview of completed courses. Show play button on the learning tile This option allows users to open e-learning courses and videos right from the course preview. The course overview page does not have to be opened. Information
If you check the Course can be found in the course catalog box in the form for a learning path, it is shown under Learning paths, and not in the course catalog.
If you check the Course can be found in the course catalog box in the form for a video, it is shown under Media library, and not in the course catalog.
Please note
Under Display, you can control the general visibility of a course on the learning platform. You also have to change the status of the course on the Course data tab for it to appear on the learning platform.
Option Meaning Enrollment As soon as you check the Show text at course enrollment box, a text field appears. When a participant enrolls in a course, a dialog box appears with the text entered in this field. Interaction elements You can select interaction elements that appear in the confirmation dialog box when booking a course. These are especially useful for integrating business terms and conditions or requesting specific information. You can assign multiple interaction elements for each course. These can be optional or mandatory. Events If you want users to complete another course after a certain period or if the course needs to be repeated, you can enter the follow-up course here. When the specified deadline is reached, the course appears under My courses on the learning platform. Course label You can assign a course a label to make it stand out on the learning platform. You can select one label for each course. Since you usually only want to draw attention to courses for a limited time, you can enter the date when the label disappears. Otherwise, you will need to delete the label manually. The labels New and Coming Soon are provided as standard. Knowledge management If you use ELO Knowledge in addition to ELO Learning, you can link a course to a space here. This allows participants to discuss technical topics outside of the course. On the learning platform, the link Discussion on the topic is created and links to the associated space. 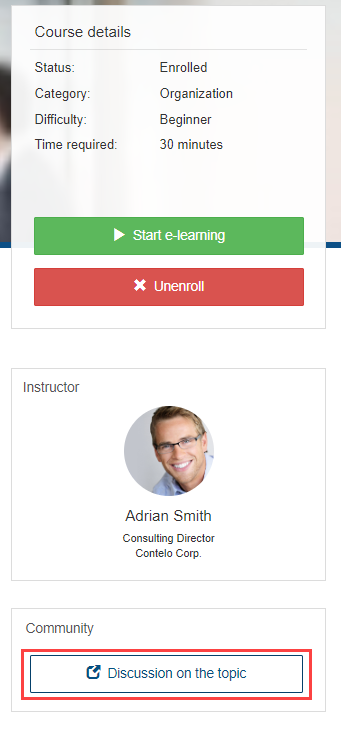
Fig.: Link to ELO Knowledge on the learning platform
Confirm your changes with Save.
Result
The changes to the form are applied.
If you have set the course status to Preview or Released and enabled a visibility option, it can be accessed on the learning platform.
# Create learning path
Information
You can combine multiple courses to form a learning path. A learning path can consist of all course types and contain different course types.
Requirement
You need all the courses you want to be part of the learning path.
Method
On the New tab, click Learning > New course.
Create a course with the Learning path course template.
Select the learning path.
Optional: If the content of the learning path is shown, click Form.
Learning paths are generally edited in the same way as described under Add course information.
Click the Contents tab.
Under Included courses, select the courses you want to be part of the learning path.
The order in which you enter the courses does not have any effect on the order the courses have to be completed.
To define a specific order, you have to edit the courses: For the included courses, enter the courses on the Requirements tab under Required courses. The learning path takes the information from the individual courses.
On the Settings tab, set the visibility of the learning path under Visibility.
Information
If you check the Course can be found in the course catalog box, it is shown on the learning platform under Learning paths, and not in the course catalog.
You can set whether a course is only shown as part of the learning path, or as a separate course in the course catalog as well.
- Only as part of the learning path: In the learning path, check the Course can be found in the course catalog box. Do not check this box for the course.
- As part of the learning path and as a course in the course catalog: In the learning path, check the Course can be found in the course catalog box. Also check this box for the course.
Confirm your changes with Save.
Result
The learning path is released on the learning platform and can be completed by participants.
# Add course photos
Information
You can add photos for the learning platform to the course. You can configure two different pictures as the cover photo and the preview image. If you only configure a cover photo, this picture will also be used as the preview image.
Method
Select the course you want to add course photos to.
On the Course tab, click Add course photos.
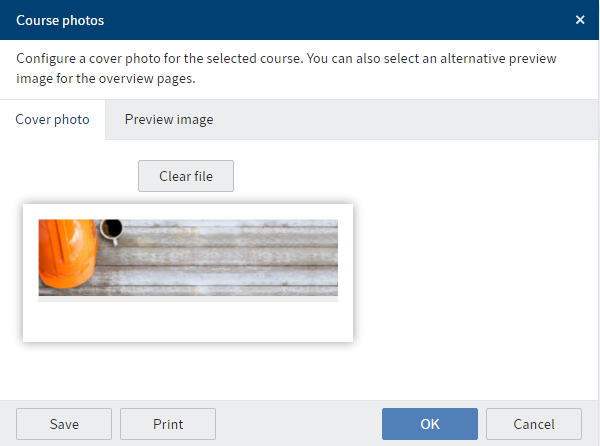
Fig.: 'Cover photo' dialog box
On the Cover photo tab, select a cover photo.
Optional: On the Preview image tab, select an image for the course preview.
The following methods are available:
- Select a file button
- Take a picture button if a webcam is connected
- Drag-and-drop onto the gray rectangle (only in the ELO Web Client)
Click OK.
Result
The images are filed and shown on the learning platform as soon as the course has been released.
# Create course material
Information
You can create course materials along with a course. The course materials are provided to participants on the learning platform for download.
When you create a course, it automatically contains the Course materials child folder. You can use this folder or create additional folders to structure your course materials. Each course material folder is shown on the learning platform as a tab.
Method: Create folder
Select the course folder you want to add a new folder to for course materials.
On the New tab, click New folder.
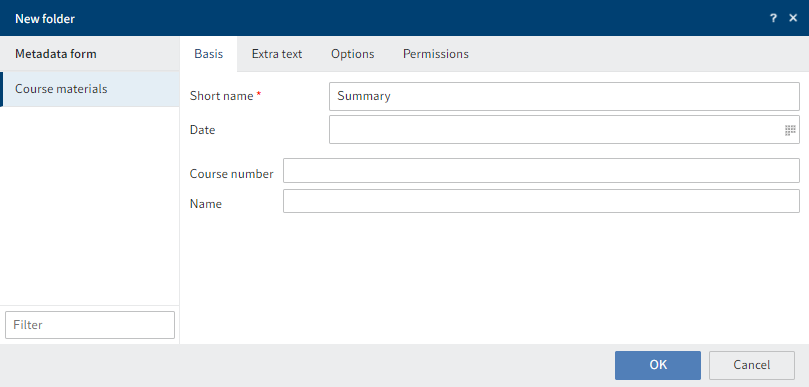
Fig.: 'New folder' dialog box
Enter a short name. The tab on the learning platform is named based on the short name.
Information
You can change the short name later on. If you want to use the original Course materials folder with a different name, change the short name as follows:
- Select the Course materials folder.
- Press F4 or click Organize > Metadata.
- Change the short name.
Course number and name: These two fields are completed automatically when the course is created.
Click OK.
Result: Create folder
The folder for course materials is created in the course folder.
Fig.: Course materials on the learning platform
Outlook: Create folder
Course materials for the participants can be filed to the folder. A folder for course materials is only shown on the learning platform if it contains files.
Method: File course materials
Select the Course materials folder.
On the New tab, click Insert > Insert file.
Select the course materials from your file system.
You have the following options:
- Select file: Click the button next to the Select file... field and select the file.
- Drop file here: Drag the file to the selected field and drop it there.
- Drag-and-drop: Drag the file to your client while the Course materials folder is selected.
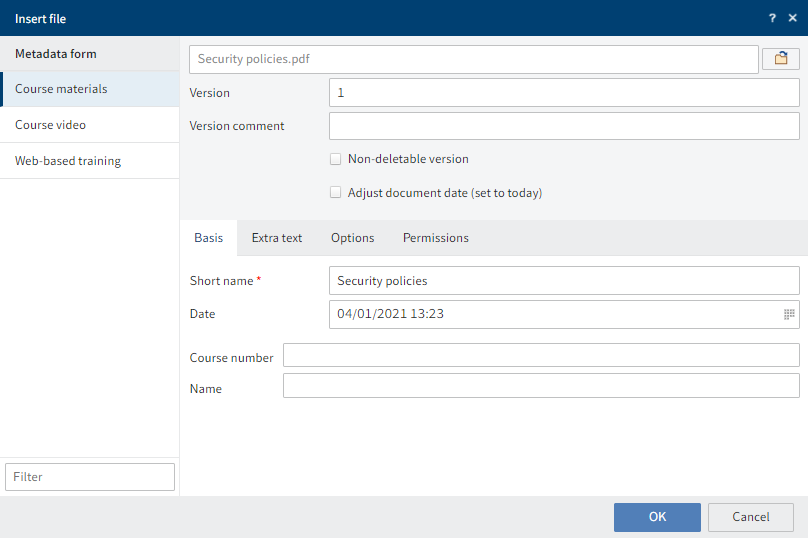
Fig.: 'Insert file' dialog box
The Course materials keywording form is selected automatically.
Course number and name: These two fields are completed automatically during filing.
Click OK.
Result: File course materials
The course materials are filed to the selected folder.
Outlook: File course materials
Once the course is released, the participants can download the course materials from the learning platform.
# Insert e-learning
Information
For a web-based training or video to be able to be shown on your learning platform, you will have to insert it in your course.
Requirement
An e-learning course was created using the New course function.
You have a web-based training that was created or purchased via an authoring tool.
Method
Select the course you want to upload a web-based training for. The file is created directly in the course folder and not in the Course materials folder. This folder is only intended for making additional files available to participants for download.
On the New tab, click Insert > Insert file.
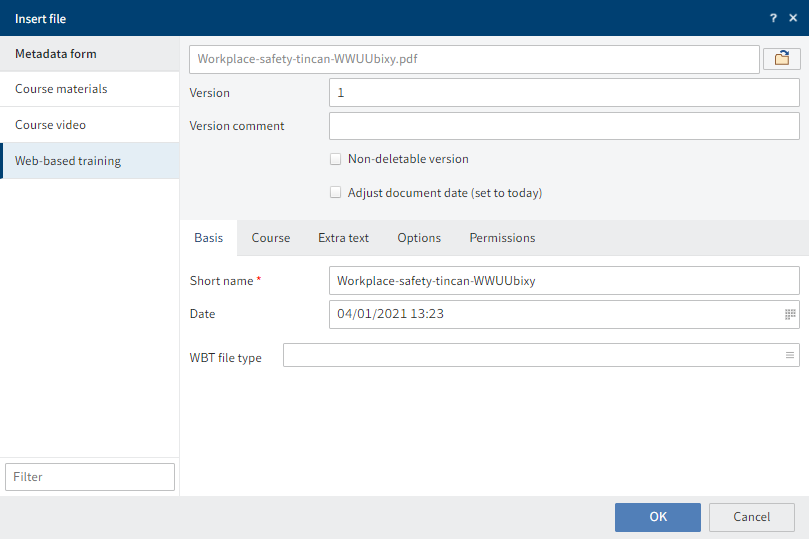
Fig.: 'Insert file' dialog box
In the Insert file dialog box, insert the web-based training.
Alternative: Drag the file and drop it on the course folder.
Select the Web-based training metadata form. This metadata form contains the Course tab. The fields on this tab are blank and do not have to be completed. The fields are automatically completed with metadata from the course on filing.
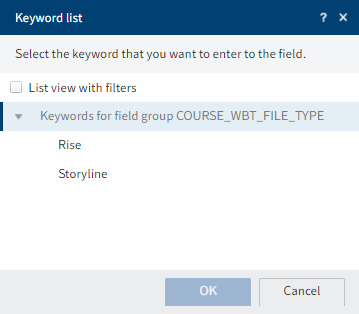
Fig.: 'Keyword list' dialog box
Optional: The default file type is Articulate Rise. To allow Articulate Storyline to read out a web-based training, click in the WBT file type field. Select Storyline in the keyword list and confirm with OK.
Click OK.
Result
The web-based training is filed to the course.
Outlook
As soon as you release the course, it can be completed on the platform.
Information
You can edit a course even if it is already active. Simply upload a new version of the course in the same way. Make sure that no participants are working on the course at this time, i.e have the status started. Otherwise, the progress of course participants will be lost.
# Insert video file
Information
You can embed video files in a course.
Requirement
A video course was created using the New course function.
You have a video file.
Method
Select the course you want to upload a video for.
Select the Video folder in the course folder.
On the New tab, click Insert > Insert file.
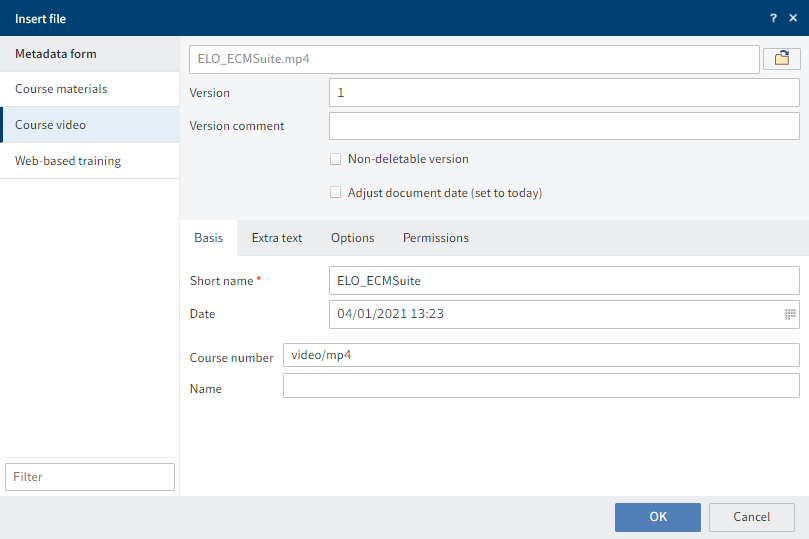
Fig.: 'Insert file' dialog box
In the Insert file dialog box, insert the video.
Alternative: Drag the file and drop it on the Video folder.
Select the Course video metadata form. This metadata form contains the Course tab. The fields on this tab are blank and do not have to be completed. The fields are automatically completed with metadata from the course on filing.
Click OK.
Result
The video is filed to the course.
Outlook
As soon as you release the course, the video can be watched on the learning platform.
If you additionally enable the option Course can be found in the course catalog, the course will appear under the Media library tab on the learning platform.
For more information, refer to the chapter Add course information.
# Embed YouTube or Vimeo video
Information
You can embed YouTube or Vimeo videos in a course.
Requirement
A video course was created using the New course function.
Method
Select the course you want to upload a video for.
Select the Video folder in the course folder.
Create an entry in this folder. This is the easiest way to do so:
On the New tab, click New folder.
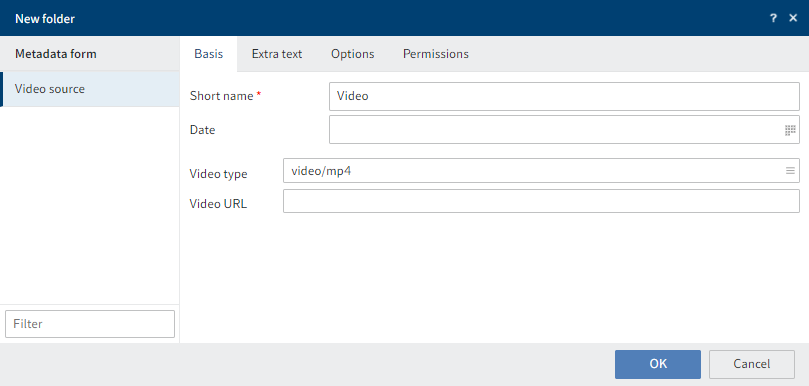
Fig.: 'New folder' dialog box
Click on the field Video type.
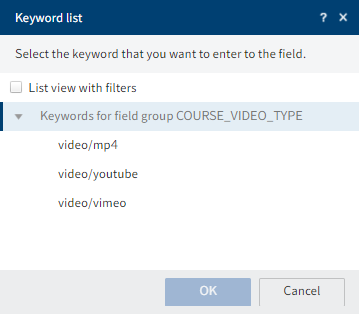
Fig.: 'Keyword list' dialog box
Select the corresponding video platform in the keyword list.
Click OK.
In the New folder dialog box, copy the URL of the video into the Video URL field.
Click OK.
Result
The video is stored in the course.
Outlook
As soon as you release the course, the video can be watched on the learning platform.
If you additionally enable the option Course can be found in the course catalog, the course will appear under the Media library tab on the learning platform.
For more information, refer to the chapter Add course information.