# Create metadata form
Please note
When configuring metadata forms, the number of forms used should not exceed double-digits.
A separate search index is built for each metadata form. A large number of metadata forms therefore requires a large amount of RAM and hard disk space for the ELO iSearch.
This applies for first generation and second generation metadata forms.
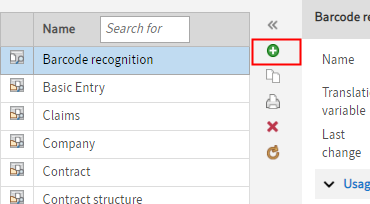
Select the green plus icon Add metadata form.
The New metadata form dialog box opens.
Enter a name for the metadata form in the Name field.
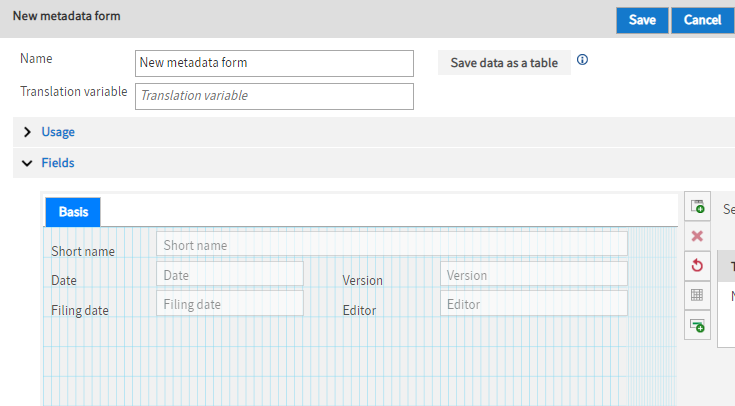
Enter all other information for the metadata form in the New metadata form dialog box.
Information
Read the following information for notes on the corresponding fields and options.
Select Save to save the metadata form.
# Basic data
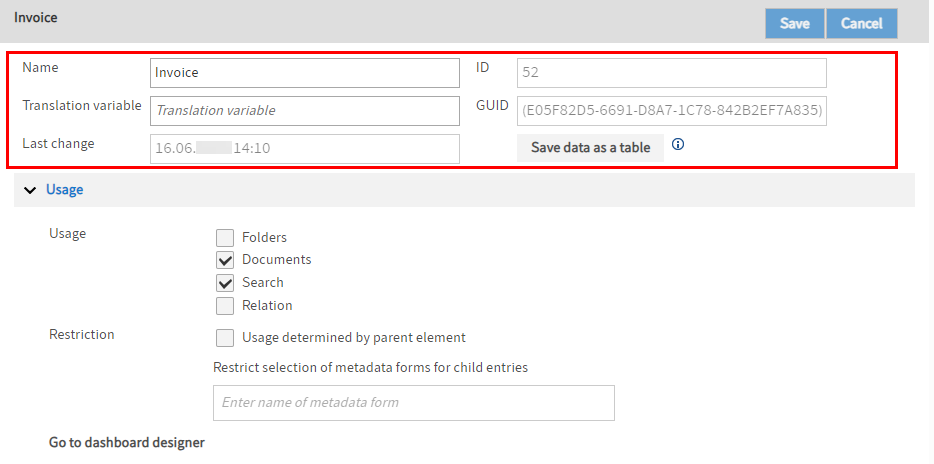
Name: Enter the name of the metadata form here.
Translation variable: This field is where you define a variable that can be used for customizing the program with scripts or for translations, e.g. the name of the metadata form.
Last change: In this field, you can see when the metadata form was modified last.
ID: Identification number of the metadata form. This is automatically assigned by the system.
GUID: This field contains the GUID of the metadata form, which is allocated by the system.
Save data as a table: Select Save data as a table if you do not want to save the data of the entries filed with this metadata form in the usual database structure (objkeys table). The entries are saved to a flat database table instead. This database table has one column per index value and one row per document. This may be required in specific cases to optimize search performance.
Important
You cannot convert data back to the usual database structure. Check carefully if this setting is necessary in your case. You will find more information under ELO server - Installation and operation > Optimization > ELO metadata table (opens new window).
# Use
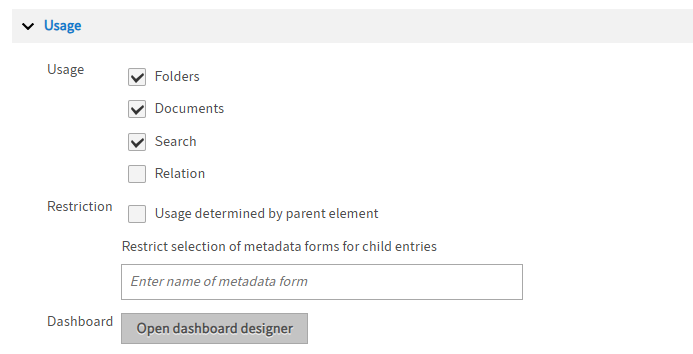
Folders: If you enable this option, the metadata form can be used to enter metadata for folders.
Documents: If you enable this option, the metadata form can be used to file documents.
Search: Select this option to use the metadata form for searches.
Relation: If this option is enabled, you can establish a link between the metadata form and Relation type fields. With Relation type fields, you can only select metadata forms in which this option is enabled.
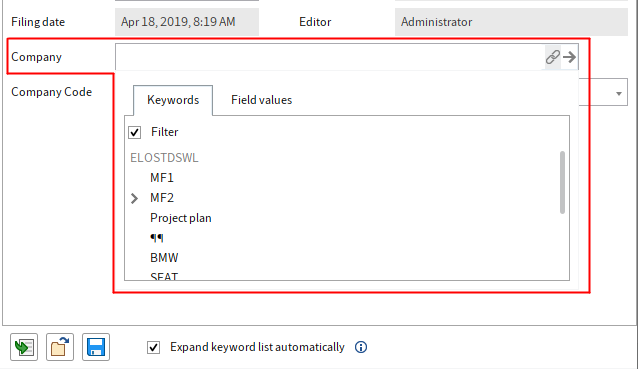
Relation fields establish a connection to the corresponding relational metadata forms. Relation fields can be used to display the priority fields of the associated metadata form as a keyword list. You can recognize relation fields by the chain icon.
Information
Double-click to transfer an entry from the keyword list to the field. Only the short name is copied into the field. You can sort the keyword list using the columns.
# Restriction
Usage determined by parent element: If the option Usage determined by parent element is enabled, then this metadata form is only available if you file or create a child entry in a folder that is restricted to this metadata form.
See the option Restrict selection of metadata forms for child entries.
Restrict selection of metadata forms for child entries: Enter which metadata forms may be used for the child entries here.
Enter the metadata form you want to use in the Enter name of metadata form field. ELO suggests possible metadata forms as you type.
Click a suggestion to add the respective metadata form to the list. To remove the metadata form from the list, select the X icon to the right.
# Dashboard
Dashboards (gen. 2) can also be created for metadata forms (gen. 1).
Open dashboard designer: Select this link to create dashboard views for metadata forms (gen. 1).
The individual steps are described in the following.
# Create a dashboard
Dashboards belong to views. So, first you have to create a view. Note the following steps for creating a dashboard.
Open the Go to dashboard designer link.

The Form designer page opens in a separate tab.
Select the plus icon.
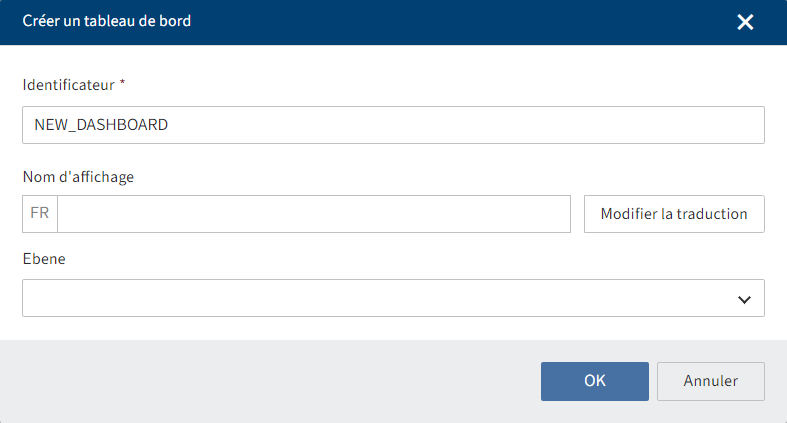
The Create view dialog box opens.
Enter a technical name in the Identifier field.
Information
Only capital letters (without umlauts and special characters), numbers, and underscores are allowed. The first character must be a letter.
The identifier must be unique.
Enter a name in the Display name field.
Optional 1: If you want to offer translated texts, you can configure them via Edit translation.
You will find more information under ELO packages > Other topics > Translations > Use translation variables (opens new window).
Optional 2: If the metadata form is used in a package and you want to assign it to a level, select a level via Level.
Select OK.
The form designer (gen. 2) opens.
On the Content tab in the Charts area, you can choose between the following chart types:
- Bar chart
- Line chart
- Doughnut chart
- Number
Drag a chart type to the layout area using drag-and-drop.
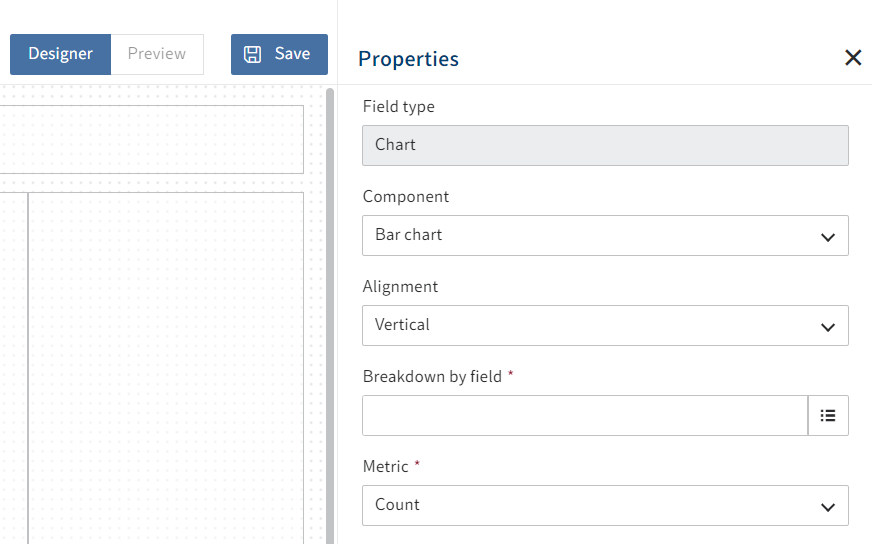
In the Properties area, you can configure the chart.
The following configurations are possible:
- Component: You can change the selected chart type at a later point.
- Alignment: In a bar chart, for example, you can select whether you want to arrange the bars vertically or horizontally.
- Breakdown by field: The chart is based on a field with aspect mapping from the metadata form. Select a previously created field for the chart in the drop-down menu. Additional settings are available depending on the field type selected.
- Date structure: Determines how the line chart is displayed by years, months, and days, for example.
- Metric: Different metric selections are available depending on the field type. While Count is especially suitable for field types such as keyword lists or text, use Average, Minimum, Maximum, Total for numeric field types.
- Filter: Select New entry (plus icon) to add a field with aspect mapping as a filter.
- Suffix: You can add numbers or words.
- Label under number: You can add labels under numbers.
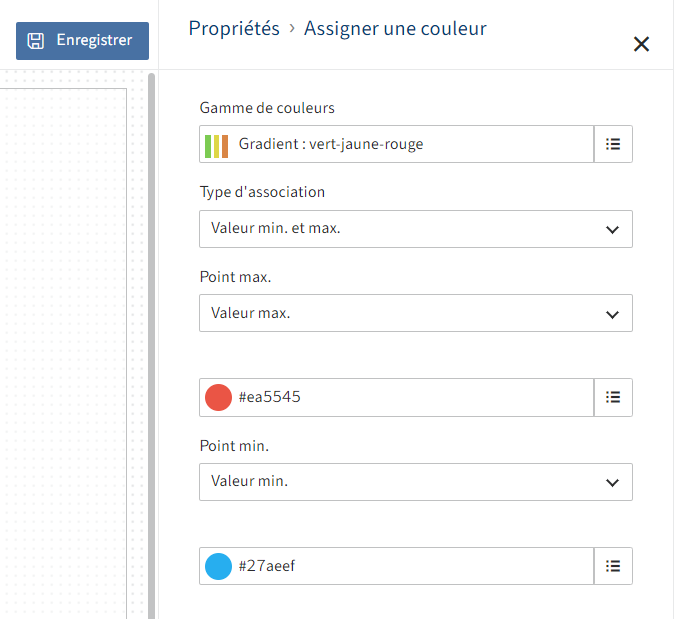
- Color palette: Select a color scheme for the chart.
- Mapping type: You can assign colors by selecting the pencil icon next to the Mapping type field. You will find more information in the following Configure mapping section.
- Use field name: If this option is enabled, the identifier and title of the field are used.
- Identifier: Enter an identifier for the chart.
- Title: Select a title for the chart. If you want to offer translated texts, you can configure them via the pencil icon next to the field.
- Subheader: Select a subheader for the chart as needed. This can help users better understand the purpose of the chart. If you want to offer translated texts, you can configure them via the pencil icon next to the field.
- Size: Select a size for the chart. This determines how the chart is arranged on the dashboard relative to other charts. The way the charts are arranged adapts to the size of the screen.
- Also show values without entries.: This option can be enabled for doughnut charts.
Repeat these two steps until you have placed all the desired charts.
Select Save.
The dashboard is saved and is now available.
- To close the form designer, close the corresponding tab.
# Configure mapping
For color palettes, you can assign specific colors data values. This makes sense for multi-color color palettes.
Select the pencil icon beside the Mapping type field.
Select a mapping type.
- Minimum and maximum value: Assign the minimum value a different color than the maximum value.
- Threshold: Define a threshold. All values below the threshold are assigned a different color than the values above the threshold.
- Rule-based: Define one or more rules as to which color should be assigned to which value/value range.
Select Apply.
The mapping type is saved.
For more information on how to create dashboards, refer to ELO packages > Metadata > Metadata forms (gen. 2) > 'Content' tab > Create dashboards (opens new window).