# Add fields
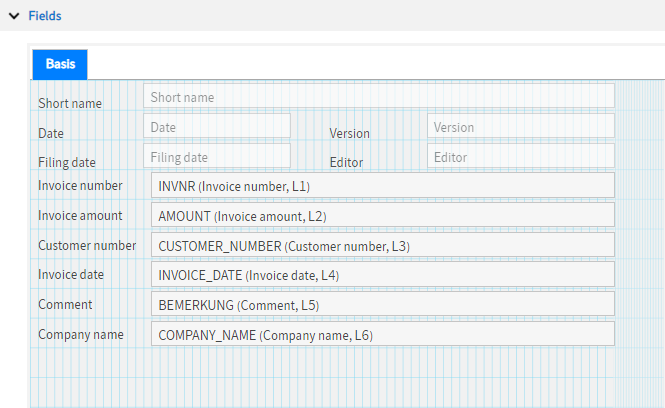
A preview of the metadata form is displayed in the left pane. You can modify the metadata form by moving the fields. You can move fields and the names of fields using the mouse.
Information
Before you use the fields in the Metadata forms and fields area, you need to define the templates for the fields in the Field templates area. Before you start creating fields, you should have finalized all the settings for the metadata forms.
Move fields
Select the relevant field.
Position the cursor on the field.
The cursor turns into a cross with four arrows.
Click and hold down the left mouse button.
Drag the field to where you want it on the metadata form.
Release the mouse button.
The field is now at the correct position on the metadata form.
Information
Move field names in the same way.
Create fields
Select the required tab on the metadata form.
Please note
You can use up to 200 fields on each metadata form. When numbering fields, it is important to note that 51 to 60 are hidden fields reserved for scripts.
Optional: Create a new tab by selecting Add tab to the right of the metadata form preview.
Select Add field to add a new field to the metadata form.
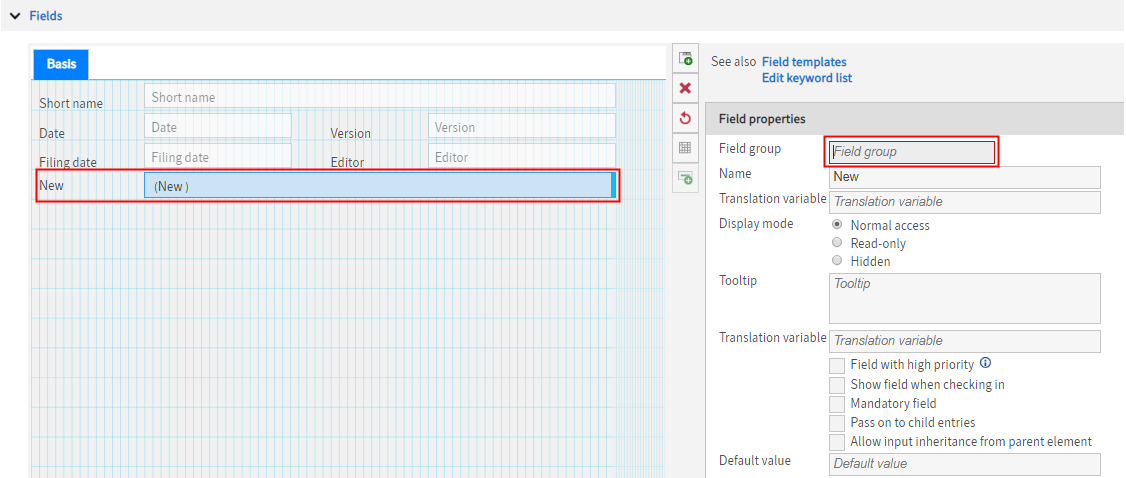
This creates a new field marked New.
You can edit the settings for the fields in the Field properties area on the right-hand side.
Enter the required information for the new field.
Information
Refer to the following explanations of the field properties for the settings.
# Field properties
Field group: Select a group name from the list of available field templates in the Field group field. You can use the group name to search multiple metadata forms, assuming they all use the same field template. You can also use the group name to provide the user with a keyword list for multiple metadata forms.
Please note
You can only use a field group once for each metadata form.
Information
Some field settings are in the Fields templates area.
Name: Enter the name of the field here.
Translation variable (name): If you want to provide the name of the field in multiple languages, enter a corresponding variable name here. There must be a properties file for those languages containing this variable.
Display mode: Define the status of the field here. The Normal access option means the field is visible and can be edited by users. If the Read-only option is selected, you cannot enter anything in the field. However, you can enter information in the field using a script, for example. If the option Hidden is selected, the field is not displayed. It is still possible to enter information using a script.
Tooltip: You can enter text in this field to be displayed as a tooltip whenever the user moves the cursor over the field.
Translation variable (tooltip): If you want to provide the tooltip in multiple languages, enter a corresponding variable name here. There must be a properties file for those languages containing this variable.
Field with high priority: If you enable the option Field with high priority under Metadata forms and fields, the information from the fields will be displayed after the file name in the tree view.
Show field when checking in: The field is displayed when checking in an entry. You can still enter metadata information at this point.
Mandatory field: Specify whether you want a field to be mandatory here. You should define this setting in the options for field templates.
Pass on to child entries: If the option Pass on to child entries is enabled, metadata information can be passed on to child entries.
Allow input inheritance from parent element: If the Allow input inheritance from parent element option is enabled, entries assigned this metadata form can inherit metadata from parent entries.
Default value: If you want a field to be automatically assigned a specific value, enter the corresponding value in the Default value field.
# Positioning
Edit the exact position of the field in the Positioning area. To help you, turn on the grid in the preview (Turn grid on/off button).
Information
If you want to see any changes you make here in preview mode, you need to save the metadata form.
Tab: Use the drop-down menu to select the tab you want the field to be displayed on.
Label column: This value specifies the horizontal starting position of the field name.
Label row: This value specifies the vertical starting position of the field name.
Input column: This value specifies the horizontal starting position of the field.
Input row: This value specifies the vertical starting position of the field.
Input width: This value specifies the width of the field in columns. If you enter 0, the column width is automatically adjusted to fit the available space.
# Form permissions
Define the permissions for the metadata form in the Form permissions area.
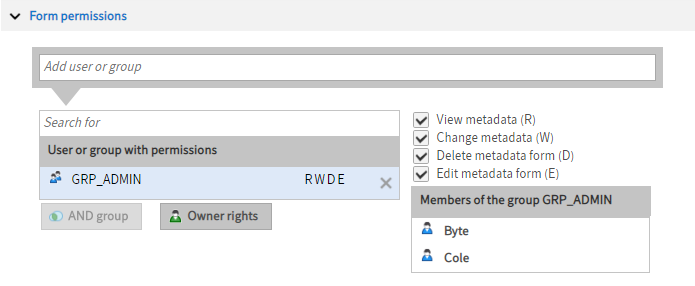
Add user or group: Search for users or groups in the Add user or group field. ELO suggests possible users and groups as you type. Select a suggestion to add a user or a group.
User or group with permissions: You can see the users and groups with permissions to the metadata form in the User or group with permissions field. Edit the permission settings using the check boxes next to the User or group with permissions field.
AND group: Select the AND group button to connect two or more groups. In this case, the assigned permissions only apply to users who are members of all connected groups. An AND group contains the overlap from the selected groups.
For more information on AND groups, refer to the documentation User administration > Concept for assigning rights and permissions > Group and permissions concept > AND groups.
Owner rights: Select Owner rights to add permissions for the user who created the metadata form.
Members of the group: Under Members of the group, you can see all users who are a member of the selected group.
# Entry options
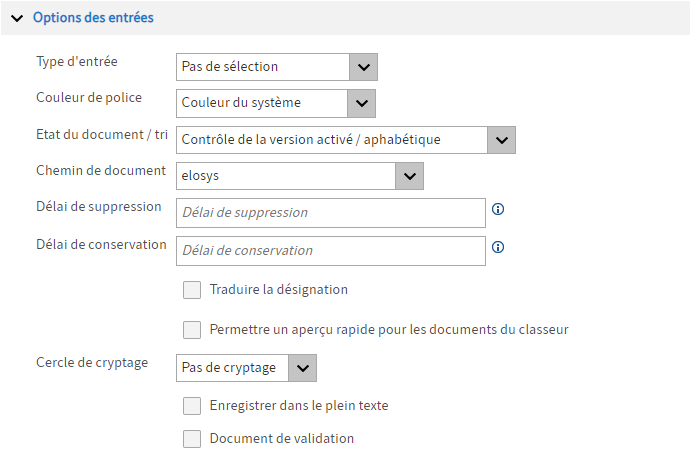
Entry type (folder forms only): Define an entry type for folders in the Entry type drop-down menu.
Font color: Color for displaying the document type.
Document status/sorting: Select the document status here that will be applied to documents filed with this metadata form. Define the sort order for documents filed with the metadata form for folders.
Document path: Select the document path to be used with the metadata form. The default path is basis.
Deletion period: Enter the period after which the entry must be deleted at the latest.
Retention period: Enter the period the entry has to be retained for. The entry cannot be deleted until the period entered is up.
Please note
The retention period must end before the deletion period.
To define the period, you can use the following syntax in the Deletion period and Retention period fields:
+<number><unit of time>
The following options are possible as the unit of time:
- Y or J: years
- M: Months
- W: Weeks
- D or T: days
Example: +10Y = in ten years
Translate short name: If you enable this option, the short name is added to the translation table.
Enable quick preview for documents in the folder: If you enable this option, the first document in the folder is displayed in the right-hand program pane instead of a list of contained documents.
Encryption key: Select an encryption key here if you wish to encrypt documents filed with this metadata form. You can also select the No encryption option.
Add to full text database: Select this option to add documents filed with this metadata form to the full text database. This allows the documents to be found in a full text search.
Approval document: This setting corresponds to the Author for approval documents permission. Documents with this option can be edited by a user with the Author for approval documents right. With approval documents, an editor may continue to edit previous versions of a version-controlled document without other users in the repository being able to see it.
# Entry permissions
Define rights for the documents to be filed here.
Please note
These settings must be matched with the permissions for the metadata form and with the permissions for the field templates.
Add user or group: Search for users or groups in the Add user or group field. ELO suggests possible users and groups as you type. Select a suggestion to add a user or a group.
User or group with permissions: You can see the users and groups with permissions in the User or group with permissions field. Edit the permission settings using the check boxes next to the User or group with permissions field.
AND group: Select the AND group button to connect two or more groups. In this case, the assigned permissions only apply to users who are members of all connected groups. An AND group contains the overlap from the selected groups.
For more information on AND groups, refer to the documentation User administration > Concept for assigning rights and permissions > Group and permissions concept > AND groups.
Owner rights: Select Owner rights to add permissions for the user who created the entry.
Parent rights: Select Parent rights to apply the settings assigned to the parent entry.
Members of the group: Under Members of the group, you can see all users who are a member of the selected group.
# Filing rules
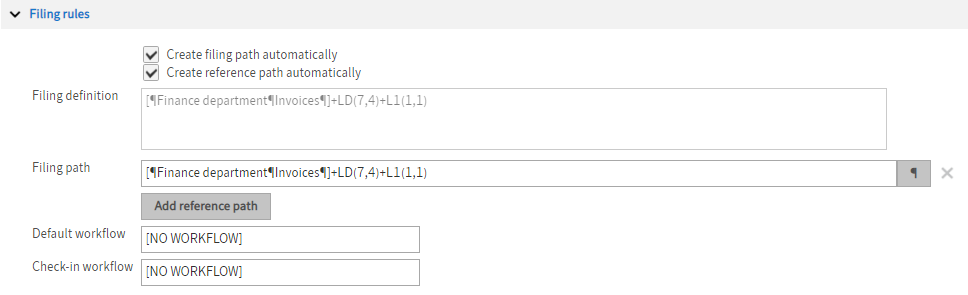
Create filing path automatically: If you select this option, folders will be created automatically if the path does not already exist when filing documents automatically.
Create reference path automatically: If you select this option, references will be created automatically if the path does not already exist when filing documents automatically.
Filing definition: You can see the current filing definition in the Filing definition field. Set the filing definition in the Filing path field. If required, you can create additional paths by selecting Add reference path.
Filing path: In the Filing path field, you can define a rule that will govern how documents are automatically filed to ELO. This is the filing path where documents filed with this metadata form are stored.
Example: [¶Invoices¶]+LD(7,4)+[¶]+L1(1,1)
The filing definition can contain fixed or variable components.
Information
For more information on filing definition syntax, refer to the chapter Filing definition and fields.
Add reference path: In addition to the filing path, you can create additional reference paths. Add fields for additional paths using the Add reference path.
Information
To remove a reference path or filing path from the filing definition, select the X icon to the right of the corresponding field.
Default workflow: Select the workflow that will be started when a document is filed with this metadata form.
Check-in workflow: Select the workflow that will be started when a document is checked in.
# Barcode Info
Barcode info: This field lists the rules defined using the barcode wizard. Define the barcode rules by selecting the button next to the display field.
Information
See the Client administration > ELO Java Client > ELO Barcode (opens new window) documentation for more information on these settings.
# Overview of fields
This contains an overview of the fields assigned to the metadata form. The table also shows you the field IDs, which you might require for the filing definition.