# Program interface
This chapter contains basic information on the ELO Web Client interface to help you get familiar with the program.
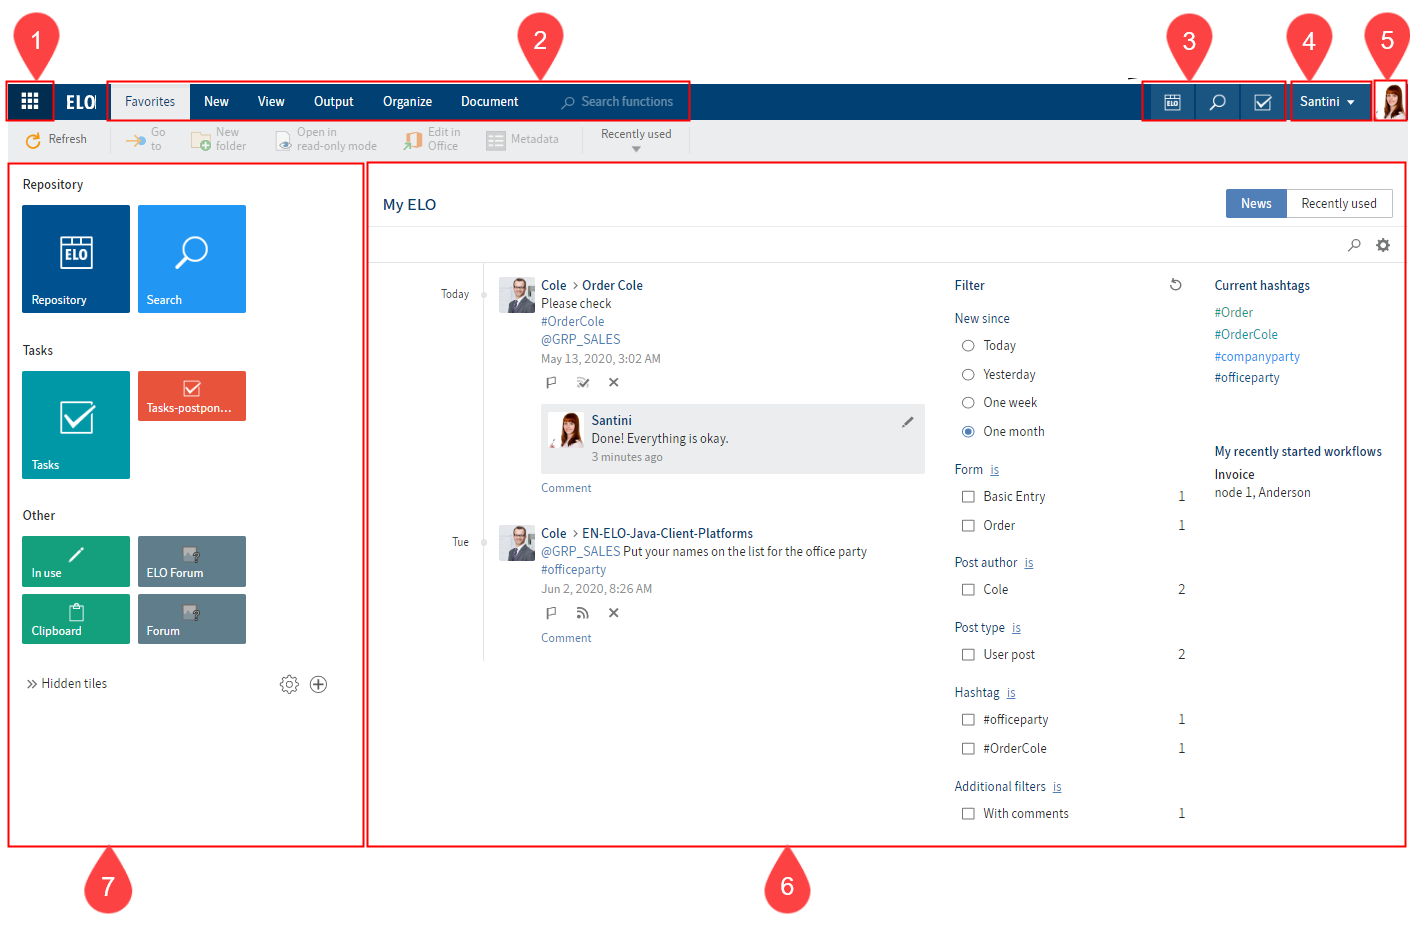
The program interface is divided into the following areas:
1 'My ELO' button: This button takes you to the My ELO home screen.
2 Ribbon: On the ribbon, you will find the functions available to you in the respective work areas.
3 Navigation bar: Navigate between the work areas using the navigation bar.
4 User menu [your name]: In the user menu, you will find various functions mainly for your personal settings.
5 Profile: In your profile, you can enter information and upload a profile picture.
6 News/Most recently used: This area is split up into News and Most recently used. The News tab helps you keep track of changes in ELO. You will find your most recently used entries on the Most recently used tab.
7 Tile navigation: This area is for navigating the program.
# What is a work area?
ELO contains different work areas. Each work area is used to complete specific tasks. Accordingly, not all functions are available in every work area.
- My ELO: This work area is on the home screen when you start the program. Tiles on the left-hand side provide access to the main areas in ELO.
- Repository: This area contains all folders and documents that you are authorized to access. This is also where you create additional folders and documents.
- Search: This area is where you search for folders and documents that are stored in the Repository work area.
- Tasks: If you are assigned tasks, you will find them here. Tasks are always related to folders or documents in the Repository work area.
- Clipboard: You can copy frequently used folders and documents from the Repository work area to the Clipboard. This enables you to quickly find the entries you need frequently or are currently working on.
- In use: When you edit a document, it automatically appears in the In use work area. Editing a document means that you have checked it out.
# 'My ELO' work area
The My ELO work area is on the home screen when you open ELO. Tiles on the left-hand side provide access to the main areas in ELO.
# Tile navigation
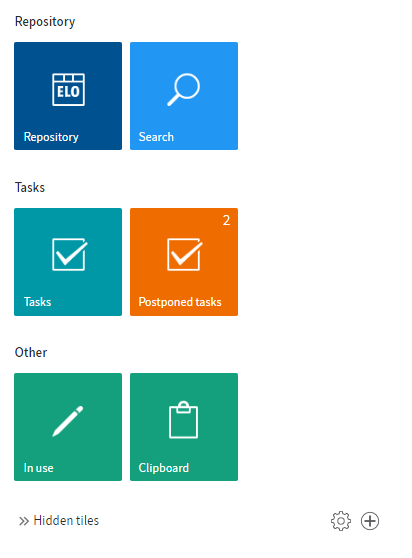
The tile navigation contains all available tiles. Tiles can be used to represent work areas, folder views, task views, search favorites, spaces and ELO apps. The following tiles are shown by default:
- ELO (or the name of your repository; this is the Repository work area)
- Search
- Tasks
- In use
- Clipboard

Tiles are organized into groups.
# Edit via the context menu
Each tile has a context menu that is opened by right-clicking the tile.
You can make the following tile settings within the tile's context menu.

- Pin to the navigation bar or Unpin from the navigation bar: This function places the tile on the navigation bar or removes it. Pinning tiles makes it easier for you to switch between the work areas.
- Change size
- Hide: When you hide tiles, they are moved to the Hidden tiles area. To restore hidden tiles, drag them to the place you want in the tile navigation.
# Change tile settings
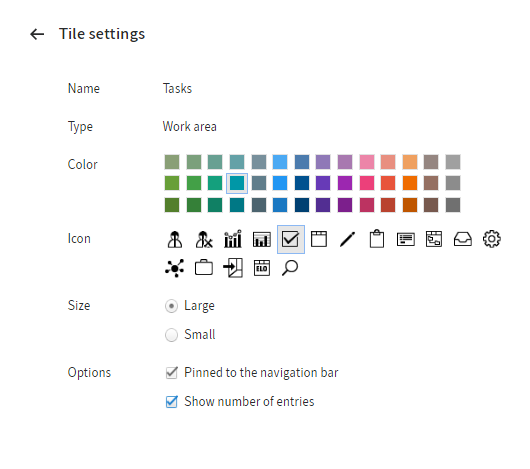
Right-clicking a tile and selecting Settings opens the settings for the selected tile. You can change the color, the icon, and the size of the tile.
You can also enable the following options:
- Pinned to the navigation bar: This function places the tile on the navigation bar or removes it. Pinning tiles makes it easier for you to switch between the work areas.

- Show number of entries: If this option is enabled, the tile shows the number of direct child entries in the work area. If you enable this option for the Repository work area, for example, only the top folder level will be shown, and not all the entries it contains. This option is particularly useful in the Tasks work area. If the number next to the Tasks work area is green, you have at least one new task.
The changes are saved automatically.
Close the tile settings by clicking the selected tile or the button with the left arrow.
You can open the tile settings for another tile by clicking the other tile.
# Create tiles
You can create tiles for quick access to folders, tasks, and searches.
# Create group
To sort your tiles by topic, you can create groups.
Method

Right-click a group name or click the plus icon to create a new group.
Outlook
- To change the position of a group, click the group name and drag the group to the place you want it holding down the left mouse button.
- Right-click a group name to change the name of the group or delete the group via the context menu. If you delete a group, the tiles in the group are moved to the Hidden tiles group. You can move groups around in the tile navigation with drag-and-drop.
Information
The names of standard ELO groups cannot be changed.
# News
The News tab helps you keep track of changes in ELO.
You will see feed posts from different entries here. Some examples include feeds you have subscribed to or in which you have been mentioned by another user. In addition, a hashtag cloud, escalated workflows, and recently started workflows that are relevant for you are shown in this work area.
Information
Most functions in the My ELO work area are feed functions. For more information, refer to the chapter Feed.
# Most recently used
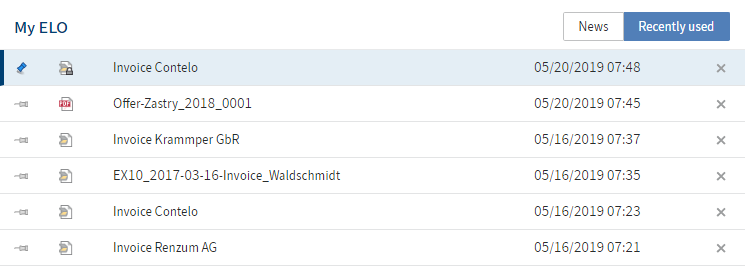
The Most recently used area contains a list of documents that you recently viewed or edited.
You can pin entries you need regularly by clicking the pin icon.

Under User menu [your name] > Configuration > Display > List of recently used entries, you can configure how many entries the list should contain and when a selected entry should be added.
# 'Repository' work area
You will find all folders and documents created in ELO in the Repository work area.
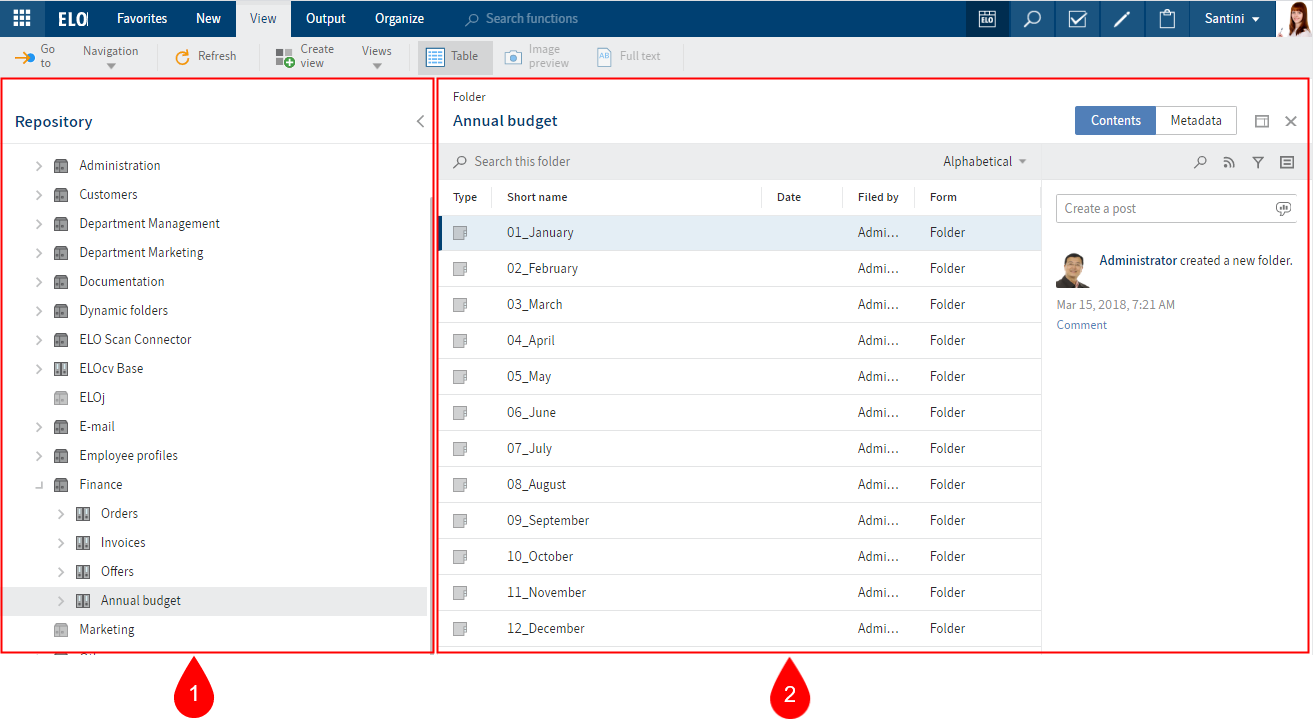
The work area is divided into the:
1 Repository structure: Overview of folders and documents
2 Viewer pane: View of folders or documents selected in the tree
For a detailed description of each component, refer to the Important components chapter.
# 'Search' work area
In the Search work area, you can search through folders and documents in the Repository work area.
Various filters are available. For searches you need regularly, you can create favorites, which enable fast searches in the tile navigation area next to My ELO.

When you open the Search work area, the Search tab appears. Using the functions on the Search tab, you can narrow down and continue your search.
The chapters 'Search' tab and Search entries explain each of the search elements and how to perform a search.
After a search, the work area is divided into the following:
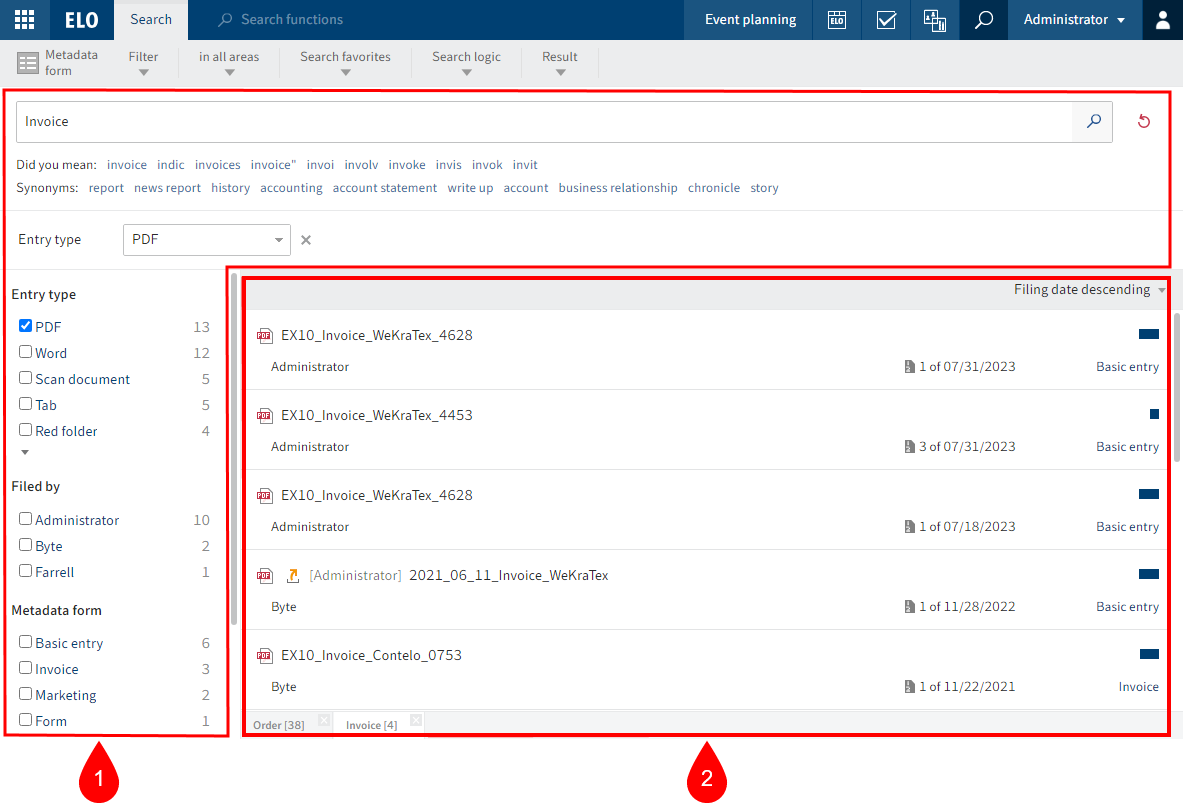
1 Search elements: Elements for narrowing down your search
2 Results: Results of your search in list form
# Search elements
Search elements help you narrow down your search.
Input
Enter one or more search terms into the input field.
As soon as you type the first letters of the search term, ELO iSearch provides you with relevant suggestions. If you enter additional letters, ELO iSearch updates the suggestions accordingly.
Clicking one of the suggestions applies it to the search field.
Information
You will find tips for entering search terms by selecting Tips for using ELO iSearch.

AND search: If you enter two terms into the search field, the system will search for entries that contain both terms.
OR search: If you enter two terms into the search field and separate them with a comma (e. g., order, invoice), the system searches for entries that include at least one of the terms.
Exclude term: To exclude a term from your search, enter it in the search field and put a minus sign in front of the term. For example, a search for -document excludes entries that contain the term document. You can combine the negated term with other terms that you do not negate.
Phrase search: To search for an exact match, enter the terms in the search field with quotation marks, e.g. social media. Only entries that contain all the terms in the order entered will be found.
Please note
If you search for NOT, OR, or AND via the search field or filters, you may encounter issues during your search.
# Narrow down search
The following options are available for narrowing down your search:
Use facets
Filters and facets allow you to narrow down your search using metadata, such as the filing date.
Filters and facets work in the same way. The only difference is how they are selected.
To learn how to select a filter, refer to the Filters chapter.
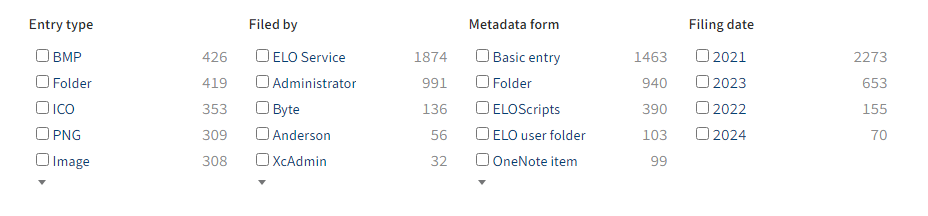
To select a facet, select the facet specification. You can also select multiple facets in this way.
Negate facets
You can apply reverse facets. For example, if you select a user and set the filter to is not, only entries that were not processed by this editor are shown. It is not possible to only negate individual filters or facets.
To negate a facet, select the facet.
# Results
The results field consists of the following elements:
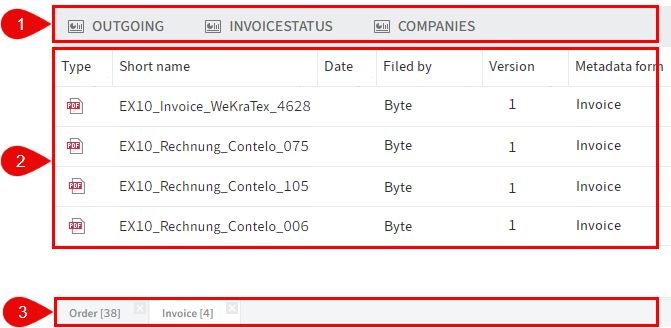
1 Dashboards
After conducting a search with a form filter, buttons are available that allow you to launch dashboards. These buttons are only displayed if dashboards have been stored for the corresponding metadata form.
Dashboards are created by the administrator. They can only be created with generation 2 metadata.
The dashboards allow you to visualize metadata of entries filed with the same metadata form in different ways. You can use bar charts, line charts, and doughnut charts.
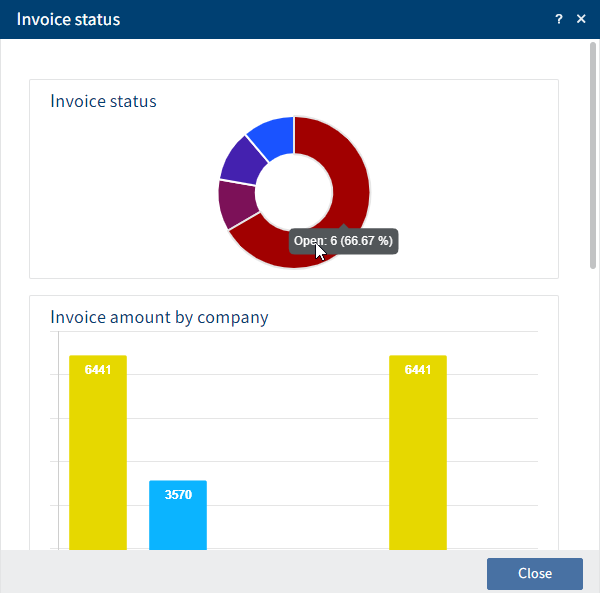
You can view details about dashboards by clicking on them.
2 Results of the current search
The results of the current search are shown as a list.
If you need more information on the individual entries, switch to the table view (Ribbon > View > Table). To switch back to the list view, select the Table button again.

For a better overview, you can sort the results according to your requirements.
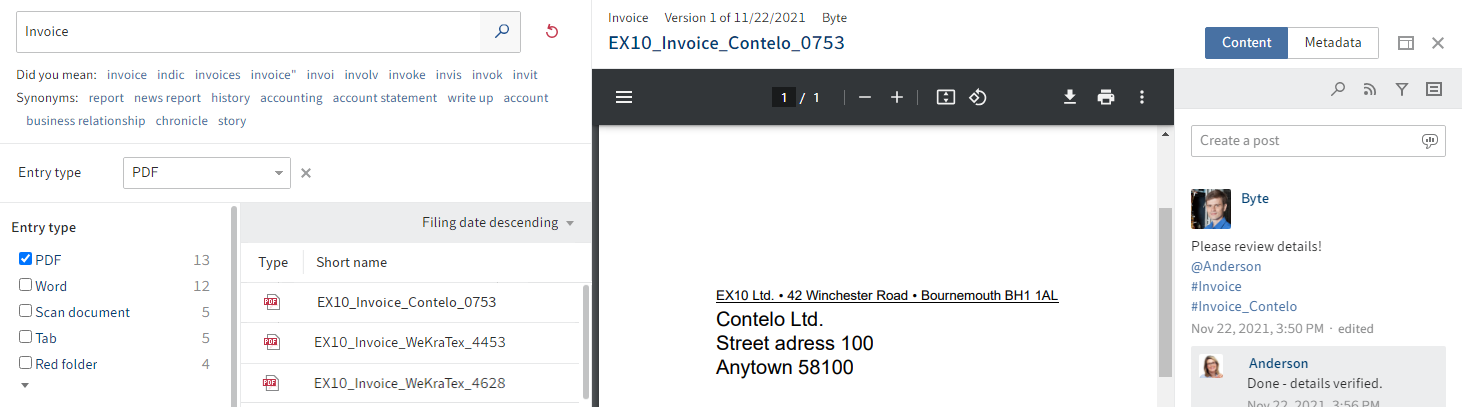
Select an entry to view its contents.
Use the X icon in the top right-hand corner to close the view.
To go to the filing location of the selected entry, select View > Go to on the ribbon.
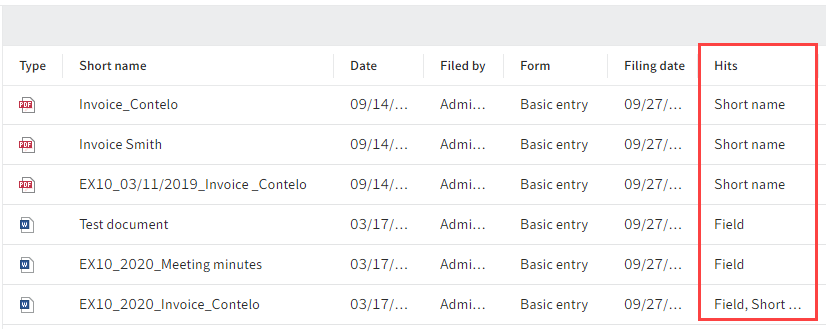
Hits: You can also see where the search was found (short name, full text ...). You need to enable this option in the configuration (User menu [your name] > Configuration > Search > Show results text or hits > Hits).
Results text: You can also display the results text. You need to enable this option in the configuration (User menu [your name] > Configuration > Search > Show results text or hits > Results text).
Reset search: Restores the search settings to default values. You can set the default as follows: Narrow down your search using areas and filters/facets. On the ribbon, select Search > Filter > Set as default.
3 Search views
The last search queries are displayed as a search view in a bar below the results list of the current search.
A search view is used to temporarily save search results and search settings. Metadata searches are automatically saved as a temporary search view.
Selecting the corresponding search view automatically runs the search. You can delete a search view with the X icon.
Please note
These search views are deleted when you close ELO. If you want to save a search request, use the Add favorite function (Search work area > Ribbon > Search > Search favorites).
Outlook
In the Search work area, you can use the same functions on entries as in the Repository work area, for example edit documents, create tasks, or send entries.
To go to the filing location of the selected entry, select View > Go to on the ribbon.
You can create favorites and dynamic folders, which work with custom searches.
# 'Tasks' work area
In the Tasks work area, you will find a list of your tasks.
To learn how to edit tasks, refer to the 'Task' tab chapter.
The following types of tasks are available; you can distinguish them by their icon.
| Workflows | Workflow icon |  |
| Workflows with form | Form icon |  |
| Reminders | Calendar icon |  |
| Monitoring entries | Camera icon |  |
New entries are shown with a green dot.
If you need more information on the individual entries, switch to the table view (Ribbon > View > Table). To switch back to the list view, select the Table button again.

For a better overview, you can sort the tasks according to your requirements.
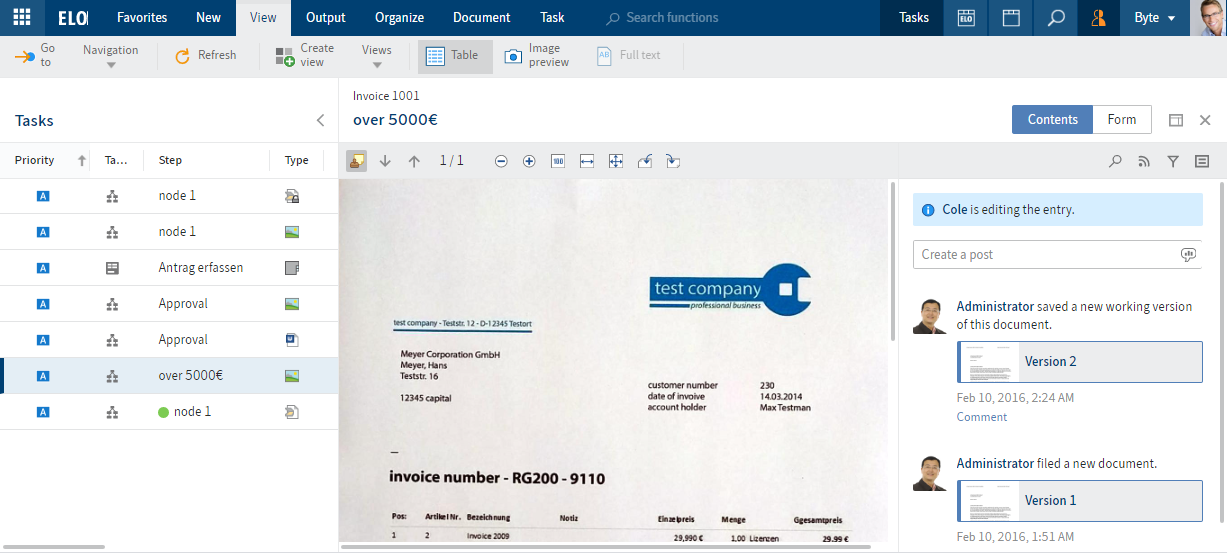
Select an entry to view its contents.
Use the X icon in the top right-hand corner to close the view.
The job instruction tells you what the task is.

Tasks disappear from your Tasks work area in the following ways:
- Workflows: Actively: You forward the workflow using the form or the function (Ribbon > Tasks > Forward workflow), delegate it, or hand it off. Passively: A group workflow is accepted by another member of the group.
- Reminders and monitoring: You delete the entry (Ribbon > Organize > Delete).
# Edit workflow with a form
For workflows with forms, you will find the form on the Metadata tab. You can edit and forward it here.
If you receive a workflow you have to forward via a form, the Forward workflow button is not active.
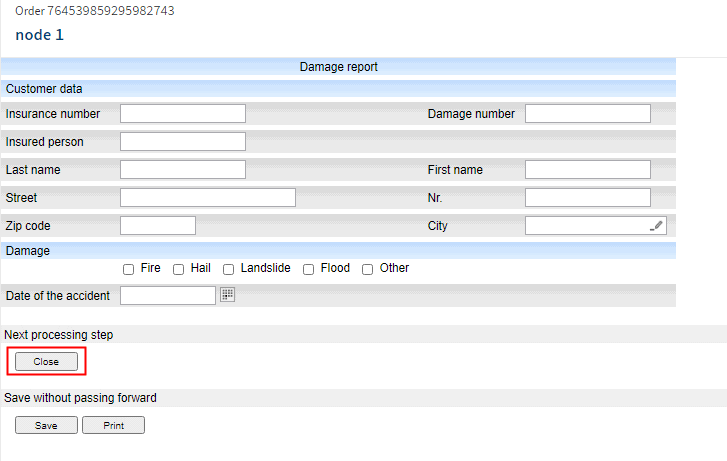
Method
Edit the fields of the form as indicated in the task.
To forward the workflow after editing the form, select the corresponding button within the form.
# 'Clipboard' work area
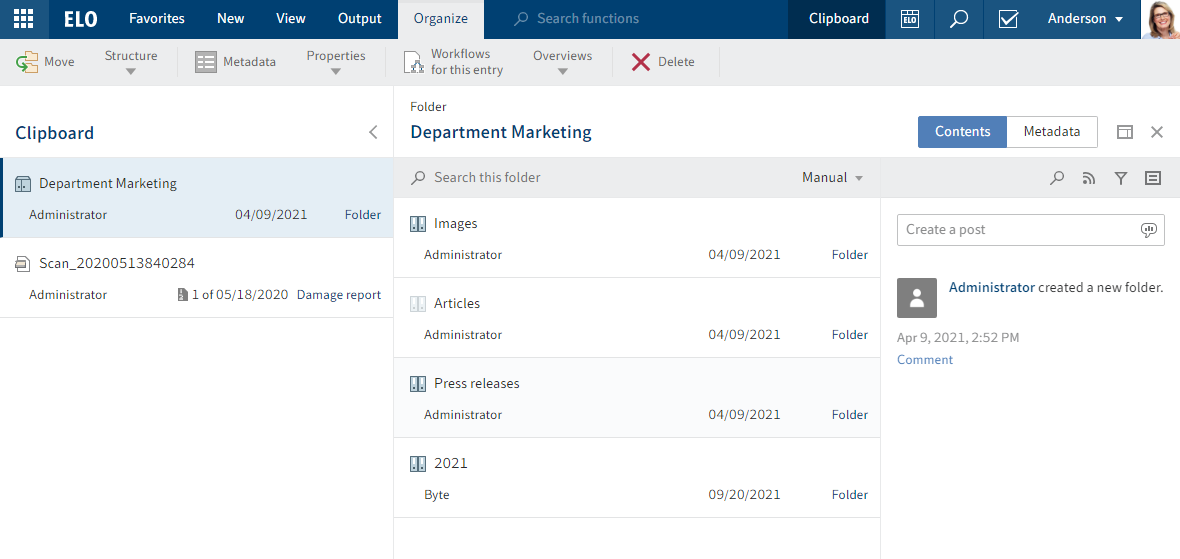
The Clipboard is a work area where you can store documents temporarily. You can also create a favorites list here.
To place an entry on the Clipboard, select it and, on the ribbon, select View > Copy to Clipboard.
You can edit entries on the Clipboard in the same way as entries in the Repository work area. The changes are applied to the Repository work area.
Navigation and display are the same as in the Repository work area.
For a detailed description of each component, refer to the Important components chapter.
An entry remains in the Clipboard work area until you remove it (Ribbon > View > Remove from Clipboard).
# 'In use' work area

The In use work area shows you all the documents you have checked out for editing. The chapter Check out and edit document explains how to check out and edit documents.
Navigation and display are the same as in the Repository work area.
For a detailed description of each component, refer to the Important components chapter.
Once you check in the document or cancel editing, it automatically disappears from the In use work area.
# Spaces
Spaces are areas where you can collaborate with other users. You can file new entries and work on them with members of the space.
Workspaces are workspaces in ELO for different functional levels. With the help of filters and different views, you can edit data and analyze it in charts and tables.
The Teamspace function enables you to collaborate across teams. All teamspace members can gather and edit documents together and exchange information using the feed.
For more information, refer to the Workspaces and Teamspaces chapters.
This section explains how you can access spaces.
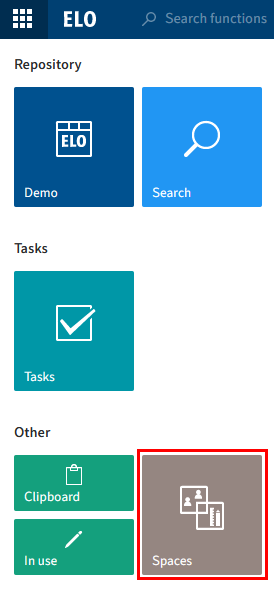
You can find the spaces in the My ELO work area via the Spaces tile. In this area, you see all spaces that you are a member of.
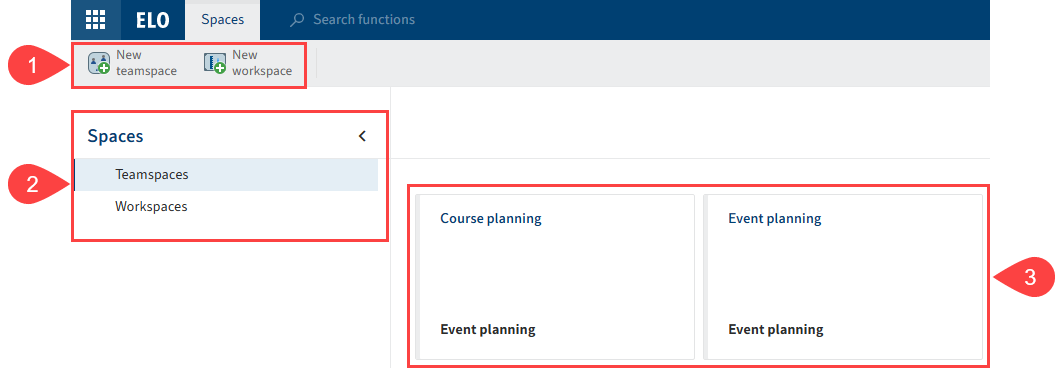
In the overview of spaces, you have access to the Spaces tab.
You have the following options:
1 Create a new teamspace or workspace: If these buttons are disabled, there are no teamspace templates or workspace types available for creating new spaces.
2 Switch between teamspaces and workspaces
3 Navigate to a teamspace or workspace: They are shown as tiles and sorted by creation date.
# 'My ELO' button

Use the My ELO button to open the 'My ELO' work area. The My ELO work area is on the home screen when you open ELO.
Alternative: Use the CTRL + WINDOWS keyboard shortcut to open your My ELO start screen.
This area contains your news and most recently used entries, as well as the tile navigation.

If My ELO is highlighted in green, this means you have news in My ELO.
# Ribbon

You can launch functions from the ribbon.
The ribbon provides access to most functions in ELO.
Information
Some functions can also be run from the context menu. Right-click an entry in ELO to open the context menu.
Tabs: The ribbon is organized into tabs. Some tabs are always shown (default tabs), while others only appear when the tab functions can be used (contextual tabs).
The default tabs are:
- Favorites: With the default settings, this tab contains several important functions. You can add other functions.
- New
- View
- Output
- Organize
- Task
The contextual tabs are:
- Document: This tab appears when you select a document.
- Search: This tab appears when you select the Search work area.
- Clipboard: This tab opens when copying, referencing, or moving entries.
Functions: The functions are arranged logically by relation. The most important functions are pinned to the ribbon. Others can be found in drop-down menus. If a function is grayed out, you cannot use it at your current position in ELO.
Search functions: You can search for functions using the search field. Selecting a function in the results list executes the function.
You can customize your ribbon so that you can find the functions you need quickly in the following ways:
- Pin function to ribbon and remove from ribbon
- Only show icon on function buttons
# Pin function
Many functions can be found in drop-down menus as standard. You can pin functions from the drop-down menu you need more frequently to the ribbon. You can pin functions to the respective tab or to the Favorites tab.
Method
Open the drop-down menu containing the function.

Right-click the function that you want to pin.
- Pin to favorites: The function is pinned to the Favorites tab. You can save the functions you use most frequently to the Favorites tab. This function can also be found in the drop-down menu you pinned it from.
- Pin here: The function is pinned to the tab you currently have open. This function can no longer be found in the drop-down menu you pinned it from.
# Remove function from ribbon
You can also remove pinned functions from the ribbon.
Method
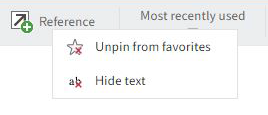
'Favorites' tab: Right-clicking the function and selecting Unpin from favorites removes the function from the Favorites tab.
Additional tabs: Right-clicking the function and selecting Unpin from here returns the function to the drop-down menu.
# Hide function text
If the icon for a function is enough for you, you can hide the text. This only works for functions pinned to the ribbon.
Method
Right-click the function.

Select Hide text.
# Show function text
You can disable the option to hide the text.
Method
Right-click the function.

Select Show text.
# Navigation bar

The navigation bar gives you quick access to several work areas in ELO. You can quickly switch to work areas without having to go to the My ELO home screen.
You can pin all areas available as tiles in My ELO to the navigation bar by right-clicking the tile.
If you have enabled the option to show the number of entries on the tiles, they will also be shown on the navigation bar. To learn how to show the number of entries, refer to the chapter 'My ELO' work area.
# Active substitutions

You can substitute for other users or be substituted for by others. In both cases, you can see that a substitution is active by the person icon.
- Orange person: A substitute is currently set for you.
- Blue person: You are currently substituting for at least one user.
Selecting the icon opens more information on your substitutions.
You can learn how to appoint a substitute in the chapter Assign substitute.
You can learn how to accept a substitution in the chapter Accept substitution.
# User menu [your name]
![User menu [your name]](/user/elo-web-client/23-lts/assets/img/user-menu-your-name.ccba053e.png)
Clicking the User menu [your name] button opens a drop-down menu. This menu takes you to areas where you can configure settings for your account. You can also log off at the end of your session here.
You can find explanations on each of these functions in the chapter User menu [your name].
# Profile

This button takes you to your profile. In your profile, you can enter information on your professional background, your contact details, and upload a profile picture.
# Context menu
Right-click an entry to open the context menu. Alternatively, use the menu key of a selected entry. The context menu contains selected functions that you will also find on the ribbon.
The context menu contains different functions depending on the work area you are in.