# 'Output' tab
# Send document
Keyboard shortcut: CTRL + M
This function enables you to send a document as an e-mail attachment. A new e-mail opens in your e-mail program with the document attached. Enter any necessary additional information and send the document.
# Send as ELO link
This function enables you to send a selected entry as an ELO link. A new e-mail opens in your e-mail program with the ELO link attached. The recipient can open the entry from the ELO link. The recipient must have access to ELO.
# Send as PDF
Available in: Ribbon > Output > Send
This function converts a document to PDF format. A new e-mail opens in your e-mail program with the PDF attached.
You can send the PDF with or without annotations (e. g. sticky notes). Select the desired option in the Send as PDF dialog box.
You can specify your preferred setting in the configuration under Dialog boxes > Annotations when sending as PDF. You can select the options Confirm via dialog box, Do not embed annotations, or Always embed annotations.
# Save as
Keyboard shortcut: CTRL + S
Use this function to store the currently selected document outside of ELO.
# Save as ELO link
Available in: Ribbon > Output > Save
Use this function to store the selected entry as an ELO link in your local file system. The ELO link opens the filing location of the file in ELO. This enables another user to open the entry in ELO. This person must have access to ELO.
# Link with drag-and-drop
Available in: Ribbon > Output > Save
If this function is enabled, you create a link file when you drag an entry from ELO. When you drop the entry onto the target, you create a link to the entry in ELO. This function allows you to create links on the desktop or in an e-mail, for example.
Click the entry you want to create an ELO link for.
Drag and drop the entry outside of the client, e. g. on your desktop.
Release the mouse button.
The ELO link is created.
Click the link to open the corresponding entry in ELO.
# Save table to clipboard
Available in: Ribbon > Output > Save
Use this function to copy the currently selected table entries to the clipboard. The entries can then be inserted into an external program, e. g. Microsoft Excel.
Alternatively available in: Toolbar > Display options > Table.

# Folder synchronization
Available in: Ribbon > Output > External link
The function Folder synchronization enables you to synchronize data in an ELO folder with an external file system or a mobile device or create a copy of the folder. For example, you can take all the documents you need to external appointments and then import any changes back into ELO.
Requirement: First you need to map the ELO folder to an external folder via Output > External link > Configure folder.
ELO checks whether synchronization folders from known cloud service providers are located on your computer. You are then asked if you want to use these folders as counterparts for folders in ELO. You can also synchronize folder pairs of your choice. The function automatically synchronizes data in both directions. In addition to synchronizing documents, it is also possible to map folder structures.
You can access data in your provider's cloud and edit it from any Internet-ready device. Once you log back on to the ELO Java Client, you can transfer changes or new files to ELO.
Important
As you can synchronize in both directions, this may cause documents to be deleted on the computer's file system.
The following describes how to use folder synchronization once you have set up least one folder pair. You can find more information on how to do this in the section Configure folder.
Method
- On the ribbon, select Output > External link > Folder synchronization.
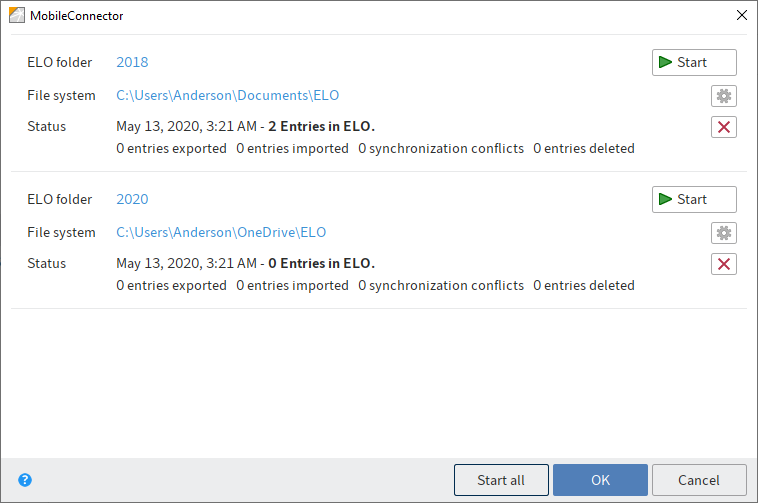
The Folder synchronization dialog box opens. You will see existing folder pairs and the status of the last synchronization run.
The dialog box contains the following options:
Start (green triangle): Starts synchronization for the respective folder pair
Please note
If you have enabled the option Synchronize without metadata in the settings and add a file to the folder in the file system, the file name must start with a plus icon (+) so that it is transferred to ELO during synchronization. The plus icon in the file name is automatically removed during synchronization.
Settings (gear icon): Opens the Add folder dialog box You can change the settings for the respective folder pair here. If the settings for a folder pair were changed, you will see an orange bar in front of the folder pair in the Folder synchronization dialog box.
Delete (X icon): Removes the folder pair
Information
Deleting a folder pair does not delete the folders themselves. It only removes the folder mapping.
Start all: Starts synchronization for all available folder pairs
Please note
If you delete and edit the JSON files, you will lose important data about the synchronization process.
# Configure folder
Available in: Ribbon > Output > External link
The Configure folder function enables you to configure an ELO folder for synchronization with a folder outside of ELO or save a copy.
To select a folder for synchronization, follow the steps below.
Select a folder in ELO.
On the ribbon, select Output > External link > Configure folder.

In the Add folder dialog box, you specify the target folder in the file system and define the transmission settings.
# ELO folder
Under ELO folder, you can see the folder selected in ELO.
# Target in file system
Under Target in file system, you can see the folder selected as the target in the file system. You can select existing paths from the drop-down menu of the Base folder field. Select New target to assign a different folder.
Information
The module automatically searches for cloud folders from the following providers: Dropbox, Google Drive, Microsoft OneDrive, GMX MediaCenter, WEB.DE Online-Speicher, and SpiderOak Hive. If this kind of folder is detected on the computer's file system, ELO automatically enters the detected path under Base folder.
# Transfer options
In the Transfer options area, you can adjust the synchronization settings. The following settings are available:
Synchronize, with metadata: The folders selected above are synchronized. An additional file is stored on the file system for each synchronized entry (folder or document). This additional file saves the metadata of the synchronized entry in JSON format.
Synchronize without metadata: The folders selected above are synchronized. This option synchronizes the documents and child folders but ignores the metadata. If you add a file to the folder in the file system, the file name must start with a plus icon (+) so that it is transferred to ELO during synchronization. The plus icon in the file name is automatically removed during synchronization.
Save as copy without metadata: The Save as copy option saves an identical copy of the folder to the Windows file system but without metadata (GUID, metadata information).
Run automatically when ELO starts: If you select the option Run automatically when ELO starts, the base folder and ELO folder are synchronized every time ELO starts.
Please note
If you need to synchronize a large number of folders, this will delay all other processes when starting ELO. For this reason, this function is not recommended for very large directories that rarely change. In such cases, it makes more sense to create multiple folder pairs and only set up automated synchronization for selected ones.
Export references as well: Enable the Export references as well option to also export references in the folder for synchronization.
# Additional information
To start the folder synchronization, select Output > External link > Folder synchronization on the ribbon..
# Create external link
Available in: Ribbon > Output > External link
The external link enables users without ELO to access files. You can send the external link to people outside your company network, e. g. by e-mail. Users can download the files directly via the link.
Information for administrators
Without additional configuration, the function is only available for computers that are in the same network or domain as the ELO server. For information on enabling the function for external devices, refer to the ELO server (opens new window) documentation.

The following options are available to restrict an external link:
- Available until: Period during which the link is available to external users
- Available indefinitely
- Restrict number of downloads to
The following options are available to provide a link:
- Send by e-mail: Send an e-mail with the external link to the shared document.
- Copy to clipboard: The external link is available in the clipboard for further use, such as in an HTML document. It can be used with an HTML document, for example.
Information
If you have selected multiple documents, the Copy to clipboard function is not available.
# Outlook
You can open an external links overview. You can edit or delete the external links here.
# External links overview
Available in: Ribbon > Output > External link
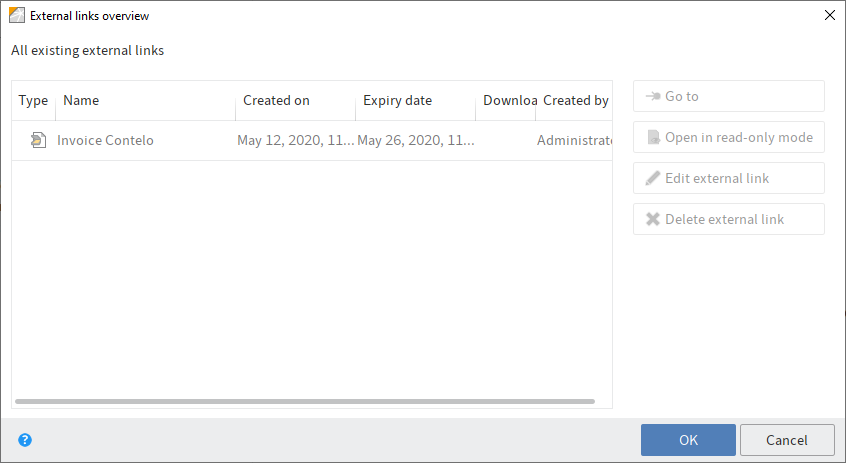
The External links overview dialog box contains an overview of the documents for which an external link was created. You can edit or delete the external links.
The list is divided into the following columns:
- Type: Document type
- Name: Short name of the document the external link refers to.
- Created on
- Available until: Shows how long the external link is available. If a time is not specified, the link can be accessed indefinitely.
- Access count: Indicates how many times the external link can be accessed. If a number is not entered, the link can be accessed an unlimited number of times. Every time the external link is accessed, the number of times it can be accessed again decreases.
- Created by
The dialog box has the following buttons:
- Go to: Jumps straight to the respective document
- Open in read-only mode: Opens the respective document in an external application
- Edit external link: Opens the Edit external link dialog box. You can change the settings of the selected external link here.
- Delete external link: Removes the selected external link. The external link is initially marked red. The link is deleted once you select OK, closing the dialog box. If you close the dialog box with the Cancel button, the delete action is reversed.
# Manage mobile devices
Available in: Ribbon > Output > External link
This function allows you manage the mobile devices used to transfer documents to the ELO Java Client with the ELO Connect app. The connection settings are configured in ELO Connect. A new device will only appear in the Manage mobile devices dialog box after data has been transferred.
You can rename the mobile devices or delete them from the list.
For more information, refer to the ELO Connect (opens new window) documentation.
# Print document
Keyboard shortcut: CTRL + P
This function enables you to print a document selected in ELO.
# Print metadata
Available in: Ribbon > Output > Print
You can use this function to print the metadata of a selected entry. Only the basic information that is also displayed on the Metadata tab is printed.
For more information on metadata, refer to the Important components chapter.
# Fax document
Available in: Ribbon > Output > Print
Use this function to send a document as a fax. This function uses the fax printer configured in the Configuration dialog box (Ribbon > User menu [your name] > Configuration > Technical presets > General > Set as fax printer).
Information
If you don't have a printer with a fax function, the document will be printed.
# Export
This function enables you to export folders or documents from ELO. You can also export the entire repository.
Information
To export the entire repository, select the top level of the Repository work area.

Use this dialog box to make settings for the file export.
# Export target
In the Export target dialog box, you can see the target path for exporting the data set if this has already been selected.
Select: Opens the dialog box for selecting the target path and specifying the file name. The file type must be ELOEXP.
# Selection
In the Selection area, you can see how many elements (folders or documents) you have selected for export.
# Filter documents
In the Filter documents section, you can set filters for restricting which documents you want to export.
By date: If you have enabled this option, you can set a date range for the document date and the filing date. Only documents within these date ranges will be exported.
By metadata form: If you enable this option, you can select one or multiple metadata forms from the drop-down menu. Only those documents that were assigned the selected metadata form(s) will be exported.
# Export parameters
In the Export parameters area, you determine which components will be taken into account during export. You can choose from Folder structure with documents, Folder structure only and Documents only. Depending on your selection, you can select additional export options. This includes All document versions, Keyword lists, Reminders, and the option Replace references with originals.
Folder structure with documents: If this option is enabled, the folder structure and the documents in it will be exported.
Folder structure only: If this option is enabled, the folder structure is copied without documents.
Documents only: If this option is enabled, the documents are copied without the folder structure.
Empty folders: If you enable this option, folders that are empty will also be exported.
All document versions: If this option is enabled, all document versions will be exported.
Attachments: If this option is enabled, the current attachments are also exported.
Keyword lists: If this option is enabled, the keyword lists assigned to the metadata forms are exported with the entries.
Please note
Keyword lists that already exist in the target repository may be replaced during import. If there are identical metadata forms in the export data set and the target repository, check whether you want to import the keyword lists as well.
Reminders: If this option is enabled, reminders are also exported with the entries.
Replace references with originals: If this option is enabled, references will be replaced with their original files during export. If this option is disabled, references are only replaced if the original documents were not exported with the entries.
Decrypt and export encrypted documents: This option also includes encrypted documents in the export.
OK: Starts the export process
# Import
This function enables you to import data into the Repository work area.
Please note
You can only import data that was previously exported from an ELO repository.

# Source
Select: Use the Select button next to the Source field to choose a source for the import. The source must be a ZIP or ELOEXP file.
# Import target
Define an import target in ELO. You can either select a new target in ELO or copy the old filing location from the export data set.
Select: Use the Select button next to the Import target field to select an import target in ELO.
Apply from export data set: If this option is enabled, the data set imported will retain the structure it had when you exported it. The respective structure is displayed next to the option.
# Method
The following methods are available for handling GUIDs:
Information
A globally unique identifier (GUID) is a number with 128 bits used for the unique identification of documents and folders in ELO on distributed computer systems.
Check GUIDs: When importing the data set, the GUIDs are compared with the GUIDs in ELO. The following options are available if there are identical GUIDs:
- Reassign GUID: Entries that have an existing GUID in ELO are imported with new GUIDs. This allows you to create duplicates.
- Do not import: Entries that have an existing GUID in ELO are not imported.
- File as new version: Entries that already have a GUID in ELO are imported as a new version of the corresponding entries.
Reassign GUIDs of all entries: ELO does not check whether GUIDs already exist during import. All entries from the import data set are assigned new GUIDs. This allows you to create duplicates.
# Options
Keep filing date: To keep the filing date, select this option.
Import keyword list: This option allows you to import keyword lists from the data set.
Re-encrypt documents: If you select this option, a list of encryption keys found by the system appears. To import entries with an encryption key in encrypted form, enter the corresponding passwords. If you do not enter a password for an encryption key, entries in the corresponding encryption key will be imported unencrypted.
OK: Starts the import process
# Package dependencies
If a source has package information, its package dependencies are shown in this area.
The source can only be imported if all specified package dependencies are available in ELO.
Information
If any package dependencies are missing, contact your system administrator.
Check package dependencies: You can check the dependencies again, e.g. after the required packages have been imported.