# Important actions in detail
This chapter is especially helpful for getting started. It explains how to perform basic actions.
# Create folders
You want to create a new folder in ELO.
Method
Open the Repository work area.
Select the folder in the repository that you want to create the new folder in.
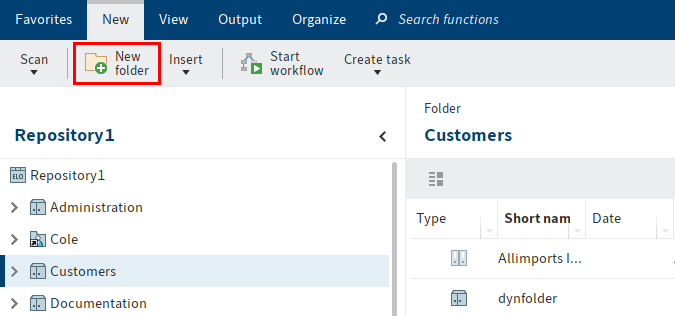
Select New folder on the New tab.
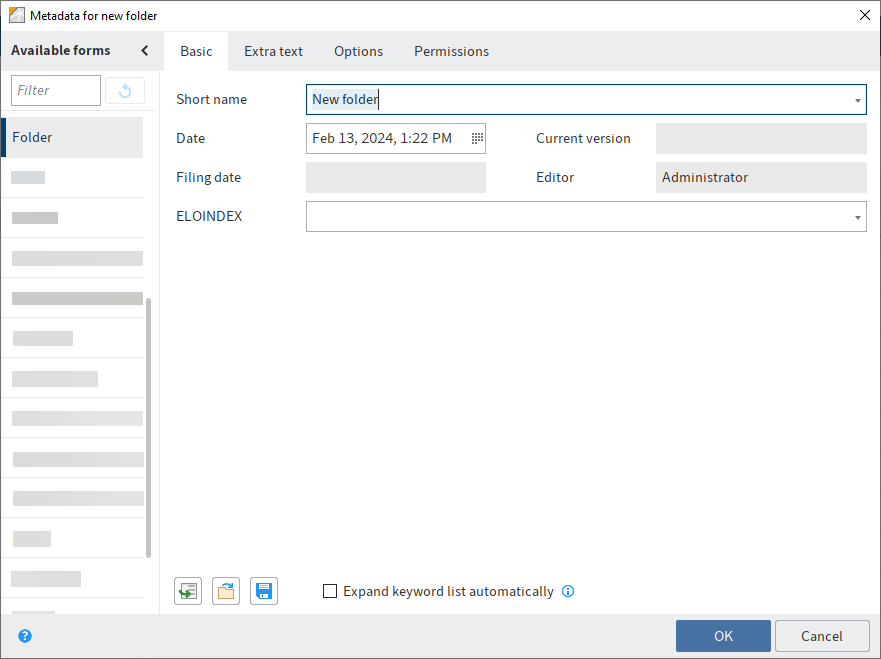
The Metadata for new folder dialog box opens. The Folder form is selected by default.
Information
In the Metadata for new folder dialog box, you only see forms in the Available forms column that have been assigned the Folders usage option in the metadata form manager of the ELO Administration Console.
Enter the name of the new folder in the Short name field.
Information
The more detailed your entries are, the easier it will be for you to locate the folder.
Once you have entered the required information, select OK.
Result
A new folder is created.
Outlook
The folder can be used for filing documents or for creating additional child folders.
You can save an existing folder structure as a default index and insert it into other folders. A default index is used as a template and can be used as often as required. You will find more information here: Save as default index.
# File document
You have the following options for storing a document in ELO:
- Via drag-and-drop
- With the 'Insert file' function
- Scan it to the Intray and file it
- With the 'Document from template' function
# File a document with drag-and-drop
You want to drag and drop a document to ELO from Windows Explorer.
Method
Open the Repository work area in ELO.
Open Windows Explorer.
Click the document in Windows Explorer and drag it to the desired target folder.
Alternative: You can file multiple documents to ELO. Select the documents while holding SHIFT or CTRL in Windows Explorer and drag them to the desired target folder.
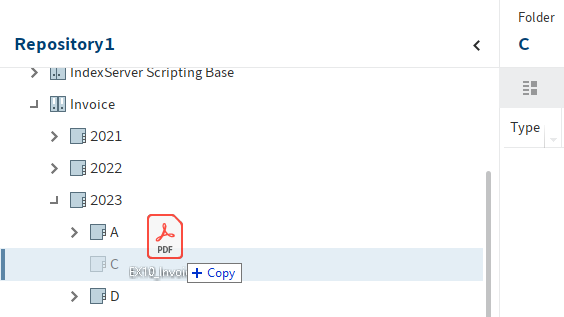
Release the mouse button.
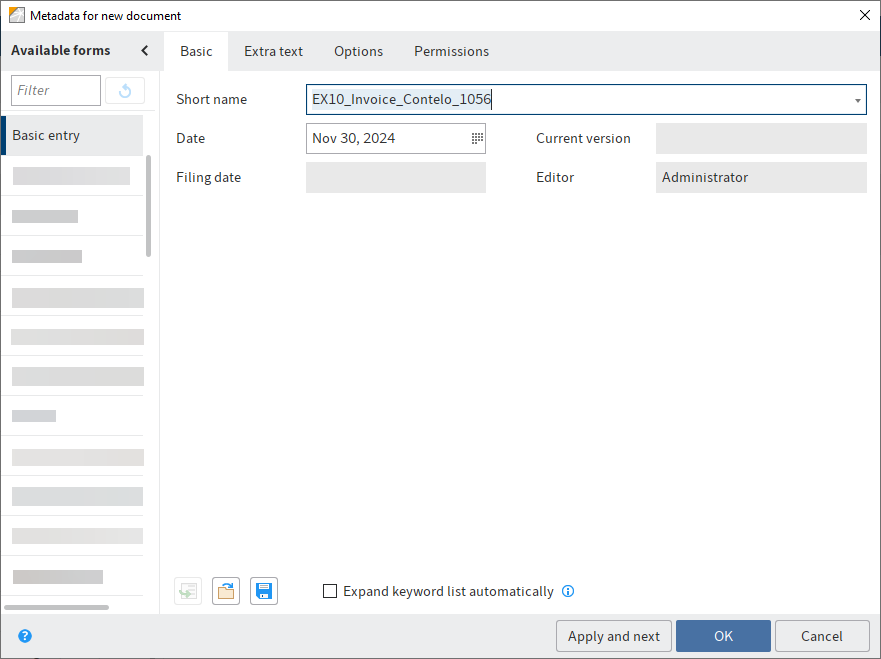
The Metadata for new document dialog box opens.
Select a metadata form in the Available forms column.
Enter a short name.
Optional: Enter additional metadata.
Alternative: For multiple documents, you can enable the Same metadata for all documents (serial filing) option below the Short name field. Refer to chapter Serial filing for more information.
Information
The more precise the information is that you enter for a document, the easier it is to find the document later on. For detailed information on this topic, refer to the Metadata chapter.
Select OK once you have entered all metadata.
Result
You have filed the document to ELO.
Outlook
You can modify documents stored in ELO. If the document is version-controlled, a new version of the document is stored after you have made changes. The old version is retained. You have the following options:
# Store document with the 'Insert file' function
You want to transfer a document from your file system to ELO.
Method
In the Repository work area, select the folder that you want to insert the document into.
On the ribbon, select New > Insert > Insert file.
In the Insert file dialog box, select the desired file.
Alternative: You can file multiple files to ELO. Select the desired files while holding the SHIFT or CTRL key.

The Metadata for new document dialog box opens.
Select a metadata form in the Available forms column.
Enter a short name.
Optional: Enter additional metadata.
Alternative: For multiple files, you can enable the Same metadata for all documents (serial filing) option below the Short name field. Refer to chapter Serial filing for more information.
Information
The more precise the information is that you enter for a document, the easier it is to find the document later on. For detailed information on this topic, refer to the Metadata chapter.
Select OK once you have entered all metadata.
Result
You have filed the document to ELO.
Outlook
You can modify documents stored in ELO. If the document is version-controlled, a new version of the document is stored after you have made changes. The old version is retained. You have the following options:
# Scan a document to the Intray and file it
You want to scan a document and file it to ELO.
Requirements
- A scanner needs to be connected to the computer.
Please note
If you are using the 64-bit version of ELO, you will need to use the ELOscanTool for scanning. You will find this setting under Ribbon > User menu [your name] > Configuration > Technical presets > General > Use as scan method > ELOscanTool TWAIN (Windows).
Method
Open the Intray work area.
Place the document in the scanner.
Select the Scan document button on the File tab to start the scan process.
Optional: A dialog box may appear. Make the desired settings and select Scan.
The scan is performed.
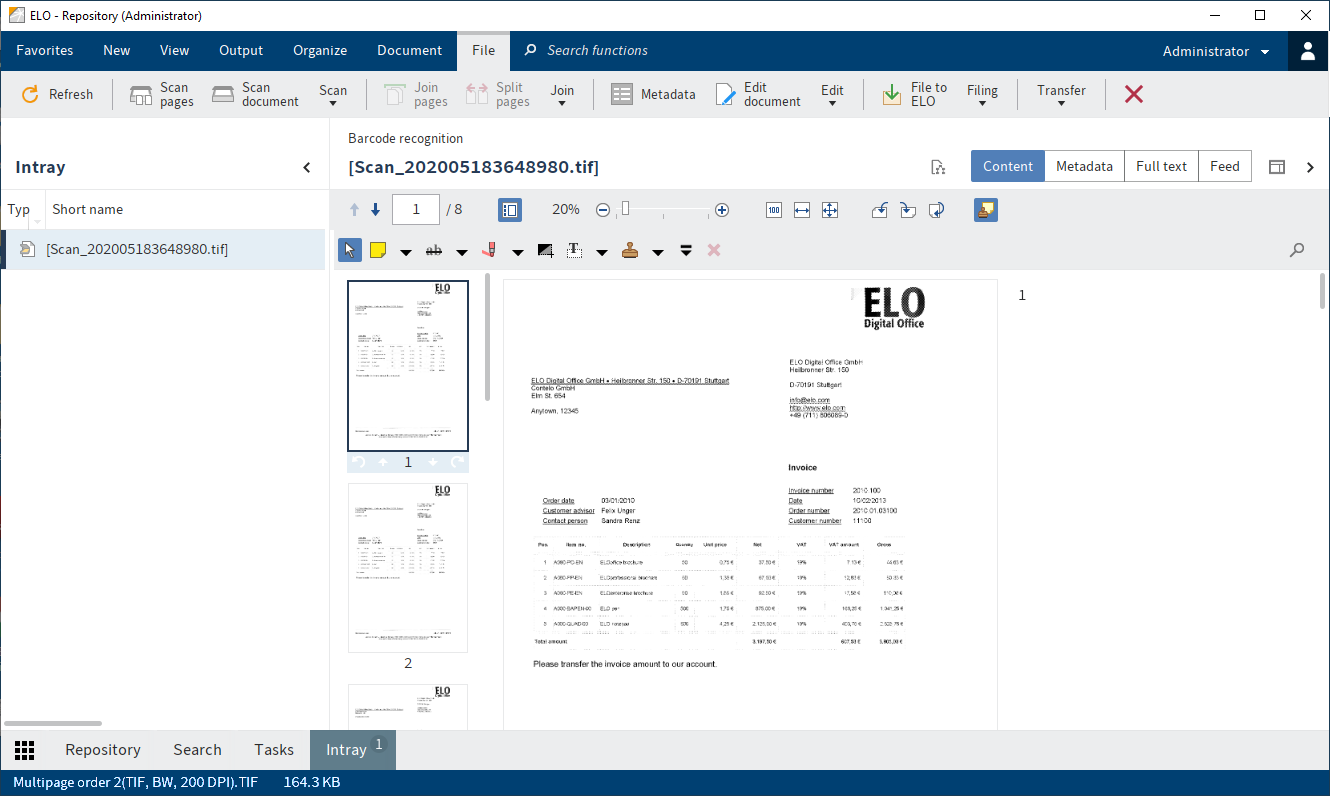
The scanned document appears in the viewer pane.
File document
Follow these steps to file the scanned document to ELO.
Select the scanned document in the Intray work area.
On the File tab, select File to ELO.
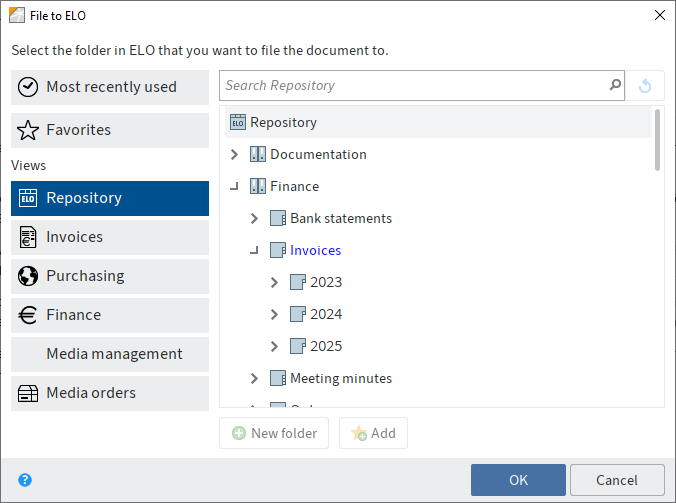
The File to ELO dialog box opens.
Select the folder where the scanned document should be filed.
Select OK.
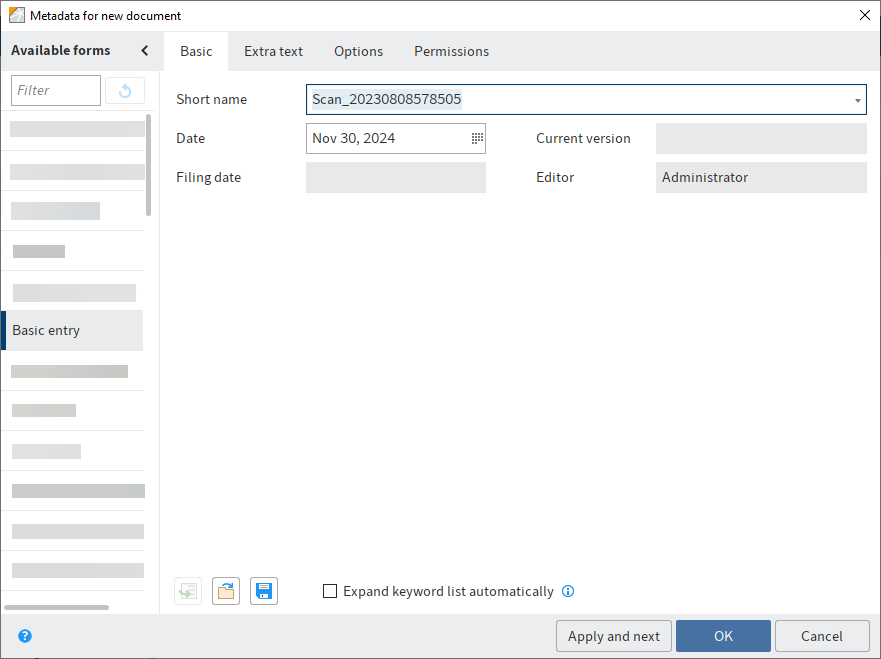
The Metadata for new document dialog box opens.
Select a metadata form in the Available forms column.
Enter a short name.
Optional: Enter additional metadata.
Information
The more precise the information is that you enter for a document, the easier it is to find the document later on. For detailed information on this topic, refer to the Metadata chapter.
Select OK once you have entered all metadata.
Result
You have filed the document to ELO.
Outlook
You will find more information about the functions on the File tab in the 'File' tab chapter.
You can modify documents stored in ELO. If the document is version-controlled, a new version of the document is stored after you have made changes. The old version is retained. You have the following options:
# Store document with the 'Document from template' function
You want to create a new document with the help of a document template.
Requirements
- Templates must be created in an application such as Microsoft Word.
- There must be a document template in ELO, e. g. for Microsoft Word documents.
- You must know the name of the folder in ELO containing the document templates.
- You must know where you want to store the document in ELO.
Information
Assuming you have the corresponding permissions, you can define a central folder for templates in ELO. You will find this setting under Ribbon > User menu [your name] > Configuration > Technical presets > Folder for document templates.
Method
Open the Repository work area.
Select the folder in the tree structure that you want to file the document to.
On the ribbon, select New > Insert > Document from template.
Keyboard shortcut: CTRL + N
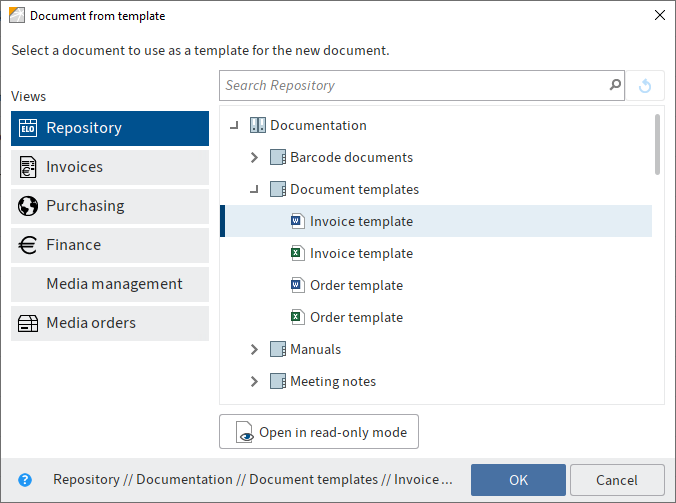
The Document from template dialog box opens.
Open the folder with the document templates and select the appropriate template.
Select OK.
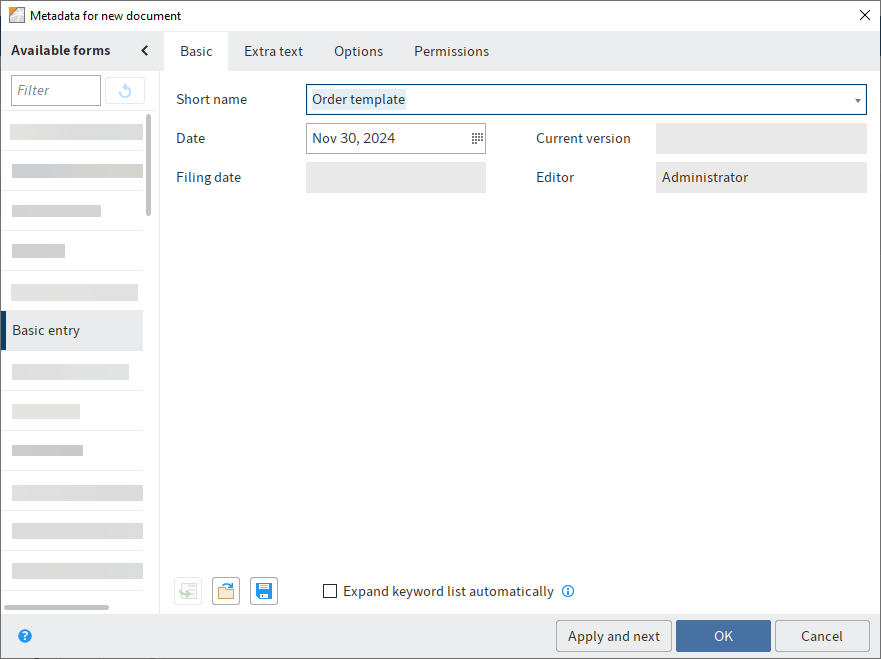
The Metadata for new document dialog box opens.
Select a metadata form in the Available forms column.
Enter a short name.
Optional: Enter additional metadata.
Information
The more precise the information is that you enter for a document, the easier it is to find the document later on. For detailed information on this topic, refer to the Metadata chapter.
Select OK once you have entered all metadata.
The dialog box closes. The corresponding external application will start and the document template will be displayed.
Make the desired changes.
Save the document and close the external application.
The document is now located in the designated folder in ELO.
Select the document in ELO.
On the ribbon, select Document > Check in.
Keyboard shortcut: ALT + I
The Version information dialog may appear. If so, enter a version number and a version comment.
Result
You have filed the new document to ELO.
Outlook
You can modify documents stored in ELO. If the document is version-controlled, a new version of the document is stored after you have made changes. The old version is retained. You have the following options:
# Edit entry
You can edit the content of documents in ELO. To do so, you must check out the document, and check it back into ELO when you have finished working on it. You can Check out and edit a single document or an entire folder. When an entry is checked out (folder or document), it is locked and cannot be edited by other users.
# Check out and edit document
You want to edit a document and file the new version to ELO.
Method
Open the Repository work area.
Select the document you want to edit.
The preview of the document is displayed in the viewer pane.
On the ribbon, select Document > Check out and edit.
Keyboard shortcut: ALT + O
The document is opened in the corresponding application and can be edited.
In ELO, the name of the user who currently has the entry checked out is shown in square brackets before the document name. The document cannot be edited by other users as long as it is checked out.
Edit the document in the external application.
Save the document in the external application.
Close the external application.
Information
You can file the edited document to ELO via the Repository work area or the In use work area. Select the Check in function on the Document tab.
Select the document in ELO.
Select the Check in function on the Document tab to transfer the document back to ELO.
Keyboard shortcut: ALT + I
Alternative: Right-click a document in the repository and select Check in from the context menu.
Information
If you do not change a document and select the Check in function, the Check in document dialog opens. In this dialog box, you can cancel editing or file the document as a new version anyway.
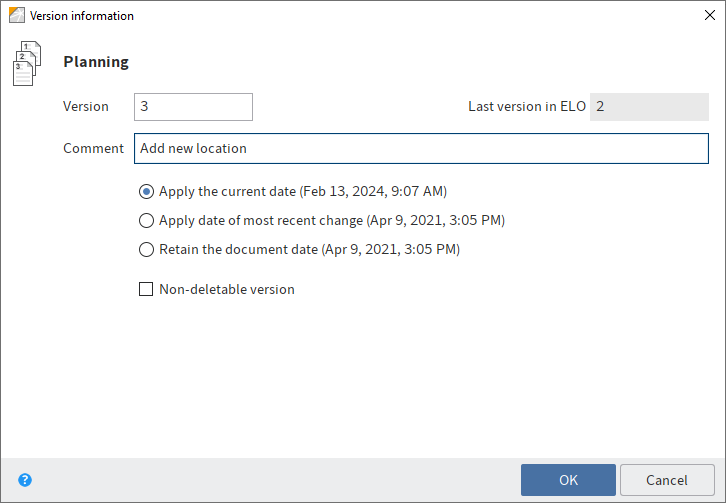
The Version information dialog box appears.
Optional: Enter a version number and version comment.
If you want to update the document date in ELO to the current date, select the Apply the current date option. The document date is the date that is saved along with the document version. In contrast, the filing date is the date on which a document was filed to ELO.
Users with the appropriate permissions can delete versions of a version-controlled document. If you do not want your version to be deleted, select the Non-deletable version option.
Select OK.
Result
The document is checked back into the Repository work area with a new version number.
Related functions
- Load new version: With this function, you can also load a new version without checking out and editing the current version of a document filed to ELO.
- Check out to OneDrive: Use this function to check out a Microsoft Office document in ELO to Microsoft OneDrive for editing. The document is stored in your OneDrive folder until you check it back into ELO.
# Check out and edit folder
ELO also lets you check out entire folders and edit their contents. This allows you to lock multiple documents at once.
Please note
If you check out a folder with all the references, you cannot check in the references separately. Instead, you need to check in the entire folder. In addition, you cannot check in the original documents that are linked to the references until you have checked in the entire folder.
Method
Open the Repository work area.
Select the folder you want to check out.
Right-click the folder to open the context menu.
In the context menu, select the Check out and edit function.
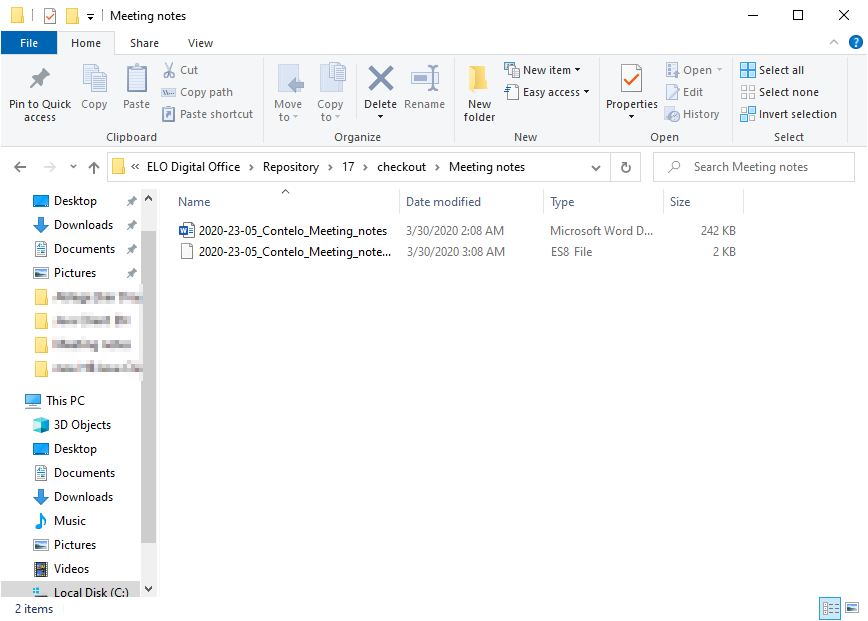
The folder is temporarily stored in a checkout directory on your file system. You can open and edit the individual documents from here.
Information
Child folders are not checked out. A file in ES8 format is created for each document. Files in ES8 format are used for saving metadata. The Windows Explorer default settings hide ES8 files.
The entire folder appears as checked out in the In use work area.
Check in
When you have finished editing the documents, you can check the folder back into ELO.
Select the checked out folder in ELO.
Right-click the folder to open the context menu.
Choose the Check in function in the context menu.
During check-in, ELO recognizes which documents have been changed. With the default settings, the Version information dialog box appears for every changed document.
Result
The folder was checked in. The changed documents were filed as new versions.
# Start workflow
Using workflows, you can assign other users or groups tasks.
An integrated escalation management function allows you to track whether the set deadlines are met once a workflow is started.
The following options are available for starting workflows:
- Start ad hoc workflow function
- Start workflow function
Ad hoc workflows are simple, predefined workflows available in ELO. The workflows available to you when you run the Start workflow function were defined by your company.
You can learn how to start an ad hoc workflow in the chapter Ad hoc workflow.
Method
Select the entry (folder or document) you want to start a workflow for.
On the New tab, select the Start workflow function.
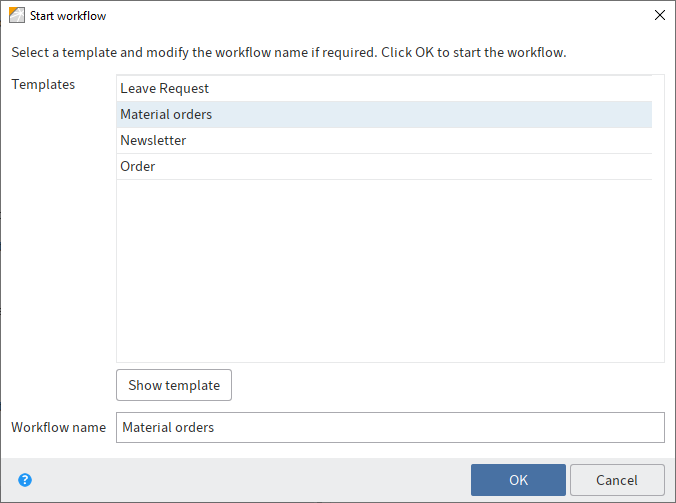
Select a workflow template.
Show template: You can see the individual steps of the workflow here. As the workflow is already configured, you do not have to configure any additional settings.
Information
To allow changes to the template when starting the workflow, enable the option Start workflow in edit mode (Ribbon > User menu [your name] > Configuration > Advanced settings > Workflow).
In addition to the workflow steps, you will see the respective editor and, if applicable, the time allowed for the workflow step until escalation (days:minutes:seconds).
Outlook
Once you have started a workflow, it will appear in your My ELO work area under My recently started workflows.
You can view workflows for an entry using the function Workflows for this entry (available in: Ribbon > Organize).
You can find information about creating a workflow template in the ELO workflow (opens new window) documentation.
# Forward workflow
When you receive a workflow task, it will appear in your Tasks work area. You can see what task you are being requested to perform in the Workflow step field.
You have the following options for completing your task:
The workflow contains a form. You will see the form in the viewer pane on the Form or Metadata tab. In this case, forward the workflow by selecting the button on the form.
You can use the 'Forward workflow' function to process the workflow in a dialog box. You must have enabled the option Process tasks with "Forward workflow" dialog box in the configuration under Advanced settings > Workflow.
You received the workflow as a member of a group. In this case, you have to accept it first by selecting the Accept workflow button on the Task tab. This prevents the workflow from being processed by multiple users at once. Once you have accepted a workflow, it will disappear from the task list of the other group members.
Information
If you are unable to accept a group task, you need the corresponding role. You can enable roles via User menu [your name] > Enable roles.
# Method with form
If you receive a workflow that you want to forward with a form, you can edit it on the Form or Metadata tab in the viewer pane.
Select the workflow that you want to forward.
Edit the fields of the form as indicated in the task.
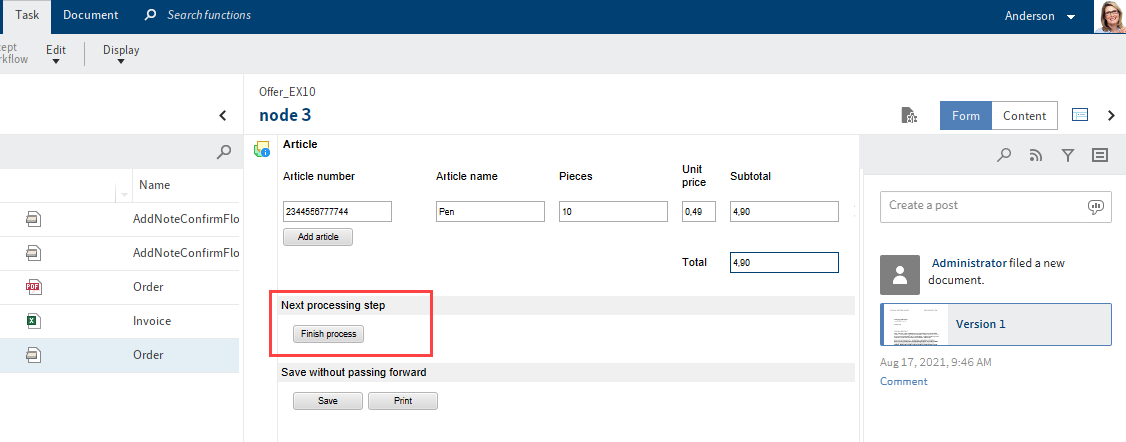
To forward the workflow, select the corresponding button within the form.
Depending on which settings apply for the current node, you can select one or more successor nodes under Forward.
# Method with dialog box
Select the workflow that you want to forward.
On the Task tab, select the Forward workflow function.
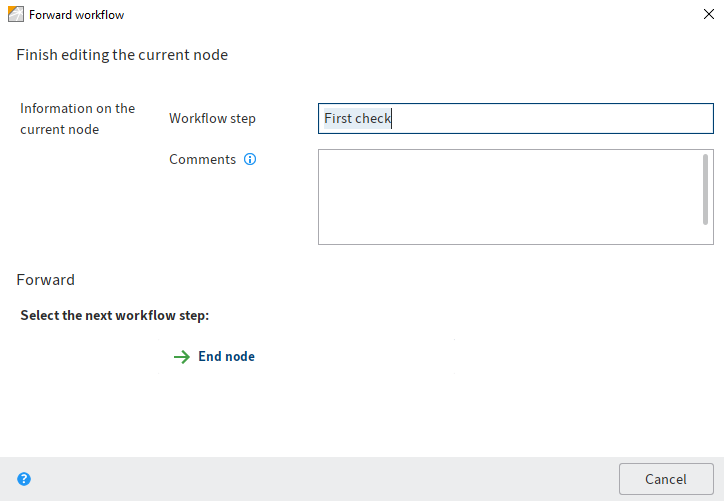
You can make the following settings:
Workflow step: Enter the name of the workflow node here.
Comments: Enter a message or instructions for the next user here.
Please note
You can only view the comment if you navigate to Organize > Overviews > Workflow overview and enable the List view.
As soon as you click the name of the successor node, the node is forwarded and the dialog box closes.
Select the next workflow step: Depending on which settings apply for the current node, you can select one or more successor nodes in the Forward area.
# Create tile
You can create tiles that provide you with quick access to a specific area of the repository. These types of tiles are called views.
A new view is displayed as a tile in the tile navigation on your My ELO home screen.
You can create two types of views:
- Folder view: A folder view takes you straight to a frequently used folder.
- Task view: A task view shows you tasks with criteria you selected (e. g. tasks with expired deadlines).
Information
Like views, search favorites are displayed as tiles on your My ELO home screen. You will find more information about search favorites in the: Save search chapter.
# Create folder view
You can create views for folders in the Repository work area that you use frequently.
Method
In the Repository work area, select the folder you want to create a view for.
On the ribbon, go to the View tab and select New view.
Keyboard shortcut: ALT + N
In the New view dialog box, the name of the folder is automatically displayed in the Name field. You can change this name if you want to use a different one.
In the Folder area, the folder that you just selected in the Repository work area is already selected. You can select a different folder if you want to.
Select OK.
Result
A tile is created for the new view under the Repository group in the tile navigation.
Outlook
You can drag and drop a tile to another position.
You can also pin a tile to the navigation bar using the context menu (right-click).
For more information, refer to the Tile navigation chapter.
If you have created multiple views, you have the option to group them. To learn how to create a group in the tile navigation, refer to the chapter Create group.
You can rename or delete a folder view. To do so, select View > Views > Manage views on the ribbon and select the corresponding view in the dialog box.
# Create task view
You can create task views with your own custom criteria, for example with a high priority.
A task view creates a tile that gives you direct access to the tasks meeting the selected criteria.
Please note
Tasks displayed in a task view based on the criteria you set are no longer visible in the Tasks work area. You can access these tasks from the corresponding task view tile in the My ELO work area.
Method
Navigate to the Tasks work area.
On the ribbon, go to the View tab and select New view.
Keyboard shortcut: ALT + N
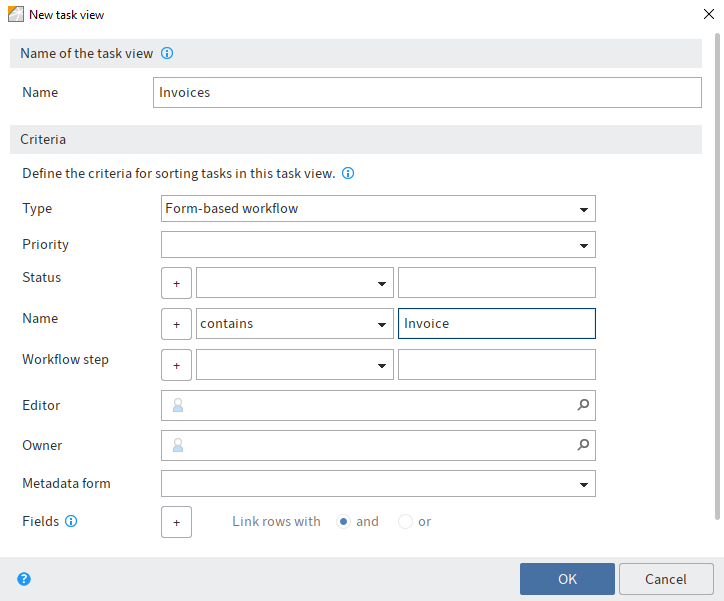
In the New task view dialog box, define the criteria for showing tasks in the task view.
Some fields are only enabled based on other fields. For example, Fields is enabled once you have made a selection under Metadata form.
You can set the following criteria:
Type: You can select the type of tasks that should be filtered for here. If no task type is selected, all tasks are displayed.
Priority: Use the Priority drop-down menu to specify the priority according to which you want to filter the tasks. Only tasks with the selected priority are displayed. If no priority is selected, all tasks are displayed.
Status/Name/Workflow step: Use the drop-down menu and the input field to define which criteria the status, name, or workflow step of the tasks must meet for the corresponding tasks to be displayed.
Use the drop-down menu to select which condition applies.
In the input field, enter the character string that the selected condition should be applied to. To enter multiple strings, separate the entries with the pilcrow character
¶.Editor: Select an editor of the tasks. Suggestions will appear as soon as you start to type. The task view only contains tasks assigned to the selected editor.
Owner: Select an owner of the tasks. Suggestions will appear as soon as you start to type. The task view only contains tasks assigned to the selected owner. The owner is the user who started the workflow.
Metadata form: Use the Metadata form drop-down menu to select a metadata form if you only want tasks with the corresponding metadata form to be displayed in the task view.
Fields: If you have selected a metadata form, you can use the plus sign to add fields so that you can filter by their contents.
Select the field from the first drop-down menu. In the second drop-down menu, select which condition applies.
In the input field, enter the character string that the selected condition should be applied to.
If you add multiple fields, you can connect the lines with and or or.
Show postponed workflows: If this workflows option is enabled, postponed workflows will also be displayed within the new task view.
Select OK.
Result
A tile is created for the new view under the Tasks group in the tile navigation.
Outlook
You can drag and drop a tile to another position.
You can also pin a tile to the navigation bar using the context menu (right-click).
For more information, refer to the Tile navigation chapter.
If you have created multiple views, you have the option to group them. To learn how to create a group in the tile navigation, refer to the chapter Create group.
You can rename or delete a task view. To do so, select View > Views > Manage views on the ribbon and select the corresponding view in the dialog box.
You will find more information on the Tasks work area in the 'Tasks' work area chapter.
# Search entries
You can search for entries (folders or documents) in ELO.
There are different ways to find documents in ELO. You can either use ELO iSearch or the metadata search.
# Input
Enter one or more search terms into the input field.
Matching search terms are suggested as you type. To accept a suggestion, double-click on the term.
Information
You will find tips for entering search terms by selecting more under the input field.
Select Start search to search for the term.
Reset search: You can restore the search default with this button.
# Narrow down search
The following options are available for narrowing down your search:
# Narrow down areas
You can limit your search to specific areas.
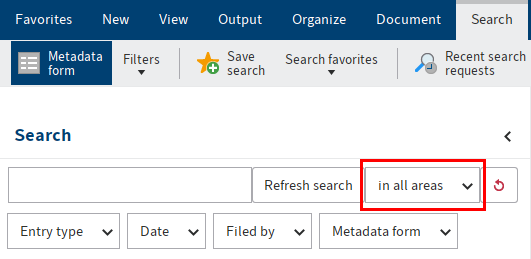
Do this by selecting in all areas and choosing the areas.
If you have selected multiple areas, the search behaves as follows:
One search term:
- If you enter one search term, entries containing the search term in one of the areas are shown.
Multiple search terms:
- AND search: With an AND search (entering terms without a connecting element, e. g.
dog cat), all entries that contain all search terms in one of the searched areas are shown. - OR search: With an OR search (entering terms with a comma, e. g.
dog, cat), all entries that contain at least one search term in one of the searched areas are shown.
Information
For technical reasons and to improve ELO iSearch performance, these areas cannot be searched in combination in the AND search.
Example
You search for two terms in different areas: One of the terms is in the full text of a document, and the other is in the short name. ELO iSearch does not return any matches. In this case, it only lists results that include all search terms in the same area.
If you search for just one of the terms and restrict the search using filters, you will get better results.
# Narrow down folders
You can narrow down the search to a single folder.
Information
For technical reasons, this option may cause the search results to take a long time to load.
- In the Repository work area, select the folder you want to search.
- Switch to the Search work area.
- On the ribbon, select Search > Search logic > Current folder only.
- Make additional settings as required.
You need to select Start search again for the restrictions for a previously performed search to take effect. If you select the Current folder only option, the searched folder is displayed in a tooltip.
# Filters
You can narrow down the search using filters: Ribbon > Search > Filters. After you have selected the filter, specify the filter via the drop-down menu.
For detailed information on using filters, refer to the chapter Filters.
# Display search results
In the Search work area, you can use the same functions on entries as in the Repository work area, for example edit documents, create tasks, or send entries.
To go to the filing location of the selected entry, select View > Go to on the ribbon.
The search results are shown in multiple columns when the default settings are used. The table columns correspond to the fields of the metadata forms. The results can be filtered within the columns. By clicking the column headers, the results can be sorted in ascending or descending order.
# Context menu
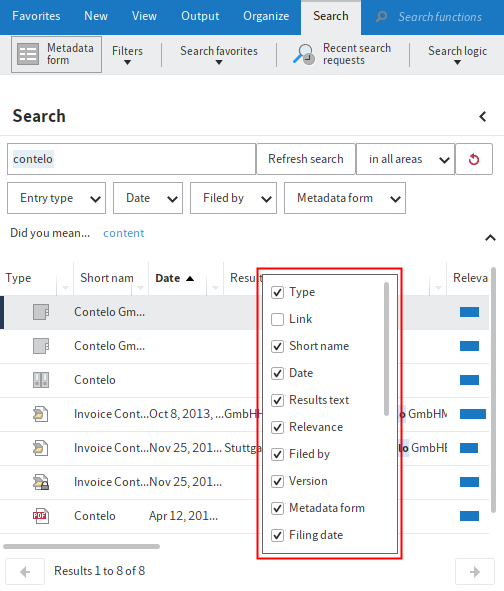
Right-click a column header to open a context menu. Select the columns that you want to display.
# Numeric values
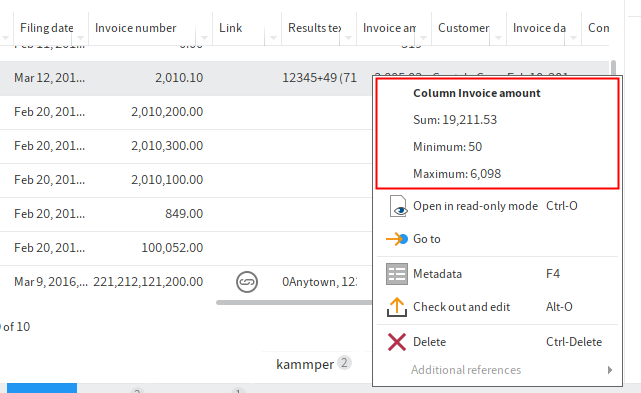
ELO provides the following additional information in the context menu for columns that only contains numeric values.
- Sum: Calculates the column sum.
- Minimum: Returns the lowest value in a column.
- Maximum: Returns the highest value in a column.
# Filters
You can apply filters to the columns of the search results.
![]()
You can access the filters via the arrow icon next to the column label.
# Highlighted full text matches
Matches are highlighted in the full text preview. Switch to the Full text option in the viewer pane.
![]()
If the document contains more than one match, you can jump back and forth between the matches in the full text using the Show next hit (arrow pointing downwards) and Show previous hit (arrow pointing upwards) buttons.
You can also display the hits in the Results text table column. Enable the Results text option under Ribbon > User menu [your name] > Configuration > Display > Search.
# Display mode for search results
With the default settings, the search results are displayed as a list. You can also view search results as a tile, table, or tree structure. You can access the settings via Toolbar > Display options.
Outlook
You will find more information on the search here:
- 'Search' work area: General use, wildcard search, phrase search
- 'Search' tab
# Search a business object

For business objects, you start a search within the region of a business object via the search field in the viewer pane. The system then searches for the entered short name. The search is restricted to the region of the business object, including the associated child folders.
# Assign substitute
Substitutions ensure that your tasks are completed even if you do not have access to ELO for a longer period of time.
You can create substitutes and activate them immediately or later on.
Please note
A substitution rule can only be changed or deleted by the following users:
- The user who created the substitution
- Main administrator
- Sub-administrator (of the user being substituted for)
- Supervisors (of the user being substituted for)
Information for administrators
When upgrading from ELO 11 or older versions, the active substitution rules are transferred and applied. This means that substitutions remain active for an unlimited period of time, substitution rights remain inactive with the right May activate/deactivate outside a scheduled period. This requires ELO Indexserver 20.01 or a higher version.
Method
On the ribbon, select User menu [your name] > Assign substitute.
Select your substitute using the input field or from the drop-down menu.
You can be substituted for by other users or by groups.
To configure more exact settings, tap one of the users or groups with substitution rights.
As long as you haven't configured any settings for a substitute, their status will be Incomplete. With this status, the substitute cannot be used. You can configure settings either right away or later on.
You can configure different settings for different substitutes. For example, you can plan your substitutions in advance and edit their settings after the fact.
In the Users with substitution rights list, you see the users and groups that are designated as substitutes. Active substitutes are marked green. Incomplete substitutions are marked yellow. To complete a substitution, at least one of the options Active substitution in this period and May activate/deactivate outside a scheduled period must be enabled AND one of the options Substitute inherits everything or Restrict substitution. At least one of the boxes below the option Restrict substitution must be selected.
# Settings
The following options are available for assigning a substitute:
- You can set a period during which another user automatically acts as your substitute.
- This gives the other user the right to substitute for you. In this case, they have to activate the substitution themselves.
Period: The Active substitution in this period option enables the input fields for the period. If you disable option, the input fields are disabled. Entered periods are retained and can be reactivated later on.
You can define the following periods:
- A definite period with a start and end
- An unlimited period
- Multiple definite and/or unlimited periods
If you have defined a substitution with an unlimited period, you can end the substitution by deleting the period with the X icon.
Information
Periods are not deleted automatically; you have to delete them by selecting the X icon.
Substitution rights: If you enable the May activate/deactivate outside a scheduled period option, the substitute is allowed to activate or deactivate the substitution. This gives them permission to substitute for you in general without you defining a substitution period.
Substitution scope: You can individually configure how many rights you want to give your substitutes.
Select one of the following options:
- Substitute inherits everything
- Restrict substitution
Important
If you enable the option Substitute inherits everything, your substitute will have access to all documents, tasks, and functions that you have access to. This includes your personal documents, tasks, and notes that otherwise only you can see.
Substitute inherits everything: The substitute is assigned all your rights. The substitute will have access to:
- Documents in ELO (including personal ones)
- Files in your Intray
- Your personal tasks and workflows
- Group memberships and group tasks
- Notes (including personal ones)
- Client functions
Restrict substitution: You can individually configure how many rights you want to give your substitutes. You must enable at least one of the following three options:
Personal tasks and workflows: If you enable this option, your substitute can access tasks and workflows that you have been assigned personally, not those given to you as a member of a group. The substitute requires the Extend workflow rights user right in order to be able to view the documents associated with a task. This user right can only be granted by an administrator.
Intray access: If you enable this option, your substitute has access to your Intray.
Please note
To allow your substitute access to documents in your Intray, the documents must already have been saved on the server. You can enable this setting under User menu [your name] > Configuration > Advanced settings > Settings for the Intray work area > Save Intray on server when logging off. If necessary, contact your system administrator.
Inherit group membership: Use the drop-down menu to select which of your groups the substitution applies to. Your substitute is assigned the user rights, permissions to entries, annotations, feed entries, and group tasks associated with the group. This allows you to create multiple substitutes for the same period and allocate permissions for different groups. Only the groups that allow substitution are available for selection.
![]()
If you are currently being substituted for, you will recognize this based on the orange figure next to your User menu [your name].
You will also see on your My ELO start screen that you are being substituted for.
# Forward substitutions
Substitutions are not forwarded automatically.
This means: Cole has appointed Anderson as his substitute. In turn, Anderson appoints a different user as her substitute. This user does not receive the tasks, rights, etc. that Anderson is given as substitute for Cole.
May forward substitution: By enabling this option, you allow your substitute to pass on the substitution to another user.
Even in this case, the substitution is not forwarded automatically – the user has to forward it actively.
Use this option with caution to prevent rights from being forwarded unintentionally within the company.
# Additional information
# Add and search annotations
# Add annotations
Annotations include sticky notes, text notes, and stamps. Annotations are affixed to a single page of a document. You can only place annotations, text notes, and sticky notes on documents that can be displayed in the document viewer (PDF, TIFF, JPEG, ...).
The following example shows how to do this using a sticky note. The method is similar for other types of annotations.
Information
To use stamps, you must have been assigned at least one stamp by the administrator.
You can also create custom stamps that only you can use.
Information
You can use the Create margin note function if you want to add a note on an entire document or on a document in another format.
Requirements
- You need a document that can be displayed with the document viewer, e.g. a PDF or image file.
Method
Select the document that you want to place an annotation on.
The document is shown in the viewer pane.
Information
You can assign permissions so that not all users can see or edit annotations. You will find the permissions settings for sticky notes and text notes under Ribbon > User menu [your name] > Configuration > Annotations. You define the permission settings for stamps in the Stamps overview dialog box. You will find more information in the Add stamps section.
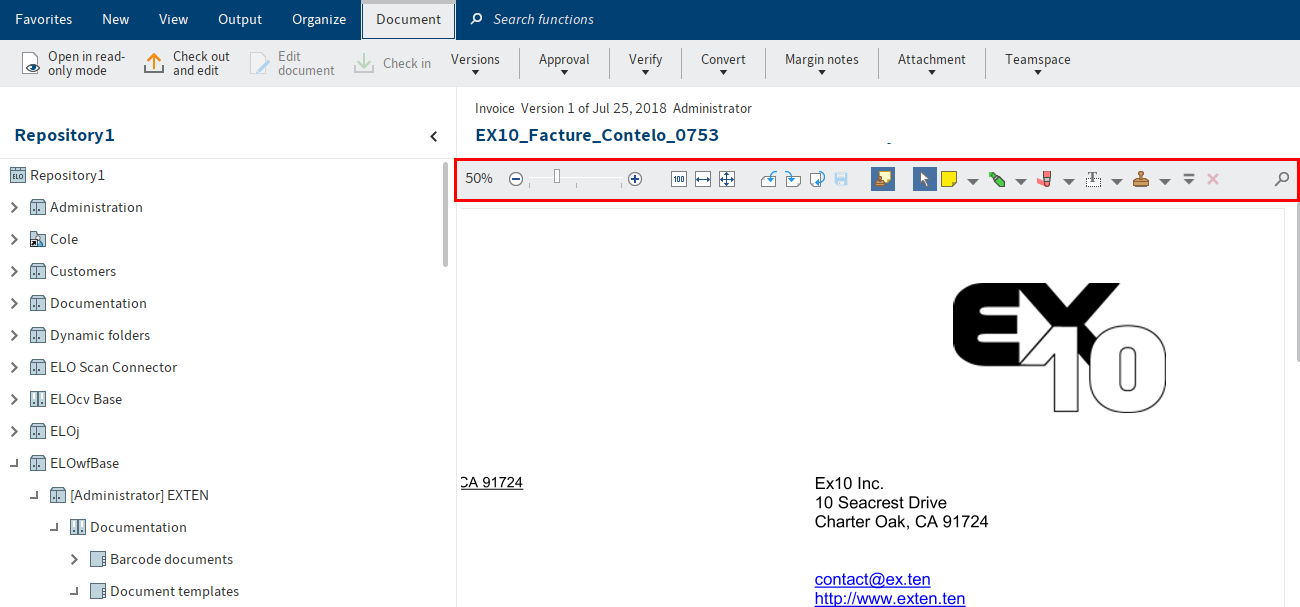
The document viewer toolbar is displayed above the document in the document viewer.
Apply a sticky note
Select the sticky note icon on the document viewer toolbar to enable the Sticky note function.
Information
To use an annotation function multiple times in succession, hold down the ALT GR key as you click the function. To return to normal mode, choose the Select function (cursor icon).
Optional: To change the color, click the triangle next to the sticky note icon and select a different color from the drop-down menu.
The cursor turns into a sticky note in the color you selected.
Click the part of the document you want to place the sticky note on.
The sticky note is created. The dotted border indicates that the sticky note can be edited. The editor and the current date are displayed below the sticky note.

Enter text.
Click the area outside of the sticky note.
Result
The text you entered is saved. The sticky note is displayed on the document.
Information
You can use the context menu to open e-mail addresses, ELO links, and web pages in a sticky note (Available in: Right-click > Open links).
Outlook
Double-click the sticky note to edit it. To delete a sticky note, select the sticky note with the selection tool and then select Delete in the document viewer toolbar.
# Add stamps
You can create new stamps or edit existing ones.
Information
Default stamps cannot be edited or deleted.
Method
In the viewer toolbar, select the triangle icon next to the stamp icon.
In the drop-down menu, select the Stamps overview button.
The Stamps overview dialog box opens.
Select Add.
The Add stamp dialog box opens.
In this dialog box, select the name as well as the text or image for a stamp. The following settings are available:
Date: The current date is added to the stamp text. Appears in the text field as
%d{dd.MM.y}.- Other usable formats: Select the triangle icon to open examples of other time and date formats.
Time: The current time is added to the stamp text. Appears in the text field as
%X.User: The name of the user is added to the stamp text. Appears in the text field as
%u.Font
Permissions: You can set who can see the stamps here.
Please note
These permissions do not define who is allowed to use the stamp.
Select OK to save the stamp.
Result
The stamp appears in the drop-down menu that you open using the triangle icon next to the stamp icon.
Outlook
You can select the stamp you want to use from the drop-down menu.
To edit stamps of your own, select a stamp in the Stamps overview dialog box and choose Edit.
# Search annotations
The Search metadata function can be used to search for margin notes and annotations.
Requirements
- There must be at least one document in ELO that contains an annotation or margin note.
Method
Open the Search work area.
On the ribbon, select Search > Search logic > Search metadata.
Keyboard shortcut: CTRL + F
The Search metadata dialog box opens. The default search form is selected.
Optional: Select a different search form if required.
Select the Options tab.
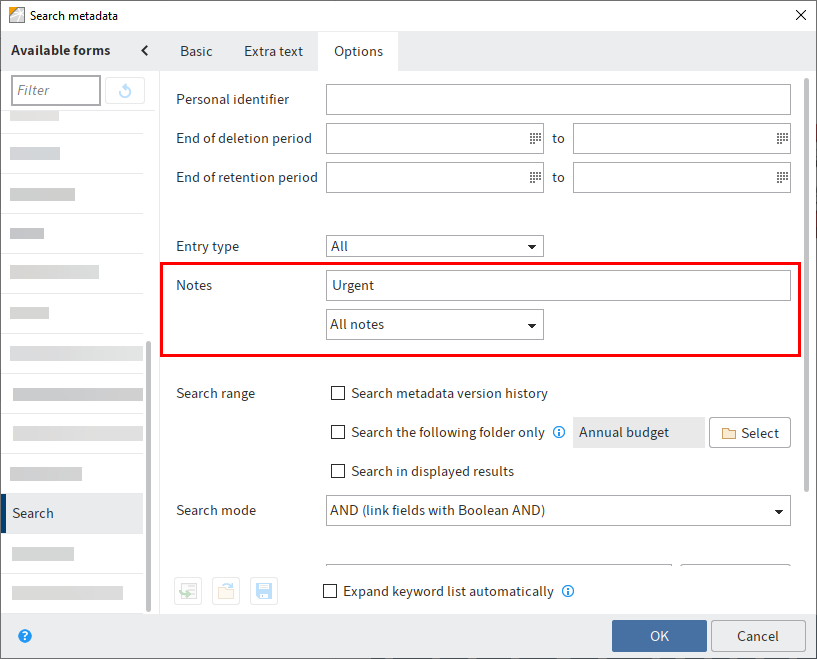
Enter a search term in the Notes search field.
Information
If you want the search to include annotations that do not contain any text, enter an asterisk (*) in the search field.
Optional: You can select the type of notes you want to search for from the drop-down menu under the Notes field.
Select OK.
Result
The search starts. The search results appear in the Search work area.