# 'New' tab
# Scan to repository
Available in: Repository work area > Ribbon > New > Scan
This function enables you to scan documents straight to the Repository work area. After scanning, you must enter metadata for the document. The scanned document is filed to the last selected folder in ELO.
Please note
You need to have a compatible scanner installed and selected.
# Attach to back
Available in: Repository work area > Ribbon > New > Scan
This function attaches pages to the end of a TIFF document that was already filed to ELO. You need to scan the pages.
Please note
You need to have a compatible scanner installed and selected. To check whether a scanner is installed, select the Select scanner button under Ribbon > New > Scan.
# Attach to front
Available in: Repository work area > Ribbon > New > Scan
This function attaches pages to the front of a TIFF document that was already filed to ELO. You need to scan the pages.
Please note
You need to have a compatible scanner installed and selected. To check whether a scanner is installed, select the Select scanner button under Ribbon > New > Scan.
# Select scan profile (drop-down menu)
Available in: Ribbon > New > Scan
Use the drop-down menu to select a scan profile for the next scan. Create new scan profiles with the Scan profiles function.
# Scan profiles
Available in: Ribbon > New > Scan
Use this function to open the Scan profiles dialog box. In it, you can define profiles for scanning documents. A scan profile enables you to define settings, such as which resolution to use or which format to store the scanned documents in. This way, you can set up a custom scan profile for each source document.
Scan profiles are used to take the specific properties of documents into account, such as texts, color images, high-resolution images, different formats, etc.
Information
You will also find the Print separator pages function in the Scan profiles dialog box. You can find more information about this function in the Join (separator pages) section.
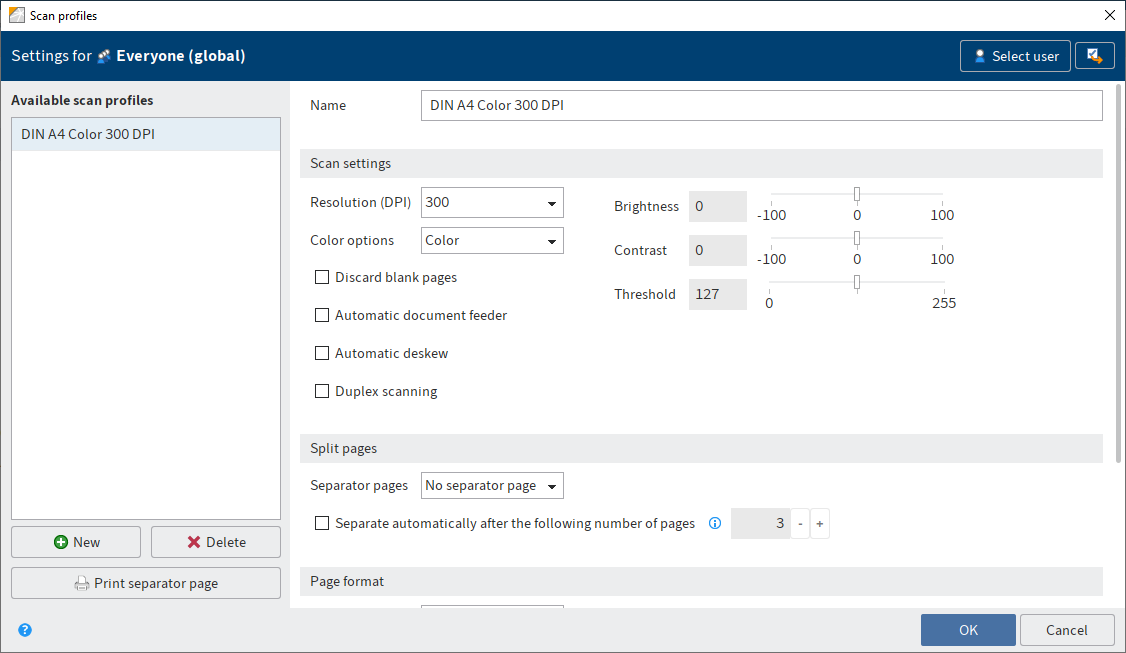
You can make the following settings:
# Available scan profiles
Under Available scan profiles, you can see all scan profiles available to the selected user or group.
New: Creates a new scan profile
Delete: Deletes the selected scan profile
Print separator page: Opens the Print separator page dialog box. In the Print separator page dialog box, select whether a separator page will be printed with horizontal or vertical bars.
You need a separator page when you scan multiple documents one after the other. A separator page shows the transition to a new document and ensures that the documents are filed individually to the Intray work area after scanning.
# Name of the profile
Name: Use the Name field to enter the name of the selected scan profile.
# Scan settings
The following settings apply to the scan process. The settings can only be edited if you have created a new profile or selected an existing profile.
Information
The settings are not supported by all scanners.
Resolution in dpi: In the Resolution in dpi drop-down menu, you can select the resolution (dpi = dots per inch) for the scan process.
Color options: In the Color options drop-down menu, select whether you want to create a color, black/white, or grayscale scan.
Discard blank pages: If this option is enabled, blank pages will not be scanned.
Automatic document feeder: This option is intended for scanner who have an automatic paper feeder.
Automatic deskew: If this option is enabled, pages scanned diagonally are straightened, if possible.
Duplex scan: This option is intended for scanners that can scan front and back pages.
Brightness: Define the brightness of the scan here.
Contrast: Define the contrast of the scan here.
Threshold: Define the threshold for the scan process here. The threshold is the value that determines whether a pixel is white or black.
# Split pages
The following settings apply to how to handle separator pages.
Separator pages: You can use the drop-down menu to specify whether you want to use separator pages. If multiple documents are scanned in sequence, ELO recognizes individual documents based on the separator pages.
Automatically split pages after the following page number: If you select this option, ELO splits the documents when scanning based on the defined number of pages.
You can also use separator pages. If a separator page is detected, ELO splits the document after the separator page. The page count begins again after the separator page.
# Page format
The following settings apply to the documents being scanned.
Page size: In this drop-down menu, you select which paper format is used.
Dimensions in: Use this drop-down menu to set the unit of measurement for a user-defined page format.
Scan clip: If you have selected the option User-defined in the Page size drop-down menu, use the fields under Scan clip to specify the area that will be included in the scan.
# Save document
The following settings apply to the save process.
Image format: Use this drop-down menu to select the file format you want to save scanned documents in. The following formats are available:
- TIFF: Black/white and color scans
- JPEG: Only color scans
- PDF: Black/white and color scans
Compression: In this drop-down menu, you can specify whether you want to compress the scanned documents.
Quality: If you have selected the JPEG option in the Compression drop-down menu, you can select the image quality.
# Select scanner
Available in: Ribbon > New > Scan
Use this function to choose the scanner that you want to use. This function only applies when you use multiple scanners.
# New folder
Use this function to create a new folder in ELO. You can find more information in the Create folder chapter.
# Insert file
This function enables you to transfer a file from your local file system to ELO. The file is filed to the currently selected folder. If you are in the Intray work area, the file is transferred to the Intray work area.
For more information, refer to the chapter Insert document.
# Document from template
Keyboard shortcut: CTRL + N
Use this function to create a new document based on a document template. Use the Document from template dialog to select a document to use as a template. The template is opened for editing in the corresponding application. After editing, the document must be saved and checked back into ELO.
For more information, refer to the chapter Insert document.
# Start workflow
This function starts a new workflow. The workflows available to you when you run the Start workflow function were defined by your company. Use the Start workflow dialog box to change a template for the new workflow. To allow changes to the template when starting the workflow, enable the option Start workflow in edit mode (Ribbon > User menu [your name] > Configuration > Advanced settings > Workflow).
You can find more information in the Start workflow chapter.
# Ad hoc workflow
Keyboard shortcut: CTRL + W
This function starts a new ad hoc workflow. Ad hoc workflows are simple, predefined workflows available in ELO. You can use an ad hoc workflow to route an item to users for approval or to notify users.
You can make the following settings in the Start ad hoc workflow dialog box:
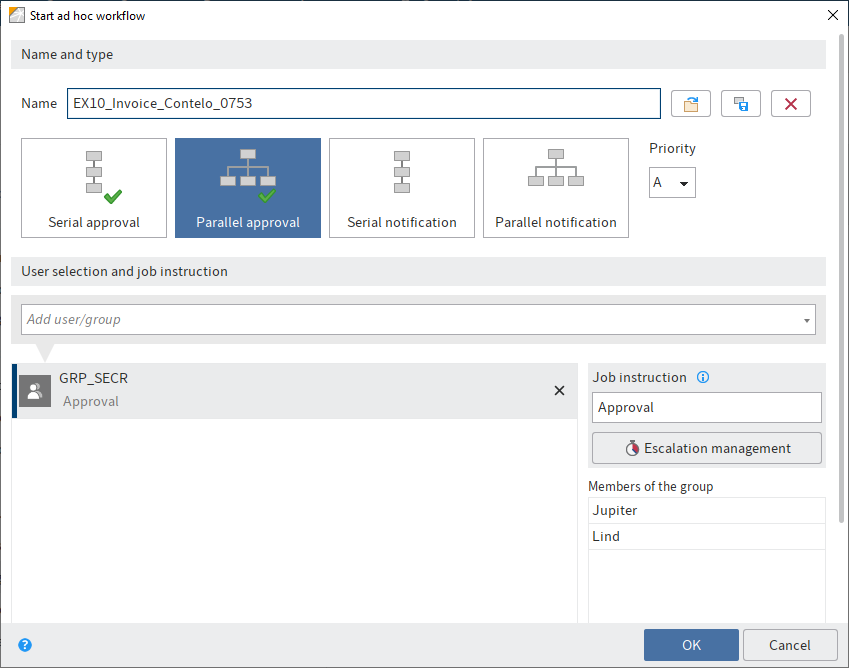
# Name and type
Name: Insert the name of the new ad hoc workflow here.
Load ad hoc workflow from template (folder icon): Use the Load ad hoc workflow from template function to load ad hoc workflows saved as a template.
Save as template (diskette icon): The Save as template function allows you to save the current ad hoc workflow as a template. You can assign a name to the template.
ELO creates a folder for each saved template in the user's folder under Administration//Users//<Folder with corresponding number range>//<User name>//data//AdHoc Templates. The template data is saved to the extra text of the respective folder.
Information
With the default settings, templates are only available to the user who creates them. However, a user with the corresponding permissions can forward these templates to other users as a reference/copy. The references/copies must be saved to the AdHoc Templates folder of the respective user.
Delete an existing template (X icon): You can delete ad hoc workflow templates with the Delete an existing template function. A dialog box appears in which you can select the template you want to delete.
Please note
If you delete the original template, any references that you have created will also be deleted.
Priority: Set an importance level for the workflow: A (= high), B (= medium), or C (= low). You can sort and filter the task list according to priorities.
Type: Select the type of ad hoc workflow you want to create. You can choose from the following types:
- Serial approval: The workflow is passed forward sequentially to the participants. They must decide whether or not to approve the workflow step. Depending on the result, the corresponding notification is sent to the selected recipient.
- Parallel approval: The workflow is distributed in parallel. All recipients receive the workflow at the same time. Each participant must grant approval.
- Serial notification: The workflow is passed forward sequentially to the individual participants. They must confirm receipt of the workflow one after another. As long as the user does not confirm the workflow, the workflow is not passed forward to the next participants.
- Parallel notification: The workflow will be sent to all participants at once. They must confirm receipt of the workflow. After completion, the corresponding notification is sent to the selected recipient.
# User selection and job instruction
Add user/group: Search for the desired user or group in the Add user/group field. Suggestions will appear as you type.
Click the corresponding suggestion to select a user or a group.
Alternative: If you select the triangle to the right of the Add user/group field, this will open a drop-down menu. This menu contains a list of the users and groups you selected recently.
Information
In the case of serial ad hoc workflows, the workflow is delivered according to the order in the list. To change this order, use the Move up (small arrow icon pointing up) or Move down (small arrow icon pointing down) buttons.
Job instruction: In the Job instruction field, enter the individual job instruction for the user selected in the list. The user sees the job instruction in the Workflow step column of the Tasks work area as soon as they have accepted the workflow.
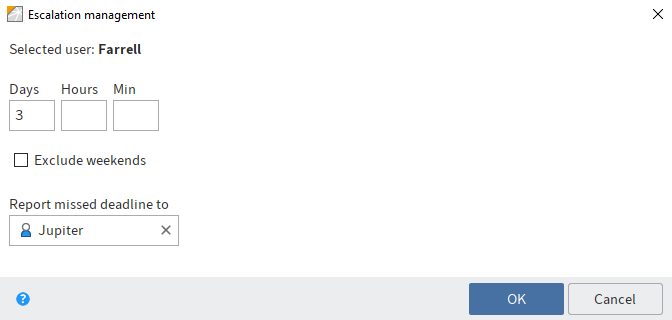
Escalation management: Select the Escalation management button to open this dialog box. This dialog box is where you specify how long the workflow may remain with the respective user. There is also the option to include or exclude Saturdays and Sundays when calculating the maximum workflow duration. You can also select a user who is notified if the deadline is missed.
Group members: If you select a group, a list of members appears.
Expand: If you select the Expand button, groups are not displayed as a group. Instead, the individual members of the group are listed.
Information
If the group is selected, one member of the group can accept and process the workflow. If you expand the group, every member of the group can accept and process the workflow.
# Completion options
Recipient: In this field, you can see which user will be notified when the ad hoc workflow is completed. You can change the recipient with Select user.
Success notification: Enter a text for the completion message.
Enter a text for this message in the Cancellation message field. This only applies to Approval type ad hoc workflows.
Withdraw the workflow from all users as soon as one user does not approve it: This option only applies for Parallel approval workflows. Enabling this option means that users no longer need to edit approval processes that have been canceled.
In the End script field, you can select a script that is executed after the ad hoc workflow is completed.
OK: Select OK to start the ad hoc workflow.
# Reminder
Available in: Ribbon > New > Create task
Use this function to create a reminder for a document or a folder. A reminder defines a date on which the document or the folder appears in the Tasks work area of the user responsible.
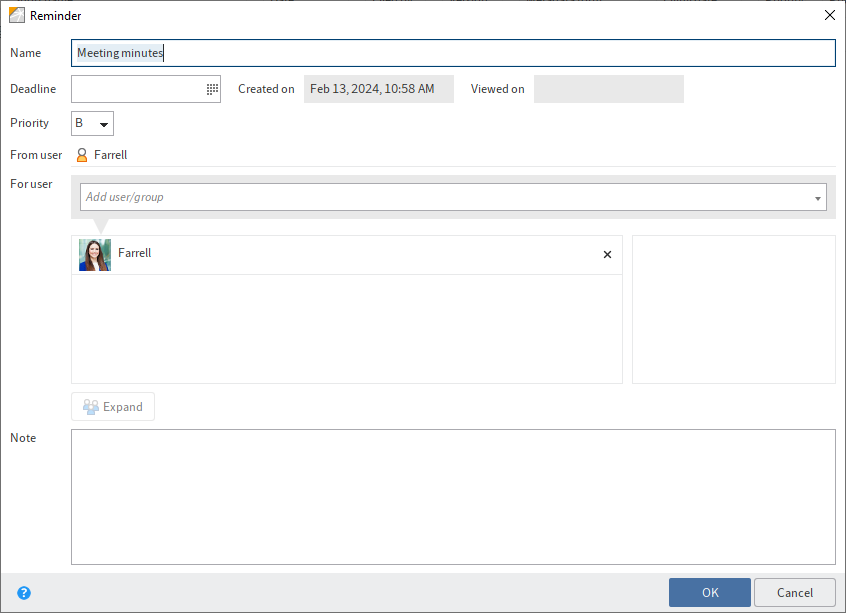
Use this dialog box to create a new reminder. You can edit existing reminders as well.
The following options are available:
Name: Enter a name for the reminder.
Deadline: Enter the date on which the document should be resubmitted as a task.
Created on: The date that the reminder was created on.
Viewed on: Shows the date that the reminder was viewed on.
Priority: Choose between the priority levels A, B, or C. You can sort and filter the task list according to priorities.
From user: Indicates who created the reminder.
For user: Search for the desired user or group in the Add user/group field. Suggestions will appear as you type.
Click the corresponding suggestion to select a user or a group.
Alternative: If you select the triangle to the right of the Add user/group field, this will open a drop-down menu. This menu contains a list of the users and groups you selected recently.
Group members: If you select a group, a list of members appears.
Double-click the corresponding user in the Members of the group column to select a member of a group.
Cancel selection: Use the X icon next to the selected user or group to cancel the selection.
Expand: If you select the Expand button, groups are not displayed as a group. Instead, the individual members of the group are listed.
Note: Enter a message or instructions for the recipient of the reminder.
Additional information:
- You can open an overview of your reminders under Ribbon > Organize > Overviews.
- You can change a reminder in the Tasks work area > Ribbon > Task > Edit.
- There are two ways to delete a reminder:
- With the function Delete reminder (available in: Ribbon > Organize > Overviews > Reminders overview)
- Select the reminder in the Tasks work area and select the function Delete (available in: Ribbon > Organize).
- To display all reminders associated with an entry, select the entry and select Ribbon > Organize > Overviews > Reminders for entry.
# Monitor changes
Available in: Ribbon > New > Create task
This function enables you to keep track of changes to a document or folder. If another user creates a new version of the document being monitored or if another user adds an entry to the folder being monitored, you will be notified in the Tasks work area.
Information
If you are monitoring a folder, you will be notified as soon as another user has created a new document or new child folder within this folder. When you monitor folders, you are not notified of changes to their child folders. To monitor changes to a child folder, you have to monitor the child folder specifically.
You can make the following settings:
- Name: Enter a name for the entry being monitored. The name of the selected entry is entered by default.
- Priority: Set the importance of the monitoring instance: A (= high), B (= medium), and C (= low). You can sort and filter the task list according to priorities.
- Note: Enter a note that appears in your Tasks work area.
Additional information:
You can open an overview of entries you are monitoring under Ribbon > Organize > Overviews. You can edit or end monitoring actions here.