# Edit metadata
This function allows you to view the metadata for the entry.
If you have permission, you can edit the metadata.
Metadata is data about a folder or a document. It includes information on the entry itself, for example when it was filed, or its name in the Repository work area. It also includes the permissions structure for the entry, meaning who has what access to the entry. The quality of a repository depends to a great extent on the quality of the metadata. Metadata allows you to organize documents in a standardized way and file them quickly to ELO. In addition, using metadata makes it easier to find documents.
A new metadata model was introduced with version ELO 21 in addition to the previous metadata model. Both models are used in parallel. In the following, these metadata models are referred to as generation 1 (gen. 1) and generation 2 (gen. 2).
In gen. 2, forms and metadata forms are shown differently in the Metadata dialog box. The metadata concept will remain the same.
There are three ways to open the Metadata dialog box manually. Select an entry and
- on the toolbar, select Organize > Metadata.
- right-click to open the context menu, then select Metadata.
- press the keyboard shortcut F4.
To ensure the active application isn't covered up, the dialog box is shown simplified in the sidebar with all fields in list form.
This section provides information about entering metadata:
# Metadata forms
You enter metadata into metadata forms. Metadata forms contain templates that are specifically created for this document type. All documents of the same type receive the same permission settings and are filed to ELO based on a fixed pattern.
The appearance of and functions in the metadata forms depend on the metadata model.
| Gen. 2 metadata form | Gen. 1 metadata form |
|---|---|
 |  |
The Available forms area lists all the available metadata forms. The list contains either metadata forms for folders or for documents, depending on the type of entry selected in ELO.
Select a metadata form from the drop-down menu.
Please note
When you change the metadata form, metadata may be lost or incorrectly assigned.
# Fields
The metadata for a document is entered into fields.
The type of field determines the data you need to enter and what you need to consider when doing so. There are different types of fields, which can be configured differently from metadata form to metadata form.
Text field: You can enter letters, numbers, and special characters in a text field.
Mandatory field: Fields can be configured as mandatory to complete the metadata entry. A red asterisk or a red marking indicates that a field is mandatory. If there are any conflicts, a warning will appear below the field.
Please note
Do not enter any words that can act as search operators (NOT, OR, AND) in fields. Otherwise, you may encounter issues when searching for these words.
# Icons
If a field contains an icon, this means that ELO helps you to enter content in the field.
The following tools are available:
 | Keyword list |
 | Drop-down menu |
 | Calendar |
 | Time |
 | Relation |
# Keyword lists

Keyword lists are used to standardize entries and make it easier to enter metadata.
There are two types of fields with keyword lists:
- You have to select an entry from the keyword list.
- You can select an entry from the keyword list or you can type in your own entry.
If you click a field and a keyword list appears, you cannot make entries.
To open the keyword list, select the keyword list icon. Navigate the list using the mouse or arrow keys.
# Relations
Relation type fields are used to link a field with the metadata of another entry.

Clicking the chain icon opens a list of entries. Select the entry you want to link. Navigate the list using the mouse or arrow keys.
Clicking the arrow next to the chain icon takes you straight from the metadata of the entry to the metadata of the linked entry.
# Tabs

The dialog box for entering metadata is divided into tabs. All metadata forms contain the following tabs:
- Form (in gen. 1 metadata forms, this tab is called Basic)
- Extra text (only in gen. 1 metadata forms)
- Options
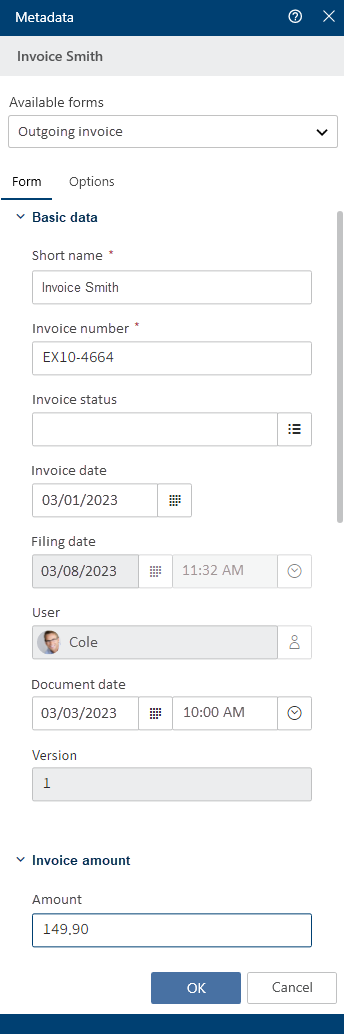
# 'Basic' tab
Information
In gen. 2 metadata forms, this tab is called Form.
The Basic tab contains at least the following five default fields:
Short name: You can change the display name of the entry in this field.
Document date (gen. 2)/Date (gen. 1): The date can be freely assigned and changed via the calendar icon. This field automatically contains the date of the last change for new entries and for changes.
Version (gen. 2)/Current version (gen. 1): Shows the current version.
Filing date: The filing date of the entry or creation date of the folder. The date is automatically set and cannot be changed.
Editor: The name of the user who last modified the entry. This field cannot be changed.
Additional fields appear depending on the settings in the metadata form.
# 'Extra text' tab
Information
This tab only appears in gen. 1 metadata forms.
In this text field, you can enter information that is not covered by the other fields, for example a more exact description or a comment. The field can also be used for script settings.
# 'Options' tab
Sensitivity: You can choose one of five sensitivity levels for the entry. The sensitivity level is shown in the viewer pane above the document preview.
Please note
If you have configured a sensitivity level for an entry, you can change the sensitivity level, but you cannot remove it.
Personal identifier: If the entry relates to a person, enter information that enables you to identify the relevant person in this field. This term is intended to help you find the entry using the metadata search.
Please note
The metadata search is only available in the ELO Java Client and ELO Web Client. You will find more information on personal data in the respective chapter of the ELO Java Client (opens new window) and ELO Web Client (opens new window) documentation.
End of deletion period: Enter the date on which the entry must be deleted at the latest. This date must come after the date you have entered under End of retention period. You can select a date using the calendar icon in the field.
Please note
If you do not complete the Personal identifier and End of deletion period fields, a dialog box will appear indicating that no personal identifier has been specified.
End of retention period: Enter the date on which the entry must be deleted at the latest. The entry cannot be deleted before the entered date.
Please note
The retention period must end before the deletion period.
Entry type: The entry type identified by ELO is displayed here. If necessary, select another entry type from the drop-down menu. This setting determines the icon that is displayed in the list view in ELO.
Font color: Select a font color from the drop-down menu, e.g. to highlight the entry in your filing structure. The system color is set by default.
Document status: Select the document status from the drop-down menu.
Version control enabled: When the document is changed, the previous versions are saved. The versions of a document can be restored.
Version control disabled: Only one version of the document is saved. A new version replaces the previous version. The previous version is deleted and is no longer available.
Important
If you select this option, the previous version is overwritten each time you save. The Document > Load new version function overwrites the current version, and does not create a new one. For this reason, we do not recommend using this option.
Non-modifiable: Neither the document nor the associated metadata can be edited.
Important
The status Non-modifiable cannot be reversed.
Encryption: Encrypt documents to restrict access to them. This option specifies which encryption key that controls document encryption should be used. The password must be entered when opening an encrypted document. This field is completed automatically depending on the selected metadata form and cannot be changed.
Add to full text database: When this option is enabled, documents are processed for the full text database and can be then found using the full text search. This requires the document to contain text information.
Object ID and GUID: This option shows the internal ELO entry number. This entry cannot be changed. The entry ID is required when testing the checksum.
Filed by: The user who filed or entered the metadata for the document is entered here automatically. This field cannot be changed.
# Permissions
The users that have access rights to the selected entry are listed in the Permissions dialog box. You can change the settings, provided you have the corresponding permission.
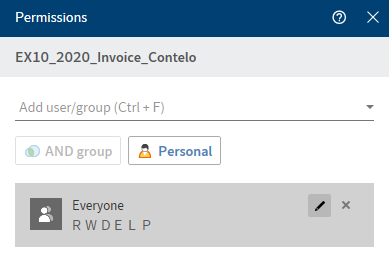
Add user/group: From the drop-down menu, select a user or group that you want to give permission to this entry.
The permissions settings for the selected user or group appear and can be enabled or disabled. Edit existing settings by selecting the pencil icon (keyboard shortcut: ALT + 2).
The following options are available:
| Access right | Description |
|---|---|
| View (R) | View entries and metadata, add annotations |
| Change metadata (W) | |
| Delete (D) | Mark entries as deleted. Only users with administrative rights can delete entries permanently. |
| Edit (E) |
|
| Edit list (L) |
|
| Set permissions (P) | Change permissions |
To remove an existing permission, select the X icon (keyboard shortcut: DEL key).
AND group: To create a new group from the overlapping groups, select at least two groups and then select AND group.
Personal: Select Personal to assign yourself sole access to the selected entry. All other permissions will be revoked.

Show group members: To show all members of a group, select the group icon (keyboard shortcut: ALT + 1).
# Assign control
You can assign controls from a form in a Microsoft Office template to a field in the ELO metadata.
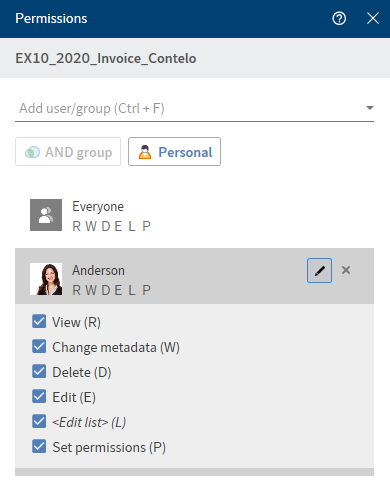
To do so, you need to enable the Developer tab in Microsoft Word: Ribbon > File > Options > Customize Ribbon.
To connect the content of the metadata to the Word form fields, in Metadata > General in the configuration, check the box next to Link the content of the controls from Word to the metadata.
Method
Create multiple controls in a document template in Microsoft Word, for example a content control for selecting the date or a drop-down list content control for the project name.
File the document to ELO and choose the metadata form with the fields you want to link to controls later on. In our example, we select the Report metadata form with the fields Project, Meeting date, Location, and Topic.
Select the filed document in ELO, then select Document > Check out and edit on the toolbar.
The document is opened for editing in Microsoft Word.
Switch to the Desktop work area.
In the Word template, select the control you want to assign to a field in the metadata form.

On the toolbar, select Organize > Assign control.
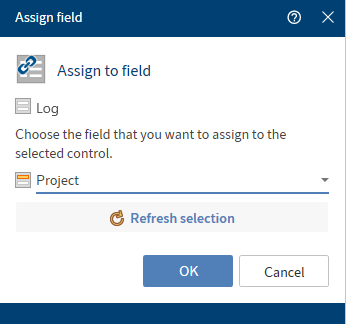
The Assign field dialog box opens with the name of the metadata form.
Choose the field that you want to assign to the selected control from the drop-down menu. In our example, we select the Project field.
Optional: Selecting Refresh selection refreshes the selection in Microsoft Word if you have made any changes in the meantime.
Select OK to close the dialog box.
The control has been assigned to a field.
Repeat this step for the other controls in your document template.
Optional: On the toolbar, select Organize > Overview of controls to check which fields are linked.
Result
The controls are now linked to fields in the ELO metadata.
Outlook
You can now create a report with the document template by pressing the Document from template button. When opening the document template, the Metadata dialog box opens. All information provided within the mapped fields is automatically transferred to the document's form fields.
Once the document has been created and checked back in, the values of the mapped fields are automatically checked and the content of the metadata form automatically adjusted.
# Overview of controls
Available in: Desktop work area
The Overview of controls function shows which metadata form is assigned to the document and which controls have been assigned to fields.
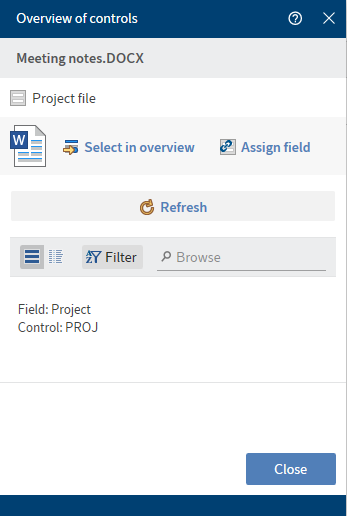
Select in overview: The active control in Microsoft Word is brought into focus in the overview.
Assign field: Assign the active control in Microsoft Word to a field. The Assign field dialog box opens.
Refresh: The controls in Microsoft Word are reloaded.
You can view the overview either in list or table format. By selecting Filter, you can sort, group, and filter to narrow down the list. The search field next to the magnifying glass icon also allows you to narrow down the results with its search-as-you-type function.
You can show the control assigned to each list entry by selecting the arrow button.
You can change the existing assignment by selecting the chain icon. The Assign field dialog box opens.
An error message is displayed in the following cases:
- No assignment available
- Field was assigned multiple times
- No corresponding field in the metadata form