# Organize entries
# Reference
You can create a reference for entries (folders or documents) that you need at multiple positions in the repository.
Unlike with moving, the entry remains at its original position. A reference is also created.
If you want to delete a document that has been referenced, ELO will notify you of this reference.
The following options are available for referencing entries:
- Reference function
- Drag-and-drop
# 'Reference' function
Method
Select the entry you want to reference.
On the toolbar, select Organize > Reference.
Keyboard shortcut: CTRL + R
The entry is copied to the clipboard.
To select a target folder, select the corresponding folder in the tree structure.
If you selected the wrong folder, you can correct this by selecting the right folder. The folder selection is changed.
With the Insert function, you insert the reference in the target folder.
# Drag-and-drop
Method
Select the entry you want to reference and drag it to the target folder holding down the mouse button.
Keyboard shortcut: Hold down the ALT key and release the mouse button on the item.
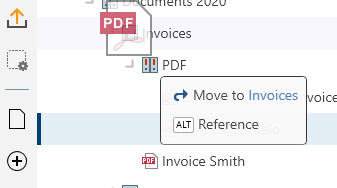
Press the ALT key to reference the entry.
# Copy
You can copy entries (folders or documents) that you need at multiple positions in the repository.
Unlike with referencing, the two entries are not linked after copying. They can be edited separately from one another.
Method
Select the entry you want to copy.
On the toolbar, select Organize > Copy. The entry is copied to the clipboard.
Keyboard shortcut: CTRL + C
To select a target folder, select the corresponding folder in the tree structure.
If you selected the wrong folder, you can correct this by selecting the right folder. The folder selection is changed.
With the Insert function (keyboard shortcut: CTRL + V), you insert the copied entry in the target folder.
# Cut
You can cut entries (folders or documents) that you need at another position in the repository.
Unlike with copying, with the cut action, the entry is removed from the location where you cut it from.
Method
Select the entry you want to cut.
On the toolbar, select Organize > Cut.
Keyboard shortcut: CTRL + X
To select a target folder, select the corresponding folder in the tree structure.
If you selected the wrong folder, you can correct this by selecting the right folder. The folder selection is changed.
With the Insert function (keyboard shortcut: CTRL + V), you insert the cut entry in the target folder.
# Insert
With the Insert function, you can insert a cut or copied entry at the selected location in ELO.
Method
Mark the position in ELO where you want to insert the copy.
On the toolbar, select Organize > Insert.
Keyboard shortcut: CTRL + V

The Insert copy dialog box opens.
Optional: Change the short name as needed.
The selected folder where the copy is filed is shown in the Target folder field.
Under Permissions, determine whether the permissions should be replaced with those of the target folder or whether the previous permissions should remain in place.
Select OK to close the dialog box.
Result
The copy is inserted at the desired location.
Information
In Configuration > Display > Copy, determine how ELO should behave when copying an entry into a folder with different permissions.
# Delete
The Delete function (keyboard shortcut: DEL key) deletes the selected entry. A deletion marker is set in ELO and the entry is no longer displayed.
In Configuration > Display, you can set whether all deleted entries are shown in the tree until you log off. Documents with a deletion marker are indicated by a recycle bin icon and are grayed out in ELO.
Important
It is not possible to delete an entry permanently in the ELO Desktop Client. Deleted entries have to be removed from ELO permanently by an administrator. They can be restored until the point at which they are permanently deleted.
# Restore
With this function, you can restore entries with a deletion marker.
To make deleted entries visible, check the box in Configuration > Display > Show deleted entries until next logoff. Entries with a deletion marker are indicated by a recycle bin icon and are grayed out in ELO. Selecting Restore restores the selected entry and all child entries. This option is only possible if the entry has not been deleted permanently.
# Remove lock
If a user has checked out an entry, it is locked and cannot be edited by other users. With this function, you can unlock the selected entries.
Information
You can only remove your own locks.
# Link
In the Link dialog box, you can link the selected entry with other entries or view and edit existing links.
Method
To link two entries, select the first document in the Repository work area, then select Link from the context menu.

The Link dialog box opens.
In the repository, select a second document and drag it to the Link window.
Result
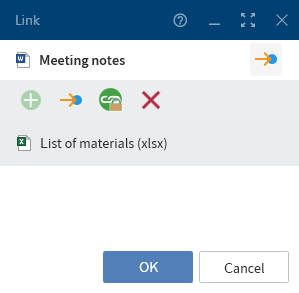
The document is shown in the list of links in the Link dialog box. You can add more links in this same way.
Three links are shown in this view. If more than three links exist, you can access the additional list entries via the scrollbar.
The following functions are available in the Link dialog box:
Minimize: The dialog box is minimized to a link icon you can move in the sidebar. You can also create links by dragging elements to this icon. Select the icon to restore the original dialog box size.
Maximize: The dialog box is enlarged to the size of the entire sidebar. In this view, the list of links takes up quite a bit of space. This helps you get a better overview should more than three links exist.
Go to: To go to the entry in the repository, select it in the list of links and then select the button with the arrow icon or use CTRL + G.
Remove: To remove a link, select the entry in the list of links and select the X icon (keyboard shortcut: DEL key). The links to the entries are removed.
Create new entries as permanent links: Enable this option or use CTRL + L to prevent links added from being removed.
Please note
Inseparable links cannot be deleted.
If a link exists for an entry, this is indicated in the preview header.
![]()
# Report for entry
With the Report for entry function, you can create a report for the selected entry.
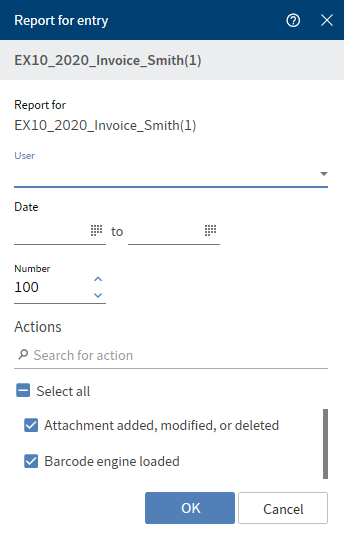
In the Report for entry dialog box, you can choose from the following options to be included when creating the report.
User: Select one or more users and/or groups from the drop-down menu. Users and groups that are not selected are not included in the report.
Date: Narrow down the report period using the calendar icon.
Number: Configure the maximum number of entries. Only this number is included in the report (most current).
Actions: Check the actions you want to be included in the report. You can search for a specific action using the search field.
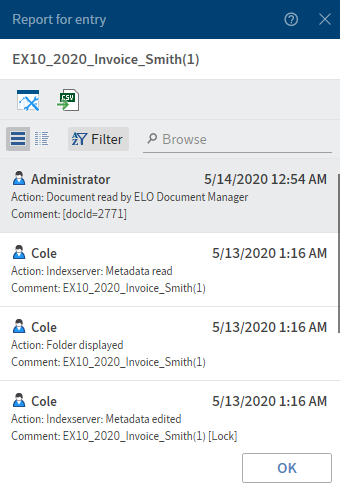
The report for the entry appears in the list view.
You can change the report options by selecting the tool icon. The arrow icon saves the report as a CSV file. A dialog box for selecting the target path on the file system opens.
You can view the report either in list or table format. Select the view via the corresponding button. By selecting Filter, you can sort, group, and filter to narrow down what's shown. The search field next to the magnifying glass icon also allows you to narrow down the results with its search-as-you-type function.