# 'Organize' tab
This tab contains functions that will help you organize your repository.
# Move
Available in: Repository work area
Use this function to move folders or documents within the repository.
Related function
Method
Select the entry you want to move.
On the ribbon, select Organize > Move.

The Clipboard tab appears.
To select a target folder, select the corresponding folder in the repository.
If you selected the wrong folder, you can correct this by selecting the right folder. The other folder is selected.
Select Move entry.
When moving a folder or document, if the permissions settings for the entry differ from the permission settings for the target folder, the Move entries dialog box appears. In this dialog box, you are provided with different options for the permissions settings.
Save selection and don't show this dialog box again: In the ELO Web Client configuration (Configuration > Dialog boxes > Inherit permissions when moving entries), you can define the settings for moving entries and also disable the dialog box.
Result
You will now find the entry at the selected new position in the Repository work area.
# Reference
Available in: Repository work area
This function allows you to create a reference for folders or documents that you need at multiple positions in the repository.
Unlike when moving an entry, the entry remains at its original position. A reference is also created.
Unlike a copy, references and their original documents are always identical. They cannot be edited individually.
Related function
Method
Select the entry you want to reference.
On the ribbon, select Organize > Structure > Reference.

The Clipboard tab appears.
To specify a target folder for the reference, select the corresponding folder in the repository.
If you selected the wrong folder, you can correct this by selecting the right folder. The other folder is selected.
Select Create reference.
Result
You will now find the reference at the selected position in the Repository work area.
Outlook
If you want to delete a document that has been referenced, ELO will notify you that this reference exists.
# Copy
Available in: Repository work area
This function allows you to copy folders or documents that you need at multiple positions in the repository.
Unlike with referencing, the two entries are not linked after copying. They can be edited separately from one another.
Method
Select the entry you want to copy.
On the ribbon, select Organize > Structure > Copy.

The Clipboard tab appears.
To select a target folder for the reference, select the corresponding folder in the repository.
If you selected the wrong folder, you can correct this by selecting the right folder. The other folder is selected.
You can modify the copy via the Copy options menu:
- Documents and folders: If you did not enable the Retain user in 'Filed by' and 'Editor' field option, your name will appear in these fields in the metadata of the copy.
- Folder: You can select which elements of the folder your copy should include.
Select Insert copy.
# Metadata
This function allows you to view the metadata for the entry.
If you have permission, you can edit the metadata. Metadata is data about a folder or a document. It includes information on the entry itself, for example when it was filed, or its name in the Repository work area. It also includes the permissions structure for the entry, meaning who has what access to the entry. The quality of a repository depends to a great extent on the quality of the metadata. Metadata allows you to organize documents in a standardized way and file them quickly to ELO. In addition, using metadata makes it easier to find documents.
A new metadata model was introduced with version ELO 21 in addition to the previous metadata model. Both models are used in parallel. In the following, these metadata models are referred to as generation 1 (gen. 1) and generation 2 (gen. 2).
In gen. 2, forms and metadata forms are shown differently in the Metadata dialog box. The metadata concept will remain the same.
There are three ways to open the Metadata dialog box manually. Select an entry and
- select Organize > Metadata on the ribbon.
- right-click to open the context menu, then select Metadata.
- press the keyboard shortcut F4.
This section provides information about entering metadata. Select one of the following links to go straight to a topic:
- Metadata forms
- Fields
- 'Metadata' or 'Basic' tab
- 'Extra text' tab
- 'Options' tab
- 'Permissions' tab
- Enter metadata with ELO Click OCR
- Identify personal data
# Metadata forms
You enter metadata into metadata forms. Metadata forms contain templates that are specifically created for this document type. All documents of the same type receive the same permission settings and are filed to ELO based on a fixed pattern.
The view and functions in the metadata forms depend on the metadata model.
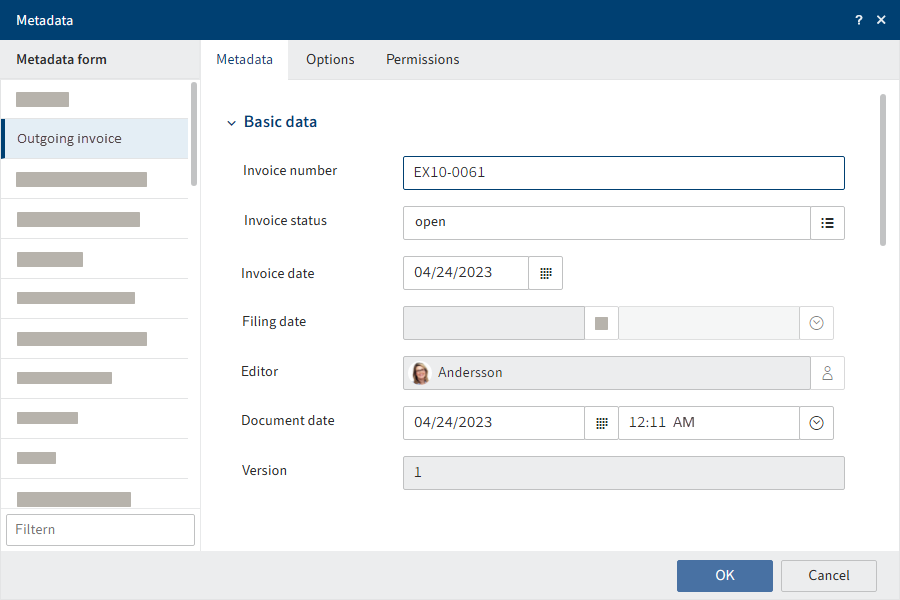
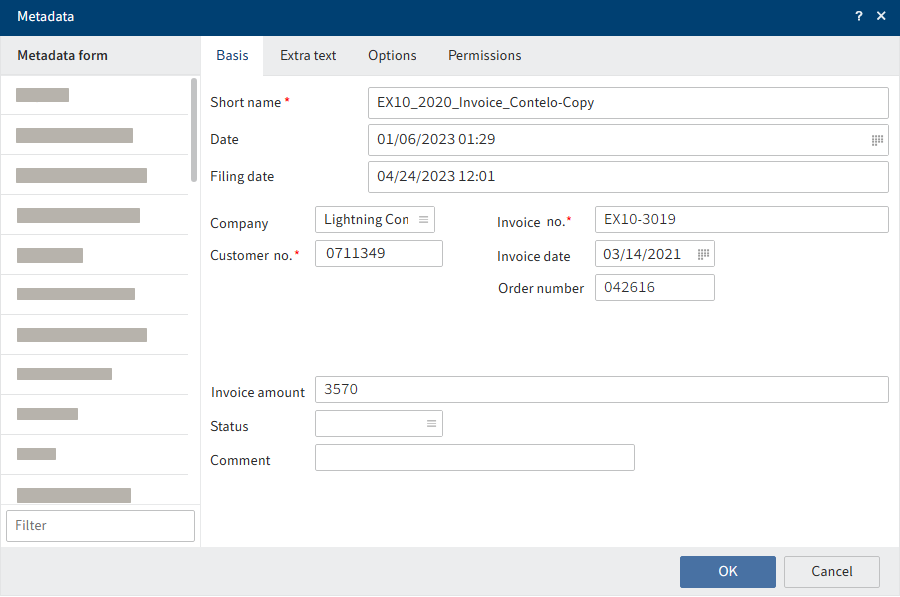
Gen. 2 metadata form
Gen. 1 metadata form
The Available forms area lists all the available metadata forms. The list contains either metadata forms for folders or for documents, depending on the type of entry selected in ELO.
Please note
When you change the metadata form, metadata may be lost or incorrectly assigned.
# Fields
The metadata for a document is entered into fields.
The type of field determines the data you need to enter and what you need to consider when doing so. There are different types of fields, which can be configured differently from metadata form to metadata form.
Please note
Do not enter any words that can act as search operators (NOT, OR, AND) in fields. Otherwise, you may encounter issues when searching for these words.
# Icons
If a field contains an icon, this means that ELO helps you to enter content in the field.
The following tools are available:
 | Keyword list |
 | Drop-down menu |
 | Calendar |
 | Clock |
 | Relation |
# Keyword lists

Fields with keyword lists are used to standardize entries as they only allow you to enter predefined values.
To open the keyword list, click the keyword list icon. Navigate the list and select a keyword using the mouse or the up and down keys. Alternatively, you can type a keyword in the field. You will be offered possible keywords in the drop-down menu.
Keyword lists (gen. 1)
There are two types of fields with keyword lists in gen. 1 metadata forms:
- You have to select an entry from the keyword list.
- You can select an entry from the keyword list or you can type in your own entry.
If you click a field and a keyword list appears, you cannot make entries.
To open the keyword list, click the keyword list icon. Navigate the list using the mouse or the up and down keys.
To edit the keyword list, right-click a keyword list entry.

You can add new keyword list entries or child entries via the context menu and edit or delete existing ones.
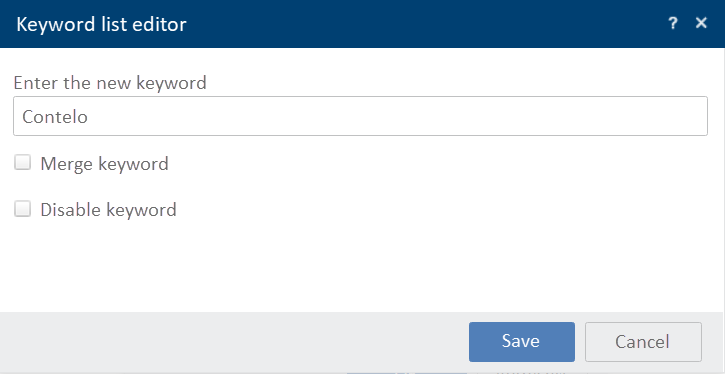
The following options are also available:
Merge keyword: If a keyword has child entries, you can use this option so that the child entries are always inserted into the field together with the parent keyword. The parent keyword option must be enabled for this to work.
For example, if your keyword list contains the keyword Invoice with the child entries Miller and Smith, either the expression Invoice Miller or Invoice Smith will be used. You can only choose between the child entries of the keyword.
Disable keyword: Use this option to deactivate a keyword. The keyword can no longer be selected and will be grayed out.
For fields without a keyword list, press F7 to open a list of previous entries to the selected fields.
Navigate the list using the mouse or the up and down keys.
# Relations
Relation type fields are used to link a field with the metadata of another entry.

The flyout (button with chain icon) opens a list of entries. Navigate the list using the mouse or arrow keys.
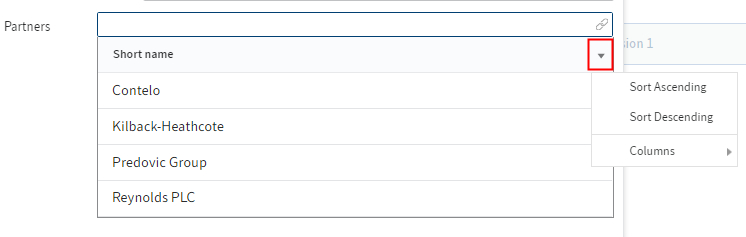
Sort the list using the drop-down menu next to the column headers.
Select the entry you want to link. The chain icon takes you straight from the metadata of the entry to the metadata of the linked entry.

If you right-click the field in the metadata for the entry, you can open the filing location of the linked entry with the Go to (closes all windows) button. Using this function closes the Metadata dialog box. For this reason, you should only use this function after saving the entry.
# Tabs
Metadata forms are divided into tabs. There are several default tabs:
- Metadata (called Basic in gen. 1 metadata forms)
- Extra text (only in gen. 1 metadata forms)
- Options
- Permissions
The default tabs are briefly described in the following section. Additional tabs appear depending on the settings in the metadata form.
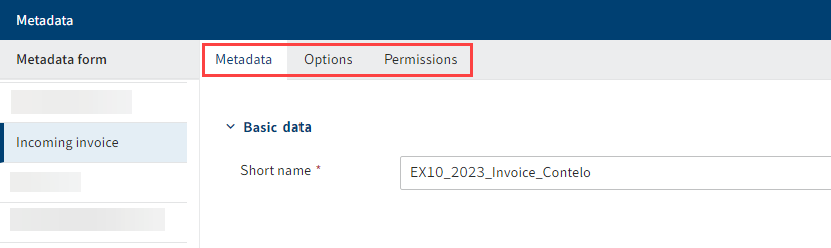
# 'Metadata' or 'Basic' tab
In gen. 1 metadata forms, the Basic tab contains the following default fields:
Short name: The short name is the name of the entry that is shown in the tree structure in the Repository work area.
Date:
- For documents: In this field, the date on which a document was created or most recently edited appears automatically. If you want to change the date to the day you file the document, enable the Adjust document date (set to today) option. If you do not enable this option, you will see the date on which the document was created under Date, and the date the document was filed to ELO is shown under Filing date. Another term for the date is Document date.
- For folders: You can select a date of your choice for this field.
For folders only:
ELOINDEX: This field is for the filing definition. When filing documents automatically, ELO identifies where to file the document through the ELOINDEX.
# 'Extra text' tab
Information
This tab only appears in gen. 1 metadata forms.
In this text field, you can enter information that is not covered by the other fields, for example a more exact description or a comment. The field can also be used for script settings.
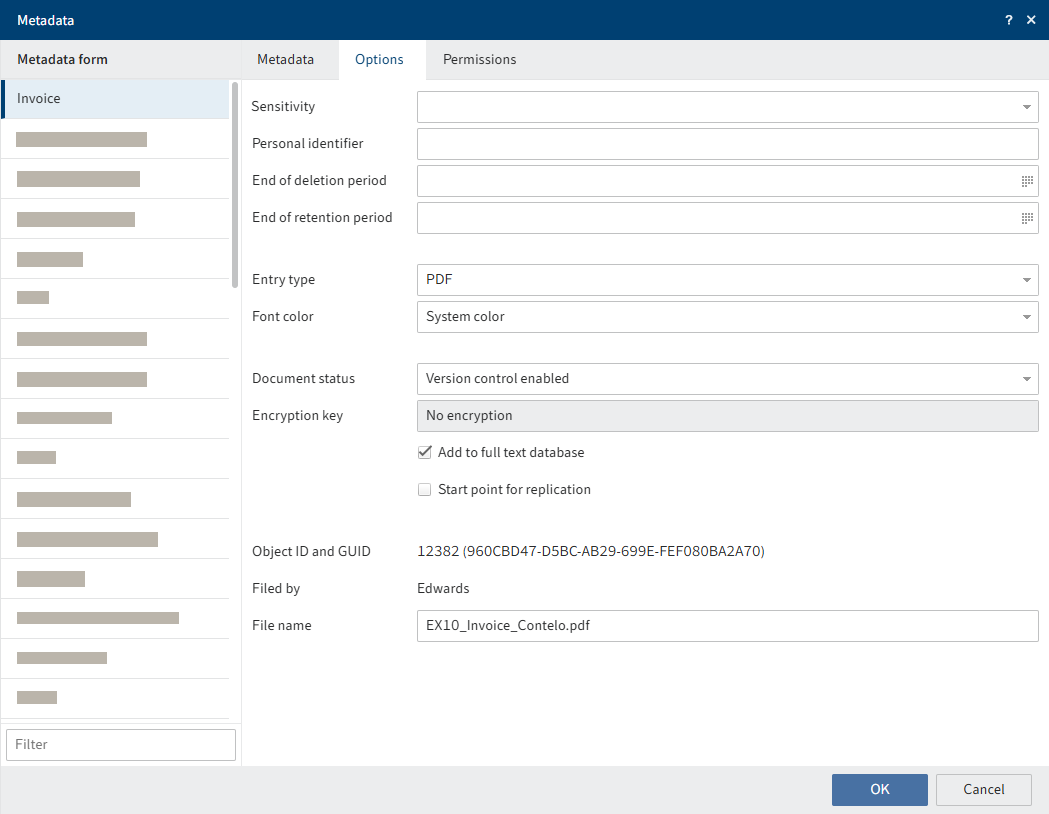
# 'Options' tab
The Options tab is where you specify the characteristics and behavior of an entry. Depending on whether you are entering metadata for a document or a folder, different settings will be displayed.
# General options
The following options are available for all folders and documents on the Options tab:
Sensitivity: You can choose one of five sensitivity levels for the entry. The sensitivity level is shown in the viewer pane above the document preview.
Please note
If you have configured a sensitivity level for an entry, you can change the sensitivity level, but you cannot remove it.
Information
You will find more information on the Personal identifier, End of deletion period, and End of retention period fields in the chapters Identify personal data and Delete entries with personal data.
Entry type: This option defines the type of entry. The icon of the entry is displayed in the list view in ELO according to the settings made here.
Font color: Select a color for the entry to highlight it in your repository structure.
Starting point for replication: If this option is enabled, you only replicate the selected entry and not the parent folders. This option allows you to replicate parts of repositories that are not stored in identical repository structures. First, you have to enable this option and then assign the folder to a replication set (Ribbon > Organize > Properties > Assign replication sets). You will find more information in the chapter Assign replication sets.
Information
If you configure this option for documents, the parent folder is still replicated.
Object ID and GUID: The first number in this field is the internal ELO object ID. This entry is primarily for information purposes and cannot be changed. The object ID is required when testing the checksum, for example.
The character string in brackets specifies the GUID of the entry. The GUID (Globally Unique Identifier) is a unique identification number. This is automatically assigned and cannot be modified. This enables you to identify every entry uniquely, even outside of the repository.
Filed by: The user who created the entry is entered here.
# Options for documents
The following options are only available for documents:
Document status: Select the editing status of the entry from the drop-down menu:
- Version control disabled: Only one version of the document is stored. The previous version is deleted and is no longer available.
Important
If you select this option, the previous version is overwritten each time you save. The View > Document > Versions > Load new version function overwrites the current version without creating a new one. Therefore, we do not recommend using this option.
If you attach files to documents without version control, only one file can be attached. Attaching another file overwrites the first attachment.
- Version control enabled: If the document is edited, a new version is created. All changes are documented. Older versions can be restored.
- Non-modifiable: ELO does not allow changes to the document and its metadata.
Warning
The document status Non-modifiable cannot be reversed.
Encryption key: This field is completed automatically depending on the selected metadata form and cannot be changed.
Add to full text database: Enable this option to add the document to the full text database. This function indexes words so that they are available in the search.
File name: The previous name of the document is entered into this field automatically. The name you entered as the Short name on the Metadata or Basic tab is the one shown in the repository, and not this name.
# Options for folders
The following options are only available for folders:
Sort order: Define the sort order of the contents of the corresponding folder in the Sort order field. If you select Manual, you can move entries within the folder manually. To sort the contents of a folder manually, select the folder in the tree view. In the viewer pane, select the entry you want to move and drag it to the position where you want it.
Enable quick preview for documents in the folder: Use this option to view the first document in a folder in the viewer pane as soon as you select the folder.
# 'Permissions' tab
The users that have access rights to the selected entry are listed on the Permissions tab. You can change the settings, provided you have the corresponding permission.

Search for the desired user or group in the User/group field. Suggestions will appear as you type.
Select the corresponding suggestion to select a user or a group.
Alternative: Select the triangle next to the field to open a drop-down menu and select a user or group.
You can also select the options Owner permissions and Parent permissions from the drop-down menu. If you select Owner permissions, you assign yourself all the rights to the folder or document. Owner permissions can be transferred, such as when you leave the company. Select the Parent permissions option to assign the new folder or document the same rights as its parent entry.
In the middle column, you can see which users or groups have already been assigned permissions for the selected entry and which permission settings apply.
To edit the permissions settings, select an entry in the middle column and select or clear individual permissions.
The following options are available:
| Access right | Description |
|---|---|
| View (R) | View entries and metadata, add annotations |
| Change metadata (W) | |
| Delete (D) | Mark entries as deleted. Only users with administrative rights can delete entries permanently. |
| Edit (E) |
|
| Edit list (L) | Folders: Change folder contents, e.g. create, move, copy, or remove documents in the folder, insert or delete reference. |
| Set permissions (P) | Change permissions |
Information
Options that are not applicable are shown in italics and enclosed in pointy brackets.
Personal: Use this button to assign yourself sole access to the respective entry. If other users or groups had permissions, they are removed.
AND group: To create an AND group, select two groups in the middle column and select AND group. AND groups only give permissions to the users who are members of both groups.
Show members: To show the members of a group, select the group, then select Show members.
# Permissions for entries in spaces
There are additional authorization options for entries that were created in a space.
You can find more information on spaces in the Spaces section.
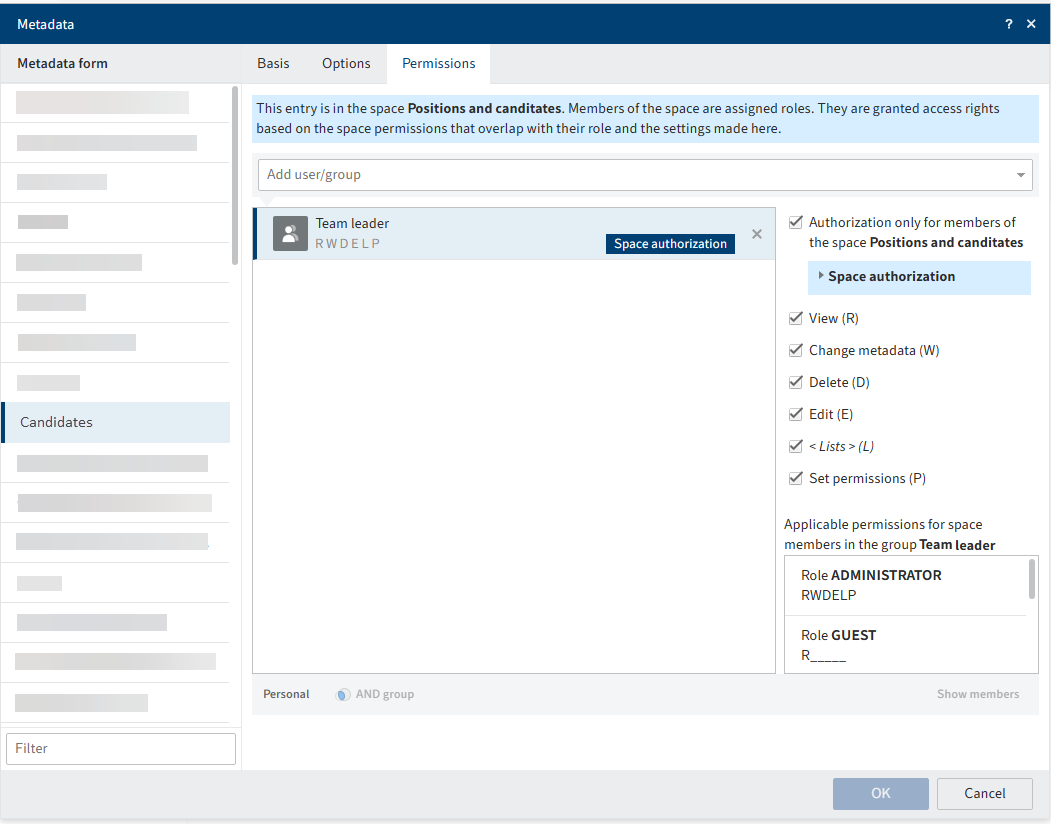
Authorization only for members of the space<space name>: Users and group members granted this permission can only access the entry if they are members of the corresponding space.
Information
This option only appears for entries created in a space. For entries created elsewhere but displayed in a space, the permissions of the entry in the repository apply.
If you enable this option, the permissions granted to group members according to their role in the space overlap with the access rights granted in the Metadata dialog box.
The permissions to the entry at the individual user level also overlap in accordance with this.

You can see the permissions in effect when you select a user or group in the Metadata dialog box.
Example
A user has the Member role in the Positions and candidates workspace. Members have RWDEL access rights for entries. The user is also a member of the Team leader group. In the Metadata dialog box, this group has all access rights for the entry.
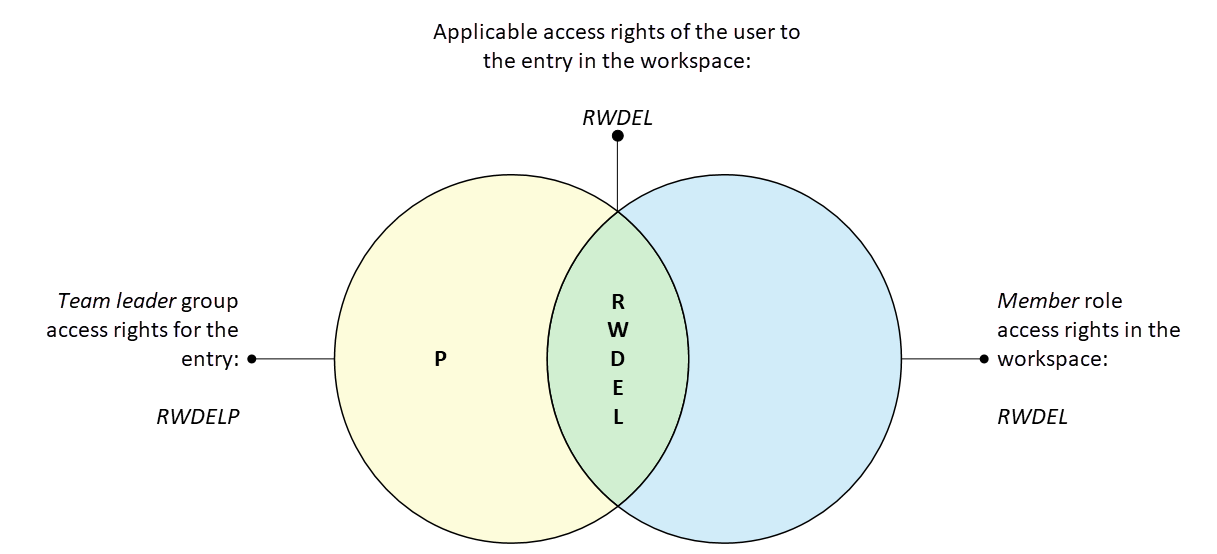
The user only has RWDEL access rights for this entry because only these access rights overlap.
Other members of the Team leader group will not have access to the entry unless they are also members of the workspace.
# Grant a non-member access to an entry
You can grant users who are not members of a space access to entries in the space. Users can open these entries from the search or with ELO links, for example.

Example
The head of HR wants to grant a head of department access to an application created in the HR workspace. The head of department needs to be able to read the application and edit the metadata. The head of HR can add the head of department on the Permissions tab and assign him the R and W access rights.
# Outlook
If you change the permissions of a folder in the Metadata dialog box, the new permissions can be passed on to the child entries (child folders and documents). After you have changed the permissions, the Permissions changed dialog box opens. Specify what effects this change should have.
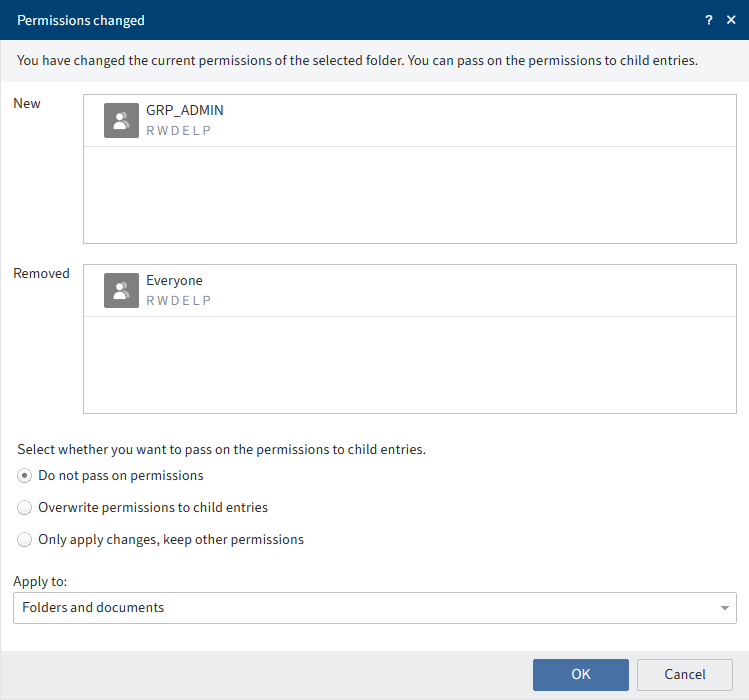
Please note
The changes do not affect references, since they retain the permission settings of the original entry.
Choose from the following options:
Do not pass on permissions: The changes are not applied to the documents and child folders in the folders.
Pass on permissions to child entries: All permissions are passed on to the entries in the folder.
Only apply changes, keep other permissions: Only permissions are passed on that result in changes to permissions for the documents and child folders in the folder.
Apply to: Using the drop-down menu, select whether to apply the changes to all child entries or only folders/documents.
# Enter metadata with ELO Click OCR
The integrated text recognition feature can be used as a tool for entering metadata. ELO Click OCR transfers text from a document into the metadata form. To use this method, you will have to save the document first. OCR works on TIF documents and in the image preview (Ribbon > View > Image preview).
Method
Select the document whose metadata you want to edit.

Configure the viewer pane so that you see both the metadata and the document.
To learn how to do this, refer to the Viewer pane chapter.
Select Edit at the bottom of the metadata dialog box.
Select the field you want to copy the value from the document into.
Holding the CTRL key and left mouse button, draw a frame around the information in the document that you want to use for the metadata.
Information
If you want to transfer multiple terms after another, select each individual term while holding CTRL + SHIFT + left mouse button. Release the mouse button after each term. Repeat the process until you have transferred all desired terms.
Release.
ELO Click OCR reads the text contents of the selected area. The recognized text information is transferred to the selected field.
Information
If you did not select a field, the recognized text is displayed in the OCR dialog box. You can copy the text you need and paste it to the Clipboard.
Select Save to end editing mode and accept the changes.
# Identify personal data
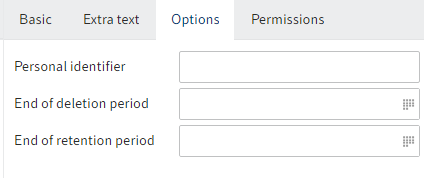
The Options tab in the Metadata dialog box contains three fields that allow you to find entries with personal data and delete them in due time.
Personal identifier: If the entry contains a personal identifier, enter information that enables you to identify the relevant person in this field. This term is intended to help you find the entry using the metadata search. For this reason, you need a company-wide system for assigning these terms. This will help you find entries containing a user's personal data. You can also search all entries containing personal data – regardless of the individual.
End of deletion period: Enter the date on which the entry must be deleted at the latest. This date must come after the date you have entered under End of retention period. You can select a date by clicking the calendar icon in the field.
End of retention period: Enter the date up to which the entry has to be retained. The entry cannot be deleted before the entered date.
Outlook
- For information on how to search for entries with personal data, see the chapter Search entries with personal data.
- For information on how to delete entries with personal data, see the chapter Delete entries with personal data.
# Assign replication sets
The function Assign replication sets enables you to assign replication sets to entries in ELO. Replication sets allow you to synchronize data between multiple locations. The replication sets must have already been mapped to the entries with the ELO Replication module.
Information
You only have to assign replication sets at one site. The assigned replication sets are configured at the other locations through replication.
Method
Please note
Replication sets are inherited upward to parent folders in the repository structure. To prevent inheritance, select the Start point for replication option for the entry you want to replicate (Organize > Metadata > Options).
Select the entry you want to assign a replication set.
On the ribbon, select Organize > Properties > Assign replication sets.
Select Add.
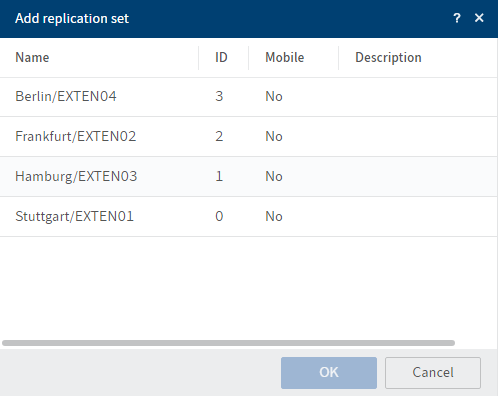
In the dialog box Add replication sets, you will see the replication sets defined in the configuration. The name of the replication set is made up of the location name and the name of the repository.
Information
The local replication set, that is the replication set where the entries are located, is assigned automatically. You do not have to add it manually.
Select one or more replication sets.
Select OK.
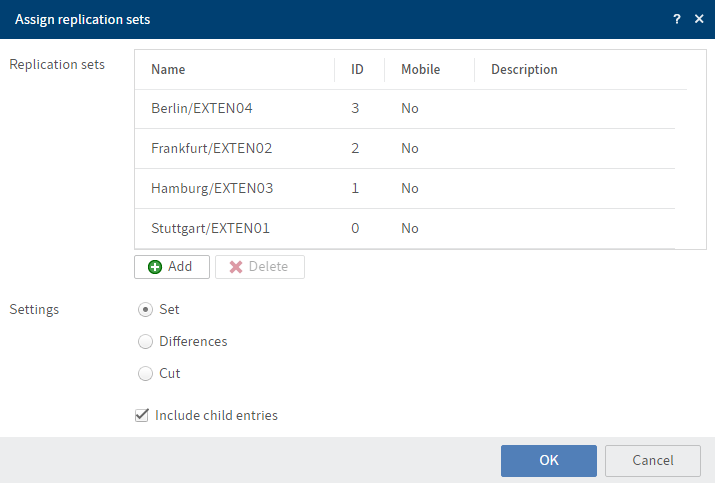
The selected replication sets appear in the Assign replication sets dialog box.
The following options are available:
- Set: All the listed replication sets are assigned to the entry.
- Differences: If you removed a replication set from the list and/or added a replication set to the list, this change is passed on to the entry. Replication sets from the list that were not changed are not passed on. The replication sets of the entry that were not changed are retained.
- Cut: The replication set is assigned to the entry selected. The replication sets that do not overlap are removed.
- Including child entries: If this option is enabled, the replication set is also assigned to the child entries of the selected entry.
Select OK.
# Workflows for this entry
With this function, you can display all workflows that have been started on a folder or document.
Method
Select the entry whose workflows you want to view.
On the ribbon, select Organize > Workflows for this entry.
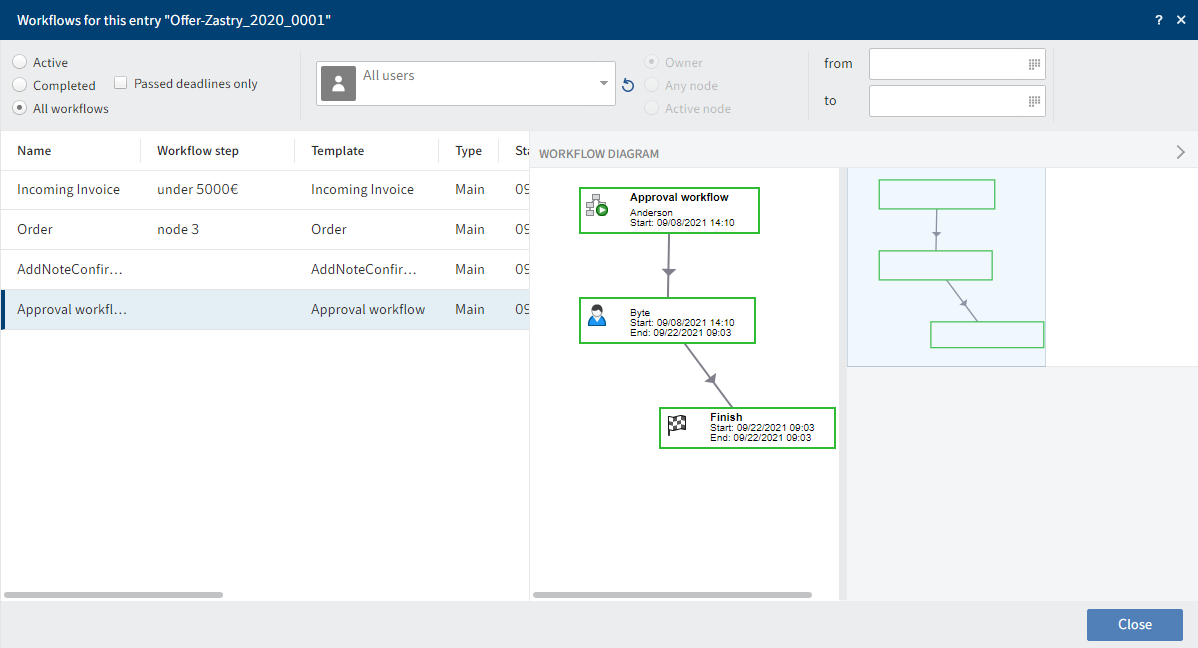
These settings are the same as the settings for the Workflow overview function.
# Workflow overview
With this function, you can view all workflows that have been started and that you have permissions for.
Method
On the ribbon, select Organize > Overviews > Workflow overview.
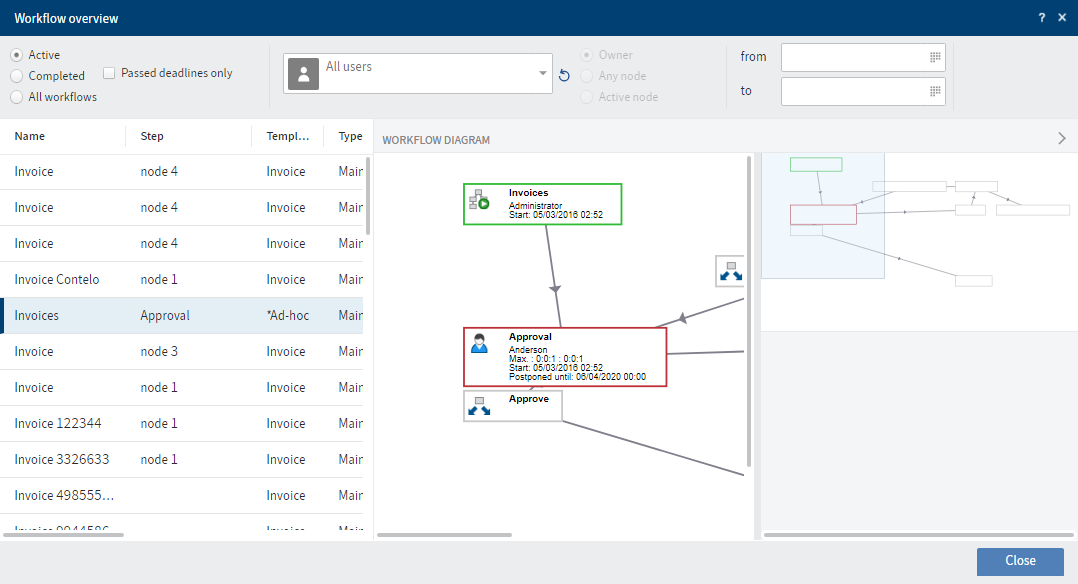
The workflows are listed as a table on the left-hand side. The selected workflow is shown as a diagram on the right-hand side. The status of the respective node is indicated by the colors in the diagram.
- Green: Node completed successfully
- Blue: Current node
- Red: Escalated node
- Gray: Future node
Configure the settings to specify how you want the workflows to be displayed:
Passed deadlines only: If this option is selected, you will only see escalated workflows. This option can be selected in combination with Active, Completed, or All workflows.
User: You can select a user/group from the drop-down menu.
Once you have selected a user/group, you can narrow down the list by selecting additional filter options:
- Owner: If this option is enabled, you only see workflows that the selected user/group is the owner of.
- Any node: If this option is enabled, you only see workflows in which the selected user/group is the editor of at least one node.
- Active node: If this option is enabled, you only see workflows in which the selected user/group is entered as the editor of the node.
Start date: With the From and To fields, you can specify how long you want the workflow to be shown. The start date of the workflow must be within this period.
If you click the blue square in the minimized view of the workflow and move it while keeping the mouse button pressed down, you can change the section shown in the large view.
Select a workflow node in the workflow diagram to get more information on the node settings.
# Monitoring overview
This function gives you an overview of all entries you are monitoring.
Method
On the ribbon, select Organize > Overviews > Monitoring overview.
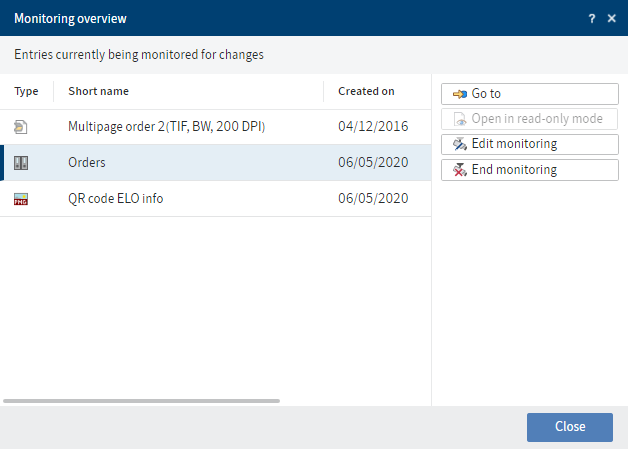
The functions in the dialog box become active as soon as you select a monitored object.
- Go to: This takes you to the monitored folder or document in the Repository work area.
- Open in read-only mode: If you select a document that is being monitored, you can open it in read-only mode. If the entry you select is a dialog box that is being monitored, this button is grayed out.
- Edit monitoring: The same dialog box as for creating a monitored object appears for editing.
- End monitoring: Monitoring is ended without any further confirmation.
# Delete
The Delete function allows you to delete folders or documents as well as tasks.
Information
Workflows cannot be deleted from the Tasks work area. Workflows have to be forwarded.
Whether you can delete folders or documents depends on your permissions.
Important
This only assigns entries a deletion marker and does not delete them permanently. It is not possible to delete an entry permanently in the ELO Web Client. Deleted entries have to be removed from ELO permanently by an administrator. They can be restored until the point at which they are permanently deleted.
Alternative
Depending on the settings, the folders or documents are automatically removed from ELO as soon as they have reached the end of their retention period.
You can enter the retention period in the metadata when filing a document.
Method
Select the entry or task you want to delete.
Select Organize > Delete on the ribbon.
Result
The entry is no longer shown in ELO. It is assigned a deletion marker until the administrator finally deletes it.
If you delete a task, it is deleted permanently.
# Delete entries with personal data
The purpose of marking entries with personal data is to be able to delete the corresponding entries in accordance with legal requirements.
Method
To delete entries with personal data, first perform a search. You can narrow down your search based on the End of deletion period or End of retention period fields.
In the search results, select the entries that have to be deleted. To select multiple entries, press the CTRL key and select the corresponding entries. If you want to select all entries or all entries you want to select are in a row, press the SHIFT key then select the top-most and bottom-most entry you want to select.
Once you have marked the entry or entries in the search results, select Organize > Delete on the ribbon.
Result
The entries can no longer be seen in the repository.
Important
The entries are not deleted permanently, just marked as deleted. This tells the administrator that the documents need to be removed from ELO permanently.