# 'New' tab
The functions on the New tab allow you to create folders or documents in ELO and start tasks.
# New folder
For information on how to use this function, refer to the chapter Create new folder.
Related functions
- Copy: If a folder with the basic structure you need already exists, you can copy this basic structure without content.
- Dynamic folder: This function allows you to create a folder whose content changes dynamically. The content of a dynamic folder is based on the result of a search. All search results appear in the folder.
# Insert file
For information on how to use this function, refer to the chapter File document.
Related functions
- Drag-and-drop: You can drag documents straight from your file system to a folder in ELO.
- Document from template: If you want to create a document from a template, use this function.
- Copy: If you want to file a document that already exists in identical form in the repository, use this function.
# Document from template
This function allows you to generate documents from a template, for example reports. Generally, you can use any document that you have access to as a template.
Method
Select the folder that you want to file the document to.
On the ribbon, select New > Document from template.
Select the document you want to use as a template.
To make sure you select the right document, you can view it using the Open in read-only mode function.
Enter metadata.
For more information, refer to the chapter Metadata.
Select OK.
Result
The document is stored in the folder you selected.
At the same time, the Check out dialog box appears automatically so that you can edit the document right away.
Outlook
You can learn how to check out and edit the document in the chapter Check out and edit document.
If you do not want to edit the document, select Close in the Check out dialog box. On the ribbon, select Document > Versions > Cancel editing.
# Start workflow
For information on how to use this function, refer to the chapter Start workflow.
Related function
Ad hoc workflow: The function Ad hoc workflow is used to start short default workflows (approval and notification).
# Ad hoc workflow
This function starts a new ad hoc workflow. Ad hoc workflows are simple, predefined workflows available in ELO. You can use an ad hoc workflow to route an item to users for approval or to notify users.
Related function
Start workflow: Use this function to start more complex workflows that were created specifically for your company.
Method
Select the entry you want to start an ad hoc workflow for.
On the ribbon, select the New tab > Create task > Ad hoc workflow.
Configure the settings for the ad hoc workflow.
Select Finish on the right side of the dialog box and configure additional settings for the ad hoc workflow here:
Recipient: From the drop-down menu, select who to notify after the ad hoc workflow is completed.
Success message: The text from this field is shown to the recipient once the ad hoc workflow has been completed. It appears in the recipient's Tasks work area.
Cancellation message (approval workflows only): The text from this field is shown to the recipient if the ad hoc workflow has been canceled. It appears in the recipient's Tasks work area.
Withdraw the workflow from all users as soon as one user does not approve it (parallel approval workflows only): If this option is enabled, all recipients must approve the workflow. Otherwise, the ad hoc workflow is canceled entirely and the task is removed from the tasks of the other selected users. In your tasks and on your home screen, the message Not approved will appear in My ELO under My recently started workflows.
End script: If required, select a script that is executed after the ad hoc workflow is completed.
Select OK.
Result
The workflow is started and displayed in the Tasks work area of the selected users.
# Settings for the ad hoc workflow
The following options are available:
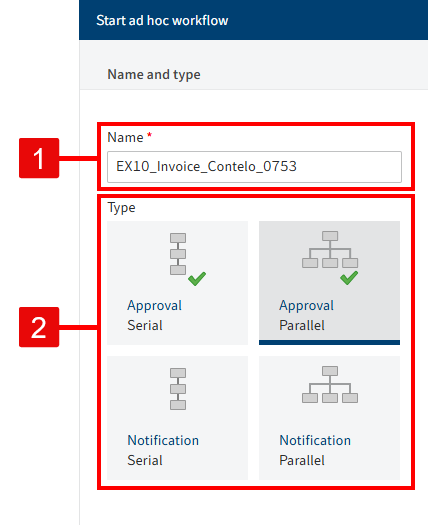
1 Name: Workflow display name
2 Ad hoc workflow type: Serial workflows are forwarded to the responsible users sequentially. Parallel workflows are sent to all involved users at the same time.
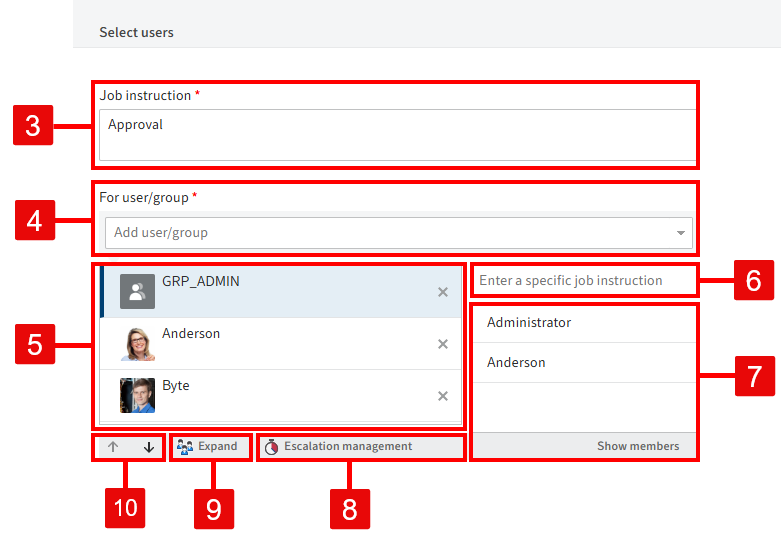
3 Enter job instruction: The job instruction can have a maximum of 128 characters.
4 Add user/group
5 Users and groups that were added to the workflow
6 Enter individual job instruction: Enter the individual job instruction for the user selected in the list here. You can select multiple. The user sees the job instruction in the Workflow step column of the Tasks work area as soon as they have received the workflow. The job instruction can have a maximum of 128 characters.
7 Members of the group: This list appears if you select a group.
8 Escalation management: Specify how long the workflow may remain with the respective user or group here. You can also select a user or group to be notified if the deadline is missed.
Information
If the workflow has escalated, it appears in the Tasks work area of the responsible users and in My ELO under Escalated workflows. Selecting an escalated workflow in My ELO takes you to the escalated workflow in your Tasks work area.
9 Expand: Show the individual members of a selected group. To do so, select the corresponding group and then click Expand. You can remove members by selecting the X icon.
Information
If a group is selected, one member of the group can accept and process the workflow. If you expand the group, every member of the group can accept and process the workflow.
10 Change order: To change the order of recipients in serial ad hoc workflows, select a recipient and change their position using the arrows (or drag-and-drop).
# Reminder
You can use reminders to remind yourself of entries that you want to deal with at a later time.
You can create reminders for folders and for documents. You can create a reminder for multiple entries within a folder at the same time.
Method
Select the entry you want to create a reminder for.
You can also create reminders for multiple entries at the same time. You can learn how to do this in the chapter How do I select multiple entries?
On the ribbon, select New > Create task > Reminder.
Configure the settings for your reminder in the Reminder dialog box.
Information
If you selected multiple entries, only the dialog box for the topmost selected entry appears at first. As soon as you have edited the settings and clicked OK, a new dialog box opens for the next selected entry.
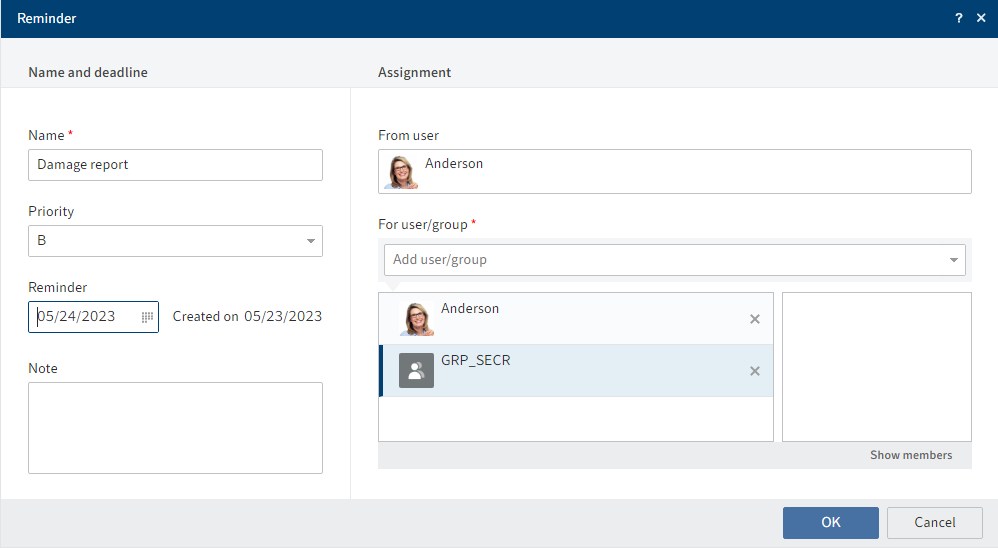
Priority: The priority level is shown in the tasks overview when a reminder is received.
Date: Select the date the task should be completed on. The date appears in the tasks overview as the Task date. Depending on the settings for how tasks are displayed, the reminder may also show up in the Tasks work area of the selected users a few days beforehand.
Information
The time at which the reminder appears in the Tasks work area depends on the setting under User menu [your name] > Configuration > Display > Task list display options > Show tasks due in the following number of days.
For user/group: Select the recipient(s) of the reminder from the drop-down menu.
In the field below For user/group, you can see which recipients have already been selected. Click the X icon to delete the users again.
Show members: If you selected a group, you can view the group's members.
Select OK.
Result
The reminder appears in the Tasks work area of the selected users at the configured time. You will recognize it by the calendar icon.
Outlook
To remove the reminder from your task view, select the notification, then, on the ribbon, select Organize > Delete.
# Monitor changes
You can monitor individual entries. If changes have been made to monitored entries, you will be notified in your Tasks work area.
- Folder: If you monitor a folder, you receive a notification as soon as other users add entries to this folder.
- Document: If you monitor a document, you receive a notification as soon as other users file new versions of the document.
Method
Select the entry you want to monitor.
On the ribbon, select New > Create task > Monitor changes.
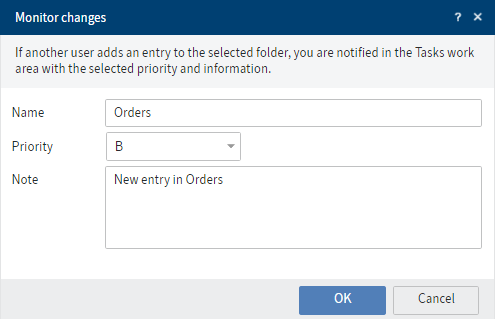
Make the settings in the Monitor changes dialog box.
Select OK.
Result
As soon as other users modify the entry, you will receive a notification in your Tasks work area.

You can recognize notifications by the camera icon.
Under the entry name, you will see the text you entered when you started monitoring the entry.
You will also see the name of the user who edited the entry.
Outlook
- To remove the notification from your task view, select the notification, then, on the ribbon, select Organize > Delete.
- You can edit or end monitoring actions at a later point. For more information, refer to the Monitoring overview chapter.