# Basics
This chapter contains basic information on the ELO Integration Client interface. It will help you get familiar with the client.
# Program interface
The ELO Integration Client shows ELO functions in your ERP or CRM system and in other third-party applications. The appearance of the program interface will differ depending on the system and configuration.
The ELO Integration Client displays specified entries (root entries) from the ELO repository. If the root entry is a folder, you can navigate and use ELO functions within this folder. For example, you can insert and edit files, and start workflows.
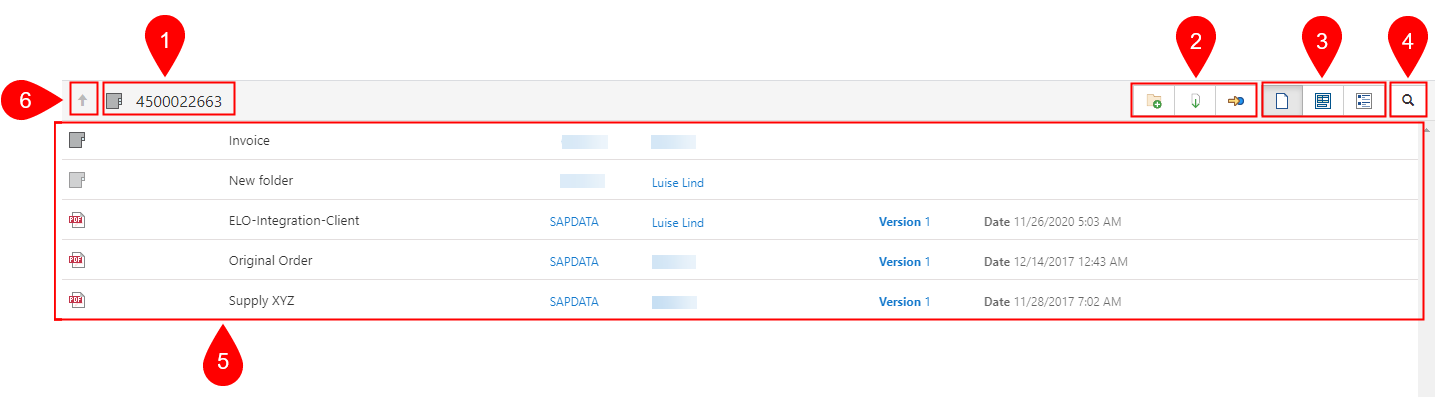
1 Current entry: Here you can see the name of the ELO entry you currently have open. This can be a folder or a file.
2 Functions: Here is where you launch ELO functions. Different functions are available depending on the entry and configuration. Hover the mouse over an icon to see the name of the function.
Depending on the size of your client window, you can access the functions from a menu.

3 Views: In the viewer pane (5), you see the contents of an ELO entry, the full text, as well as the associated form or feed. You can use the icons to switch between the views.
Depending on the size of your client window, you can access the views from a menu.

4 Search: Use the magnifying glass icon to start a search for entries in ELO.
5 Viewer pane: Here you can see the ELO entry you currently have open. If the entry is a folder, the child entries are listed. If the entry is a document, the document contents are displayed.
6 Back: The arrow icon takes you back to the previous level. The root entry is the top level. If you are in the root entry, the arrow icon is grayed out.
# Text and image view
The ELO Integration Client offers additional control elements in the viewer pane for displaying images (formats: e.g. JPG, TIFF, PNG, etc.) and text files (formats: e.g. TXT, HTML, JS, etc.) or the full text contents of documents.
# Text view
The text view is used to display the full text information of documents that have been added to the full text database. You can also configure this view for documents with specific file extensions.
Please note
Binary files may result in display errors.
The text view has a menu bar with the following functions:

Decrease or increase font size: Decreases or increases the size of the displayed text.
# Image view
The image view is used to preview image documents. You can also set this as the display mode for documents with specific file extensions.
The image view has a menu bar with the following functions:

Zoom to 100%: The image is displayed in the original size.

Fit image width to the frame: The image size fits the width of the viewer pane.

Fit image size to the frame: The image is adjusted to the height of the viewer pane so that the entire page of the document is displayed.

Adjust the image size manually: You can change the image size manually using the + and – buttons or by entering the desired zoom level in the input field.

Open in ELO file viewer: When you click the Open in ELO file viewer button, the view switches to the new ELO file viewer.
Please note
This feature is available starting with ELO version 25.0.2 and is currently in preview status. It must be configured in advance.

Page selection: By selecting a page number, you can view the page you want.
# Views
# Contents

With the Content button, you can view the contents of the selected document.
# Full text

With the Full text button, you can view the contents of the selected document.
# Forms

With the Form button, you can view and edit the Gen. 1 and 2 metadata forms for the selected document.
# Follow relation
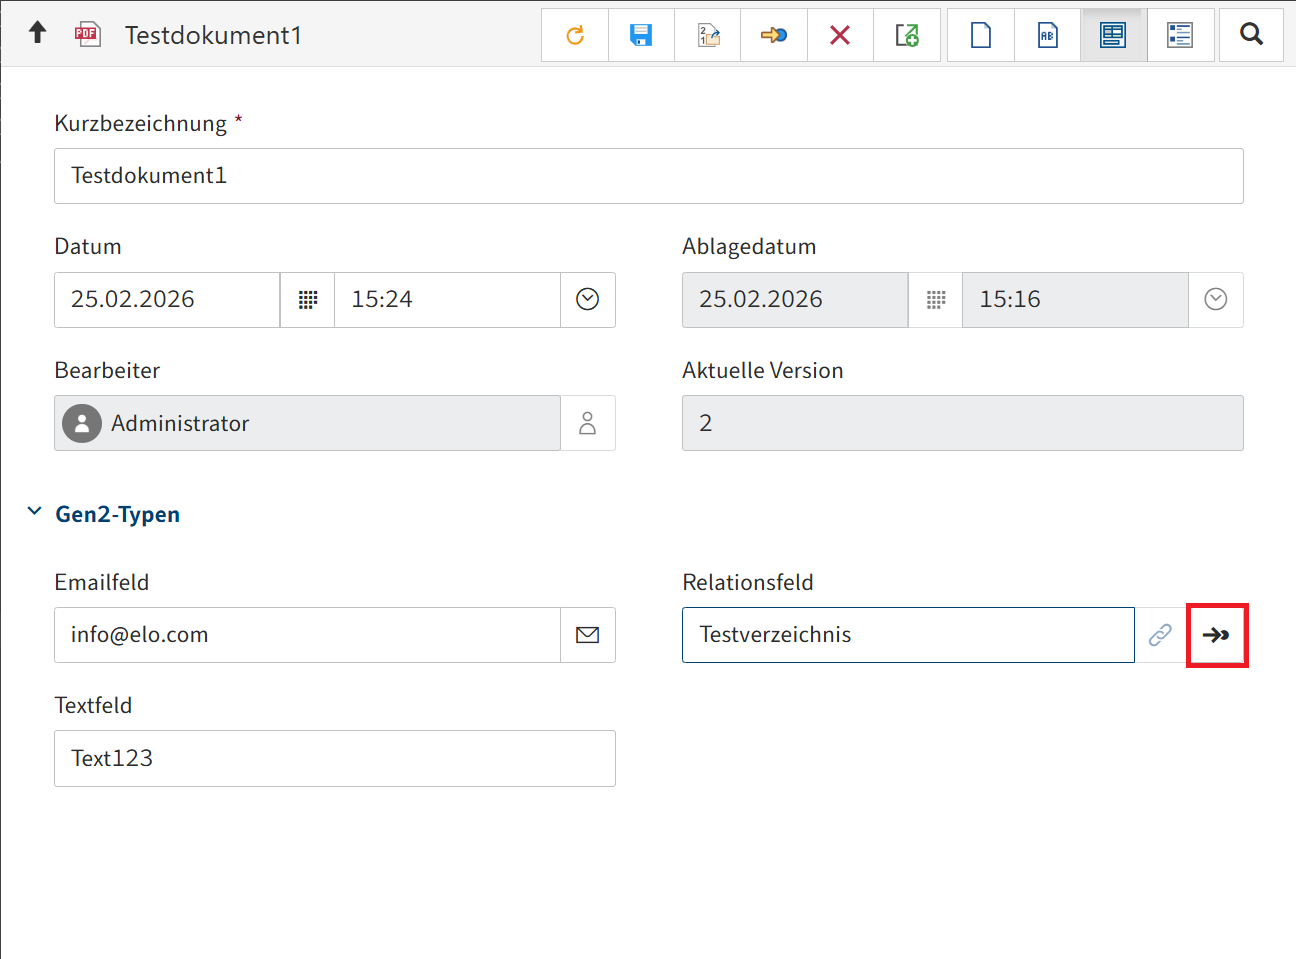
If you are using a Gen. 2 form with relation, you can navigate to the linked relation in the ELO Integration Client. To do this, click the Follow relation button next to the relation field. The relation target will then open.
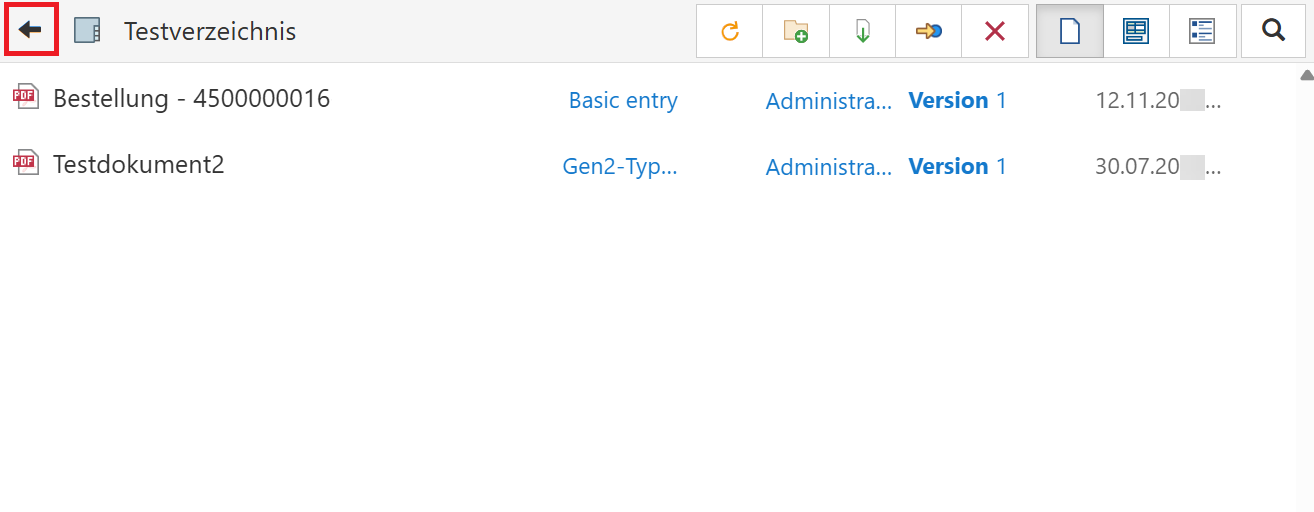
Once you have reached the relation target, the navigation button changes from an upward arrow to a left-pointing arrow. This indicates that you have followed a relation. If you now click this arrow, you will navigate back to the original root directory.
If the relation target is a directory, you can navigate to any lower levels within it. However, when navigating upward, you will always return to the original relation target and from there to the root directory.
# Feed

The feed is used to share information on an entry in ELO (document or folder) and record changes to the entry. New feed posts are denoted with a green dot.
The following message types are shown in the feed:
- Posts
- Comments
- Polls
- Events, e.g. when a new version of a document is filed or changes are made to the working version
# Create a post

Use the Create a post field to comment on the respective entry in a feed. Select Create to submit the post.
Alternative: Press CTRL+ENTER to submit a post.
The text in posts, polls, and comments can be formatted as follows:
Bold: To format a part of the text in bold type, place an asterisk (*) at the beginning and end of the text section. I would like to emphasize this *again\*. will appear in the ELO feed as follows: "I would like to emphasize this again."
Information
If you want the asterisk to appear as a character in the text, enter a backslash before the asterisk.
# Create a poll

Selecting Create poll opens a new area in the ELO feed. In this area, you can start a user poll.
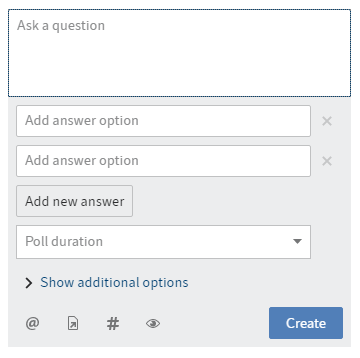
Enter the title or question of the poll in the first input field (with the placeholder text Ask a question). Enter the answer options in the next input fields (with the placeholder text Add answer option). To create an additional answer option, select the Add new answer button. You can select how long you want the poll to remain open in the Poll duration field.
Select Show additional settings to open an area with additional settings. This is where you specify whether participants can select more than one answer, see the user names in the result, and add their own answers.
Select Create to start the poll.
Select the pencil icon to edit a poll that has already started. You can edit the poll as long as no one has taken part.
Select the X button to delete a poll that has already started. You cannot undo this.
# Mention

Use mentions (@ icon) to address a feed post directly to another user or group. The users mentioned can see the corresponding feed post in their My ELO work area.
Alternative: As soon as you type an @ character, ELO automatically recognizes that you want to insert a mention.
# Reference

Use the Reference button (document icon with arrow) to link a feed post with an entry in ELO. Selecting the reference automatically takes the user to the filing location of the linked entry.
You can select the entry that you want to refer to in the Reference dialog box.
Alternative: As soon as you type a > character, ELO automatically recognizes that you want to insert a reference.
# Hashtag

Use the hashtag (# symbol) to add hashtags to a post. You can subscribe to hashtags.
Alternative: As soon as you type a # character, ELO automatically recognizes that you want to insert a hashtag. The hashtag drop-down menu opens.
# Subscribe to a hashtag
Method
Select a hashtag to subscribe to it.

The discussion page for the selected hashtag appears.
Select Subscribe.
You have subscribed to the hashtag. All posts that are marked with the corresponding hashtag appear in the My ELO work area of the ELO Web Client or the ELO Java Client.
# Visibility
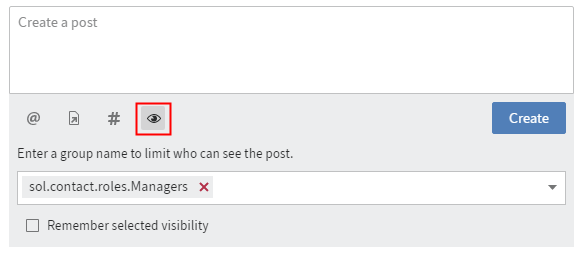
With Visibility (eye icon), you can restrict who can read the post. You can apply this restriction for future feed posts. Select the Remember selected visibility check box. Your visibility settings will be set as the default for new feed posts.
# Search feed

Select Search feed (magnifying glass icon) to search for terms within the currently selected feed. When the searched term is found, the feed is reduced to the corresponding posts. The matches are highlighted. Select the magnifying glass icon to start the search. To reset the search and display the entire feed, select the X icon next to the selected search term.
# Subscribe to feed

Select Subscribe (antenna icon) to subscribe to the feed. All feeds you have subscribed to are listed in the My ELO work area of the ELO Web Client or the ELO Java Client. Once a post is added to one of these feeds, you also see the post in the My ELO work area.
# Show filter options

Show filter options opens a window with filters for the corresponding feed. You can use these filters to restrict the feed to posts that match the respective filter. To close the selection, select the button again.

You can also see when filters are active, even when filter options are hidden.
# Enter a comment

You can enter comments on any post. The procedure for adding a comment is almost identical to creating a post. However, the visibility settings for a comment are bound to the visibility settings for the commented post, which is why you are unable to change the visibility settings for comments.
# Edit post

Select Edit (pencil icon) to edit your own feed posts and comments.
# Feed history
Edited entries are marked as edited below the entry. To open the editing history, select edited.