# Scan documents
With the Scan to repository function (available in the Repository work area > Ribbon > New > Scan), you can scan documents directly into the Repository work area. After scanning, you must enter metadata for the document. The scanned document is filed to the last selected folder in ELO.
Please note
You need to have a compatible scanner installed and selected.
Alternatively, you can use the following ribbon functions within the File tab of the Intray work area:
- Scan pages: Use this function to scan individual pages. The pages are filed to the Intray work area as separate documents.
- Scan document: Use this function to scan multiple pages and merge into one document. The scanned document will be displayed in the Intray work area.
For more information on how to scan and store a document in the Intray, refer to the chapter Insert document.
The following functions are also available.
# Attach pages
The Attach to back and Attach to front functions (available in: Repository > Ribbon > New > Scan) allow you to add pages to a TIFF document already stored in ELO. You need to scan the pages first.
Please note
You need to have a compatible scanner installed and selected. To check whether a scanner is installed, select the Select scanner button under Ribbon > New > Scan.
# Scan profiles
Available in: Ribbon > New > Scan or Intray work area > Ribbon > File > Scan
Use this function to open the Scan profiles dialog box. In it, you can define profiles for scanning documents. A scan profile enables you to define settings, such as which resolution to use or which format to store the scanned documents in. This way, you can set up a custom scan profile for each source document.
Scan profiles are used to take the specific properties of documents into account, such as texts, color images, high-resolution images, different formats, etc.
Information
You will also find the Print separator pages function in the Scan profiles dialog box. You can find more information about this function in the Join (separator pages) section.
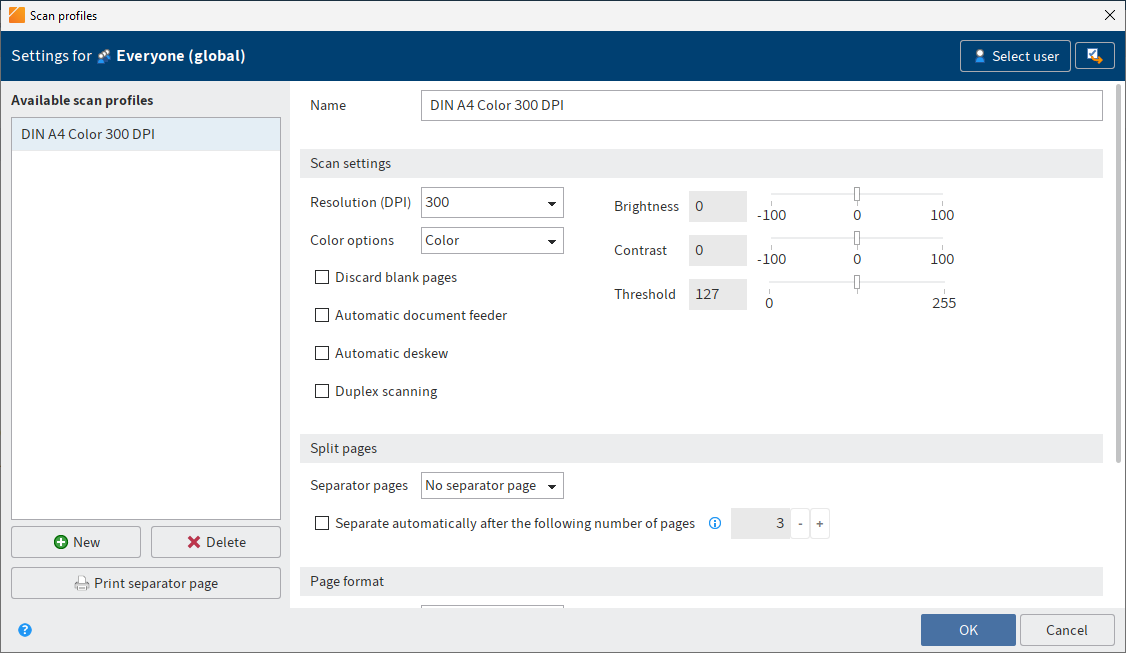
You can make the following settings:
# Available scan profiles
Under Available scan profiles, you can see all scan profiles available to the selected user or group.
New: Creates a new scan profile
Delete: Deletes the selected scan profile
Print separator page: Opens the Print separator page dialog box. In the Print separator page dialog box, select whether a separator page will be printed with horizontal or vertical bars.
You need a separator page when you scan multiple documents one after the other. A separator page shows the transition to a new document and ensures that the documents are filed individually to the Intray work area after scanning.
# Name of the profile
Name: Use the Name field to enter the name of the selected scan profile.
# Scan settings
The following settings apply to the scan process. The settings can only be edited if you have created a new profile or selected an existing profile.
Information
The settings are not supported by all scanners.
Resolution in dpi: In the Resolution in dpi drop-down menu, you can select the resolution (dpi = dots per inch) for the scan process.
Color options: In the Color options drop-down menu, select whether you want to create a color, black/white, or grayscale scan.
Discard blank pages: If this option is enabled, blank pages will not be scanned.
Automatic document feeder: This option is intended for scanner who have an automatic paper feeder.
Automatic deskew: If this option is enabled, pages scanned diagonally are straightened, if possible.
Duplex scan: This option is intended for scanners that can scan front and back pages.
Brightness: Define the brightness of the scan here.
Contrast: Define the contrast of the scan here.
Threshold: Define the threshold for the scan process here. The threshold is the value that determines whether a pixel is white or black.
# Split pages
The following settings apply to how to handle separator pages.
Separator pages: You can use the drop-down menu to specify whether you want to use separator pages. If multiple documents are scanned in sequence, ELO recognizes individual documents based on the separator pages.
Automatically split pages after the following page number: If you select this option, ELO splits the documents when scanning based on the defined number of pages.
You can also use separator pages. If a separator page is detected, ELO splits the document after the separator page. The page count begins again after the separator page.
# Page format
The following settings apply to the documents being scanned.
Page size: In this drop-down menu, you select which paper format is used.
Dimensions in: Use this drop-down menu to set the unit of measurement for a user-defined page format.
Scan clip: If you have selected the option User-defined in the Page size drop-down menu, use the fields under Scan clip to specify the area that will be included in the scan.
# Save document
The following settings apply to the save process.
Image format: Use this drop-down menu to select the file format you want to save scanned documents in. The following formats are available:
- TIFF: Black/white and color scans
- JPEG: Only color scans
- PDF: Black/white and color scans
Compression: In this drop-down menu, you can specify whether you want to compress the scanned documents.
Quality: If you have selected the JPEG option in the Compression drop-down menu, you can select the image quality.
# Select scan profile (drop-down menu)
Available in: Ribbon > New > Scan or Intray work area > Ribbon > File > Scan
Use the drop-down menu to select a scan profile for the next scan. Create new scan profiles with the Scan profiles function.
# Select scanner
Available in: Ribbon > New > Scan or Intray work area > Ribbon > File > Scan
Use this function to choose the scanner that you want to use. This function only applies when you use multiple scanners.
# Join pages
Available in: Intray > Ribbon > File
Use this function to join multiple TIFF or PDF files into a multi-page file in the Intray work area.
Information
Annotations on the files are applied to the resulting document.
Method
Hold down the CTRL key and select each document in the Intray in turn.
The topmost selected document will be the first page of the new document.
Select Join pages.
Keyboard shortcut: CTRL + K
Result
The individual pages are merged into one document.
Outlook
Use the Split pages function to separate a multi-page document into individual pages.
# Split pages
Available in: Intray > Ribbon > File
Keyboard shortcut: CTRL + T
Use this function to split the pages of a multi-page document in the Intray work area. The pages are numbered as individual documents in the Intray work area. The original is removed. The function is only available for multi-page TIFF and PDF documents.
# Join (separator pages)
Available in: Intray > Ribbon > File > Join
Information
This function is only available for TIFF and PDF files.
Information
Annotations on the files are applied to the resulting document.
You need this function for scanning documents with multiple pages. To select the start and end of a document, add separator pages to the stack during scanning.
Use empty pages or pages with a black bar as separator pages. You can print the separator pages via File > Scan > Scan profiles.
If the Join (separator pages) function is enabled, the separator pages are automatically recognized and the documents are merged into multi-page documents.
Choose from two different merge options for separator pages:
- Join using black bar separator pages
- Join using blank pages as separator page
You will find the settings for the merge options on the Ribbon > User menu > Configuration > Advanced settings > Separator page recognition.