# File entries
# Create folders
You want to create a new folder in ELO.
Method
Open the Repository work area.
Select the folder in the repository that you want to create the new folder in.
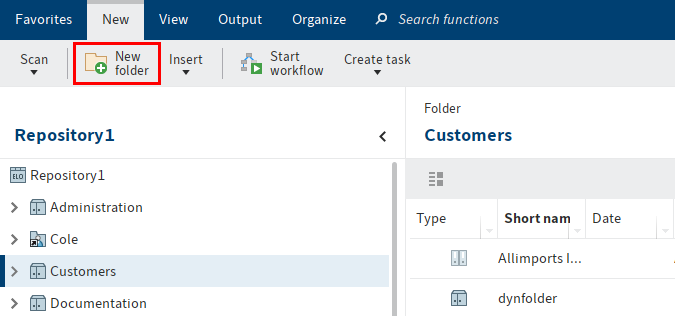
Select New folder on the New tab.
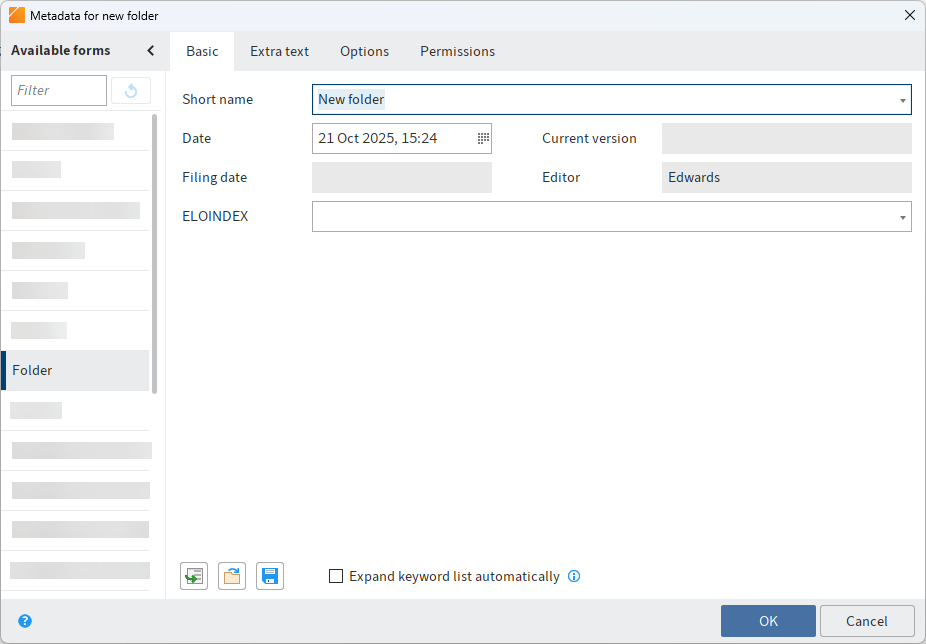
The Metadata for new folder dialog box opens. The Folder form is selected by default.
Information
In the Metadata for new folder dialog box, you only see forms in the Available forms column that have been assigned the Folders usage option in the metadata form manager of the ELO Administration Console.
Enter the name of the new folder in the Short name field.
Information
The more detailed your entries are, the easier it will be for you to locate the folder.
Once you have entered the required information, select OK.
Result
A new folder is created.
Outlook
The folder can be used for filing documents or for creating additional child folders.
You can save an existing folder structure as a default index and insert it into other folders. A default index is used as a template and can be used as often as required. You will find more information in the Save as default index section.
# File document
You have the following options for storing a document in ELO:
- Via drag-and-drop
- With the 'Insert file' function
- Scan it to the Intray and file it
- With the 'Document from template' function
# File a document with drag-and-drop
You want to drag and drop a document to ELO from Windows Explorer.
Method
Open the Repository work area in ELO.
Open Windows Explorer.
Click the document in Windows Explorer and drag it to the desired target folder.
Alternative: You can file multiple documents to ELO. Select the documents while holding SHIFT or CTRL in Windows Explorer and drag them to the desired target folder.

Release the mouse button.
The Metadata for new document dialog box opens.
Select a metadata form in the Available forms column.
Enter a short name.
Optional: Enter additional metadata.
Alternative: For multiple documents, you can enable the Same metadata for all documents (serial filing) option below the Short name field. Refer to chapter Serial filing for more information.
Information
The more precise the information is that you enter for a document, the easier it is to find the document later on. For detailed information on this topic, refer to the Metadata chapter.
Select OK once you have entered all metadata.
Result
You have filed the document to ELO.
Outlook
You can modify documents stored in ELO. If the document is version-controlled, a new version of the document is stored after you have made changes. The old version is retained. You have the following options:
# Store document with the 'Insert file' function
You want to transfer a document from your file system to ELO.
Method
In the Repository work area, select the folder that you want to insert the document into.
On the ribbon, select New > Insert > Insert file.
In the Insert file dialog box, select the desired file.
Alternative: You can file multiple files to ELO. Select the desired files while holding the SHIFT or CTRL key.
The Metadata for new document dialog box opens.
Select a metadata form in the Available forms column.
Enter a short name.
Optional: Enter additional metadata.
Alternative: For multiple files, you can enable the Same metadata for all documents (serial filing) option below the Short name field. Refer to chapter Serial filing for more information.
Information
The more precise the information is that you enter for a document, the easier it is to find the document later on. For detailed information on this topic, refer to the Metadata chapter.
Select OK once you have entered all metadata.
Result
You have filed the document to ELO.
Outlook
You can modify documents stored in ELO. If the document is version-controlled, a new version of the document is stored after you have made changes. The old version is retained. You have the following options:
# Scan a document to the Intray and file it
You want to scan a document and file it to ELO.
Requirements
- A scanner needs to be connected to the computer.
Please note
If you are using the 64-bit version of ELO, you will need to use the ELOscanTool for scanning. You will find this setting under Ribbon > User menu > Configuration > Technical presets > General > Use as scan method > ELOscanTool TWAIN (Windows).
Method
Open the Intray work area.
Place the document in the scanner.
Select the Scan document button on the File tab to start the scan process.
Optional: A dialog box may appear. Make the desired settings and select Scan.
The scan is performed.
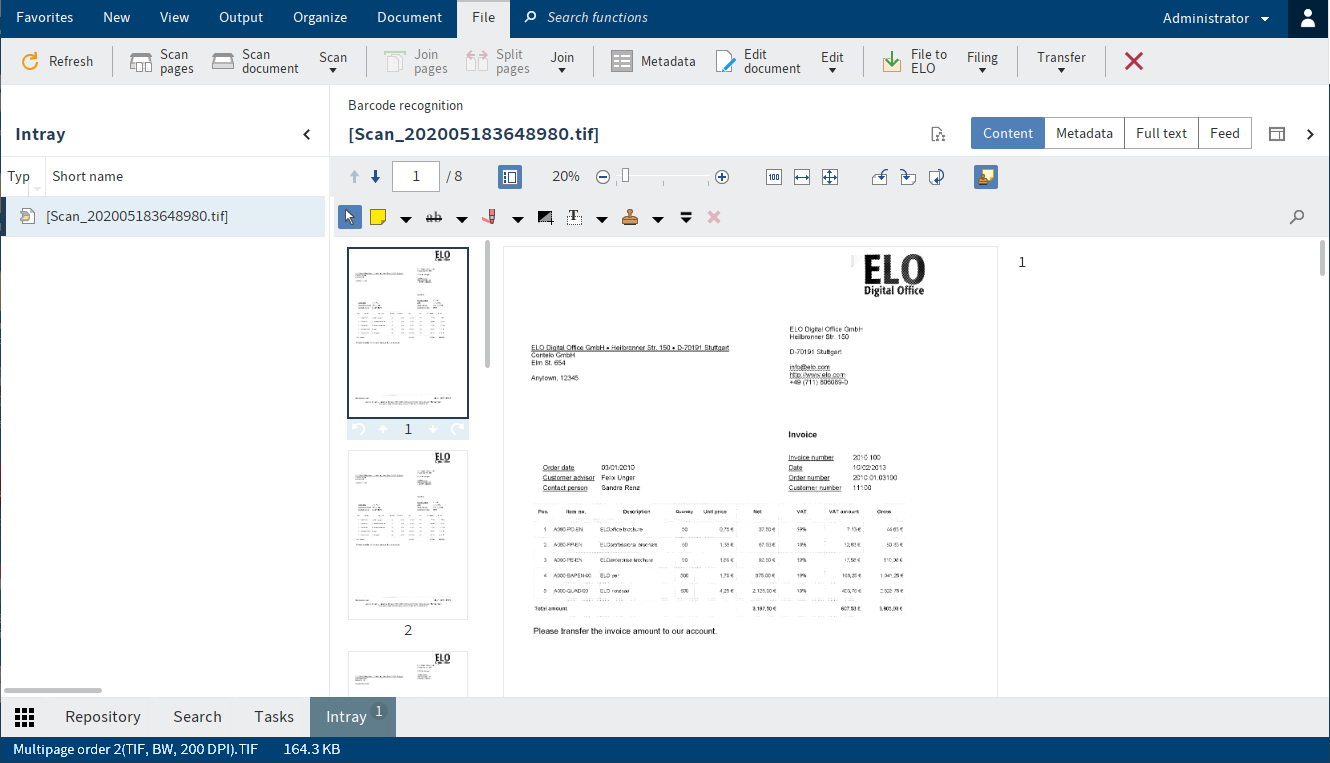
The scanned document appears in the viewer pane.
File document
Follow these steps to file the scanned document to ELO.
Select the scanned document in the Intray work area.
On the File tab, select File to ELO.
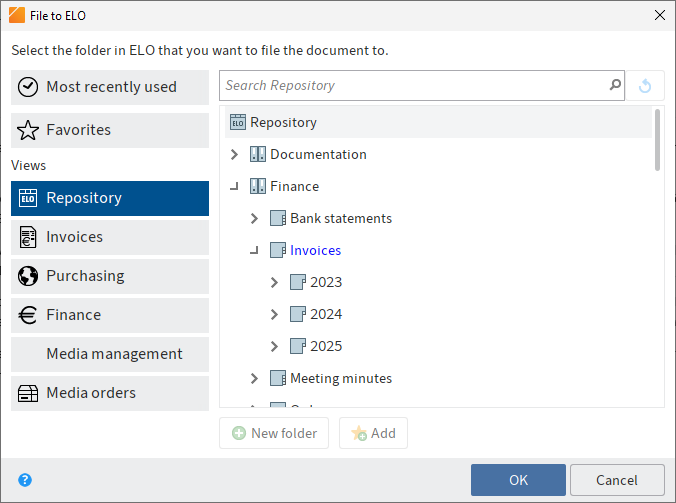
The File to ELO dialog box opens.
Select the folder where the scanned document should be filed.
Select OK.
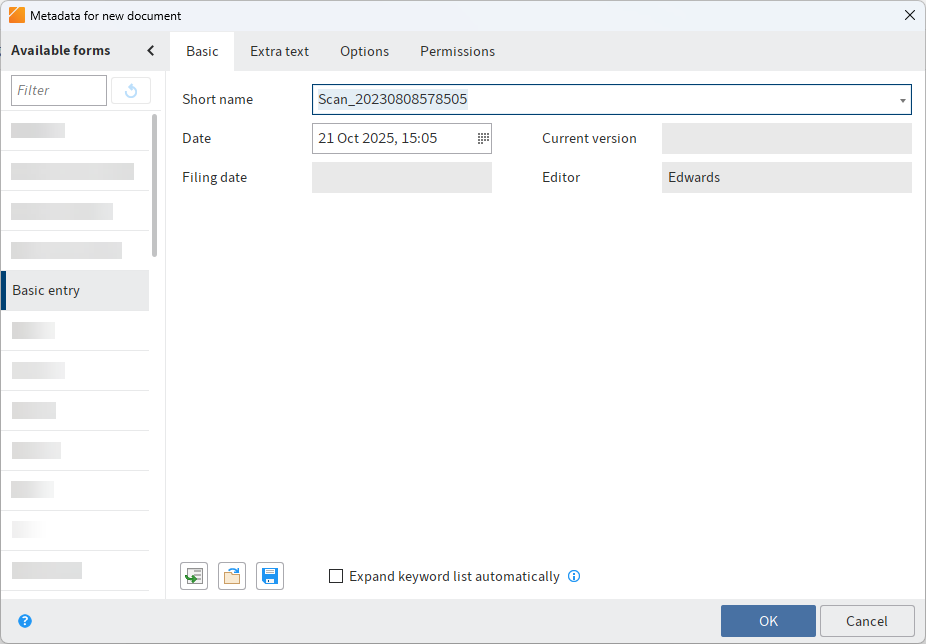
The Metadata for new document dialog box opens.
Select a metadata form in the Available forms column.
Enter a short name.
Optional: Enter additional metadata.
Information
The more precise the information is that you enter for a document, the easier it is to find the document later on. For detailed information on this topic, refer to the Metadata chapter.
Select OK once you have entered all metadata.
Result
You have filed the document to ELO.
Outlook
You will find more information about the functions on the File tab in the File entries via the Intray chapter.
You can modify documents stored in ELO. If the document is version-controlled, a new version of the document is stored after you have made changes. The old version is retained. You have the following options:
# Store document with the 'Document from template' function
You want to create a new document with the help of a document template.
Requirements
Templates must be created in an application such as Microsoft Word.
There must be a document template in ELO, e. g. for Microsoft Word documents.
You must know the name of the folder in ELO containing the document templates.
Information
The Templates function (available in: Ribbon > View > Navigation) enables you to jump to the folder with the document templates in ELO. Specify the filing location of the folder with the document templates on the Ribbon > User menu > Configuration > Technical presets > Folder for document templates.
You must know where you want to store the document in ELO.
Information
Assuming you have the corresponding permissions, you can define a central folder for templates in ELO. You will find this setting under Ribbon > User menu > Configuration > Technical presets > Folder for document templates.
Method
Open the Repository work area.
Select the folder in the tree structure that you want to file the document to.
On the ribbon, select New > Insert > Document from template.
Keyboard shortcut: CTRL + N
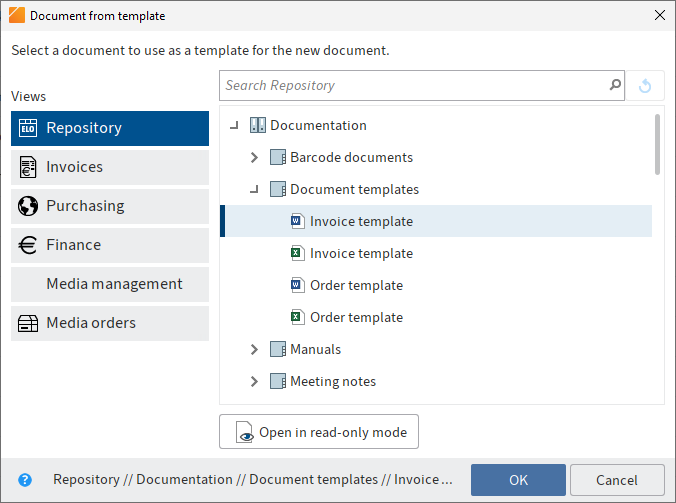
The Document from template dialog box opens.
Open the folder with the document templates and select the appropriate template.
Select OK.
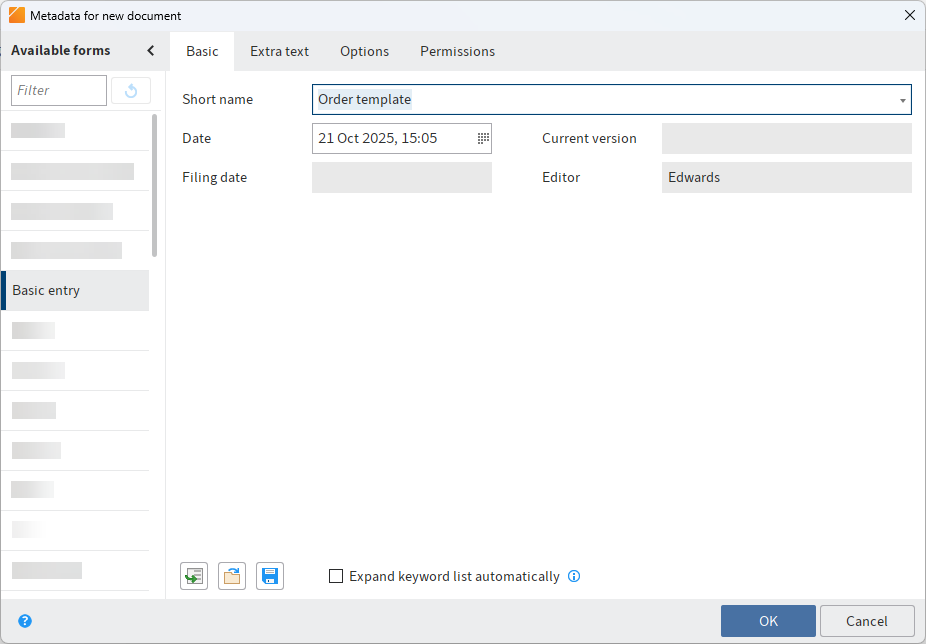
The Metadata for new document dialog box opens.
Select a metadata form in the Available forms column.
Enter a short name.
Optional: Enter additional metadata.
Information
The more precise the information is that you enter for a document, the easier it is to find the document later on. For detailed information on this topic, refer to the Metadata chapter.
Select OK once you have entered all metadata.
The dialog box closes. The corresponding external application will start and the document template will be displayed.
Make the desired changes.
Save the document and close the external application.
The document is now located in the designated folder in ELO.
Select the document in ELO.
On the ribbon, select Document > Check in.
Keyboard shortcut: ALT + I
The Version information dialog may appear. If so, enter a version number and a version comment.
Result
You have filed the new document to ELO.
Outlook
You can modify documents stored in ELO. If the document is version-controlled, a new version of the document is stored after you have made changes. The old version is retained. You have the following options:
# Create dynamic folder
The Dynamic folder function (available in: Search work area > Ribbon > Search > Result) enables you to save a previous search request as a dynamic folder in the Repository work area. Only entries that match the search criteria are displayed in a dynamic folder. If a new document is filed to ELO that matches the search criteria, the new document is automatically displayed in the dynamic folder. For example, you can display all invoices with the status Unpaid in a dynamic folder.
Dynamic folders are saved in the Repository work area. You can save them to any location here.
You can recognize dynamic folders by the folder icon with a magnifying glass.
# Default index
# Save as default index
Available in: Repository work area > Ribbon > Organize > Structure
This function saves the folder structure of the selected folder as a default index. A default index is used as a template and can be used as often as required.
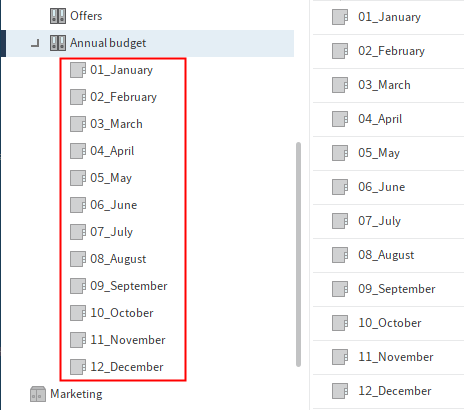
You can apply the default index to other folders via the Insert default index function. Documents or child folders with more than two levels are not saved.
Method
Select the folder that contains the child structure you want to save as a default index.
On the ribbon, select Organize > Structure > Save as default index.
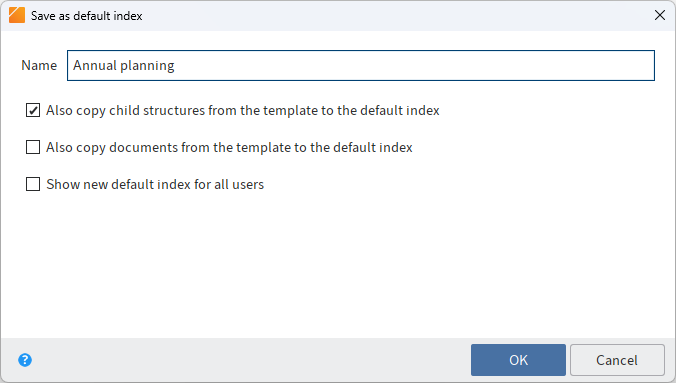
The Save as default index dialog box appears.
Enter a name for the new default index.
Optional: Select the desired options in the check boxes. You have the following options:
Also copy child structures from the template to the default index: If this option is enabled, all child structures in the selected folder are transferred to the default index.
Also copy documents from the template to the default index: If this option is enabled, all documents in the selected folder are transferred to the default index.
Show new default index for all users: If this option is enabled, the default index is available to all (global) users. If not, it is only available to the (local) user who created it.
Global default indexes are stored under Administration//Default Indexes.
Local default indexes are stored under <User> // data // Default Indexes.
Select OK.
Result
The default index is stored and is available via the Insert default index function.
Outlook
To delete an existing default index, select the Delete default index function in the Repository work area (available in: Ribbon > Organize > Structure). The Delete default index dialog box opens. Select the default index you want to delete.
# Insert default index
Available in: Ribbon > Organize > Structure
Use this function to insert a default index into a folder. A default index is a predefined child structure within a folder, e.g. a tab with a company name, months, A-Z.
Requirement: You must have created at least one default index before you can perform the following steps. You can do this with the Save as default index function.
Method
Open the Repository work area.
Select the folder that you want to add a default index to.
On the ribbon, select Organize > Structure > Insert default index.
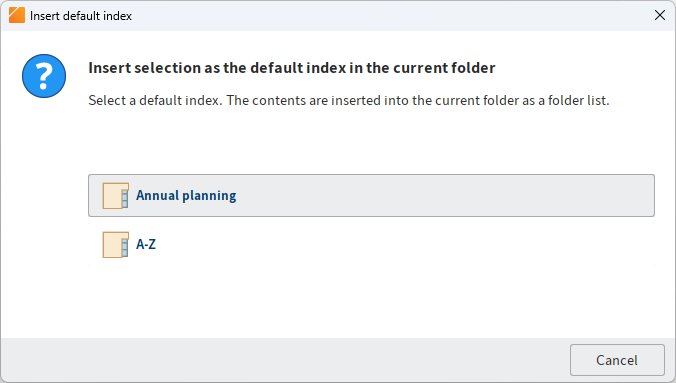
The Insert default index dialog box appears.
Select the desired default index.
Result
The default index is inserted into the folder.