# 'Organize' tab
# Move
Available in: Repository work area
You can link entries (folders or documents) within the tree structure.
The following options are available for moving entries:
# 'Move' function
Method
Select the entry you want to move.
On the ribbon, select Organize > Move.

The Move tab opens. The selected entry is displayed in the Original field.
Select the target folder in the tree structure.
The selected folder is displayed in the Target folder field.
Select Move entry.
If the permissions of the entry do not match the permissions at the target location, the Move entries dialog box opens. You can modify the permissions of the moved entries in this dialog box.
Optional: You can also save your selection so that the dialog box doesn't appear the next time you run the function. You can change your selection in the configuration (available in: User menu [your name] > Configuration > Dialog boxes > Inherit permissions when moving entries).
Result
The entry is moved to the target folder.
# Drag-and-drop
Method
Click the entry you want to move and drag it to the target folder holding down the mouse button.
The Drag-and-drop dialog box opens.
Choose whether you want to move or reference the entry. A reference ascribes to an entry.
Optional: You can also save your selection so that the dialog box doesn't appear the next time you run the function. You can change your selection in the configuration (available in: User menu [your name] > Configuration > Dialog boxes > Drag-and-drop).
# Reference
Available in: Ribbon > Organize > Structure
Use this function to create a reference to a document or folder selected in ELO. A reference is a link between a copy of an original document. The document only exists once physically in ELO. All changes to the document automatically apply to the references. This prevents duplicates.
The following options are available for referencing entries:
# 'Reference' function
Method
Open the Repository work area.
Select a document or a folder.
On the ribbon, select Organize > Structure > Reference.

The Reference tab opens.
The name of the selected document or folder is displayed in the Original field. You will be asked to select a target folder in ELO.
Select the folder in ELO that you want to create the reference in.
The folder is displayed in the Target folder field.
Select Insert reference.
Result
The Reference tab closes. The reference is created in the selected target folder.

An arrow icon indicates that it is a reference.
# Drag-and-drop
Method
Click the entry you want to reference and drag it to the target folder holding down the mouse button.
The Drag-and-drop dialog box opens.
Choose whether you want to reference or move the entry.
Optional: You can also save your selection so that the dialog box doesn't appear the next time you run the function. You can change your selection in the configuration (available in: User menu [your name] > Configuration > Dialog boxes > Drag-and-drop).
# Copy
Available in: Ribbon > Organize > Structure
Use this function to copy the currently selected entry to the clipboard. You can copy an individual document, a folder or a folder structure with child folders. Use the Insert copy function to insert an entry at the desired location in ELO.
Method
Select the entry in ELO that you want to copy.
Select Organize > Structure > Copy.

The Copy/Paste tab opens.
Select the target folder in ELO.
The target folder is entered in the Target folder input field.
Select Insert copy.
Depending on whether you have copied a document or a folder, the corresponding Insert copy dialog box opens.
When copying documents or folders, you can choose from various options. For example, you can specify whether you want to keep the notes, the references, or the permissions.
Select OK.
Result
The copy is inserted in the target folder.
# 'Insert copy' dialog box
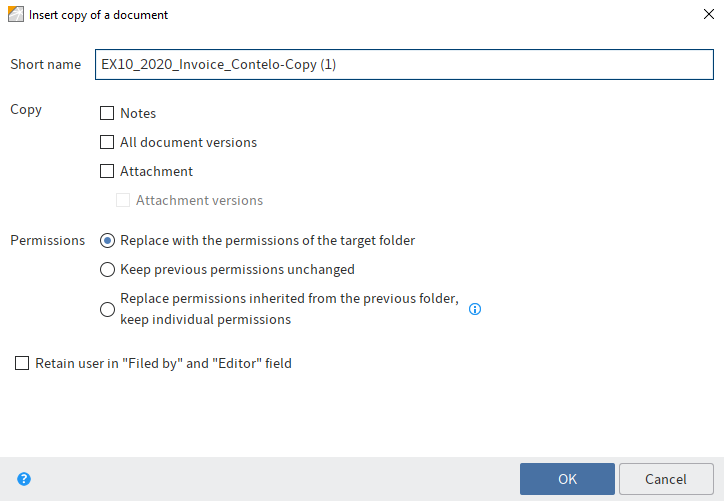
# Insert copy of a document
If you want to insert the copy of a document, you have the following options under Copy.
Notes: If this option is enabled, notes are copied as well.
All document versions: If this option is enabled, the version history of the documents is copied as well. Otherwise, the current working version is copied.
Attachments: If this option is enabled, the current attachments are copied as well.
Attachment versions: If this option is enabled, the version history of the attachments is copied as well. Otherwise, the current attachment is copied.
# Insert copy of a folder
If you want to insert the copy of a folder, you have the following options under Copy.
Basic entry only: If this option is enabled, only the selected folder without child entries is copied.
Folder structure only: If this option is enabled, the folder structure is copied without documents.
Folder structure with documents: If this option with documents is enabled, the folder structure and the documents in it will be copied.
References: If this option is enabled, references are copied as well.
Notes: If this option is enabled, notes are copied as well.
All document versions: If this option is enabled, the version history of the documents is copied as well. Otherwise, the current working version is copied.
Attachments: If this option is enabled, the current attachments are copied as well.
Attachment versions: If this option is enabled, the version history of the attachments is copied as well. Otherwise, the current attachment is copied.
# Permissions
You can make the following settings for documents as well as folders:
Replace with the permissions of the target folder: The permissions of the copied entries are ignored and replaced by the permissions of the target folder.
Keep previous permissions unchanged: The copied entries keep the existing permissions.
Replace permissions inherited from the previous folder, keep individual permissions: The permissions of the copied entries are replaced with the permissions that apply for the target folder. Permissions that were not inherited from the original folder are retained.
Retain user in "Filed by" and "Editor" field: The users entered in the Filed by and Editor fields are copied from the original entries.
# Insert default index
Available in: Ribbon > Organize > Structure
Use this function to insert a default index into a folder. A default index is a predefined child structure within a folder, e.g. a tab with a company name, months, A-Z.
Requirement: You must have created at least one default index before you can perform the following steps. You can do this with the Save as default index function.
Method
Open the Repository work area.
Select the folder that you want to add a default index to.
On the ribbon, select Organize > Structure > Insert default index.
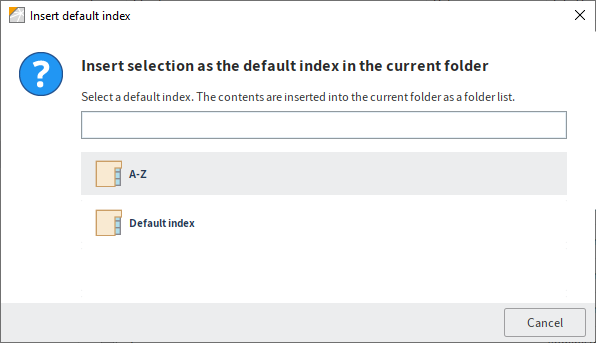
The Insert default index dialog box appears.
Select the desired default index.
Result
The default index is inserted into the folder.
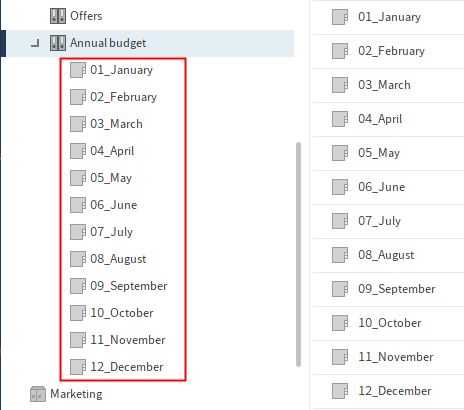
# Save as default index
Available in: Repository work area > Ribbon > Organize > Structure
This function saves the folder structure of the selected folder as a default index. A default index is used as a template and can be used as often as required.
You can apply the default index to other folders via the Insert default index function. Documents or child folders with more than two levels are not saved.
Method
Select the folder that contains the child structure you want to save as a default index.
On the ribbon, select Organize > Structure > Save as default index.
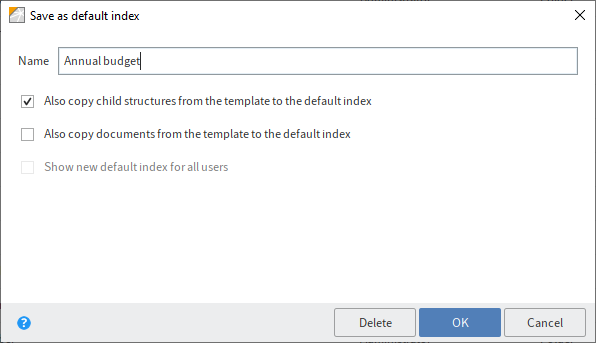
The Save as default index dialog box appears.
Enter a name for the new default index.
Optional: Select the desired options in the check boxes. You have the following options:
Also copy child structures from the template to the default index: If this option is enabled, all child structures in the selected folder are transferred to the default index.
Also copy documents from the template to the default index: If this option is enabled, all documents in the selected folder are transferred to the default index.
Show new default index for all users: If this option is enabled, the default index is available to all (global) users. If not, it is only available to the (local) user who created it.
Global default indexes are stored under Administration//Default Indexes.
Local default indexes are stored under <User> // data // Default Indexes.
Select OK.
Result
The default index is stored and is available via the Insert default index function.
Outlook
To delete an existing default index, select Delete. The Delete default index dialog box opens. Select the default index you want to delete.
# Metadata
This function allows you to view the metadata for the entry.
If you have permission, you can edit the metadata.
Metadata is data about a folder or a document.
It includes information on the entry itself, for example when it was filed, or its name in the Repository work area. It also includes the permissions structure for the entry, meaning who has what access to the entry. The quality of a repository depends to a great extent on the quality of the metadata. Metadata allows you to organize documents in a standardized way and file them quickly to ELO. In addition, using metadata makes it easier to find documents.
A new metadata model was introduced with version ELO 21 in addition to the previous metadata model. Both models are used in parallel. In the following, these metadata models are referred to as generation 1 (gen. 1) and generation 2 (gen. 2).
In gen. 2, forms and metadata forms are shown differently in the Metadata dialog box. The metadata concept will remain the same.
There are three ways to open the Metadata dialog box manually. Select an entry and
- select Organize > Metadata on the ribbon.
- right-click to open the context menu, then select Metadata.
- press the keyboard shortcut F4.
This section provides information about entering metadata. Select one of the following links to go straight to a topic:
- Metadata forms
- Fields
- 'Basic' tab
- 'Extra text' tab
- 'Options' tab
- 'Permissions' tab
- 'Version history' tab
- 'Additional information' tab
- Identify personal data
- Delete entries with personal data
- Enter metadata with ELO Click OCR
Information
If the ELO Barcode module is installed, ELO can extract metadata from barcodes. You can find more information on the ELO Barcode module and configuring it in the ELO Administration Console in the ELO Barcode (opens new window) documentation.
# Metadata forms
You enter metadata into metadata forms. Metadata forms contain templates that are specifically created for this document type. All documents of the same type receive the same permission settings and are filed to ELO based on a fixed pattern.
The view and functions in the metadata forms depend on the metadata model.
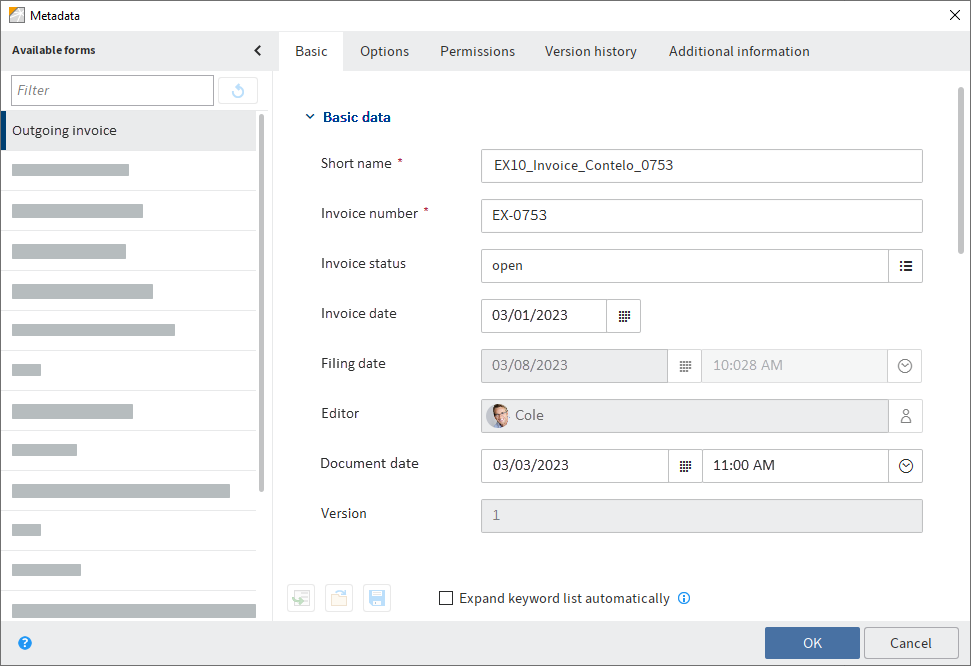
Gen. 2 metadata form
Gen. 1 metadata form
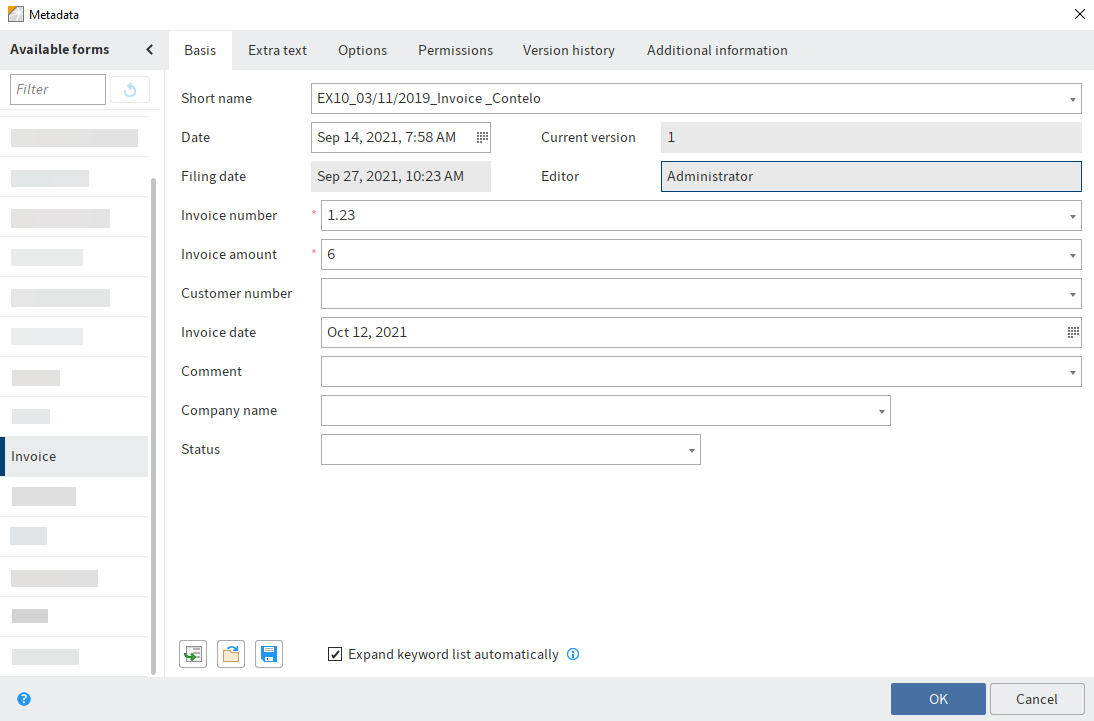
The Available forms area lists all the available metadata forms. The list contains either metadata forms for folders or for documents, depending on the type of entry selected in ELO.
Information
You can minimize the Available forms pane by selecting the Hide metadata forms icon (arrow icon pointing left). You can select the Show metadata forms button (arrow icon pointing right) to make the pane reappear.
Please note
When you change the metadata form, metadata may be lost or incorrectly assigned.
# Fields
The metadata for a document is entered into fields.
The type of field determines the data you need to enter and what you need to consider when doing so. There are different types of fields, which can be configured differently from metadata form to metadata form.
Text field: You can enter letters, numbers, and special characters in a text field.
Mandatory field: Fields can be configured as mandatory to complete the metadata entry. A red asterisk and a red marking indicates that a field is mandatory. Any conflicts are displayed at the bottom of the dialog box.
Please note
Do not enter any words that can act as search operators (NOT, OR, AND) in fields. Otherwise, you may encounter issues when searching for these words.
# Icons
If a field contains an icon, this means that ELO helps you to enter content in the field.
The following tools are available:
 | Keyword list |
 | Drop-down menu |
 | Calendar |
 | Clock |
 | Relation |
# Keyword lists

Keyword lists are used to standardize entries and make it easier to enter metadata.
There are two types of fields with keyword lists:
- You have to select an entry from the keyword list.
- You can select an entry from the keyword list or you can type in your own entry.
If you click a field and a keyword list appears, you cannot make entries.
Information
The following functions are only available in the gen. 1 metadata forms.
You can enter multiple keywords in these fields, separating them by a pilcrow sign (¶).
Please note
Keywords containing a pilcrow sign are treated like a list of keywords, as pilcrow signs are used as a separator between multiple values.
Expand keyword list automatically: If this option is enabled, the keyword list opens as soon as you start to type text into a field.

Information
You can can either click the check box to enable the Expand keyword list automatically option or use the keyboard shortcut CTRL+K.
If the Expand keyword list automatically option is disabled, you need to open the keyword list using the list icon at the bottom of the index field.
Alternative: Open the keyword list using the F7 key.
To edit the keyword list, right-click a keyword list entry.
You can add new keyword list entries or child entries via the context menu. You can edit or delete existing keyword list entries or child entries.
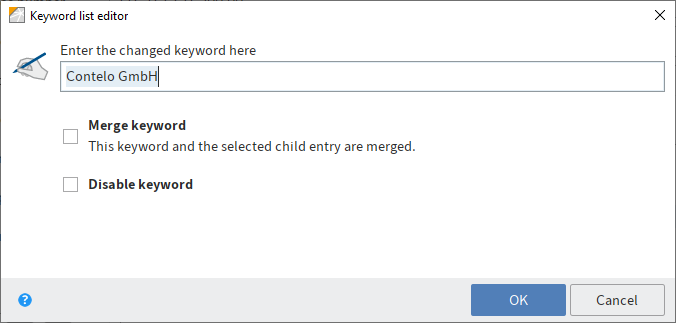
In the Keyword list editor dialog box, you change the name of a keyword.
The following options are also available:
Merge keyword: If a keyword has child entries, you can use this option so that the child entries are always inserted into the field together with the parent keyword. The parent keyword option must be enabled for this to work.
For example, if your keyword list contains the keyword Invoice with the child entries Miller and Smith, either the expression Invoice Miller or Invoice Smith will be used. You can only choose between the child entries of the keyword.
Disable keyword: Use this option to deactivate a keyword. The keyword can no longer be selected and will be grayed out.
# Relations
Relation type fields are used to link a field with the metadata of another entry.

The chain icon opens a list of entries. Select the entry you want to link. Navigate the list using the mouse or arrow keys.
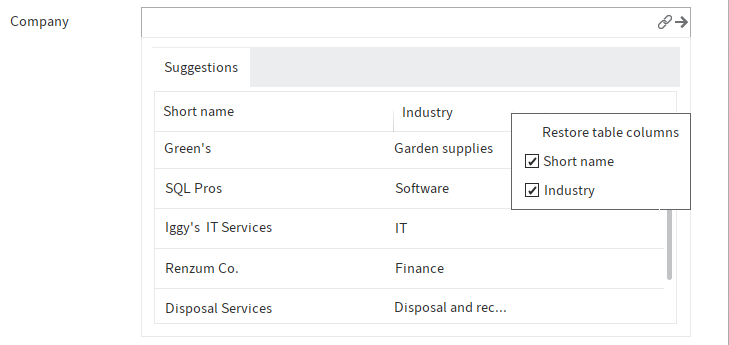
Click the title of a column to sort the list. You can hide and show columns using the context menu, which you access by right-clicking in the column titles.
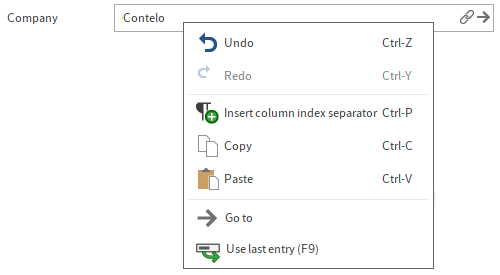
Clicking the arrow next to the chain icon takes you straight from the metadata of the entry to the metadata of the linked entry. Do this by selecting the arrow icon. Alternatively, right-click on the relation field to open the context menu and select the Go to button. The metadata of the linked entry is displayed in the Metadata dialog box.
# Additional functions in the 'Metadata' dialog box
The Metadata dialog box offers the following additional functions:
# Undo (CTRL+Z)
The keyboard shortcut CTRL+Z undoes the last action in a field.
Alternative (gen. 1 only): Click the Undo function in the context menu of the field (right-click).
# Redo (CTRL+Y)
The keyboard shortcut CTRL+Y reapplies the last action that was undone in a field.
Alternative (gen. 1 only): Click the Redo function in the context menu of the field (right-click).
The following functions are also available for gen. 1 metadata forms:
- Automatically enter metadata
- Pin function
- Use last entry
- Insert column index separator
- Load metadata
- Save metadata
These functions are briefly explained in the following section.
# Automatically enter metadata

The Enter metadata using the most recently saved/displayed entries [F3] button (icon with the green arrow) enables you to apply the metadata that you entered or opened last.
Alternative: Call the function using the F3 key.
Information
The data in the fields File name, Entry type, and Document path are not overwritten with this function. The original data is retained in these fields.
# Pin entry to field (Intray only)

To enter the same value to a field in multiple documents in the Intray, enable the function Pin entry to field using the F8 key.
Alternative: Click the Pin entry to field function in the context menu of the field (right-click).
A pin icon appears.
As soon as you file the next document with the same field, the value you entered previously will be applied.
Please note
The value is only saved for the current session. The ELO Java Client does not "remember" the value once you have closed the program.
# Use last entry
To reuse a value from a field the next time you enter metadata, use the F9 key.
Please note
The value is only saved for the current session. The ELO Java Client does not "remember" the value once you have closed the program.
# Insert column index separator

To save multiple values to a field, separate the values with a pilcrow character (¶). Use the keyboard shortcut CTRL+P.
Alternative: Click the Column index separator function in the context menu of the field (right-click).
# Load metadata

This button enables you to load a metadata file (.es8) into the current metadata for the document. Metadata of an ELO entry is stored in ES8 files.
Alternative: Call the function using the keyboard shortcut CTRL+L.
Information
When you load an ES8 file into the metadata, the existing metadata is overwritten without showing a confirmation.
# Save metadata

Select this button to save the metadata of the current folder or document as an ES8 file.
Alternative: Call the function using the keyboard shortcut CTRL+S.
# Tabs

Metadata forms are divided into tabs. There are several default tabs:
- Basic
- Extra text (only in gen. 1 metadata forms)
- Options
- Permissions
- Version history
- Additional information
The default tabs are briefly described in the following section. Additional tabs appear depending on the settings in the metadata form.
# 'Basic' tab
The Metadata dialog box opens to the Basic tab. It contains at least the following default fields:
Short name: Name of the entry that is shown in the tree structure in the Repository work area.
Document date (gen. 2)/Date (gen. 1): The document date refers to the date the associated file was last accessed. The document date is updated when changes are made to the document.
You can also edit the document date manually using the calendar function.
In gen. 1 metadata forms, you can enter information into this field using the following syntax:
+x= today in X days+xd= today in X days (d for days)+xm= today in X months (m for months)+xy= today in X years (y for years)- To enter a past date, use
-(minus) instead of+(plus).
Example 1
Entering +1m on Dec 2, 2019 returns the date Jan 2, 2020. If you were to enter -1y, this would return the date Dec 2, 2018.
ELO also automatically completes the following entries:
05is returned as <current month> 05, <current year>Dec 5is returned as Dec 5, <current year>
Example 2
Entering 31 on December 2, 2019 returns the date December 31, 2019.
Filing date: The filing date refers to the date the document is filed to ELO.
Version (gen. 2)/Current version (gen. 1): Shows the individual version number (if entered). This is not the internal version counter.
Editor: Shows the user who last edited the document.
For folders only:
ELOINDEX: This field is for the filing definition. When filing documents automatically, ELO identifies where to file the document through the ELOINDEX.
# 'Extra text' tab
Information
This tab only appears in gen. 1 metadata forms.
In this text field, you can enter information that is not covered by the other fields, for example a more exact description or a comment. The field can also be used for script settings.
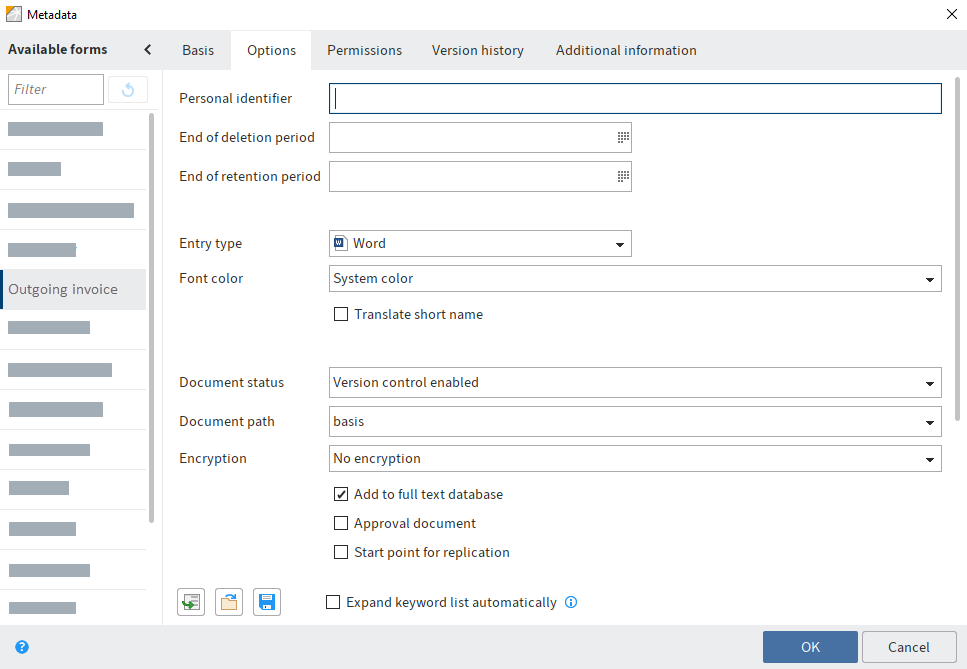
# 'Options' tab
The Options tab is where you specify the characteristics and behavior of an entry. Depending on whether you are entering metadata for a document or a folder, different settings will be displayed.
# General options
The following options are available for all folders and documents on the Options tab:
Information
You will find more information on the Personal identifier, End of deletion period, and End of retention period fields in the chapters Identify personal data and Delete entries with personal data.
Entry type: This option is used to specify the type of the entry, e. g. a Word or PDF document. This setting determines the icon that is displayed in the list view in ELO.
Font color: Select a color for the entry to improve the visual clarity of your repository structure.
Translate short name: If this option is enabled, the short name of the entry is translated into the selected display language.
Please note
In order for the translation to be displayed, a translation for the short name must have been entered in the translation table. You also need to configure the metadata form. If necessary, contact your system administrator.
Start point for replication: This option enables you to specify a folder as the starting point for replication. The next time replication takes place, the folder is placed in the Replication Base of the target repository. The administrator must insert the new folder at the desired location in the target repository. This enables you to replicate parts of repositories even if they have not been filed in identical structures. You will find more information in the ELO Replication (opens new window) documentation.
Object ID and GUID: The first number in this field is the internal ELO object ID. This entry is primarily for information purposes and cannot be changed. The object ID is required when testing the checksum, for example.
The character string in brackets specifies the GUID of the entry. The GUID (Globally Unique Identifier) is a unique identification number. This is automatically assigned and cannot be modified. This enables you to identify every entry uniquely, even outside of the repository.
Filed by: The user who created the entry is entered here.
# Options for documents
The following options are only available for documents:
- Document status
- Document path
- Encryption
- Add to full text database
- Approval document
- File name
Document status: Select the editing status of the entry from the drop-down menu:
Version control disabled: Only one version of the document is saved. The previous version is deleted and is no longer available.
Important
If you select this option, the previous version is overwritten each time you save. The Document > Versions > Load new version function overwrites the current version, and does not create a new one. For this reason, we do not recommend using this option.
If you attach files to documents without version control, only one file can be attached. Attaching another file overwrites the first attachment.
Version control enabled: If the document is edited, a new version is created. All changes are documented. Older versions can be restored.
Non-modifiable: ELO does not allow changes to the document and its metadata.
Warning
The document status Non-modifiable cannot be reversed.
Document path: This is the document path (storage path) that has been set for the entry.
Encryption: You can select an encryption key here if you want to encrypt documents. This is recommended, e. g. if documents should only be available to a specific set of users. The encryption key password must be entered when opening a document. Encryption keys are defined by your administrator. You will find more information here: Encryption keys (opens new window).
Important
The encryption process is irreversible. Encrypted documents remain encrypted.
Add to full text database: Enable this option to add the document to the full text database. This function indexes words so that they are available in the search.
Approval document: If this option is enabled, new versions of the document do not automatically become the working version. Users with the right Author for approval documents determine which version of the document should be the working version.
Two attributes separate an approval document from a normal document.
- After editing, a new version is created when checking in a document. The new version is not automatically set as the working version. To set a document version as the working version, use the function Set as working version (Ribbon > Document > Document versions).
- Before editing an approval document, the Check out and edit dialog box opens. In this dialog box, users can choose whether they want to check out and edit the working version or the newest document version.
File name: The file name of the document as stored outside of ELO, for example.
# Options for folders
The following options are only available for folders:
- Sort order
- Enable quick preview for documents in the folder
Sort order: This is where you can define how the contents of the corresponding folder will be sorted:
- Filing date: The entry with the most recent filing date is at the bottom.
- By filing date descending: The entry with the most recent filing date is at the top.
- Alphabetical: Entries are sorted ascending from A to Z.
- Alphabetical descending: Entries are sorted descending from Z-A.
- Date: The entry with the most recent document date is at the bottom.
- By date descending: The entry with the most recent document date is at the bottom.
- Manual: You can move the entries within the folder manually. To do so, the folder must be opened in the list view.
Enable quick preview for documents in the folder: Use this option to view the first document in a folder in the viewer pane as soon as you click the folder.
# 'Permissions' tab
The users that have access rights to the selected entry are listed on the Permissions tab. You can change the settings, provided you have the corresponding permission.
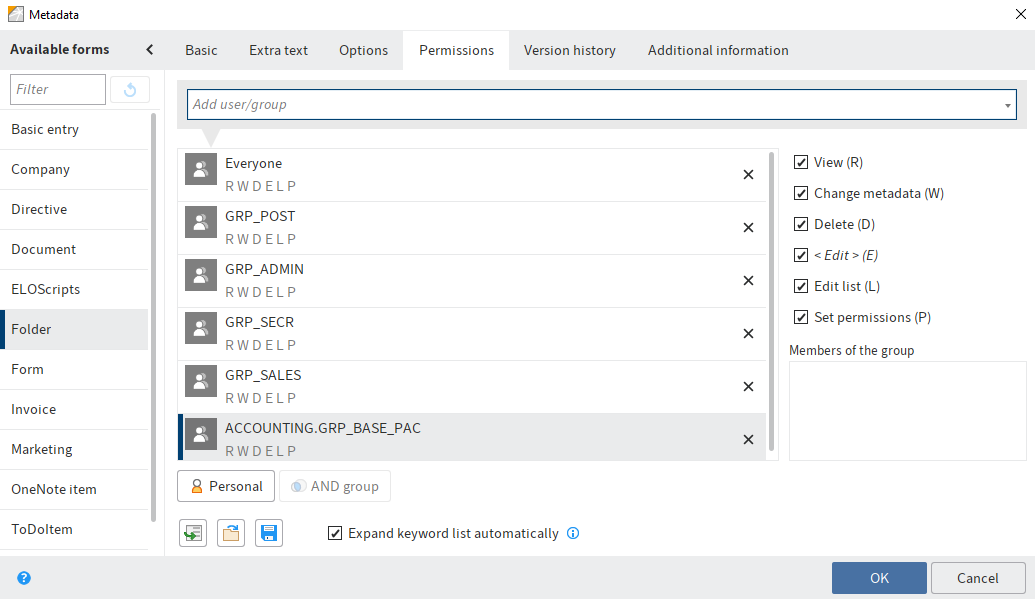
Add user/group: Search for the desired user or group in this field. Suggestions will appear as you type.
Select the corresponding suggestion to select a user or a group.
Alternative: If you select the triangle to the right of the Add user/group field, this will open a drop-down menu. This menu contains a list of the users and groups you selected recently.
In the middle column, you can see which users or groups have already been assigned permissions for the selected entry and which permission settings apply.
To edit the permissions settings, select an entry in the middle column and select or clear individual permissions.
The following options are available:
| Access right | Description |
|---|---|
| View (R) | View entries and metadata, add annotations |
| Change metadata (W) | |
| Delete (D) | Mark entries as deleted. Only users with administrative rights can delete entries permanently. |
| Edit (E) |
|
| Edit list (L) | Folders: Change folder contents, e.g. create, move, copy, or remove documents in the folder, insert or delete reference. |
| Set permissions (P) | Change permissions |
Information
Options that are not applicable are shown in italics and enclosed in pointy brackets.
Personal (orange user icon): Use the Personal button to assign yourself sole access to the respective entry. All other permissions will be revoked.
AND group: AND groups are useful if you only want to assign permissions to the users in a group that are also members of another group. To create an AND group, select two groups in the middle column and select AND group.
Group members: If you select a group, a list of members appears.
Double-click the corresponding user in the Members of the group column to select a member of a group.
Remove permissions: To remove all permissions from a user or group, select the X icon next to the selected user or group.
Please note
Keep in mind that when you revoke your own read permissions on an object, you can no longer see the entry in the repository. If you remove the Set permissions right, you will no longer be able to edit the permissions settings.
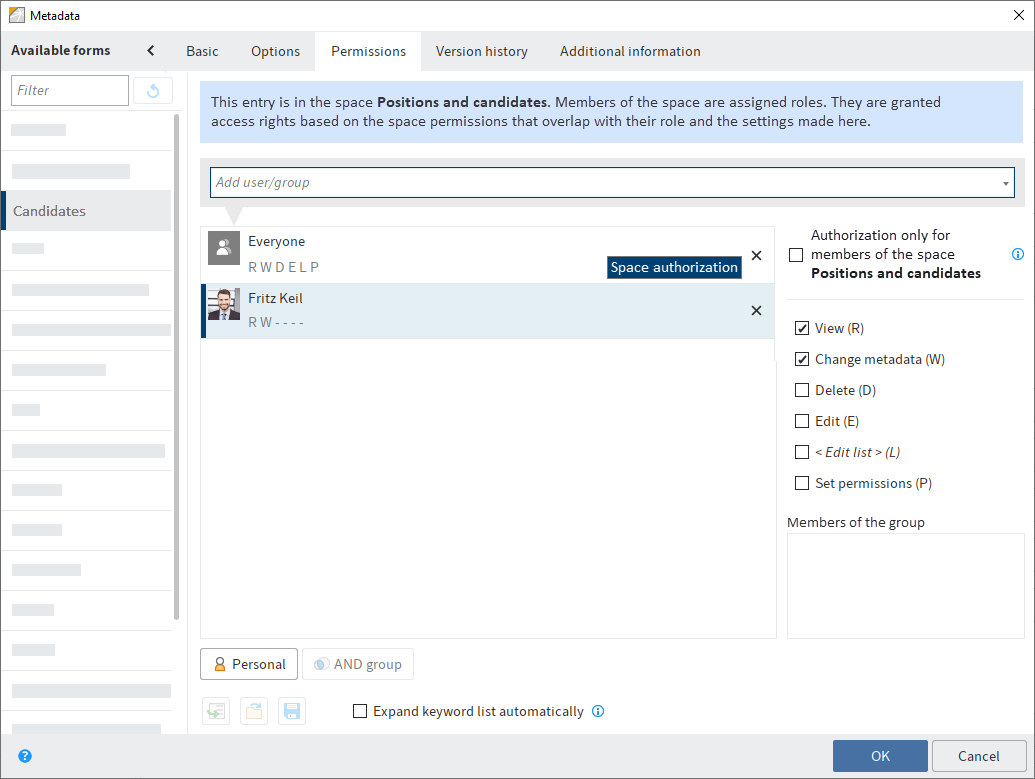
# Permissions for entries in spaces
There are additional authorization options for entries that were created in a space.
You can find more information on spaces in the Spaces section.
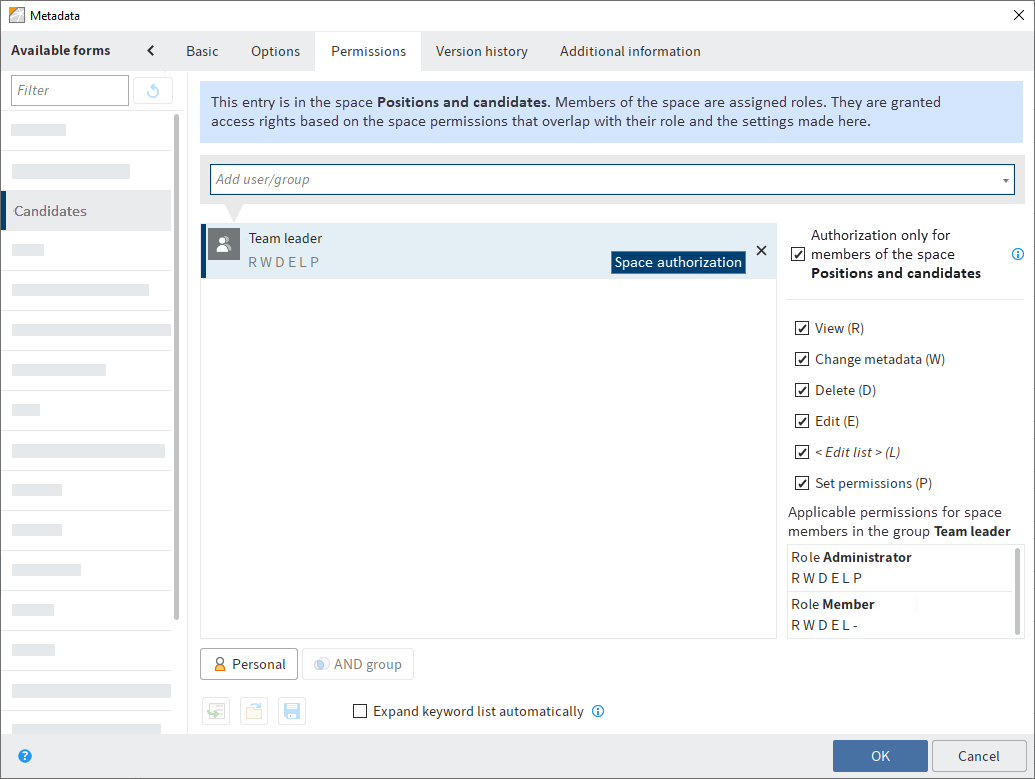
Authorization only for members of the space<space name>: Users and group members granted this permission can only access the entry if they are members of the corresponding space.
Information
This option only appears for entries created in a space. For entries created elsewhere but displayed in a space, the permissions of the entry in the repository apply.
If you enable this option, the permissions granted to group members according to their role in the space overlap with the access rights granted in the Metadata dialog box.
The permissions to the entry at the individual user level also overlap in accordance with this.

You can see the permissions in effect when you select a user or group in the Metadata dialog box.
Example
A user has the Member role in the Positions and candidates workspace. Members have RWDEL access rights for entries. The user is also a member of the Team leader group. In the Metadata dialog box, this group has all access rights for the entry.
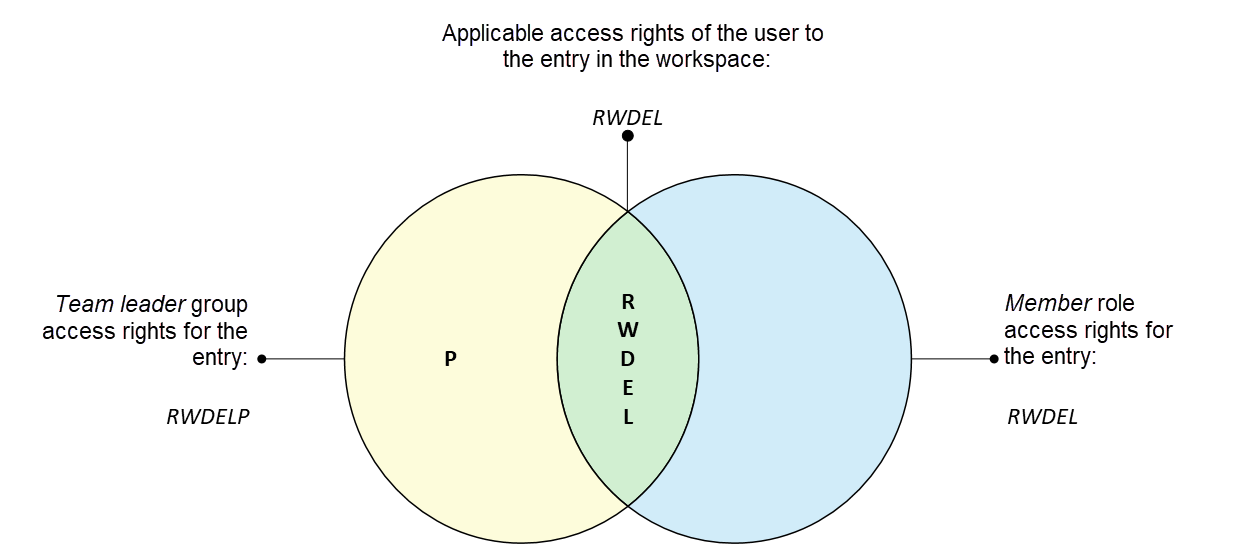
The user only has RWDEL access rights for this entry because only these access rights overlap.
Other members of the Team leader group will not have access to the entry unless they are also members of the workspace.
# Grant a non-member access to an entry
You can grant users who are not members of a space access to entries in the space. Users can open these entries from the search or with ELO links, for example.
Example
The head of HR wants to grant a head of department access to an application created in the HR workspace. The head of department needs to be able to read the application and edit the metadata. The head of HR can add the head of department on the Permissions tab and assign him the R and W access rights.
# Outlook
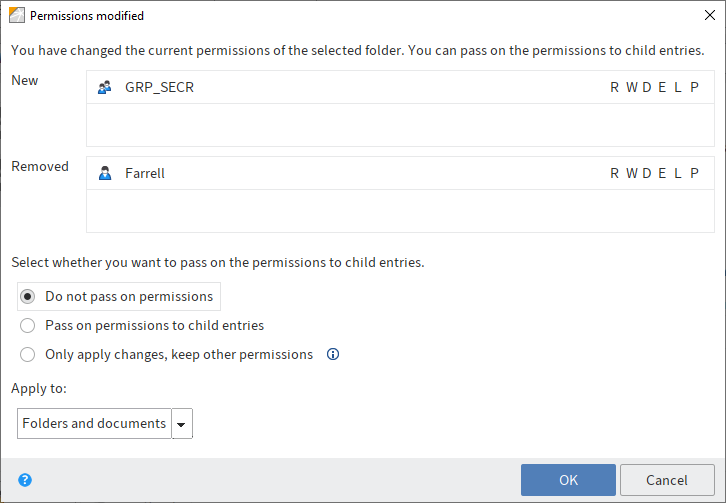
If you change the permissions of a folder in the Metadata dialog box, the new permissions can be passed on to the child entries (child folders and documents). After you have changed the permissions, the Permissions changed dialog box opens. Specify what effects this change should have.
Please note
The changes do not affect references, since they retain the permission settings of the original entry.
Choose from the following options:
Do not pass on permissions: The changes are not applied to the documents and child folders in the folders.
Pass on permissions to child entries: All permissions are passed on to the entries in the folder.
Only apply changes, keep other permissions: Only permissions are passed on that result in changes to permissions for the documents and child folders in the folder.
Apply to: Using the drop-down menu, select whether to apply the changes to all child entries or only folders/documents.
# 'Version history' tab
With version-controlled documents, changes to the metadata are documented. You will find this documentation on the Version history tab.
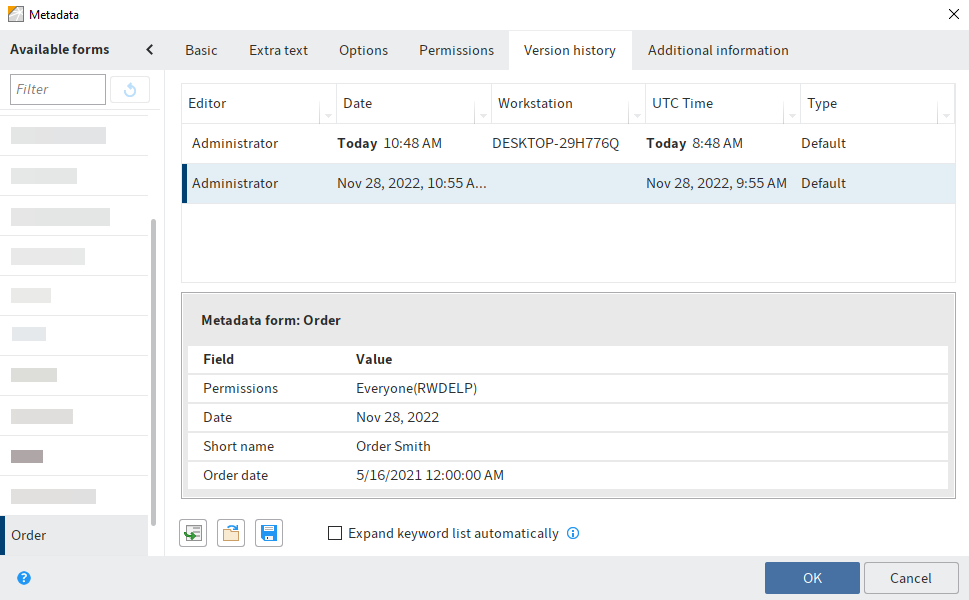
The version history contains two panes:
In the top part, you can see which users made changes and when.
The changes that the selected user made are shown in the lower part.
# 'Additional information' tab
Information
This tab is only displayed if you have been granted authorization by an administrator.
The Additional information tab provides additional fields in the database (map fields). These fields can be used for scripts, workflows, and other purposes.
# Identify personal data
The Options tab in the Metadata dialog box contains three fields that allow you to find entries with personal data and delete them in due time.
Personal identifier: If the entry contains a personal identifier, enter information that enables you to identify the relevant person in this field. This term is intended to help you find the entry using the metadata search. For this reason, you need a company-wide system for assigning these terms. This will help you find entries containing a user's personal data. You can also search all entries containing personal data – regardless of the individual.
End of deletion period: Enter the date on which the entry must be deleted at the latest. This date must come after the date you have entered under End of retention period. You can select a date by clicking the calendar icon in the field.
Please note
If you do not complete the Personal identifier and End of deletion period fields, a dialog box will appear indicating that a personal identifier has not been specified. You can disable this dialog box under Ribbon > User menu [your name] > Configuration > Dialog boxes.
End of retention period: Enter the date up to which the entry has to be retained. The entry cannot be deleted before the entered date. You can select a date by clicking the calendar icon in the field.
Please note
The retention period must end before the deletion period.
Information
You can set a retention period in the ELO Administration Console. If an entry is filed with the corresponding metadata form, the field End of retention period is completed automatically.
# Delete entries with personal data
The purpose of marking entries with personal data is to be able to delete the corresponding entries in accordance with legal requirements. You can delete entries with personal data in the following ways:
- Via the search
- With the Delete expired documents function
Method using the search
To delete entries with personal data, first perform a search. You can narrow down your search based on the End of deletion period or End of retention period fields.
In the search results, select the entries that have to be deleted. To select multiple entries, press the CTRL key and click all the entries you want to select. If you want to select all entries or all entries you want to select are in a row, press the SHIFT key then click the top-most and bottom-most entry you want to select.
Once you have marked the entry or entries in the search results, select Organize > Delete on the ribbon. Select Delete in ELO in the selection dialog box.
Result
The entries can no longer be seen in the Repository work area.
Important
The entries are not deleted permanently, just marked as deleted. This tells the administrator that the documents need to be removed from ELO permanently. You can find more information under Show deleted entries and Delete permanently.
Method using the 'Delete expired documents' function
Please note
The function Delete expired documents not only deletes entries containing personal identifiers, but all entries whose retention period has passed.
On the ribbon, select Organize > System > Delete expired documents.
The Delete expired documents dialog box appears.
Specify whether you want to delete Documents only or Documents and folders with expired retention periods.
Result
The entries can no longer be seen in the Repository work area.
Important
The entries are not deleted permanently, just marked as deleted. This tells the administrator that the documents need to be removed from ELO permanently. You can find more information under Show deleted entries and Delete permanently.
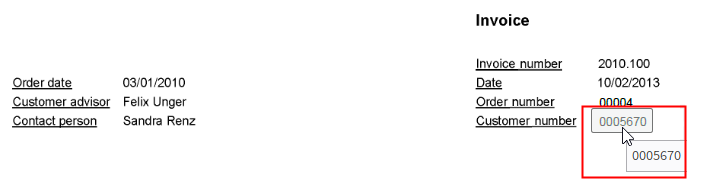
# Enter metadata with ELO Click OCR
The integrated text recognition feature can be used as a tool for entering metadata. ELO Click OCR transfers text from a document into the metadata form. This prevents users from making manual data entry errors. The following example explains how to proceed.
Click OCR can be used in all work areas. In this example, we demonstrate how the function works in the Intray work area.
Information
An OCR service needs to be installed for ELO Click OCR to work.
Method
Open the Intray work area.
Select the document that you want to edit the metadata of.
The document appears in the viewer pane.
Select Organize > Move on the ribbon.
The Metadata dialog box opens.
Select the desired metadata form.
Click the field you want to apply the metadata to.
The cursor blinks in the selected field.
Move the mouse pointer to the part of the document (preview) containing the information you require.
Information
If ELO Click OCR recognizes a text element (word or number), the element that has been found is highlighted in yellow and a tooltip with the recognized text appears.
Click the text you want to transfer to the metadata form.
Information
If you want to transfer multiple terms after another, select each individual term while holding the SHIFT button. Release the mouse button after each term. Repeat the process until you have transferred all desired terms.
Result
The recognized text information is transferred to the selected field.
# Permissions
Available in: Ribbon > Organize > Properties
This function opens the Permissions tab in the Metadata dialog box. This is where you set the permissions of a folder or a document. You will find more information under Metadata.
# Font color
Available in: Ribbon > Organize > Properties
Use this function to change the font color of a selected document or folder.
# Sort order
Available in: Repository work area > Ribbon > Organize > Properties
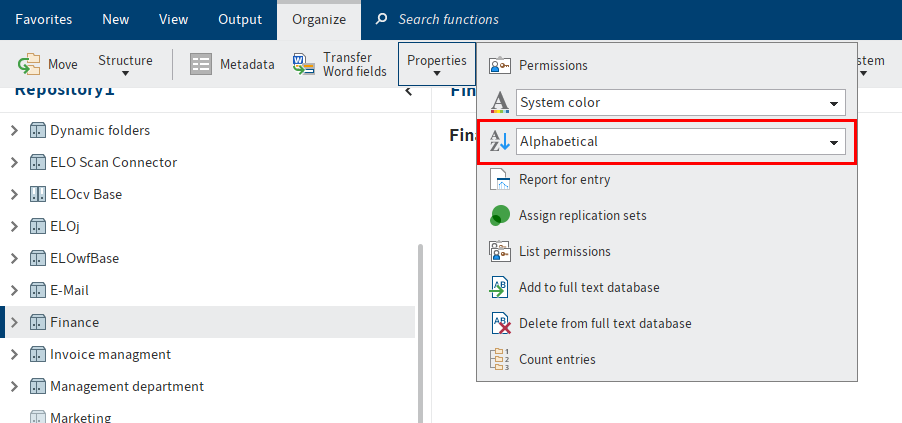
Use this function to change the sort order within a selected folder. You can choose between different sort orders in a drop-down menu:
# Sort manually
If you select the option Manual, you can sort the child entries in the folders later on.
Select a view profile that includes the Content view element.
Click the folder that you want to sort manually.
Optional: If you have not already done so, open the Content view element.
In the Content view element, click the entry (folder or document) that you want to move.
Drag and drop the entry to the selected location.
The sort order is changed.
Information
You will find other options for sorting entries in the list and tile view on the toolbar.
# Report for entry
Available in: Ribbon > Organize > Properties
Use this function to open an overview with information on the currently selected entry. Use the Configure report dialog box to specify which information to include in the overview. For example, you can define which actions will be reported or which period the report should refer to.
Choose from the following options:
Number of entries: Specify the maximum number of entries the report should contain.
Date: Enter the period which you want to create the report for.
User: With the User field, you can search for users and groups. As soon as you start typing, a drop-down menu with possible matches appears. Select the user/group for the report.
Actions: Select the actions you want to be recorded in the report.
Select all: Use this to Select all actions.
Select none: Use this to disable all actions.
OK: Select OK to create the report with the new settings.
The Report dialog box opens.
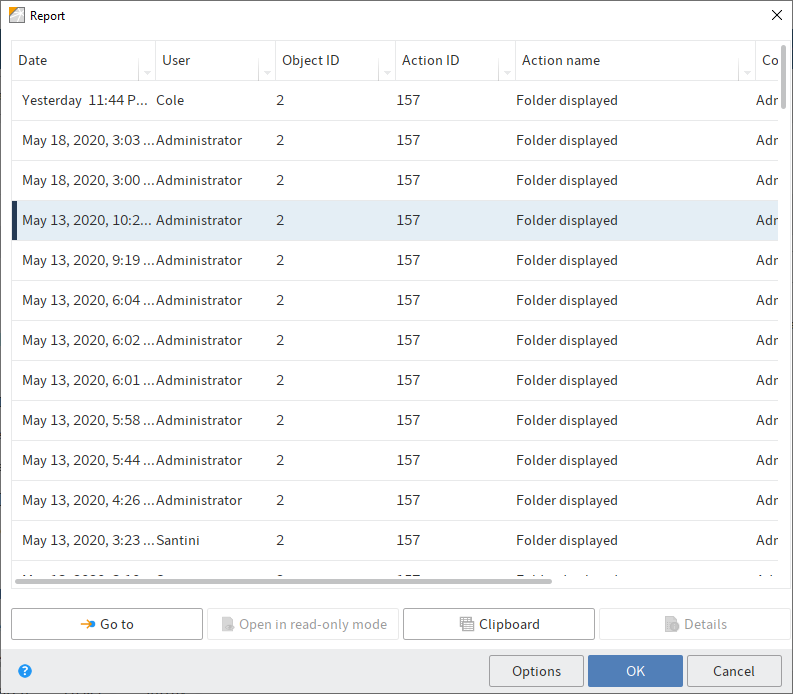
This dialog box contains an overview of the actions that were executed for an entry. The name of the executed action is displayed in the Action name column. You will also see what action was performed by whom and when.
Go to: The Go to button takes you straight to the respective entry.
Open in read-only mode: Select Open in read-only mode to open the respective document in an external application.
Clipboard: Use the Clipboard button to copy a selected area in the Report dialog box to the clipboard. This allows you to save parts of the report in an external document, for example.
Details: Select the Details button to open the Details of dialog box. The Details of dialog box lists the permissions and group membership of the user who has triggered the respective report entry.
Information
The Details of dialog box is only available for report entries with the action name Indexserver: Logon or the action ID 501. This action is only evaluated when you execute a report for the top repository level and the report settings (Open ELO action) have been configured accordingly.
Options: Use the Options button to open the Configure report dialog box. Make the changes for the report in the Configure report dialog box.
# Assign replication sets
Available in: Ribbon > Organize > Properties
The replication set is a characteristic that you assign to individual repositories in order to replicate them in another repository. Each replication set stands for one repository. Replication sets enable you to synchronize data between multiple locations. The replication sets must have already been mapped to the entries using the ELO Replication module.
You will find detailed information in the ELO Replication (opens new window) documentation.
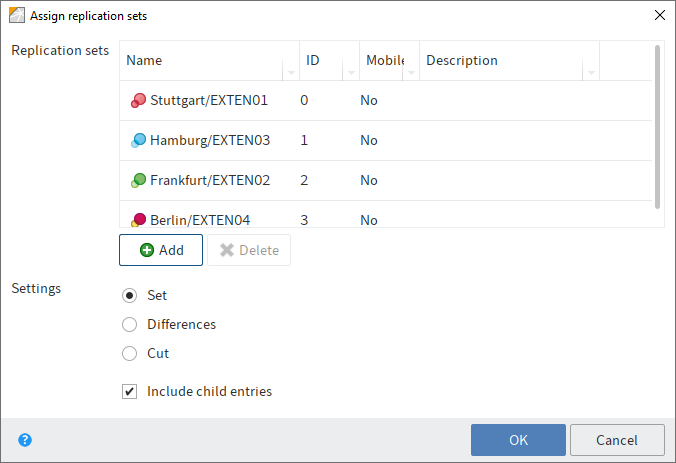
In the Replication sets field, you can see which replication sets have already been mapped to the entry. To add a new replication set, click Add and select a new replication set.
Please note
Replication sets are inherited upward to parent folders in the repository structure. To prevent inheritance, select the Start point for replication option in the Metadata dialog box of the folder you want to replicate.
# List permissions
Available in: Repository work area > Ribbon > Organize > Properties
The List permissions function enables you to view the permissions for each folder in ELO. This function helps administrators to quickly find information on the permission structures in the repository.
Information
The function is only available for folders. You will find information on the permissions of a document on the Permissions tab in the Metadata dialog box.
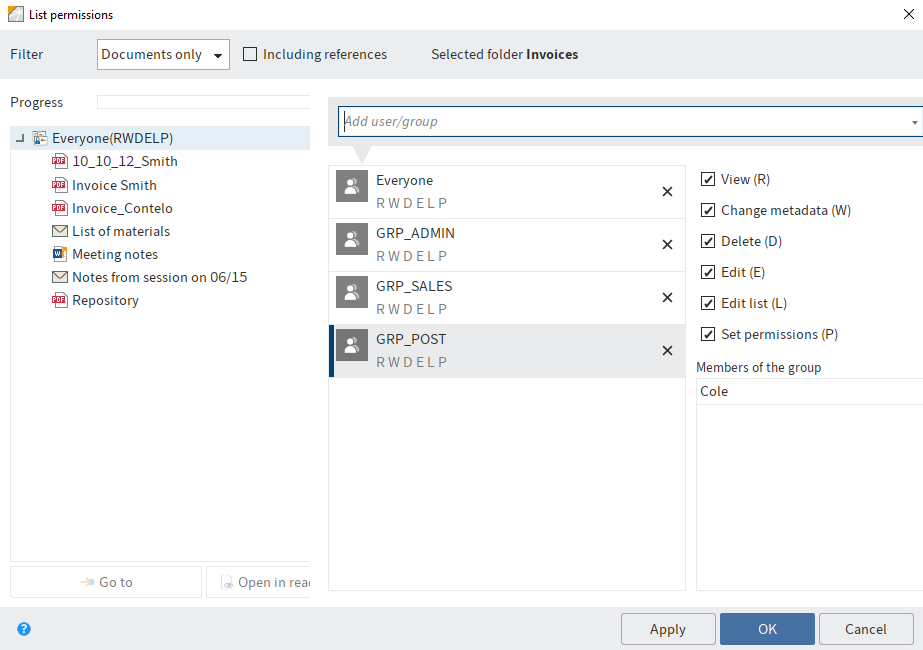
In this dialog box, you see the permissions for a selected folder including its child entries.
Filter: In the drop-down menu, select which child entries (All entries, Folders only or Documents only) you want to view the permissions of.
Including references: Select the option Including references if you also want to list permissions for references.
Selected folder: Shows the folder you selected.
Progress: While the system is searching for permissions for the selection you made, a green bar appears next to Progress to indicate the expected duration of the process.
The column below Progress lists the permission sets found in the selected folder. If you expand one of the sets (triangle symbol), you can see which child entries use this permissions set.
Go to: The Go to button takes you straight to the respective entry in ELO.
Open in read-only mode: Select Open in read-only mode to open the respective document in an external application.
# Add user/group
Search for the desired user or group in the Add user/group field. Suggestions will appear as you type.
Click the corresponding suggestion to select a user or a group.
Alternative: If you select the triangle to the right of the Add user/group field, this will open a drop-down menu. This menu contains a list of the users and groups you selected recently.
In the middle column, you can see which users or groups have already been assigned permissions for the selected entry and which permission settings apply.
# Edit permissions settings
To edit the permissions settings, select an entry in the middle column and select or clear individual permissions.
The following options are available:
| Access right | Description |
|---|---|
| View (R) | View entries and metadata, add annotations |
| Change metadata (W) | |
| Delete (D) | Mark entries as deleted. Only users with administrative rights can delete entries permanently. |
| Edit (E) |
|
| Edit list (L) | Folders: Change folder contents, e.g. create, move, copy, or remove documents in the folder, insert or delete reference. |
| Set permissions (P) | Change permissions |
Information
Options that are not applicable are shown in italics and enclosed in pointy brackets.
Personal (orange user icon): Use the Personal button to assign yourself sole access to the respective entry. All other permissions will be revoked.
AND group: AND groups are useful if you only want to assign permissions to the users in a group that are also members of another group. To create an AND group, select two groups in the middle column and select AND group.
# Members of the group
If you select a group, a list of members appears.
Double-click the corresponding user in the Members of the group column to select a member of a group.
# Remove permissions
To remove all permissions from a user or group, select the X icon next to the selected user or group.
Apply: Select Apply to save the changes. The dialog box remains open.
OK: Select OK to save changes and close the dialog box.
Cancel: Select Cancel to close the dialog box without saving the changes.
# Add to full text database
Available in: Ribbon > Organize > Properties
Use this function to add the contents of a document to the full text database. The document must contain full text information. The full text information is written to the full text database and will be used when searching for documents.

You can view the document content in full text mode in the viewer pane. This enables you to search the text for specific terms.
# Delete from full text database
Available in: Repository work area > Ribbon > Organize > Properties
Use this function to remove a document including its text contents from the full text database. This means that you cannot find the document with the full text search.
Please note
This function is also available even if the selected document does not contain any full text information.
# Count entries
Available in: Ribbon > Organize > Properties
Use this function to count entries in the currently selected folder. You can also see the amount of memory that the entries in the selected folder are using.
You can specify which entries you want to count. In addition, you can save the result as a PDF.
# Workflows for this entry
Use this function to open an overview with all workflows that exist for this entry. You can adjust the settings for viewing workflows.
Information
Hold down the left mouse button to adjust the size of the viewing panes. Drag the splitter bar at the right-hand corner of each window.
The workflows are listed as a table on the left-hand side. The selected workflow is shown as a diagram on the right-hand side. The status of the respective node is indicated by the colors in the diagram.
- Green: Node completed successfully
- Blue: Current node
- Red: Escalated node
- Gray: Future node
# Status
Select which workflows you want to view.
Information
You will only see workflows that you have permissions for.
Choose from the following options:
- Active: If this option is selected, you will only see active workflows.
- Completed: If this option is selected, you will only see workflows that are completed.
- All workflows: If this is selected, all workflows will be displayed.
- Passed deadlines only: If this option is selected, you will only see escalated workflows. This option can be selected in combination with Active, Completed, or All workflows.
- Load fields: If this option is enabled, the available metadata is shown in the drop-down menu under the columns with the title Index. This option can be selected in combination with Active, Completed, or All workflows. This option can also be combined with the Passed deadlines only option.
Please note
The Load fields option can increase loading times.
# User
To filter the view, search for a user or group in the All users and groups search field. Suggestions will appear as you type. Select the desired user or group.
To cancel the selection, click the X icon next to the selected user or group.
Once you have selected a user/group, you can narrow down the list by selecting additional filter options:
- Owner: If this option is enabled, you only see workflows that the selected user/group is the owner of. The owner is the user who started the workflow.
- Any node: If this option is enabled, you only see workflows in which the selected user/group is entered as the editor of at least one node.
- Active node: If this option is enabled, you only see workflows in which the selected user/group is entered as the editor of the node.
# Start date
from/to: Define how long you want the workflow to show up in the overview. The start date of the workflow must be within this period.
# Display mode
Choose from the following options:
- Diagram view: If you select this option, the drop-down menu and the diagram for the selected workflow are displayed.
- List view: If you select this option, the drop-down menu and a detailed overview of the selected workflow are displayed.
- Form view: Select this option to view the drop-down menu and the workflow form for the selected workflow. The workflow form must be specified in the start node.
- No details: If this option is enabled, only the drop-down menu is displayed.
Apply: Select Apply to save the changes. The dialog box remains open.
OK: Select OK to save changes and close the dialog box.
Cancel: Select Cancel to close the dialog box without saving the changes.
You will find more information on the topic of workflows in the ELO workflow (opens new window) documentation.
# Reminders for entry
Available in: Ribbon > Organize > Overviews
Use the Reminders for entry function to open an overview of the reminders that have been created for this entry.
You will find more information on creating reminders here: Create reminder.
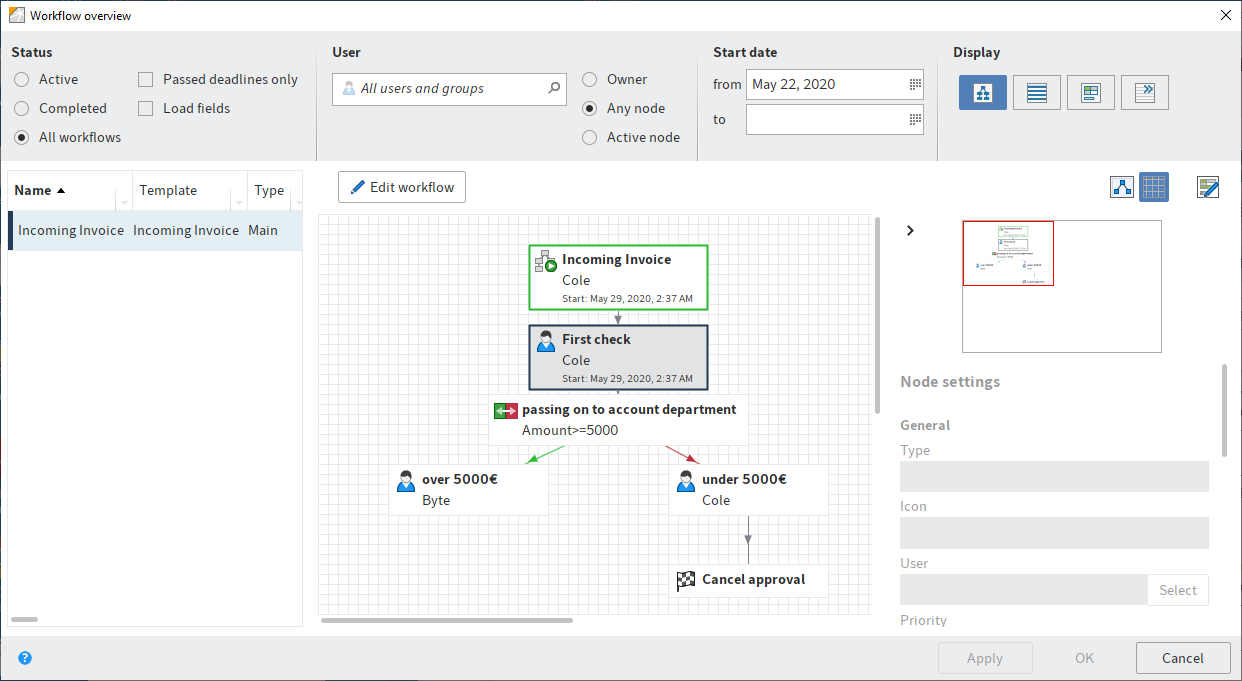
# Workflow overview
Available in: Ribbon > Organize > Overviews
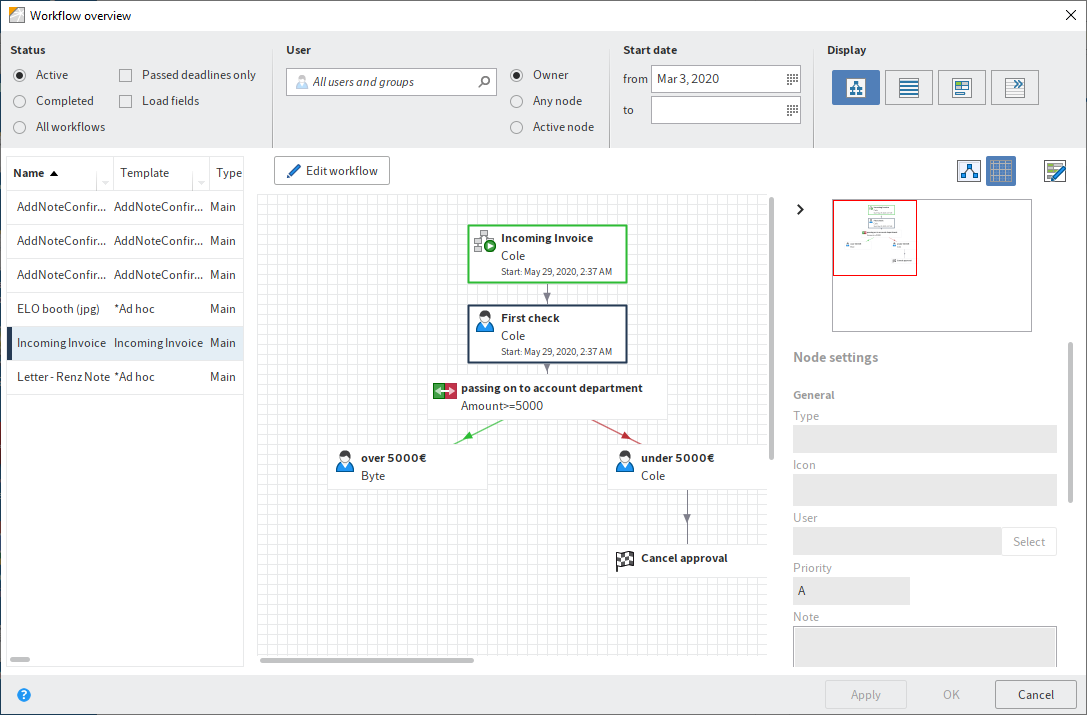
This dialog box contains an overview of all existing workflows. To view the details of a workflow, select the corresponding workflow from the list on the left.
Information
Hold down the left mouse button to adjust the size of the viewing panes. Drag the splitter bar at the right-hand corner of each window.
The workflows are listed as a table on the left-hand side. The selected workflow is shown as a diagram on the right-hand side. The status of the respective node is indicated by the colors in the diagram.
- Green: Node completed successfully
- Blue: Current node
- Red: Escalated node
- Gray: Future node
# Status
Select which workflows you want to view.
Information
You will only see workflows that you have permissions for.
Choose from the following options:
- Active: If this option is selected, you will only see active workflows.
- Completed: If this option is selected, you will only see workflows that are completed.
- All workflows: If this is selected, all workflows will be displayed.
- Passed deadlines only: If this option is selected, you will only see escalated workflows. This option can be selected in combination with Active, Completed, or All workflows.
- Load fields: If this option is enabled, the available metadata is shown in the drop-down menu under the columns with the title Index. This option can be selected in combination with Active, Completed, or All workflows. This option can also be combined with the Passed deadlines only option.
Please note
The Load fields option can increase loading times.
# User
To filter the view, search for a user or group in the All users and groups search field. Suggestions will appear as you type. Select the desired user or group.
To cancel the selection, click the X icon next to the selected user or group.
Once you have selected a user/group, you can narrow down the list by selecting additional filter options:
- Owner: If this option is enabled, you only see workflows that the selected user/group is the owner of. The owner is the user who started the workflow.
- Any node: If this option is enabled, you only see workflows in which the selected user/group is entered as the editor of at least one node.
- Active node: If this option is enabled, you only see workflows in which the selected user/group is entered as the editor of the node.
# Start date (from/to)
Define how long you want the workflow to show up in the overview. The start date of the workflow must be within this period.
# Display mode
Choose an option for displaying the workflows.
Choose from the following options:
- Diagram view: If you select this option, the drop-down menu and the diagram for the selected workflow are displayed.
- List view: If you select this option, the drop-down menu and a detailed overview of the selected workflow are displayed.
- Form view: Select this option to view the drop-down menu and the workflow form for the selected workflow. The workflow form must be specified in the start node.
- No details: If this option is enabled, only the drop-down menu is displayed.
# Context menu
Some functions can only be called from the context menu. Right-click the list to open the context menu.
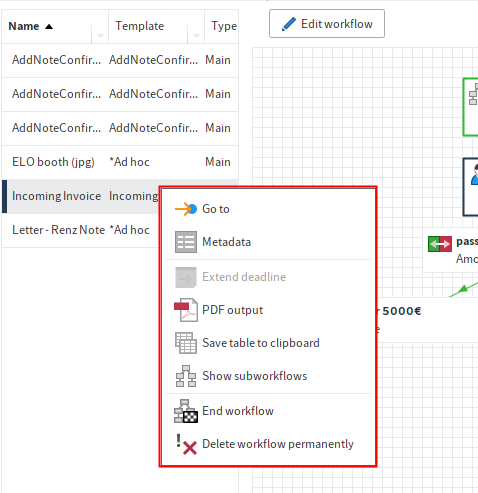
Go to: The Go to button takes you straight to the respective entry in the Repository work area.
Metadata: The Metadata menu item opens the metadata of the respective entry.
Extend deadline: You can edit the workflow deadline with the Extend deadline menu item.
PDF output: Select the PDF output menu item to save the workflow as a PDF outside of ELO.
Save table to clipboard: If you click the Save table to clipboard menu item, the data for the selected workflow is copied to your Windows Clipboard. From here, you can transfer the data to an external program.
Show subworkflows: The Show subworkflows menu item opens a dialog box that shows you the subworkflows associated with the selected workflow.
End workflow: You can stop the selected workflow with the End workflow menu item. If you do so, you can no longer edit the workflow.
Delete workflow permanently: Click Delete workflow permanently to remove the selected workflow from the system. You will be asked to confirm that you really want to delete the workflow.
Important
Permanently deleted workflows cannot be restored.
# General buttons
Apply: Select Apply to save the changes. The dialog box remains open.
OK: Select OK to save changes and close the dialog box.
Cancel: Select Cancel to close the dialog box without saving the changes.
You will find more information on the topic of workflows in the ELO workflow (opens new window) documentation.
# Reminders overview
Available in: Ribbon > Organize > Overviews
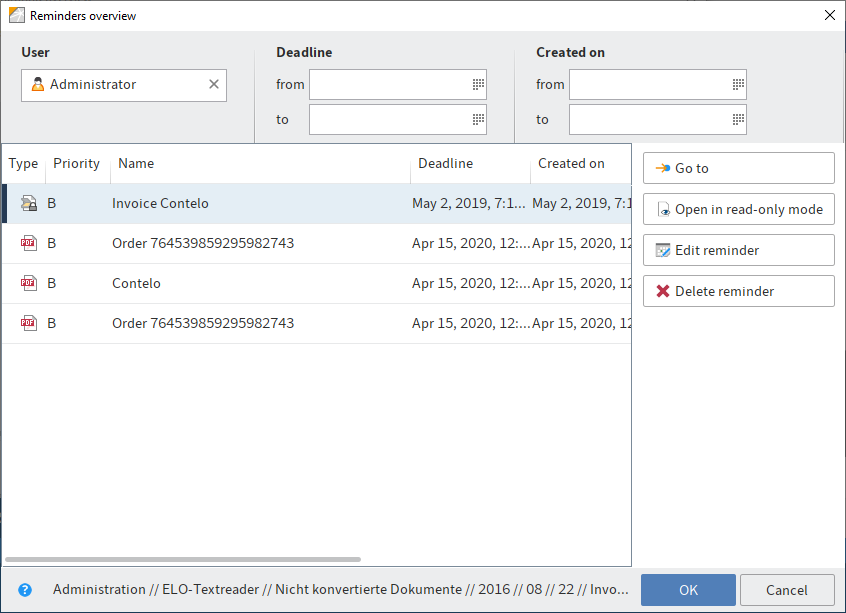
This dialog box contains an overview of your reminders. You can view and edit the reminders here. You can learn how to create reminders here: Create reminder.
# Deadline
Under Deadline, you can filter the overview by the date of the reminder.
from: Use the from field to set the start date of the period that should apply for the filter.
to: Set the end date of the period that should apply for the filter in the to field.
# Created on
Under Created on, you can filter the overview by the date the reminder was created on.
from: Use the from field to set the start date of the period that should apply for the filter.
to: Set the end date of the period that should apply for the filter in the to field.
# Functions
Once you have selected a reminder, the following functions are available:
Go to: The Go to button takes you straight to the entry in the Repository work area that is linked to the reminder.
Open in read-only mode: Select Open in read-only mode to open the respective document in an external application.
Edit reminder: Select the Edit reminder button to change the reminder.
Delete reminder: Select Delete reminder to mark the selected reminder for deletion. The reminder will be marked red. As soon as you click OK and the dialog box closes, all reminders that have been marked for deletion will be removed. If you click Cancel or click Delete reminder again, the delete action will be reversed.
# Monitoring overview
Available in: Ribbon > Organize > Overviews
This function opens an overview of the entries you are currently monitoring. You can show the filing location, open the entries in read-only mode, edit the monitoring settings, or end monitoring actions.
You see when monitoring began on an entry and which priority level it has. If there are changes to an entry that is being monitored, you will receive a notification in your Tasks work area.
To start monitoring on an entry, use the Monitor changes function (available in: Ribbon > New > Create task).
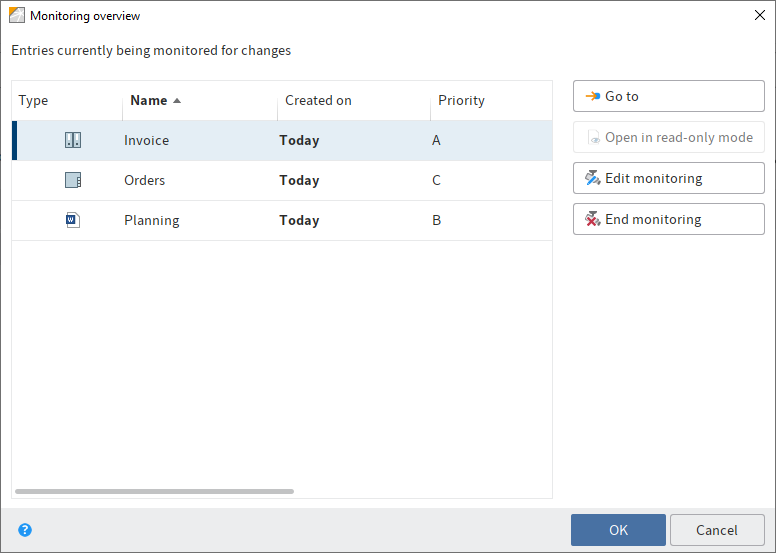
The following functions are available in the Monitoring overview dialog box:
Go to: Opens the filing location of the selected entry.
Open in read-only mode: Select Open in read-only mode to open the respective document in an external application.
Edit monitoring: This opens the Edit monitoring dialog box. In this dialog box, you can change the name, priority level, and notification settings of a monitoring action that appears in your tasks area.
End monitoring: Select End monitoring to end monitoring of the current entry. The entry being monitored is initially marked red. When you select OK, the dialog box closes and the entry is no longer monitored. If you close the dialog box with the Cancel button, the delete action is reversed.
# Delete
Keyboard shortcut: CTRL + DEL
This function enables you to delete
entries in the Repository work area
Warning
The entries (folders or documents) are not deleted permanently. They are hidden and marked for deletion. This tells the administrator that the documents need to be removed from ELO permanently. To delete entries permanently, use the functions Show deleted entries and Delete permanently. They can be restored until the point at which they are permanently deleted.
workflows, monitoring actions, and reminders in the Tasks work area
Only the task is deleted. The corresponding entry remains in the repository.
Please note
Documents in the Intray that have not yet been filed to ELO are permanently deleted with the Delete function.
# Outlook
The function Delete expired documents enables you to delete entries whose retention period has passed. You can enter the retention period in the metadata when you file the entry.
# Show deleted entries
Available in: Ribbon > Organize > Delete
Use this function to show deleted entries. Deleted entries are entries that have been removed with the Delete function and that have a deletion marker. Entries with a deletion marker are hidden in ELO.
If you show deleted entries, [deleted] is displayed after the name of the deleted entry. Use the Restore function to revert the deletion process and remove the deletion marker. Use the Delete permanently function to permanently erase deleted entries.

# Restore
Available in: Ribbon > Organize > Delete
Use this function to remove the deletion marker from an entry in ELO. This allows you to undo the deletion of an entry. This option is only available if the entry has not been deleted permanently.
To restore deleted entries, you must first show the entries again in ELO. Use the Show deleted entries function to do this. The entries are marked with [deleted] before the short name. Select an entry marked with [deleted] and select Restore. The deletion marker is removed.
If you restore a deleted folder, you can use the Restore entries deleted on or after option to define a date limit from which the documents included and deleted in the folder are restored.
# Undo
Available in: Ribbon > Organize > Delete
Use this function to undo the last editing step. This function is only available for move, referencing, and delete actions, as well as for editing the metadata in the Repository and Intray work areas.
# Remove lock
Available in: Ribbon > Organize > Delete
If a user has checked out an entry, it is locked and cannot be edited by other users. Use this function to remove the lock from a document or folder. Normal users can only remove their own locks. Administrators can also remove locks from documents set by other users.
Important
Removing a lock may lead to loss of data or changes being overwritten if the entry or metadata is being edited by another user. To unlock a document for all users, you should use the Cancel editing function in the Check in dialog box.
For more information on editing an entry, refer to the chapter Edit entry.
# Workflow designer
Available in: Ribbon > Organize > System
Use this function to open the Workflow designer. The Workflow designer enables you to create and edit the templates for your workflows.
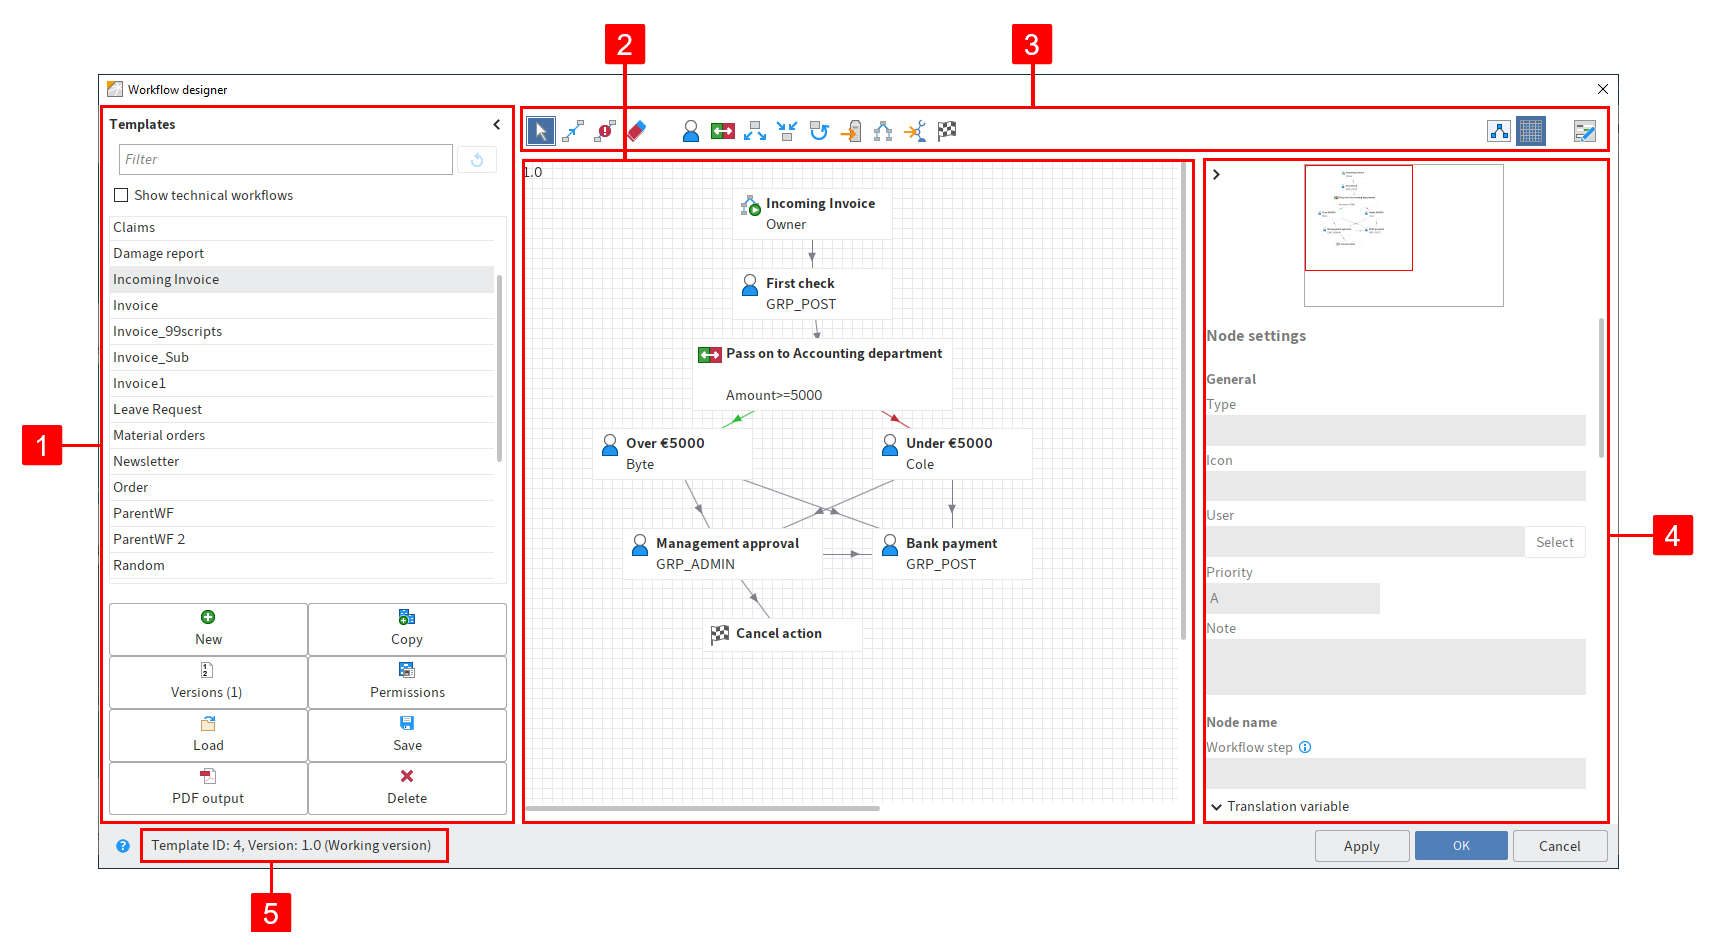
Select a template to open the template in the graphical view.
Information
Some tools are only available when you are in editing mode. Select Edit workflow template to enable editing mode.
The workflow designer consists of the following areas:
1 Templates: All available workflow templates are listed in the Templates column on the left-hand side. Click an entry to open the graphical interface. The workflow is displayed as a diagram in the middle of the dialog.
To show technical workflows, check the corresponding check box.
Information
You can show or hide the Templates column using the double arrow icon.
In addition, the column contains the following buttons for managing workflow templates:
- New: Create a new workflow template.
- Copy: Copy a workflow template selected in the Templates list. This applies the template settings.
- Versions: This is where you manage the versions of a workflow template.
- Permissions: This is where you make the permission settings for the workflow template.
- Load: Load an already created and saved workflow template.
- Save: Save the workflow template externally.
- PDF output: Create a PDF overview of the workflow template.
- Delete: Delete the selected workflow template.
2 Workspace: In the workspace, the workflow templates are displayed in the graphic view. You can see the steps (nodes) and elements that a workflow consists of and how they are connected.
3 Toolbar: This is where you find the tools for creating and editing a workflow template.
4 Node editor: This area contains a preview window and the Node settings area. Define the settings for the individual workflow nodes in the Node settings area.
5 Status bar: This is where you find the ID of the workflow template, the current version, and the node ID of the currently selected workflow node.
Apply: Select Apply to save the changes. The dialog box remains open.
You will find more information on the topic of workflows in the ELO workflow (opens new window) documentation.
# Form designer
Available in: Ribbon > Organize > System
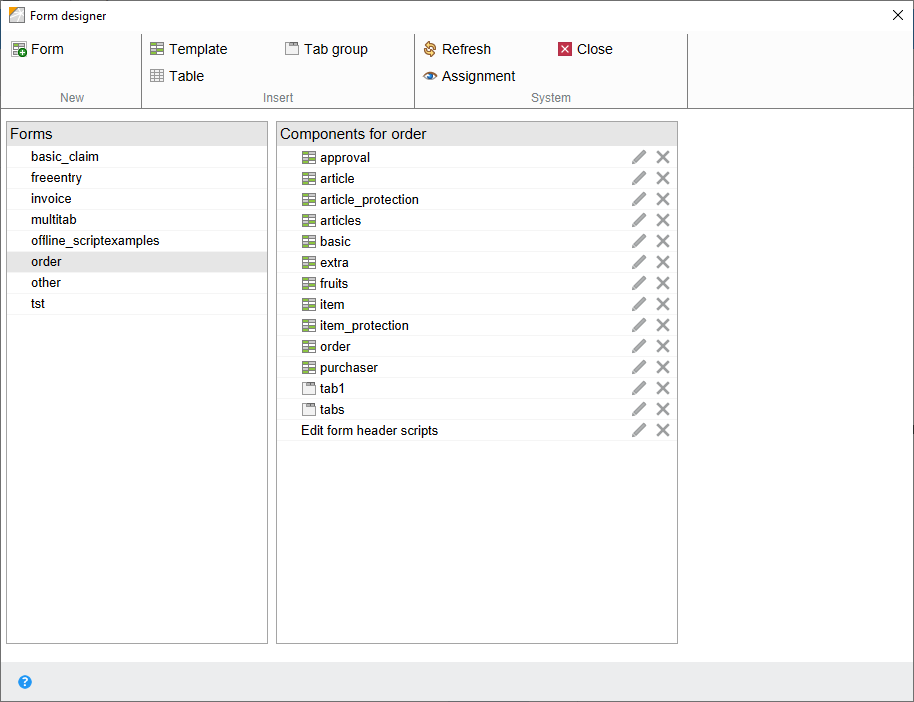
Use the Form designer dialog box to design and manage ELO forms used in the form-based workflow. Different content and buttons appear depending on the selected function. The basic functions are explained in the following.
# Toolbar
The toolbar is located in the top part of the dialog box. The tools differ depending on the selected function.
Form: Select Form to create a new form. A form can contain multiple templates.
Template: Use the Template button to create a new template for a form. Templates are the building blocks for forms. A form can consist of multiple templates and/or tables.
Tab group: Use the Tab group button to create a new tab group. Forms can be split into different tabs in tab groups. This makes it easier to structure large forms.
Table: Use the Table button to create a new table. Tables are a special type of template. With table templates, you have the option to record data in table form and save it to the database using special map fields.
Refresh: Refresh the form data with the Refresh button. This is necessary, for example, if you have loaded an image that you want to use in the form.
Close: Close the form designer with this button.
Assignment: Selecting the Assignment button opens a submenu. In this submenu, you can assign forms to individual metadata forms. These forms are displayed instead of the metadata preview if you select the corresponding option. You can edit the metadata via the form. If a form has not been assigned, ELO uses a default form.
# Forms
You can find a list with all existing forms in the Forms area.
# Components for
You can find all existing components of the selected form in the Components for area. Components are templates, tables, tab groups, and user scripts.
You will find more information on the topic of workflows in the ELO workflow (opens new window) documentation.
# Translation table
Available in: Ribbon > Organize > System
Use this function to open the Translation table dialog box. The dialog box lists all terms used in ELO in a table.
You can enter a translation for each term in the displayed languages. Click the corresponding line.
If you run the client in another language, metadata fields are displayed in the corresponding language that a translation was entered in the table for.
The basic settings provide columns for the system language (the language selected during the installation) as well as English (en) and French (fr).
You can add languages via the context menu (right-click in column 'undefined') > Add language. You can change the language via the context menu (right-click in column with language) > Edit language.
# Move document files
Available in: Ribbon > Organize > System
Use the Move document files function to move files, file versions, attachments, and/or attachment versions to another medium (i. e. to a different document path). The repository structure remains the same.
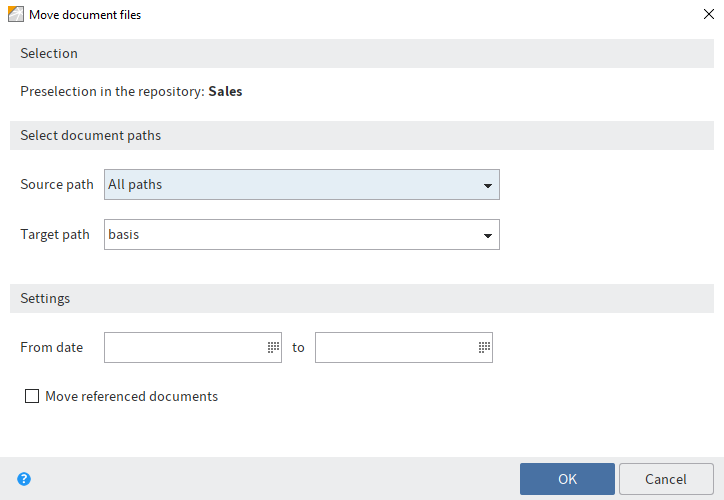
# Selection
Preselection in the repository: Indicates which folder was selected in the Repository work area.
# Select document paths
Source path: Select the source path if you only want to move files from a specific path.
Target path: Define the target path. If the desired target path does not exist, it needs to be created in the ELO Administration Console.
# Settings
From date: Enter the date on which you want to start moving files.
to: Enter the date on which you want to end moving files.
Move referenced documents as well: If this option is enabled, documents for which references exist in ELO are also moved to another path.
OK: To move the document files, select OK.
# Delete expired documents
Available in: Ribbon > Organize > System
Use this function to delete entries whose retention period has passed.
Warning
The entries (folders or documents) are not deleted permanently. They are hidden and marked for deletion. This tells the administrator that the documents need to be removed from ELO permanently. To delete entries permanently, use the functions Show deleted entries and Delete permanently. They can be restored until the point at which they are permanently deleted.
Information
You define the retention period in the metadata on the Options tab. Your administrator can set a retention period in the ELO Administration Console (Metadata forms and fields > Entry options > Lifetime).
Documents only: If you select this option, only documents whose retention period has passed are marked for deletion.
Documents and folders: If you select this option, documents and folders whose retention period has passed are marked for deletion.
OK: After clicking the OK button, the deletion markers are set according to the selected options.
# Delete permanently
Available in: Ribbon > Organize > System
Important
This function permanently deletes entries with a deletion marker from ELO. Permanently removed entries cannot be restored. You should be aware that even a differentiated backup concept only offers a limited option for restoring deleted entries.
In the Delete permanently dialog box, you can specify which entries with a deletion marker you want to permanently remove from ELO.
Remove deleted entries: All deleted documents and folders are removed from ELO.
Remove deleted document versions and versions of the attachment: All deleted document versions and deleted attachment versions are permanently removed from ELO.
Deletion date until: Enter a date here. All entries that were deleted before the specified date are permanently removed from ELO.