# 'Visitor' tab
The functions on the Visitor tab apply to a visitor or visitor group. They are only enabled when you select a visitor folder in the repository.
You will learn how to check visitors in in the chapter 'New' tab.
# Create visitor badge
Information
Before the appointment or at the beginning of the appointment, you can create a visitor badge. If you want to add a picture to the visitor badge, use the Add visitor picture function.
Requirements
The visitor must be registered. They cannot already be checked in.
Method
- In the dashboard or repository, select the folder of the visitor you want to create a visitor badge for.
If you want to create visitor badges for a group, select the group folder. You can also create a visitor badge for an individual member of a group by selecting this member only.
- On the ribbon, go to the Visitor tab and click Create visitor badge.
Result
The visitor badges for a group are filed to the group folder. The visitor badge for an individual visitor is filed to their folder.
Outlook
Visitor badges can be printed using commercial badge printers with Windows printer drivers.
In the ELO Web Client, you can use the browser print function.
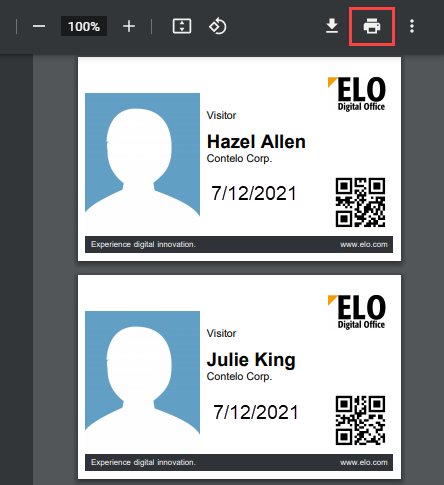
Fig.: 'Print' button
You can also press the Print button.
All visitor badges include a barcode or a QR code. You can use this code to check visitors in or out using a scanner device. Depending on the administrative settings, visitors can also complete these tasks themselves. This is especially practical for appointments spanning multiple days.
# Add visitor picture
Information
After registering a visitor, you can upload a picture from the file system, or take a picture with the webcam during check-in.
Method
- In the dashboard or repository, select the file of the visitor whose visitor photo you want to capture.
For groups, you have to use the individual visitor files. Go straight to the file of the person you want to take a picture for, then repeat the entire process for each visitor.
- On the ribbon, go to the Visitor tab and click Add visitor picture.
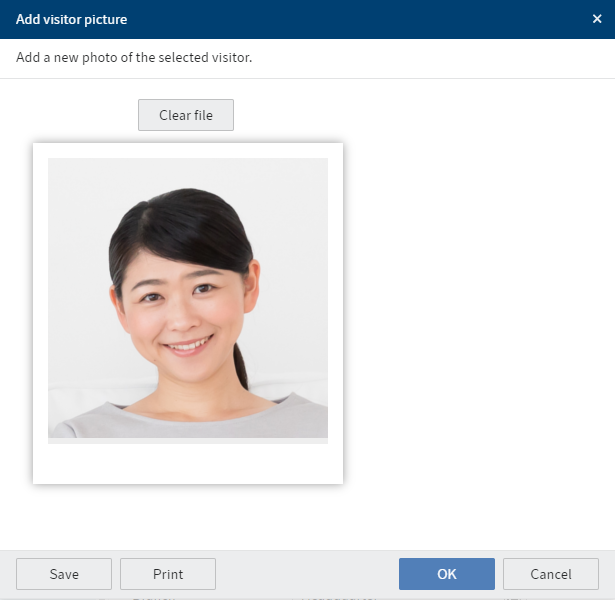
Fig.: 'Add visitor picture' dialog box
In the Add visitor picture dialog box, a live preview appears right in the dialog box if a webcam is connected.
Take a picture/Select a file: You can take a picture of the visitor using a webcam or select a picture from your file system.
- Click OK.
Result
The picture is saved to the visitor's file.
Outlook
The picture is automatically used when creating a visitor badge using the Create visitor badge function.
# Request signature
Information
You can request signatures from visitors. During check-in, visitors can complete a questionnaire and/or provide a signature using a mobile device.
Requirements
A document has been created for signing.
Method
In the dashboard or repository, select the file of the visitor you want to have sign a document. This can be an individual visitor or a member of a group, but not an entire group.
On the ribbon, go to the Visitor tab and click Request signature.
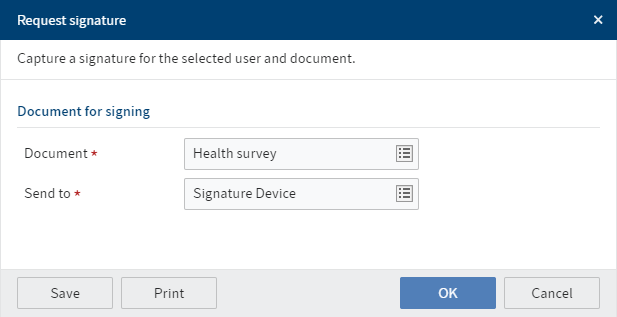
Fig.: 'Request signature' dialog box
- In the Request signature dialog box, select the document you want the visitor to sign.
Send to: The document selected under Document is sent to the user account that you select in this field. The selected user account should be accessed via a mobile device in order to be able to have the document signed.
- Click OK.
Result
The document is sent to the ELO user account that you selected under Send to.
Outlook
The visitor can complete the questionnaire and/or sign the document using a tablet. The signed document is saved to their visitor file.
# Cancel registration
Information
You can cancel registration for pre-registered visitors as long as they haven't been checked in. You can cancel registration for individual visitors, entire groups, or individual group members.
Method
- In the dashboard or repository, select the file of the visitor whose pre-registration you want to cancel.
If you want to cancel an entire group, select the group folder. If you want to cancel a member of a group, select the folder of the group member.
- On the Visitor tab, click Cancel registration.
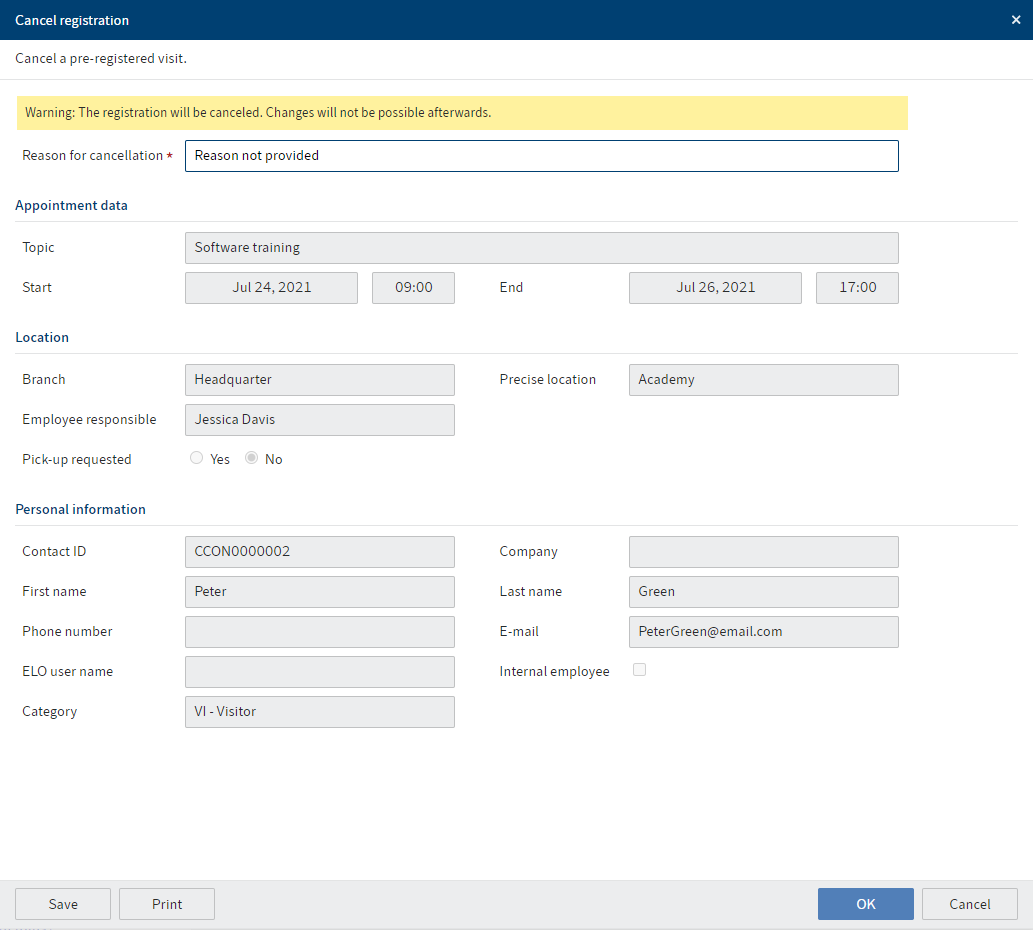
Fig.: 'Cancel registration' dialog box
In the Cancel registration dialog box, enter a reason for cancellation.
Click OK.
Result
The pre-registration is canceled.
# Check in visitor
Information
On the day of the visit, you check the visitor in. You can check in individual visitors, an entire group or company, or individual members of a group.
Alternatives
Register visitor: If you want to check in a visitor who hasn't already been registered, use this function.
Register group: If you want to check in a group that hasn't already been registered, use this function.
Requirements
The visitor has to be registered for the day. If you use the function for a visitor that is not registered for the day, a copy of the visitor file is created for the current day.
Method
- In the dashboard or repository, select the file of the visitor you want to check in.
If you want to check in an entire group, select the group folder. Even if you don't want to check in all group members, select the folder. You can exclude individual group members.
- On the ribbon, go to the Visitor tab and click Check in visitor.
The dialog boxes differ depending on whether you are checking in a visitor or a group. For this reason, they are described separately in the following.
# Check in visitor
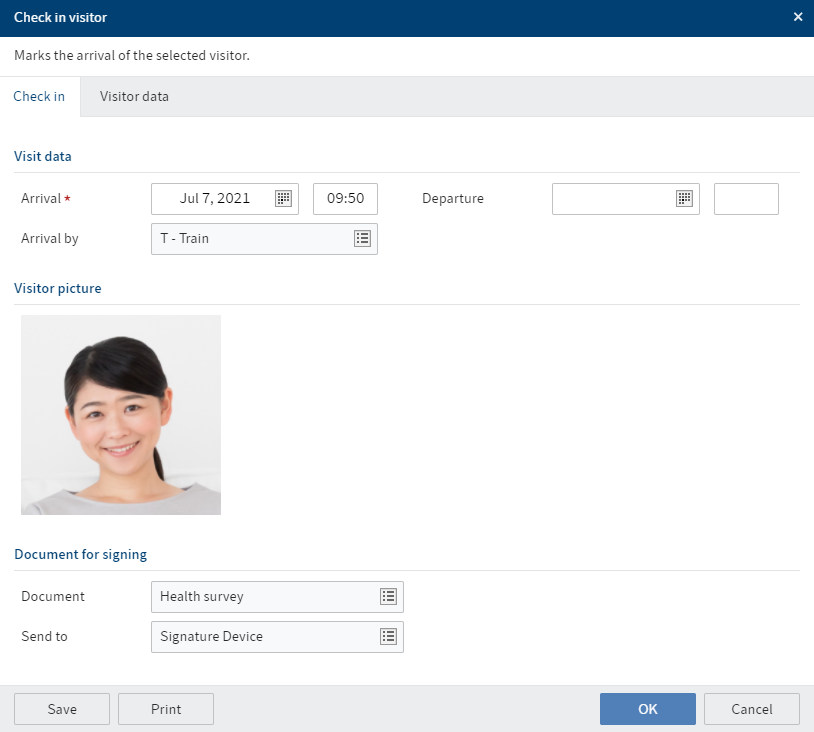
Fig.: 'Check in visitor' dialog box, 'Check in' tab
In the Check in visitor dialog box, the Visitor data tab is already filled with the data from pre-registration.
Information
If visitors appear too far in advance for their pre-registered appointment, the information under Appointment data will not be applied. ELO assumes that this is a separate appointment. Check-in is treated as registration.
The arrival time is automatically completed on the Check in tab.
- Fill out the fields on the Check in tab accordingly.
Take a picture/Select a file: You can take a picture of the visitor using a webcam or select a picture from your file system.
Document: If you want the visitor to sign a document on arrival, select the document here.
Send to: The document selected under Document is sent to the user account that you select in this field. The selected user account should be accessed via a mobile device in order to be able to have the document signed.
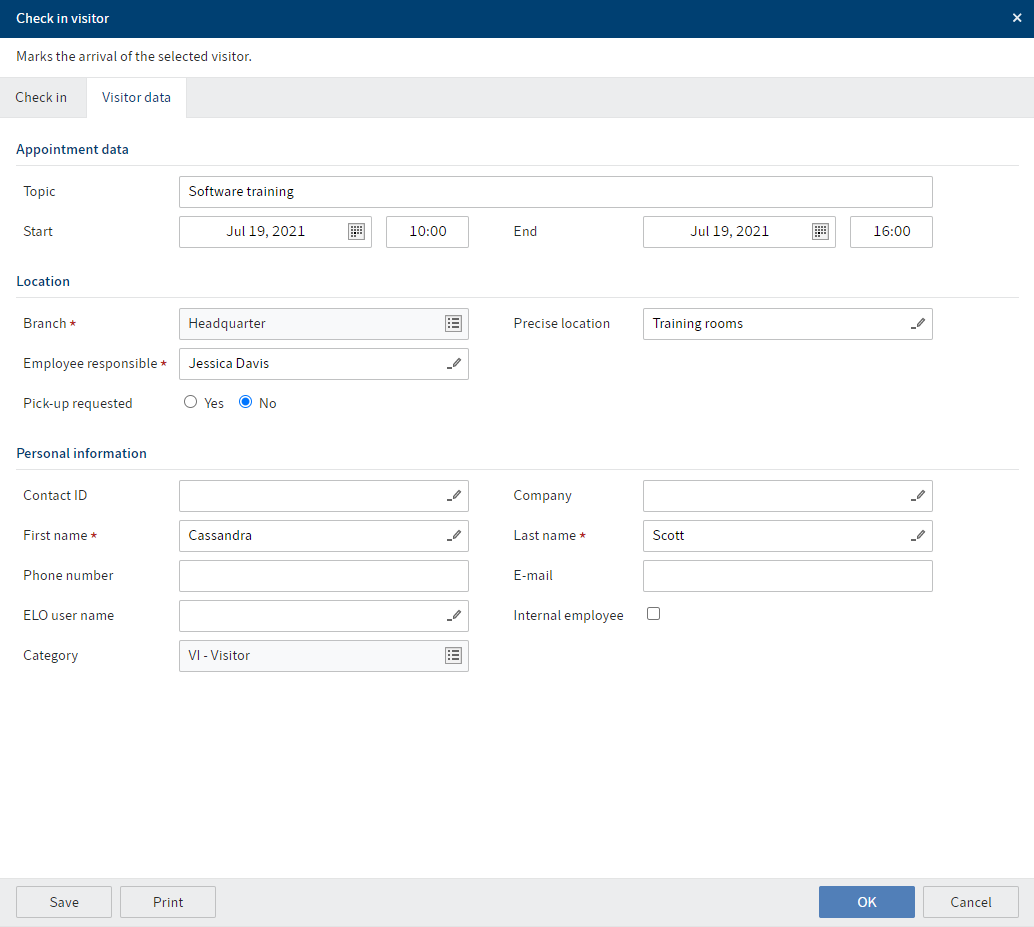
Fig.: 'Check in visitor' dialog box, 'Visitor data' tab
The information on the Visitor data tab was entered during pre-registration. You can edit it if necessary.
- Click OK.
Result
The visitor is checked in.
Outlook
You can create a visitor badge.
If you requested a document to be signed, you will find it in the Tasks area of the selected ELO user account. The visitor can complete the questionnaire and/or sign the document using a tablet. The signed document is saved to their visitor file.
On the day of the appointment, you can check the visitor back out using the Check out visitor function.
# Check in group
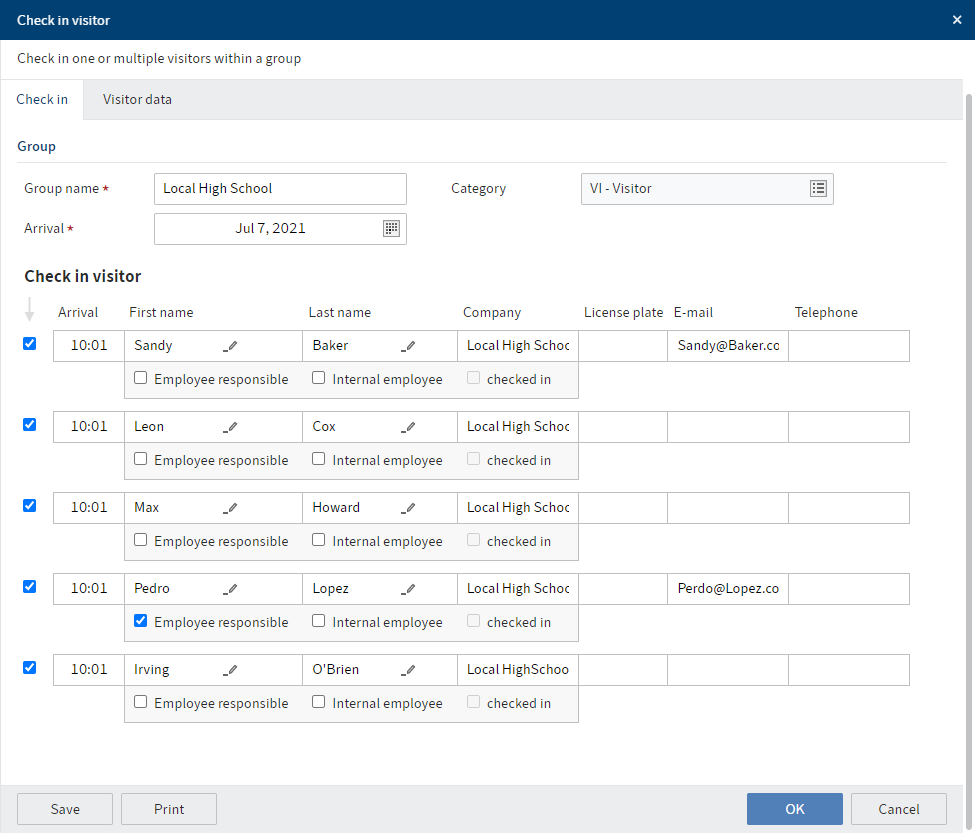
Fig.: 'Check in visitor' dialog box, 'Check in' tab
In the Check in visitor dialog box, the Visitor data tab is already filled with the data from pre-registration. You can edit it if necessary.
Information
If visitors appear too far in advance for their pre-registered appointment, the information under Appointment data will not be applied. ELO assumes that this is a separate appointment. Check-in is treated as registration.
Check in visitor: Before the name of each group member, you will find a check box that is automatically checked. If you don't want to check in a member of the group yet, you can uncheck this box for now. To check them in later, use the Check in visitor function.
Checked in: This option is not active in Visitors. The box is automatically checked as soon as you check the visitors in.
Result
The group members are checked in.
If not all members of the groups are present, the group folder remains grayed out.
Information
The status of the entire group does not change to CI – checked in until all members have been checked in.
Outlook
To check in additional group members, select the group again and then click Check in visitor.
You can create a visitor badge for all members of a group at once.
You can add a visitor picture and request a signature for individual group members.
If individual group members did not show up after all, you can cancel their registration.
At the end of the visit, use the Check out visitor function.
# Check out visitor
Information
At the end of the appointment, you check visitors back out.
Alternative
Visitors with visitor badges can check themselves out using a scanning device.
Method
- In the dashboard or repository, select the folder of the visitor you want to check out.
If you want to check out an entire group, select the group folder. Even if you don't want to check out all group members, select the folder. You can exclude individual group members.
- On the ribbon, go to the Visitor tab and click Check out visitor.
The dialog boxes differ depending on whether you are checking out a visitor or a group. For this reason, they are described separately in the following.
# Check out visitor
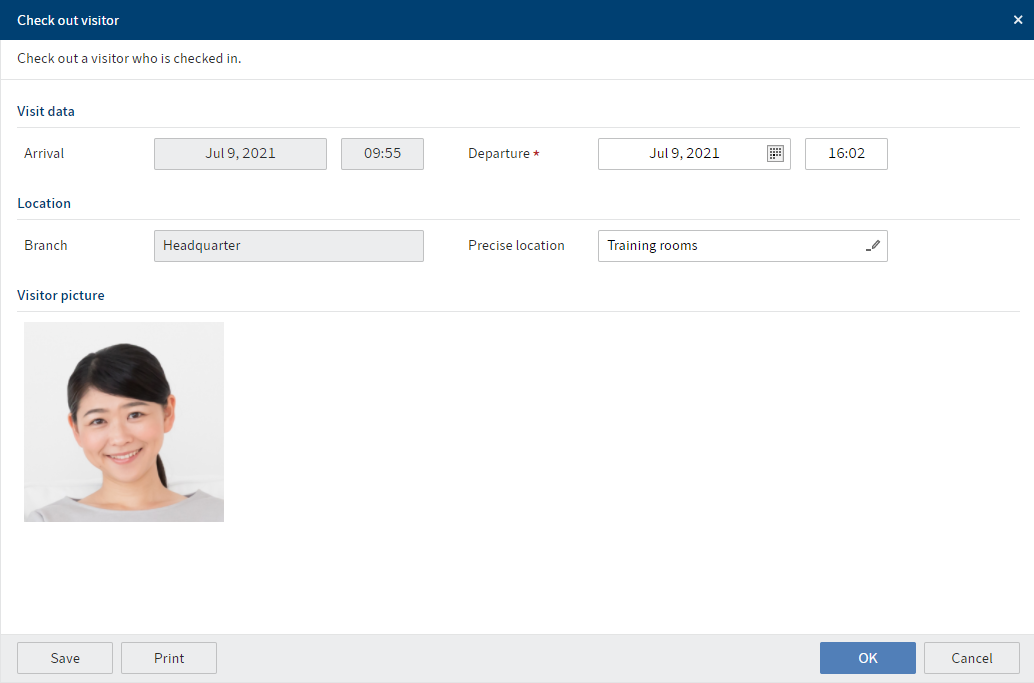
Fig.: 'Check out visitor' dialog box
In the Check out visitor dialog box, the time of departure is entered automatically.
- Click OK.
Result
The visitor is checked out.
Outlook
Visitors who have checked out can be checked back in at a later time.
# Check out group
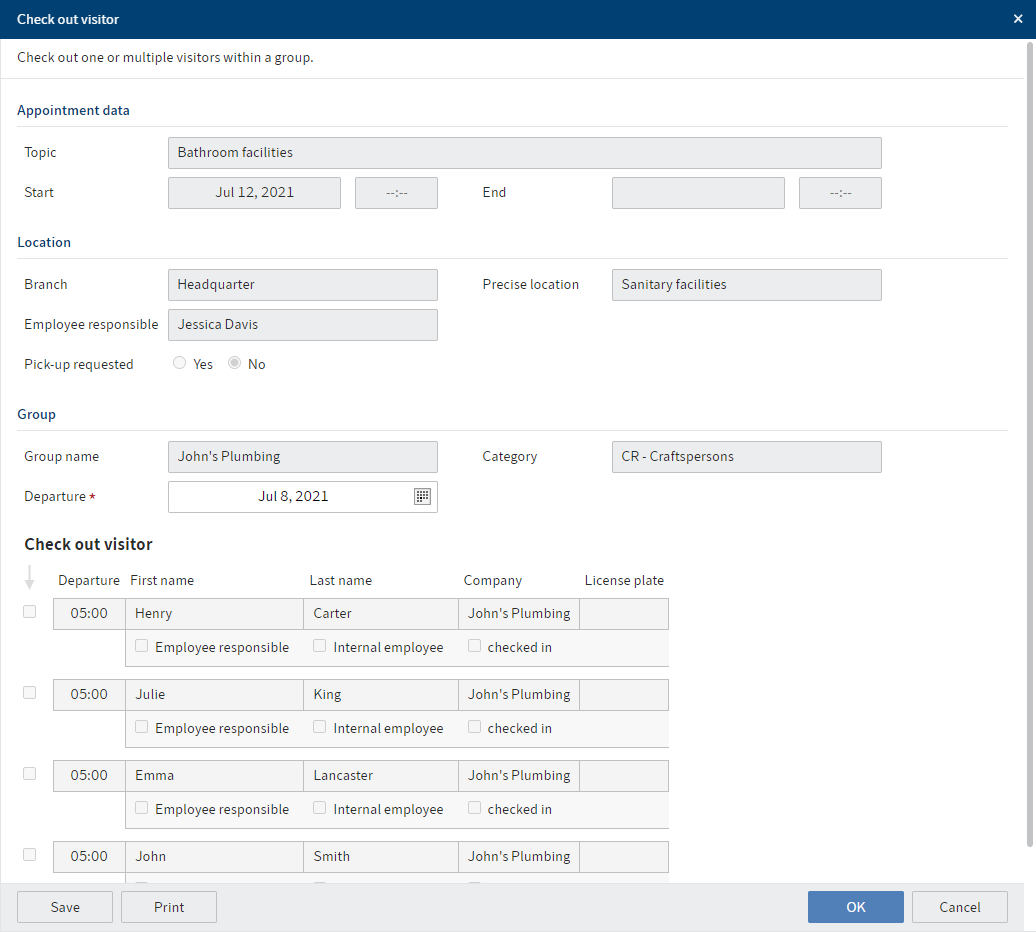
Fig.: 'Check out visitor' dialog box
In the Check out visitor dialog box, the time of departure is entered automatically.
Check out visitor: Before the name of each group member, you will find a check box that is automatically checked. If you don't want to check out a member of the group yet, you can uncheck this box for now. To check them out later, use the Check out visitor function.
- Click OK.
Result
The group is checked out.
Information
The group is not checked out until all members of the group have been checked out. Before this, only individual members of the group are checked out. If the group does not check out together, repeat this process until the entire group has been checked out.
Outlook
Visitors who have checked out can be checked back in at a later time.
# Edit pre-registration
Information
After registration and before check-in, you can edit the visitor data via the Edit registration function.
Alternative
You can also edit the data via the form in the group or visitor folder.
Method
- In the dashboard or repository, select the folder of the visitor whose pre-registration you want to edit.
If you want to edit an entire group, select the group folder. If you want to edit a member of a group, select the folder of the group member.
- On the ribbon, go to the Visitor tab and click Edit registration.
In the Edit registration dialog box, you can edit all fields.
- Click Save changes.
Result
The changes are applied.
Outlook
You can edit a pre-registration as many times as you'd like until the visitor has been checked in.
# Deactivate long-term badge
Information
You can deactivate long-term badges you have access to. This is recommended if the visitor badge has been lost, for example.
Method
- In the dashboard or repository, select the folder of the long-term badge you want to deactivate.
Alternative: Select any visitor folder.
- On the ribbon, go to the Visitor tab and click Deactivate long-term badge.
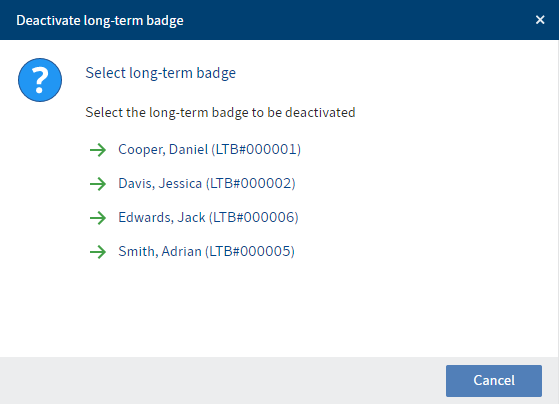
Fig.: 'Select long-term badge' dialog box
Optional: If you haven't selected the relevant long-term badge, select it in the Select long-term badge dialog box.
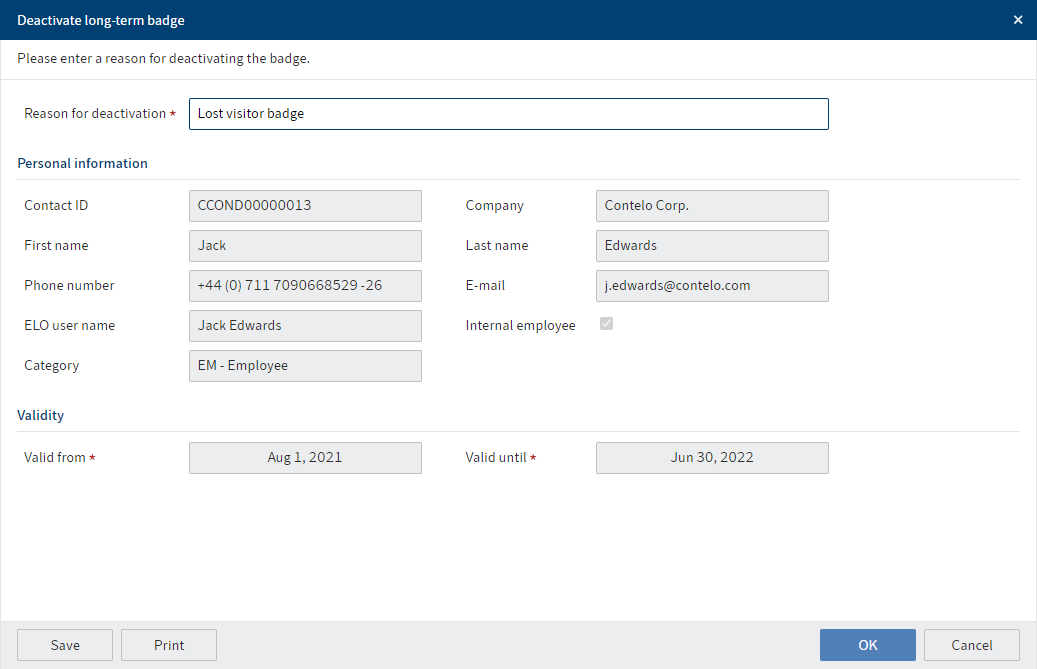
Fig.: 'Deactivate long-term badge' dialog box
In the Deactivate long-term badge dialog box, enter a reason for deactivating the badge.
Click OK.
Result
The long-term badge is deactivated. If the bearer of the long-term badge attempts to check in using the Self check-in function or at the front desk, they will get an error message indicating that check-in is not possible.
Outlook
It is not enough to create a new badge using the Create visitor badge function after deactivation, as this badge would have the same code as the one you just deactivated. Use the New long-term badge function instead.