# 'New' tab
On the New tab, you will find all the functions you can use to pre-register or check in visitors on the spot in the Visitor group.
You can also create Long-term badges and Visitor lists.
You will learn how to proceed after creating a visitor in the chapter 'Visitor' tab.
# Pre-register visitor
Information
You want to register a visitor for an appointment in the future.
Alternative
Register visitor: If the appointment will take place right away, use this function.
Method
- On the ribbon, go to the New tab and click Visitor > Pre-register visitor.
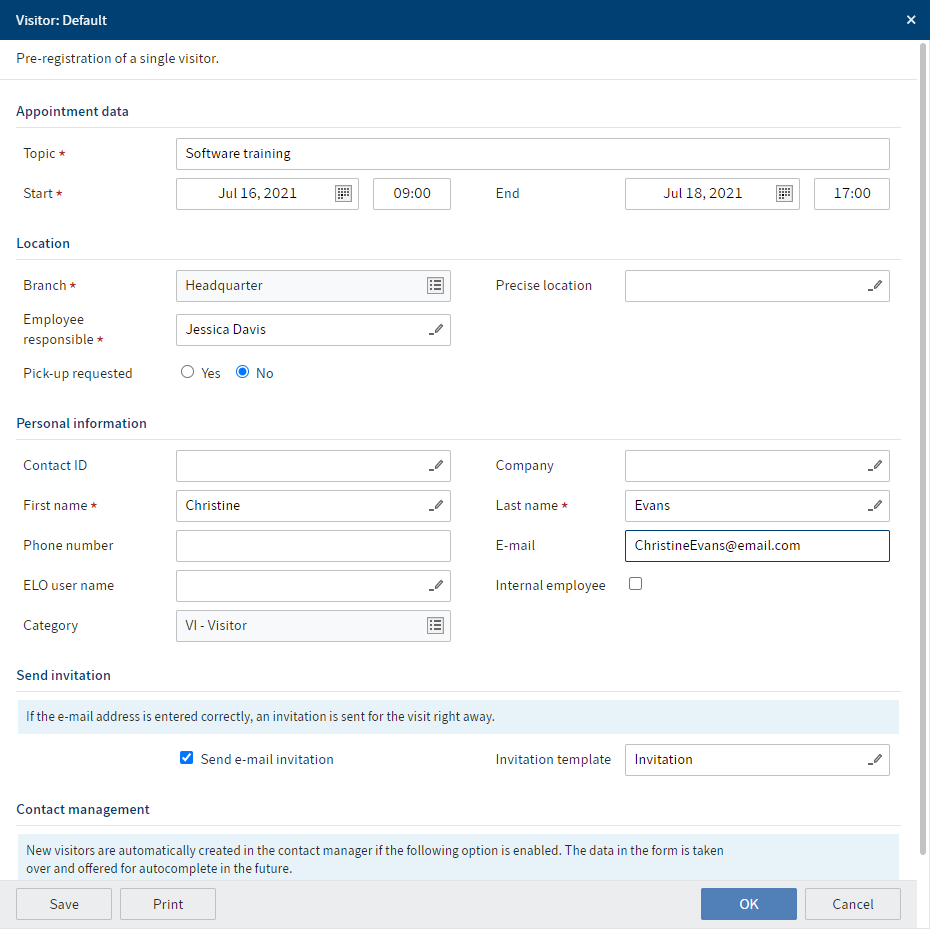
Fig.: 'Visitor' dialog box
The Visitor dialog box contains fields with information on the planned appointment, the location of the appointment, and the visitor.
Mandatory fields are marked with a red asterisk.
Fields with a pencil icon contain keyword lists. When you enter a value in the respective field, matching list entries appear.
- Fill out the fields accordingly.
Contact reference: If the visitor is already created as a reference, they have a contact reference that you can select from the suggestions. Otherwise, the field is left blank.
ELO user name: If the visitor has an ELO user account, enter their name in this field.
Send e-mail invitation: In the Invitation template field, select an appropriate invitation template. Once you click OK, the e-mail is sent.
Create new contacts: If you select this option, a contact reference is automatically created and the entered visitor information is saved. The next time you log on, you can access the saved data and don't have to enter it again.
- Click OK.
Result
The file is created in the // Visitor management // Visitors // [Year] // [Month] folder.
The form contains the entered information and can be changed later on.
As the appointment will take place in fewer than 30 days, the file also appears in the folder // Visitor management // Visitors by deadline // Visitors expected in the next 30 days.
If you checked the Create new contacts box, the contact information is filed to the Visitor contacts folder, where you can enter additional data.
Outlook
You can correct or update data entered with the Edit pre-registration function.
Before the appointment or on the day of the appointment, you can create a visitor badge.
You can add a visitor picture and request a signature on the day of the visit.
If the visitor cancels, you can cancel their registration.
Otherwise, you can use the Check in visitor function on the day of the appointment.
# Pre-register group
Information
You want to register a group for an appointment in the future.
Alternatives
Pre-register company: If you don't want to register each member of the group by name, use this function.
Register group: If the appointment will take place right away, use this function.
Method
- On the ribbon, go to the New tab and click Visitor > Pre-register group.
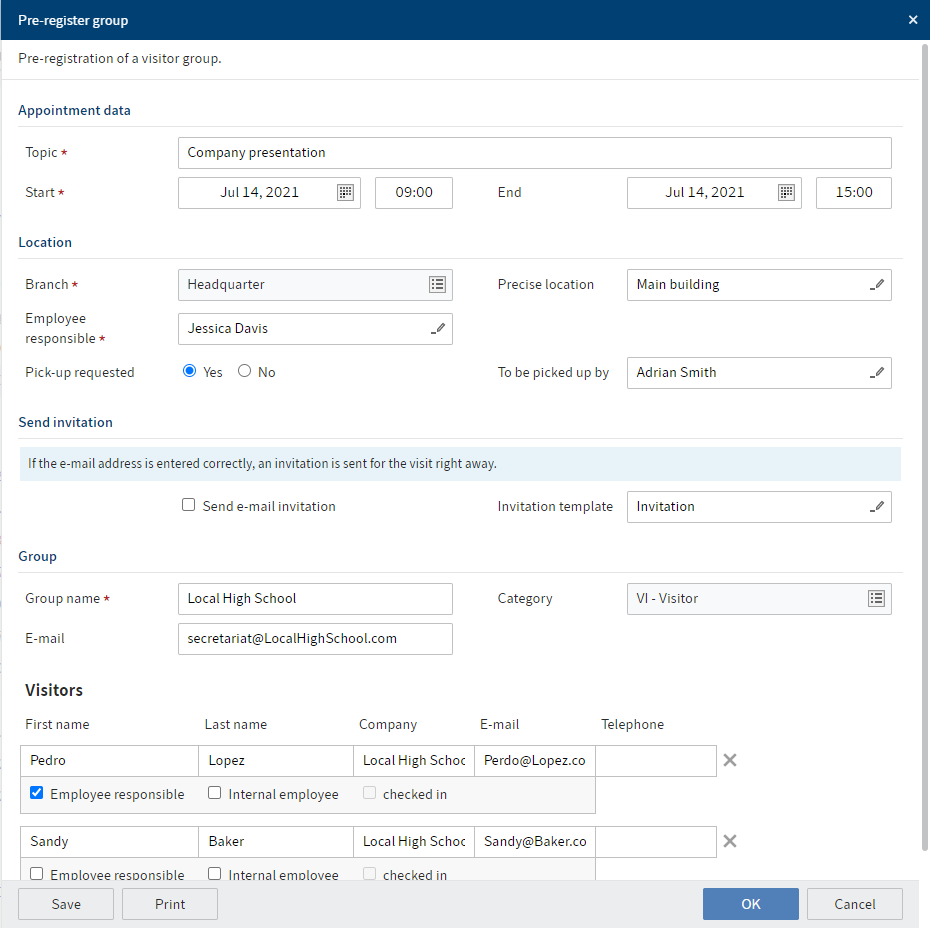
Fig.: 'Pre-register group' dialog box
The Pre-register group dialog box contains fields with information on the planned appointment, the location of the appointment, and the group.
Mandatory fields are marked with a red asterisk.
Fields with a pencil icon contain keyword lists. When you enter a value in the respective field, matching list entries appear.
Send e-mail invitation: In the Invitation template field, select an appropriate invitation template. Once you click OK, the e-mail is sent.
Employee responsible: There must be exactly one person responsible. If you do not select a group member, the first person in the list is automatically selected as the employee responsible.
Checked in: This option is not active in Visitors. The box is automatically checked as soon as you check the visitors in.
- Click OK.
Result
The file is created in the // Visitor management // Visitors // [Year] // [Month] folder.
As the appointment will take place in fewer than 30 days, the file also appears in the folder // Visitor management // Visitor groups by deadline // Groups expected in the next 30 days.
The Group form contains the entered information. Each member of the group also has their own form, which you can edit.
Outlook
You can correct or update data entered for the group and group members with the Edit pre-registration function.
Before the appointment or on the day of the appointment, you can create visitor badges.
You can add visitor pictures and request signatures on the day of the appointment.
If the visitor cancels, you can cancel their registration.
Otherwise, you can use the Check in visitor function on the day of the appointment.
# Pre-register company
Information
You want to register a company for an appointment in the future. During registration, you only enter the number of visitors.
Alternative
Pre-register group: If you want to register each member of the group by name, use this function.
Method
- On the ribbon, go to the New tab and click Visitor > Pre-register company.
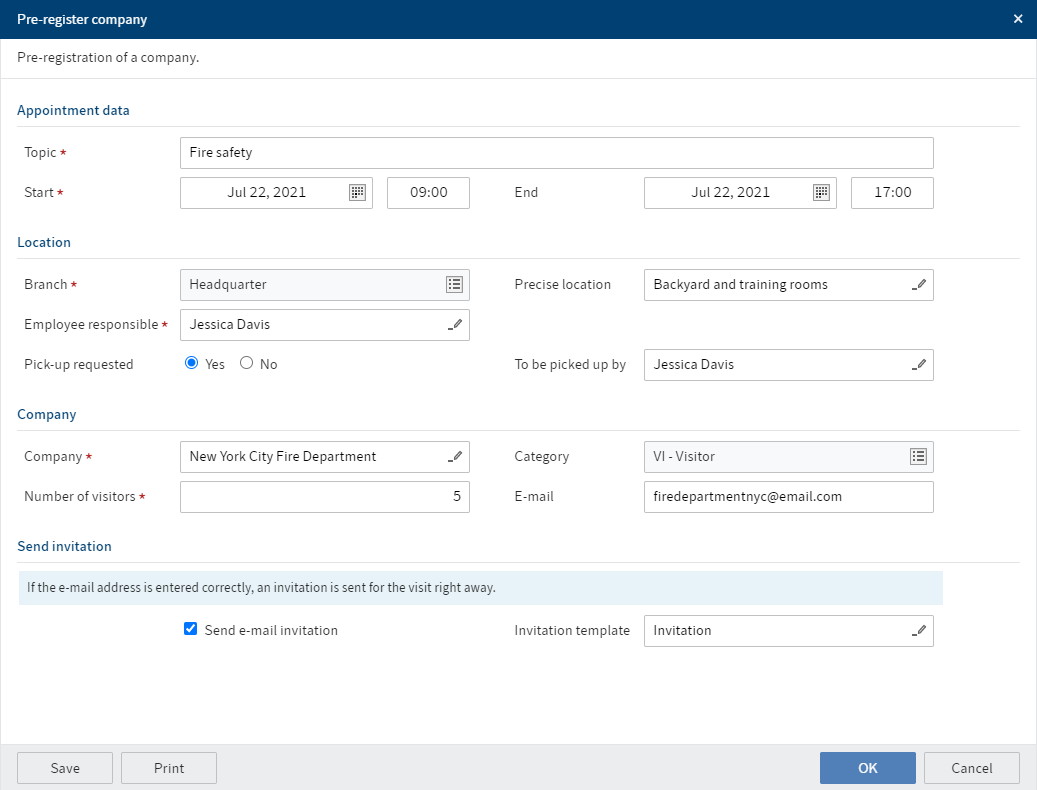
Fig.: 'Pre-register company' dialog box
The Pre-register company dialog box contains fields with information on the planned appointment, the location of the appointment, and the group.
Mandatory fields are marked with a red asterisk.
Fields with a pencil icon contain keyword lists. When you enter a value in the respective field, matching list entries appear.
- Fill out the fields accordingly.
Send e-mail invitation: In the Invitation template field, select an appropriate invitation template. Once you click OK, the e-mail is sent.
- Click OK.
Result
The file is created in the // Visitor management // Visitors // [Year] // [Month] folder.
As the appointment will take place in fewer than 30 days, the file also appears in the folder // Visitor management // Visitor groups by deadline // Groups expected in the next 30 days.
The Company form contains the entered information. Each member of the company also has their own form, which you can edit.
Outlook
You can correct or update data entered for the company and company members with the Edit pre-registration function.
Before the appointment or on the day of the appointment, you can create visitor badges.
You can add visitor pictures and request signatures on the day of the appointment.
If the visitor cancels, you can cancel their registration.
Otherwise, you can use the Check in visitor function on the day of the appointment.
# Register visitor
Information
You can check in a visitor on the day of an appointment without pre-registering them. At the end of this process, the visitor is checked in.
Alternatives
Pre-register visitor: If the appointment will take place in the future, use this function.
Method
- On the ribbon, go to the New tab and click Visitor > Register visitor.
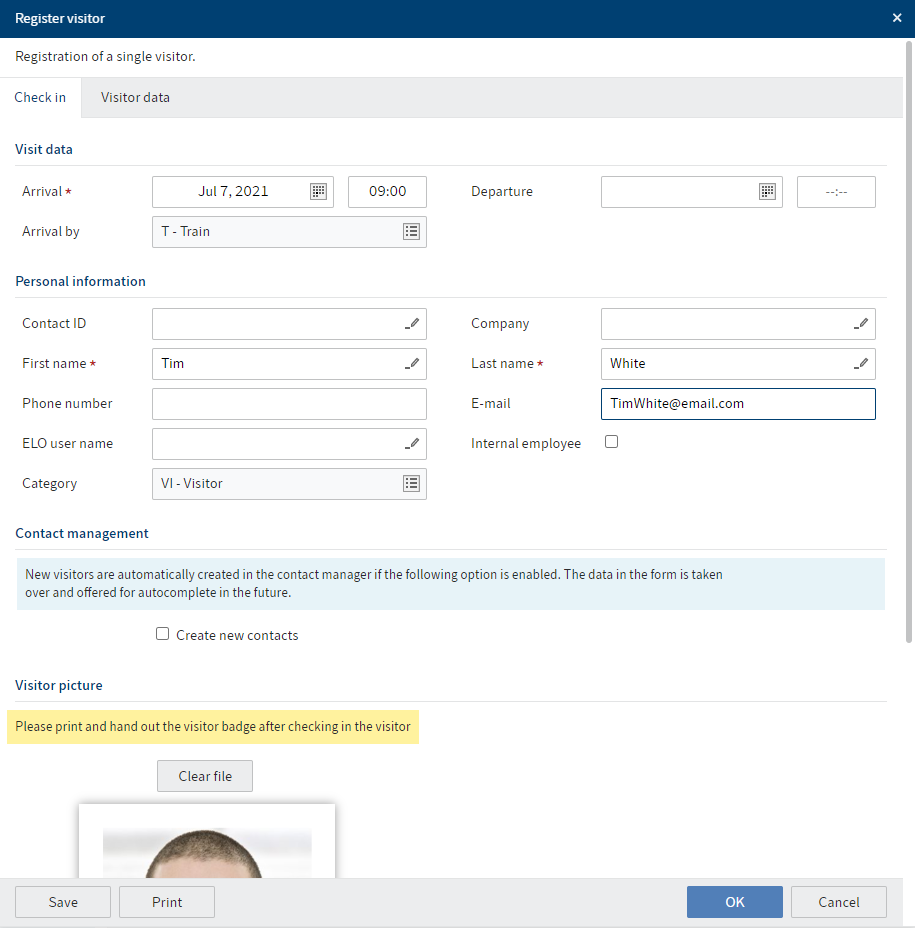
Fig.: 'Register visitor' dialog box
In the Register visitor dialog box, you will find the input fields for checking in the visitor on two tabs.
Mandatory fields are marked with a red asterisk.
Fields with a pencil icon contain keyword lists. When you enter a value in the respective field, matching list entries appear.
- Fill out the fields on the Check in tab accordingly.
Contact reference: If the visitor is already created as a reference, they have a contact reference that you can select from the suggestions. Otherwise, the field is left blank.
ELO user name: If the visitor has an ELO user account, enter their name in this field.
Create new contacts: If you select this option, a contact reference is automatically created and the entered visitor information is saved. The next time you log on, you can access the saved data and don't have to enter it again.
Take a picture/Select a file: You can take a picture of the visitor using a webcam or select a picture from your file system.
Document: If you want the visitor to sign a document on arrival, select the document here.
Send to: The document selected under Document is sent to the user account that you select in the Send to field. The selected user account should be accessed via a mobile device in order to be able to have the document signed.
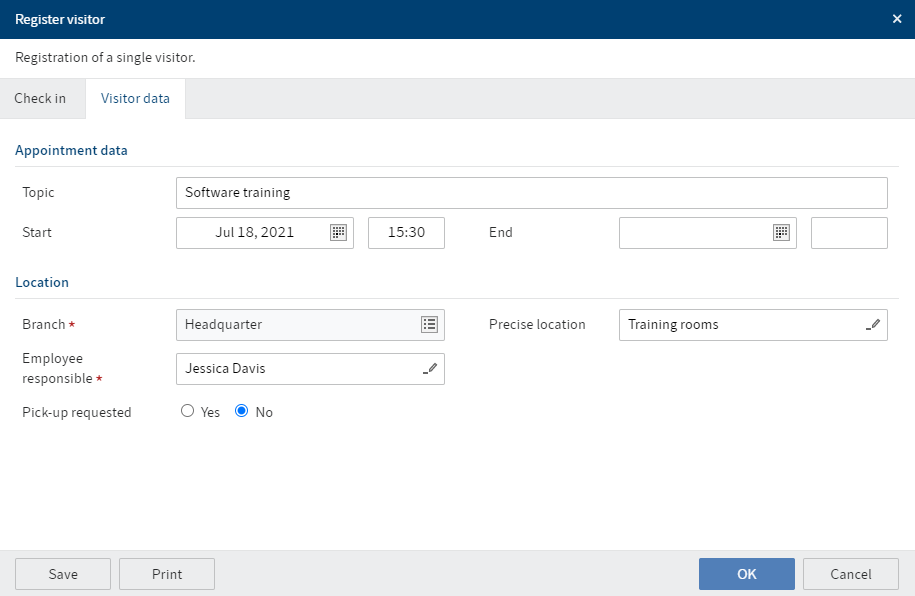
Fig.: 'Register visitor' dialog box, 'Visitor data' tab
Fill out the fields on the Visitor data tab accordingly.
Click OK.
Result
The file is created in the // Visitor management // Visitors // [Year] // [Month] folder.
The form contains the entered information.
The visitor's folder also appears under // Visitor management // Visitors by deadline // Recent visitors.
The visitor is checked in.
If you checked the Create new contacts box, the contact information is filed to the Visitor contacts folder, where you can edit it or enter additional data.
Outlook
You can create a visitor badge.
If you requested a document to be signed, you will find it in the Tasks area of the selected ELO user account. The visitor can complete the questionnaire and/or sign the document using a tablet. The signed document is saved to their visitor file.
On the day of the appointment, you can check visitors back out using the Check out visitor function.
# Register group
Information
You can check in a group on the day of an appointment without pre-registering them. At the end of this process, the group is checked in.
Alternative
Pre-register group: If the group appointment will take place in the future, use this function.
Method
- On the ribbon, go to the New tab and click Visitor > Register group.
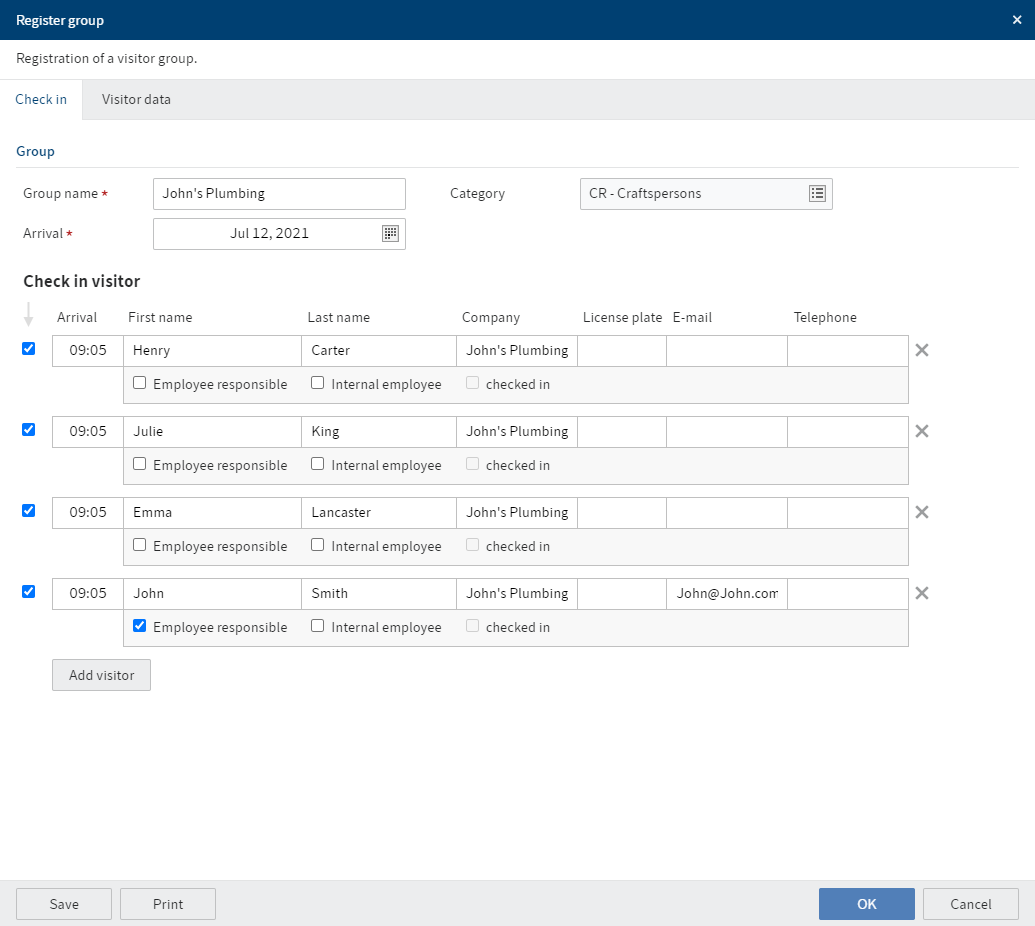
Fig.: 'Register group' dialog box, 'Check in' tab
In the Register group dialog box, you will find the input fields for checking in the group on two tabs.
Mandatory fields are marked with a red asterisk.
Fields with a pencil icon contain keyword lists. When you enter a value in the respective field, matching list entries appear.
- Fill out the fields on the Check in tab accordingly.
Check in visitor: Before the name of each group member, you will find a check box that is automatically checked. If a member of the group is running late but has already been added to the list, you can uncheck this box for now. To check them in later, you can use the Check in visitor function.
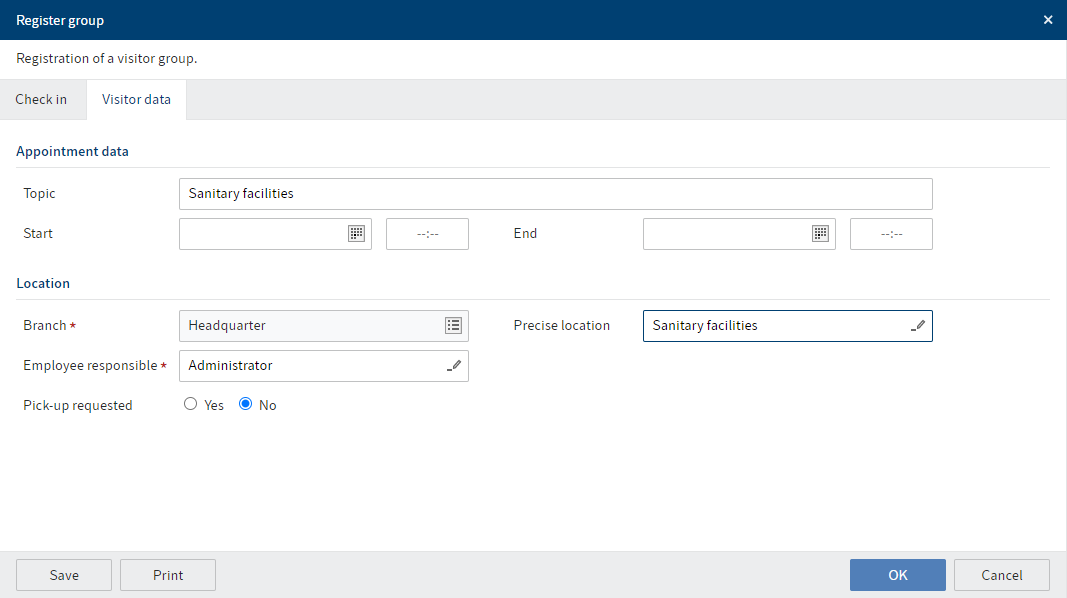
Fig.: 'Register group' dialog box, 'Visitor data' tab
Fill out the fields on the Visitor data tab accordingly.
Click OK.
Result
The file is created in the // Visitor management // Visitors // [Year] // [Month] folder.
The form contains the entered information.
The visitor's folder also appears under // Visitor management // Visitor groups by deadline // Recent groups.
The group is checked in.
Outlook
If you haven't checked a group member in yet, you can do this with the Check in visitor function.
You can add visitor pictures, create visitor badges, and request signatures.
On the day of the appointment, you can check the group back out using the Check out visitor function.
# New long-term badge
Information
A long-term badge is a badge that allows bearers to check in and out using the Self-service functions in the client or intranet. With the physical badge, visitors can check in and out via a code scanner.
Method
- On the ribbon, go to the New tab and click Visitor > New long-term badge.
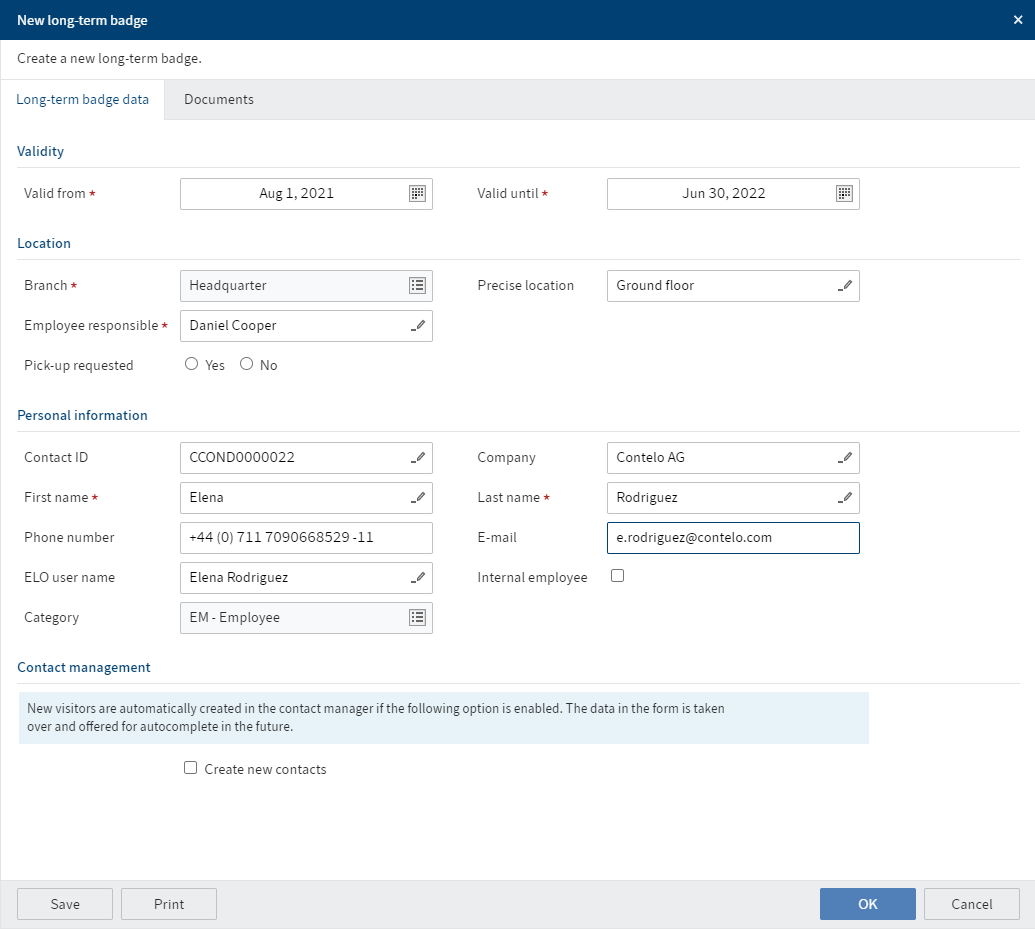
Fig.: 'New long-term badge' dialog box, 'Long-term badge data' tab
In the New long-term badge dialog box, you will find the input fields for creating a long-term badge on two tabs.
Mandatory fields are marked with a red asterisk.
Fields with a pencil icon contain keyword lists. When you enter a value in the respective field, matching list entries appear.
- Fill out the fields on the Long-term badge data tab accordingly.
Contact reference: If the user is already created as a reference, they have a contact reference that you can select from the suggestions. Otherwise, the field is left blank.
ELO user name: Complete this field so that the user can check in and check out on their client. Otherwise, they can only check in and out via a scanning device.
Create new contacts: If you select this option, a contact reference is automatically created and the entered visitor information is saved. The next time you log on, you can access the saved data and don't have to enter it again.
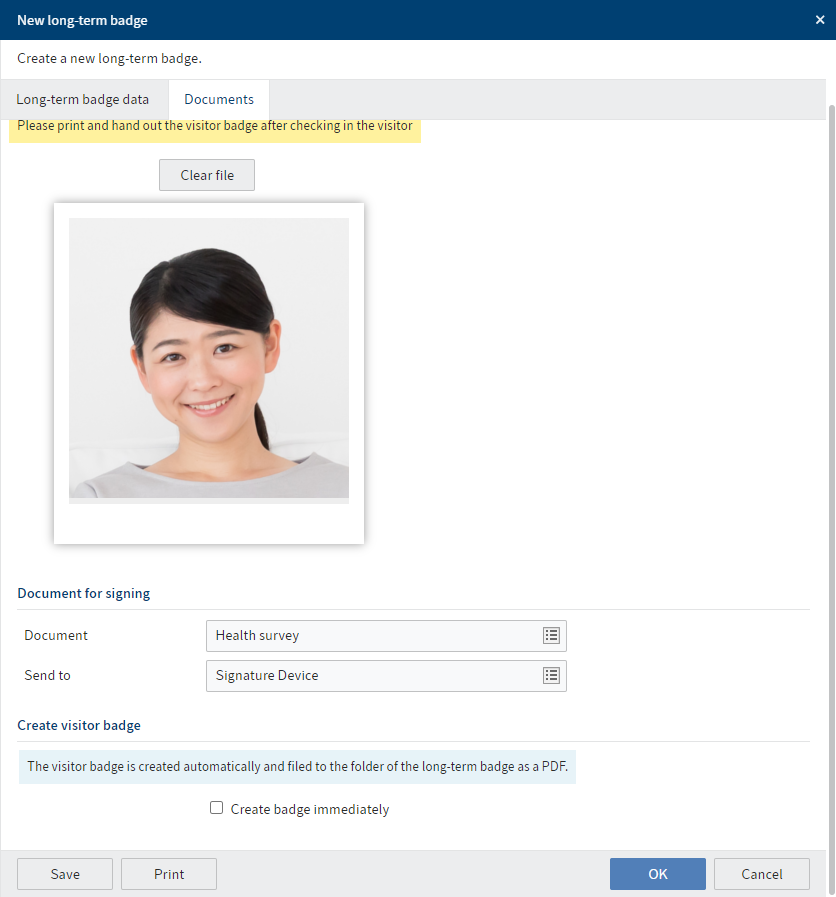
Fig.: 'New long-term badge' dialog box, 'Documents' tab
- Fill out the fields on the Documents tab accordingly.
Take a picture/Select a file: You can take a picture using a webcam or select a picture from your file system.
Document: If you want the visitor to sign a document on arrival, select the document here.
Send to: The document selected under Document is sent to the user account that you select in this field. The selected user account should be accessed via a mobile device in order to be able to have the document signed.
Create badge immediately: You can create a long-term badge when creating the folder. Alternatively, you can use the Create visitor badge function later. Without the badge, the user can only use the self-service functions in the client or intranet.
- Click OK.
Result
The long-term badge is filed to // Visitor management // Long-term badges.
The form contains the entered information.
The user can now check themself in and out via the self-service functions.
Outlook
If you have disabled the option Create badge immediately, you can create a badge using the Create visitor badge function.
Long-term badges can be printed using commercial badge printers with Windows printer drivers.
In the ELO Web Client, you can use the browser print function.
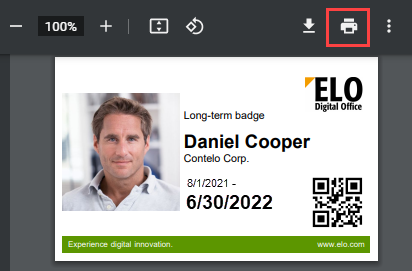
Fig.: 'Print' button
You can also press the Print button.
All long-term badges include a barcode or a QR code. With this code, the bearer of the long-term badge can check in and out at a scanning device.
If you requested a document to be signed, you will find it in the Tasks area of the selected ELO user account. The visitor can complete the questionnaire and/or sign the document using a tablet. The signed document is saved to their visitor file.
You can disable the long-term badge using the Deactivate long-term badge function, for example if the user has lost their long-term badge.
# Create visitor list
Information
You can create a list of all visitors checked in or out at any time.
Method
- On the ribbon, go to the New tab and click Visitor > Create visitor list.
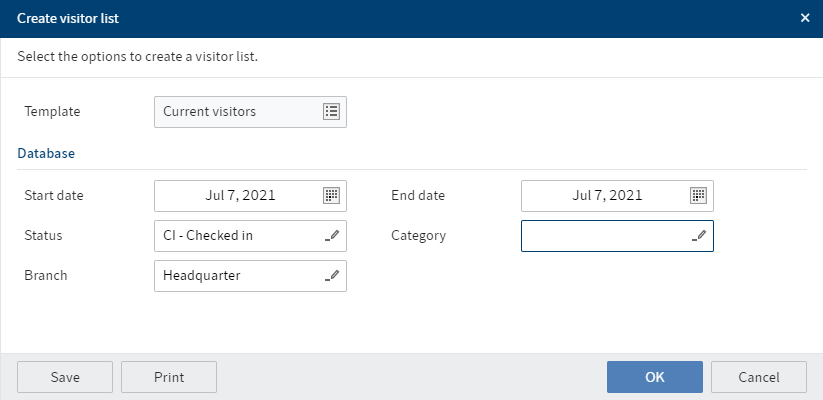
Fig.: 'Create visitor list' dialog box
- In the Create visitor list dialog box, select which visitors the list should include.
Category: Leave this field blank if you want the list to contain all categories of visitors.
- Click OK.
Result
The visitor list is filed to // Visitor management // Visitor lists.