# Complete tasks with workflows
Using workflows, you can assign tasks to other users or groups.
An integrated escalation management function allows you to track whether the set deadlines are met once a workflow is started.
You can find more information on all the workflow functions in the ELO Java Client (English) (opens new window) and ELO Web Client (English) (opens new window) user documentation.
# Start workflow
The Start workflow function gives you access to workflows with different levels of complexity designed for specific processes within your company.
Related function
Ad hoc workflow: Starts short default workflows for approval or notification.
Method
Select the entry you want to start a workflow for.
On the New tab > select Start workflow.
Select a workflow template.
Show template (ELO Java Client)/Preview (ELO Web Client): Shows the individual steps of the workflow. As the workflow is already configured, you do not have to configure any additional settings.
Information
To allow changes to the template when starting the workflow, enable the option Start workflow in edit mode (User menu [your name] > Configuration > Advanced settings > Workflow) in the ELO Java Client.
In addition to the workflow steps, you will see the respective editor and, if applicable, the time allowed for the workflow step until escalation (days:minutes:seconds).
Select OK.
Result
The workflow starts.
Outlook
- Once you have started a workflow, it will appear in your My ELO work area under My recently started workflows.
- You can view workflows for an entry using the function Workflows for this entry (available in: Ribbon > Organize).
You can find information about creating a workflow template in the ELO workflow (English) documentation (opens new window).
# Forward workflow
When you are assigned a workflow task, it will appear in your Tasks work area.
The next step depends on whether or not the workflow contains a form.
If you have received a workflow and the Forward workflow button on the Task tab is disabled, this is for one of the following reasons:
- If receive a workflow with a form, forward it using the form.
- You received the workflow as a member of a group. You can find more information about the process in the Forward group workflows section.
The way you forward a workflow differs depending on whether the workflow contains a form or not.
Related functions
- Delegate workflow: You can delegate a workflow node to another user. The user is displayed in an additional node in the workflow. You can specify whether you want to be notified after completing the workflow task.
- Hand off workflow: You can hand off your entire processing step to another user. You will then no longer notified of the progress of the workflow.
- Postpone workflow: You can suspend processing of a workflow. The workflow will be hidden in the Tasks work area until the specified date. Undo the postponement with the Cancel postponement function.
- Extend workflow deadline: Extend a workflow with an expired deadline.
Method
Select the workflow that you want to forward.
On the ribbon in the Task tab, select > Forward workflow.

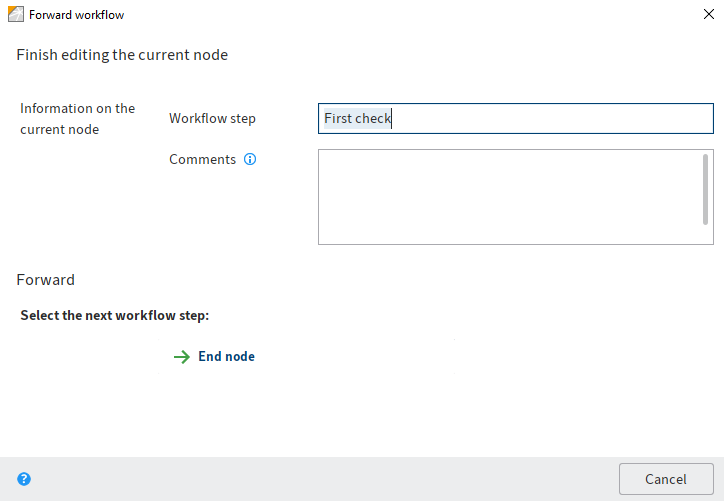
You can define a name for the workflow node in the dialog box and enter a note for the next user.
Please note
You can only view the comment in the ELO Java Client if you navigate to Organize > Overviews > Workflow overview and enable the List view.
Select the next workflow step.
The workflow is forwarded and the dialog box is closed.
Information
Select the desired option in the ELO Web Client followed by OK.
Depending on which settings apply for the current node, you can select one or more successor nodes in the Forward area.
Result
The workflow is forwarded and disappears from your tasks.
# Workflow with form
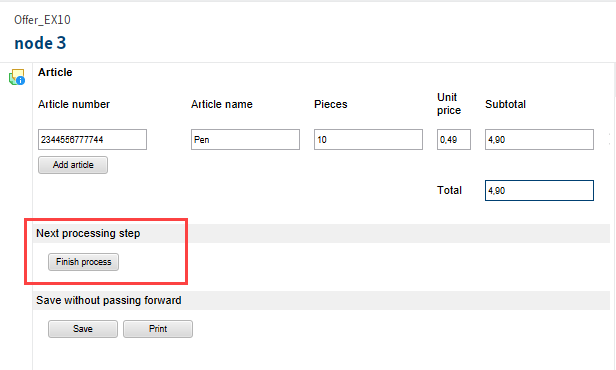
For workflows with forms, you will find the form on the Form tab (ELO Java Client) or Metadata (ELO Web Client). You can edit and forward it here.
If you receive a workflow you have to forward via a form, the Forward workflow button is disabled.

Method
- Edit the fields of the form as indicated in the task.
- Select the corresponding button within the form.
Result
The workflow is forwarded and disappears from your tasks.
# Forward group workflows
You can receive, forward, or hand off a workflow as a member of a group.
Please note
Once you have accepted a group workflow, it will disappear from the task list of the other group members. This prevents the workflow from being processed by multiple users at once.
Method
Select Ribbon > Task > Accept workflow.
Alternatively: You can also accept a form workflow by double-clicking the entry in the task list.
Result
You have accepted the workflow.
Outlook
Use the Return workflow function to undo this action.
# Start ad hoc workflow
Ad hoc workflows are simple, predefined workflows available in ELO. You can use an ad hoc workflow to route an item to users for approval or to notify them.
Method
Select the entry you want to start an ad hoc workflow for.
On the ribbon, select the New tab > Create task > Ad hoc workflow.
Configure the settings for the ad hoc workflow.
Select Completion options (ELO Java Client)/Finish (ELO Web Client) and configure additional settings for the ad hoc workflow here, for example:
Success message: The text from this field is shown to the recipients above once the ad hoc workflow has been completed. It appears in the recipient's Tasks work area.
Cancellation message (approval workflows only): The text from this field is shown to the recipient above if the ad hoc workflow has been canceled. It appears in the recipient's Tasks work area.
Withdraw the workflow from all users as soon as one user does not approve it (parallel approval workflows only): If this option is enabled, all recipients must approve the workflow. Otherwise, the ad hoc workflow is canceled entirely and the task is removed from the tasks of the other selected users. In your tasks and on your home screen, the message Not approved will appear in My ELO under My recently started workflows.
End script: If required, select a script that is executed after the ad hoc workflow is completed.
Select OK.
Result
The workflow is started and displayed in the Tasks work area of the selected users.
# Settings for the ad hoc workflow
The following options are available:

1 Name: Workflow display name
2 Ad hoc workflow type: Serial workflows are forwarded to the responsible users sequentially. Parallel workflows are sent to all involved users at the same time.
3 Priority: You can sort and filter the task list according to priorities.

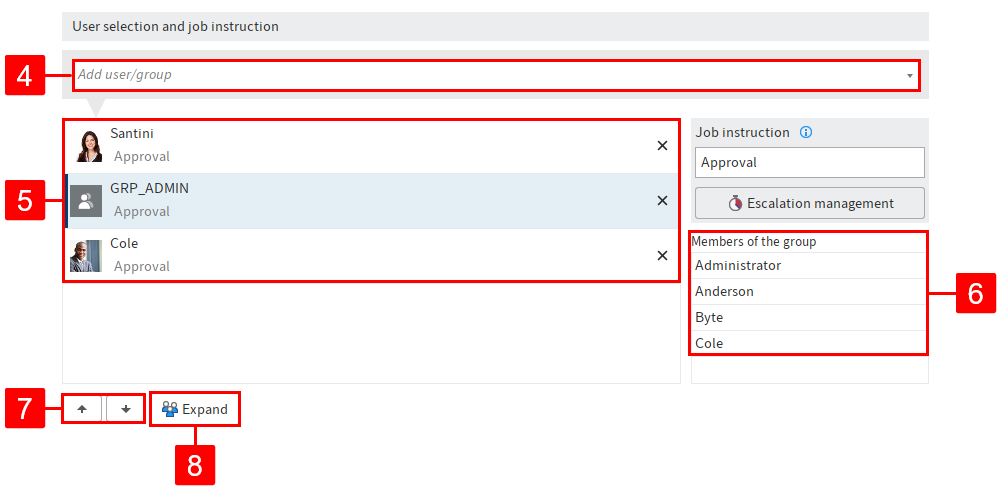
4 Add user/group
5 Users and groups that were added to the workflow
6 Members of the group (ELO Java Client): This list appears if you select a group. In the ELO Web Client, you can open the list by selecting the Show members button.
7 Change order: To change the order of recipients in serial ad hoc workflows, select a recipient and change their position using the arrows (or drag-and-drop).
8 Expand: Show the individual members of a selected group. To do so, select the corresponding group and then click Expand. You can remove members by selecting the X icon.
Information
If the group is selected, one member of the group can accept and process the workflow. If you expand the group, every member of the group can accept and process the workflow.

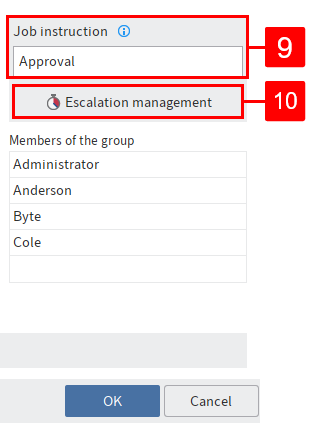
9 Enter job instruction: Enter the individual job instruction for the user selected in the list here. You can select multiple. The user sees the job instruction in the Workflow step column of the Tasks work area as soon as they have accepted the workflow.
Information
The job instruction can have a maximum of 128 characters.
10 Escalation management: Specify how long the workflow may remain with the respective user or group here. You can also select a user or group to be notified if the deadline is missed.
Information
If the workflow has escalated, it appears in the Tasks work area of the responsible users and in My ELO under Escalated workflows. Selecting an escalated workflow in My ELO takes you to the escalated workflow in your Tasks work area.
The following functions are only available in the ELO Java Client:
1 Load ad hoc workflow from template (folder icon): Opens ad hoc workflows saved as a template.
2 Save as template (disk icon): Saves the current ad hoc workflow as a template. You can assign a name to the template.
Information
With the default settings, templates are only available to the user who creates them. However, a user with the corresponding permissions can forward these templates to other users as a reference/copy. The references/copies must be saved to the AdHoc Templates folder of the respective user.
3 Delete an existing template (X icon)
Please note
If you delete the original template, any references that you have created will also be deleted.