# Important actions in detail
This chapter is especially helpful for getting started. It explains how to perform basic actions.
# Create new folder
Before you can file documents, you will need folders in the Repository work area.
The New folder function (or the INS key) creates a new folder entry in ELO.
Related function
- Copy: If a folder with the basic structure you need already exists, you can copy this basic structure without content.
Method
In the repository, select the folder where you want to create the new folder.
On the toolbar, select New > New folder.
Keyboard shortcut: INS key
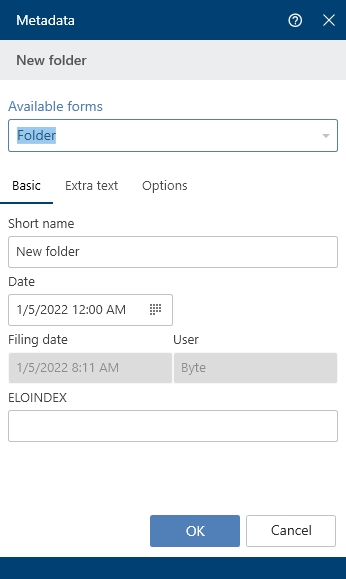
The Metadata dialog box opens.
Enter a name for the new folder in the Short name field.
Optional: If the new folder relates to a person, complete the Personal identifier and End of deletion period fields in the Options area.
Select OK to close the dialog box.
Result
A new folder is created.
Outlook
Like physical folders, you can add contents to folders: You can create additional child folders or file documents directly to them.
Change folder name: If you want to change the name of a folder, proceed as follows:
- Select the folder.
- On the toolbar, select Organize > Metadata.
- Change the name in the Short name field and confirm with OK.
# Create new view
With the New view function, you can create a new folder view. The folder view is created as a new tile in the tile navigation.
A view provides you with quick access to a specific area of the repository. When you create a view, it is displayed as a tile in the tile navigation.
Related functions
- Task view: A task view shows you tasks with criteria you selected.
- Most recently used: The Most recently used tab in the My ELO work area provides fast access to your folders. You can pin folders here.
- Configuration - Views: In the Views category of the configuration, you can also create new views.
Method
In the Repository work area, select the project folder you want to create a view for.
On the toolbar, select View > New view.
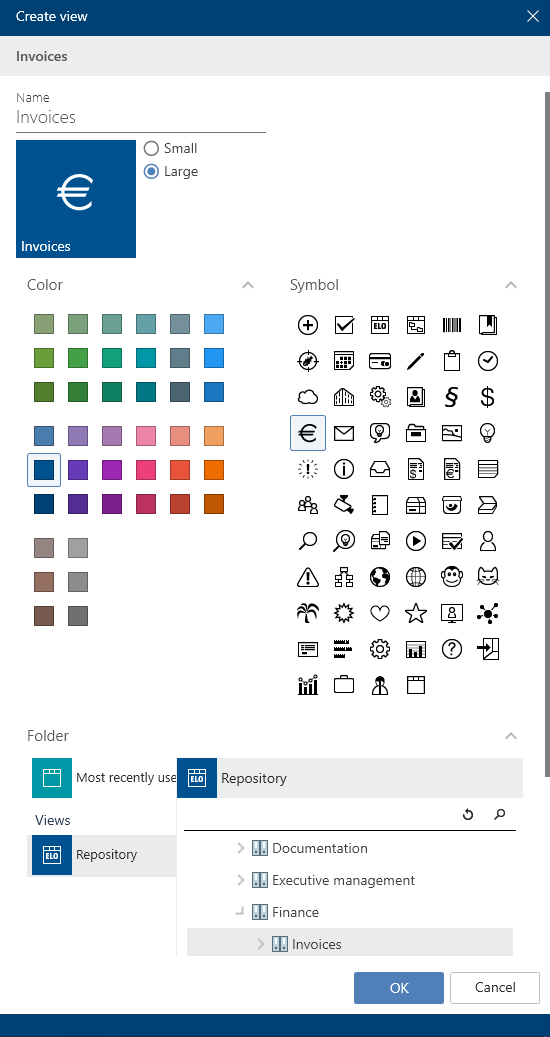
The Create view dialog box appears.
Configure the tile by selecting a size, color, and icon.
The Name field automatically contains the name of the folder you selected. You can change the name.
Optional: In the bottom area of the dialog box, you can change the selected folder.
Select OK to close the dialog box.
Result
A tile is created for the new view under the Repository group in the tile navigation.
Outlook
You can drag and drop a tile to another position.
If you have created multiple views, you have the option to group them. To learn how to create a group in the tile navigation, refer to the section Groups.
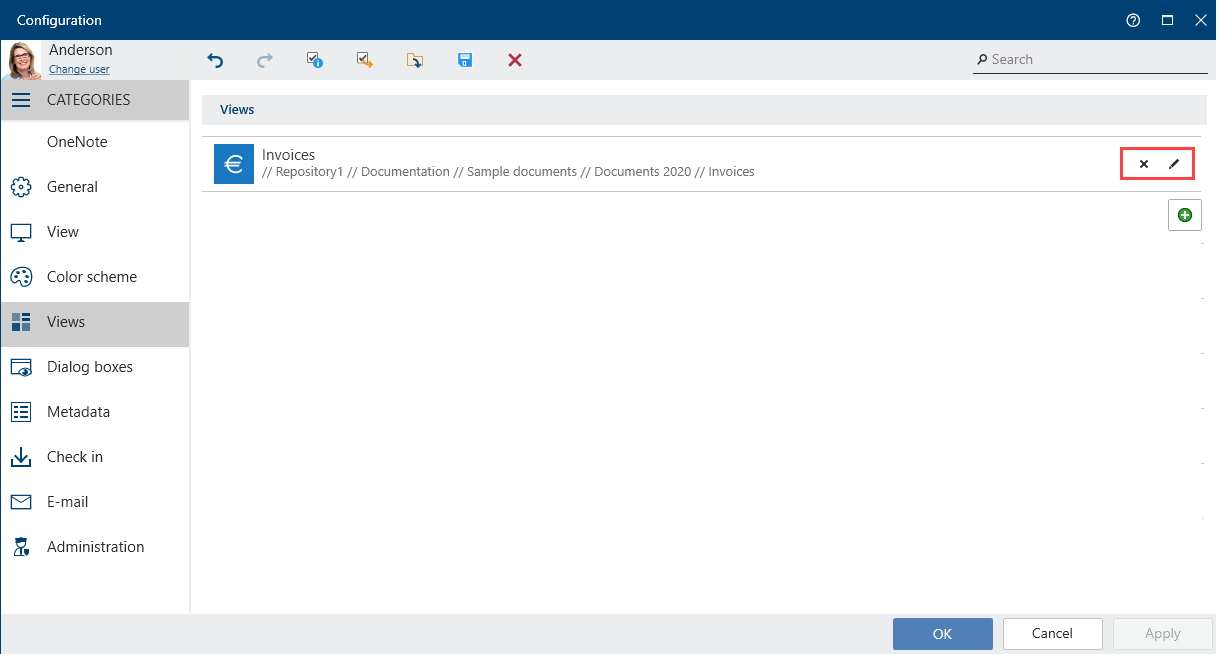
You can edit or delete the view later on. To do so, open the configuration by selecting User menu [your name]. There, navigate to the Views category. You can delete the view by selecting the X icon or edit it by selecting the pencil icon.
# Insert files/folders
With the Insert files/folders function, you can file a document or folder from the file system to the selected folder in ELO.
Related functions
- Drag-and-drop: You can drag documents straight from your file system to a folder in ELO.
- Document from template: If you want to create a document from a template, use this function.
Method
Select a folder in the Repository work area where you want to insert a file or folder from the file system.
On the toolbar, select New > Insert files/folders.
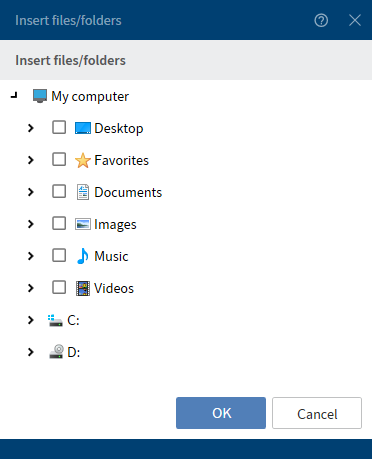
The Insert files/folders dialog box appears.
Select what documents or folders you want to file by checking the corresponding boxes. You can select multiple.
Select OK to confirm your selection.
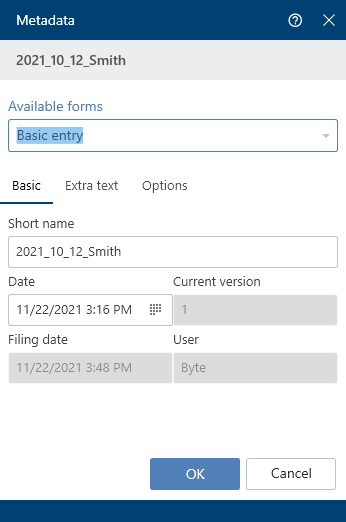
The Metadata dialog box opens.
Select a metadata form and enter the metadata. Confirm with OK.
Result
The files or folders are filed to the selected position in ELO.
Outlook
You can modify documents stored in ELO. If the document is version-controlled, a new version of the document is stored after you have made changes. The old version is retained.
Important functions for working with documents are:
- Check out and edit document
- Check in
- Load new version
- Send as ELO link
- Start workflow (only ELO Desktop Client Plus)
# File a document from the file system to ELO
You can store a file from the file system in ELO and replace the file in the file system with an ELO link in order to prevent duplicate data.
In Configuration > Dialog boxes > Multiple entries as an ELO link, you configure the system so that filed documents are moved to ELO and an ELO link is created.
Related function
Method
Open the Desktop work area.
Also open the Microsoft Windows Explorer.
Select a file in the Windows Explorer.
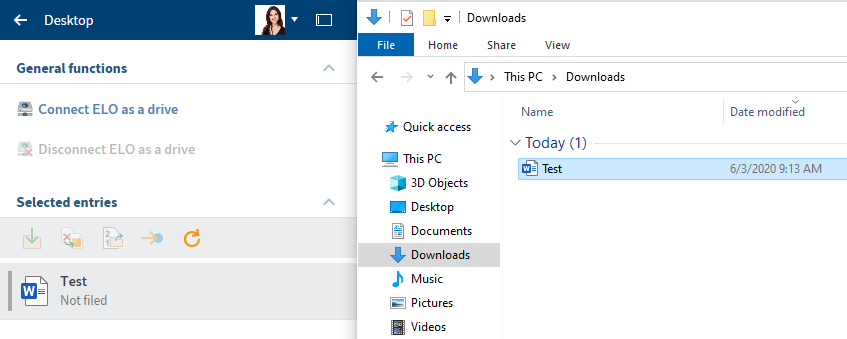
In the Desktop work area, ELO recognizes that the document is not filed to the repository.
In the Desktop work area, select the File button (green arrow) to file the selected document to ELO.
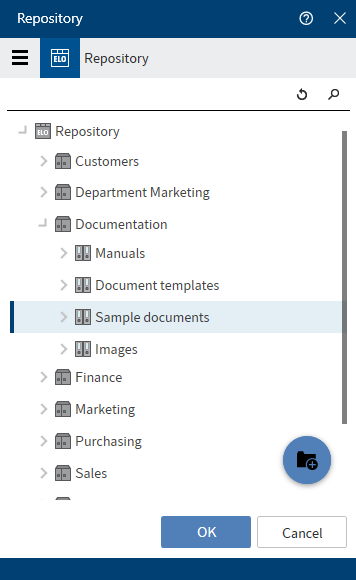
The Repository dialog box opens.
Select the target folder.
Select OK to confirm your selection.
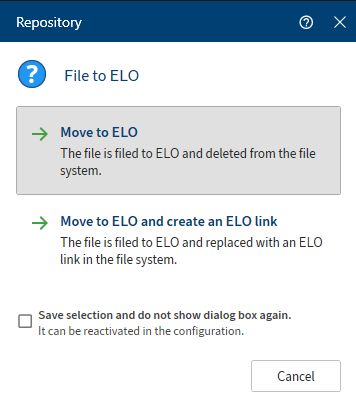
An additional Repository dialog box opens.
Select either Move to ELO or Move to ELO and create an ELO link.
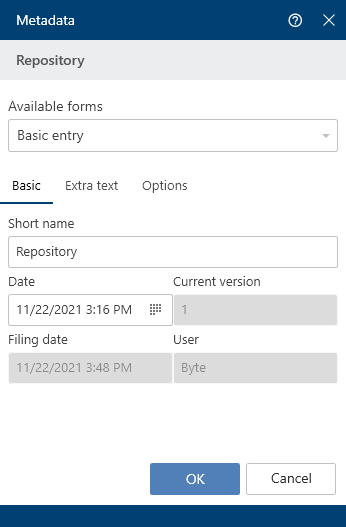
The Metadata dialog box opens.
Select a metadata form in the Available forms column.
Complete the fields in the selected metadata form.
Confirm with OK.
Optional: Depending on the setting, the Version comment dialog box may now open. If this is the case, you can enter the version number and relevant comments. This dialog box can be enabled or disabled in Configuration > Dialog boxes > Version comment.
Result
The file is filed to ELO. If you select the Move to ELO and create an ELO link option, the file is replaced with an ELO link in the file system.
Outlook
You have two options for filing documents in ELO:
- Filing an Office document that hasn't been saved to the file system
- Filing an Office document that has been saved to the file system
# Filing an Office document that hasn't been saved to the file system

The example above shows the Desktop work area when a Microsoft Office document is opened and not yet saved in the file system.
Save in ELO: File the document to ELO. The Repository dialog box then opens. Select the target folder here.
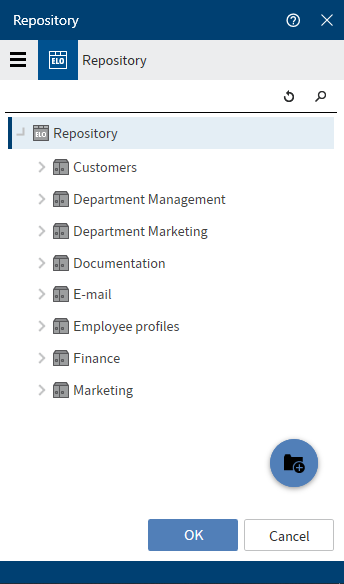
Alternative: Create a new folder by selecting the blue plus icon.
After confirming with OK, the document is opened in Microsoft Office in read-only mode.
# Filing an Office document that has been saved to the file system
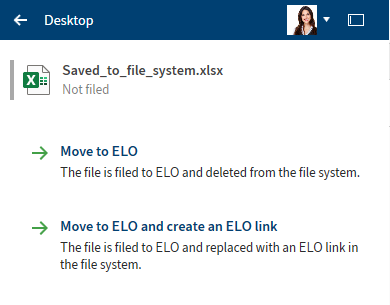
The example above shows the Desktop work area when a Microsoft Office document is opened and saved in the file system.
Move to ELO: The document is moved to ELO and deleted from the file system. In the Select filing folder dialog box, select the target folder or create a new one.
Move to ELO and create an ELO link: The document is moved to ELO and deleted from the file system. In the file system, the document is replaced with an ELO link to the entry in ELO. In the Select filing folder dialog box, select the target folder or create a new one.
# Alternative via drag-and-drop
You can also file a document from your file system to ELO using drag-and-drop.
Dragging and dropping items on the tree opens a context menu with the filing functions. User rights are also validated in real time.
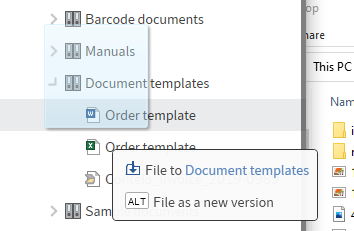
If you press and hold the ALT key, the file is saved as a new version.
# File Microsoft OneNote items in ELO
You can file your Microsoft OneNote notebooks to ELO. You can file the entire notebook in ELO, or just individual items, such as sections or pages. You can synchronize changes you make later on. For more information on synchronizing OneNote items, refer to the section Synchronize Microsoft OneNote item.
Method
Open Microsoft OneNote with the notebook you want to file to ELO. At the same time, open the Desktop work area.
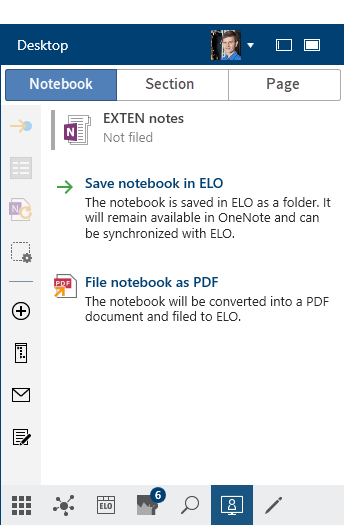
The following options are available:
- Save notebook in ELO: The notebook is saved in ELO as a folder. It will remain available in OneNote and can be synchronized with ELO.
- File notebook as PDF
Select the option Save notebook in ELO.
The repository structure appears.
Select the folder where you want to file the Microsoft OneNote notebook in ELO. Click OK to confirm.
Alternative: Create a new folder by selecting the blue plus icon.

The Metadata dialog box opens.
Complete the Metadata dialog box with the necessary information.
You can select a metadata form in advance via Configuration > Microsoft OneNote > Metadata. The preferred form is then completed automatically when filing Microsoft OneNote items.
Select OK to close the dialog box.
The Metadata dialog box appears for each section and page you've created in the notebook. With pages, the Version comment dialog box also appears depending on the settings. In the Version comment dialog box, you can enter the version number and relevant comments. This dialog box can be enabled or disabled in Configuration > Dialog boxes > Version comment.
Select OK to close the dialog box.
Result
The notebook is filed to ELO with all its contents.
Information
The automatic sort order in ELO always overwrites the sort order in Microsoft OneNote. This does not apply to section groups. These are always sorted alphabetically in Microsoft OneNote.
Outlook
All Microsoft OneNote items can be filed separately to ELO based on this.
Please note
Entries in ELO that are located in an invalid position for Microsoft OneNote are ignored. This includes a section in another section or a page in a section group, for example.
# File e-mails
You can determine how ELO behaves when filing e-mails from Microsoft Outlook in Configuration > E-mail.
You can organize how items from Microsoft Outlook (e-mails, calendar entries, tasks) are filed in the Desktop work area.
You have the following options for filing e-mails:
# Manual filing
Method
In Microsoft Outlook, select the e-mails you want to file.
At the same time, open the Desktop work area.
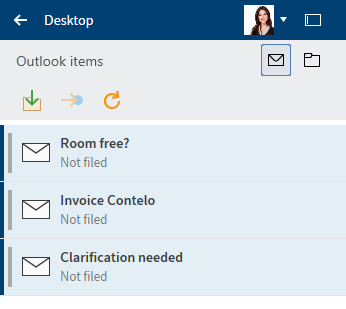
In the Outlook items area (letter icon) in the Desktop work area, the status indicates whether the Outlook items are already filed to ELO.
Three functions are available:
- Move to ELO: The selected item is filed to ELO based on your configuration.
- Go to: Goes to the filing location in ELO if the item is filed to ELO.
- Refresh: Refreshes the current view. The data is refreshed.
Select the e-mails you want to file in the Desktop work area.
Select the Move to ELO function.
The filing structure opens.
Select the folder where you want to file the e-mail and confirm with OK.
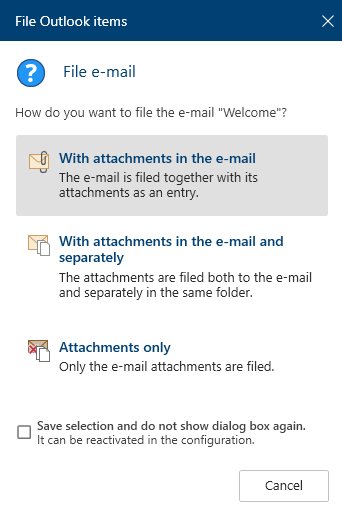
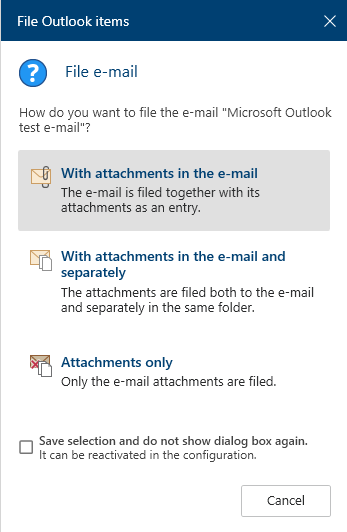
The File Outlook items dialog box opens.
Three options are available:
- With attachments in the e-mail
- With attachments in the e-mail and separately: The attachments are filed both to the e-mail and separately in the same folder.
- Attachments only
Select one of the options.
The Metadata dialog box opens.
Select a metadata form and enter the metadata.
Confirm with OK.
Result
The selected e-mails are filed according to the option selected.
# Link folder
We recommend linking the filing of Outlook items with folders in ELO.
Method
Select the folder icon.
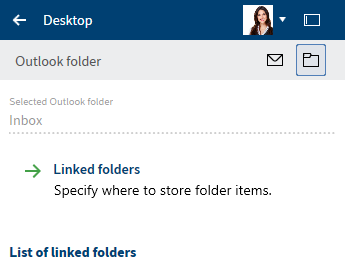
The Outlook folder area contains the following sections:
- Selected Outlook folder
- Linked folders: Determine where folder items are filed to ELO.
- List of linked folders
To create a new link, select Linked folders.
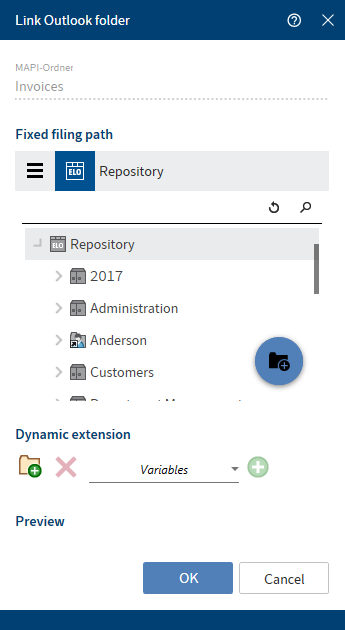
The Link Outlook folder dialog box opens.
Using the search field above the tree view, you can select a fixed filing path in ELO.
Select OK to save the path you have assigned to the Outlook folder.
Result
You will now see this new link in the List of linked folders.
# Dynamic extension
This dialog box enables you to define dynamic extensions for the filing path.
Method
Select New folder level (folder icon with green plus icon) to create a new folder level.
Optional: Select Delete folder level (X icon) to delete any folder levels that you have accidentally created.
Select a variable. You can select from ten variables in the drop-down menu.
Select the green plus icon to add variables for the folder level.
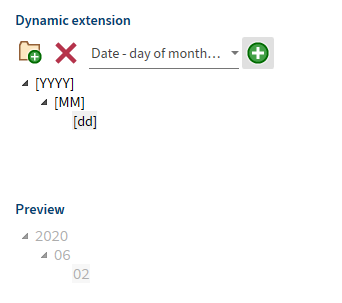
Repeat this process until you have defined all folder levels.
The preview shows how the dynamic extension would look with the defined variables.
Select OK to save the dynamic extension.
Result
The folder link is defined and appears in the list of linked folders.
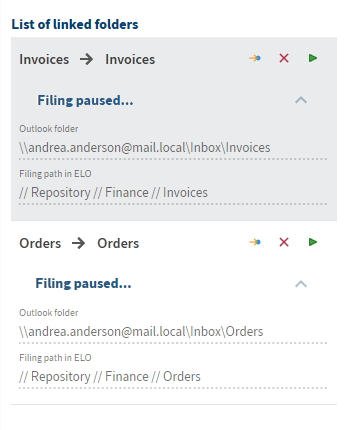
In the list of linked folders, you have the following options:
- Go to (yellow arrow icon): Navigate to the filing path in ELO.
- Delete (X icon): Remove the link from the list.
- Start filing (green arrow icon): The items from the Outlook folder are filed to ELO and a child folder structure is created for filing e-mails.
The status is Filing paused before initial filing. Under this, you will see the path to the linked Outlook folder and the filing path in ELO.
After starting filing, the status changes to Filing ended/stopped.
The log under this indicates which steps have been performed.
# File e-mails from Microsoft Outlook folders via drag-and-drop
You can move the e-mails you've organized in Microsoft Outlook folders to your repository via drag-and-drop. Not each individual e-mail has to be moved separately. Instead, all e-mails in a Microsoft Outlook folder can be moved together.
Method
Open the Repository work area and navigate to the folder where you want to file the e-mails.
Click the folder in Microsoft Outlook that you want to file and drag it to the folder where you want to file the e-mails.

The File Outlook items dialog box opens.
Three options are available:
- With attachments in the e-mail
- With attachments in the e-mail and separately: The attachments are filed both to the e-mail and separately in the same folder.
- Attachments only
Select one of the options.
The Metadata dialog box opens.
Select a metadata form and enter the metadata.
Select OK to close the dialog box.
Result
The e-mails from the Microsoft Outlook folder are filed based on the selected functions.
# Manage e-mails
ELO helps you manage e-mails. You have the following options for working with e-mails in ELO:
- Perform a combined search in ELO and Microsoft Outlook.
- You can reply to or forward e-mails in ELO.
- File e-mails to ELO from Microsoft Outlook.
# Combined search in ELO and Microsoft Outlook
ELO features a combined search for e-mails in the ELO repository and Microsoft Outlook.
Method
Open the Search work area.
Open the Search options (filter icon).
Select the search range.
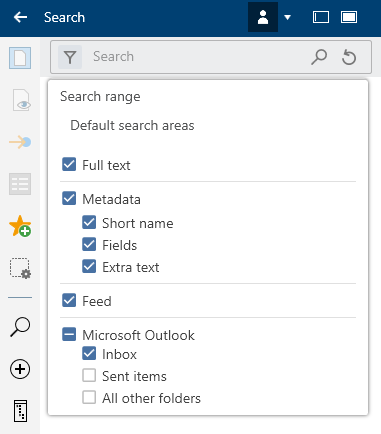
To be able to search for entries in ELO and Microsoft Outlook, the box next to Microsoft Outlook and at least one other option (Full text, Metadata, Feed) must be checked.
To only search for e-mails, set the Entry type filter to E-mail.
Select Perform search (magnifying glass icon).
Keyboard shortcut: ENTER key
Result
The search results are displayed.
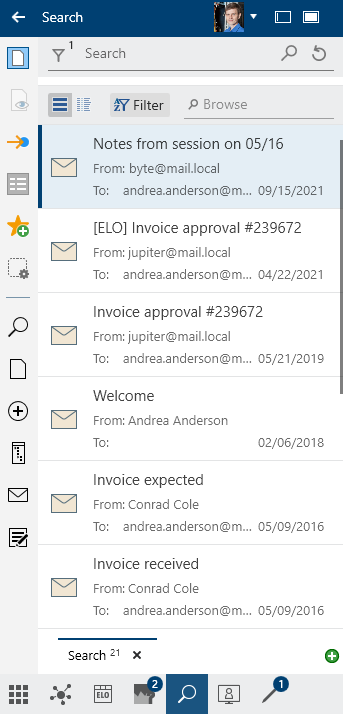
All entries marked with the Microsoft Outlook symbol are search results from Microsoft Outlook. Entries without this icon are entries filed to ELO.
# Reply to and forward e-mails
You can reply to e-mails right in ELO without opening Microsoft Outlook by opening an e-mail with the Preview function. The e-mail can already be filed to ELO or be found using the combined ELO and Microsoft Outlook search.

These functions connect ELO to Microsoft Outlook:
- Reply, Reply to all, Forward: You are familiar with these functions from Microsoft Outlook. A Microsoft Outlook window for replying to the e-mail opens and you can process your e-mail as usual.
- Open in Microsoft Outlook: You open the e-mail in Microsoft Outlook and can process it as usual.
- Save in ELO
# Filing e-mails from Microsoft Outlook
You can organize how items from Microsoft Outlook (e-mails, calendar entries, tasks) are filed in the Desktop work area.
You can move the e-mails you've organized in Microsoft Outlook folders to ELO together.
Refer to the Filing e-mails section to learn how to file Microsoft Outlook items in ELO.
# Check out and edit document
With the Check out and edit function, you can open a selected document in an external program for editing. Once you have finished editing the document, check it back in (refer to the Check in document section for more information). A new version of the document is created, which becomes the new working version. The working version is always the version that you see when you select the document.
The old version is still retained.
While the document is checked out, it is locked for other users. During this time, other users can only view the document in read-only mode (Document > Open in read-only mode). This prevents multiple users from being able to make changes to a document at the same time.

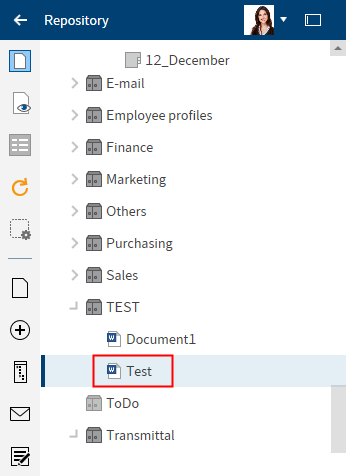
You can recognize checked out documents by a yellow arrow next to the document icon. Next to this you will see the user currently editing the entry.
Related function
- Check out to OneDrive: Use this function to check out a Microsoft Office document in ELO to Microsoft OneDrive for editing.
Method
Open the Repository work area.
Open the folder with the document that you would like to edit.
Select the document.
To edit the document, select Document > Check out and edit on the toolbar.
Keyboard shortcut: ALT + O
The document is opened for editing in an external program. It is transferred to the In use work area and cannot be edited by other users.
Information
If you close the document in the external application, it is still checked out.
To cancel, still select Close. In the In use work area, select the document. On the toolbar, select Document group > Discard document changes.
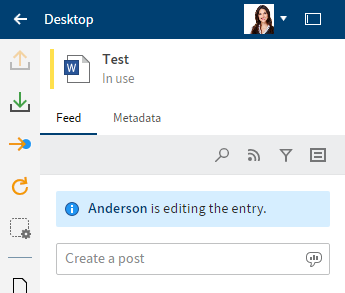
In the Desktop work area, you will see that the document is in use.
Edit the document.
Save the document in the external application.
You do not have to check the document back in right away. You can keep it checked out and edit it later. Use the Edit document function for this.
In addition to the Repository work area, you will also conveniently find the document in your In use work area as long as you have it checked out.
Result
The document is changed locally but not in ELO.
Outlook
To apply your changes to ELO and save your document as a new version, use the Check in function.
Discard document changes: If you want to discard the changes, use this function.
# Check in document
The Check in function files a checked out, changed document to ELO as a new version.
Related function
- Discard document changes: If you want to discard the changes, use this function.
Method
Select a checked out document in ELO.
To transfer the document back to the repository, select Document > Check in on the toolbar.
Keyboard shortcut: ALT + I
Optional: Depending on the setting, the Version comment dialog box may now open. If this is the case, you can enter the version number and relevant comments. This dialog box can be enabled or disabled in Configuration > Dialog boxes > Version comment.
Select OK.
Result
The document is filed as a new version in ELO. The document is removed from the In use work area and can be edited again.
Outlook
To learn how to revert to an older version, refer to the Document versions chapter.
# Narrow down a search request
Available in: Search work area
You can search for documents and folders. The more information you enter about the entry you are looking for, the better the result will be.
This section describes an example of a search. You will find descriptions of the interface and all search options in the chapters 'Search' work area and 'Search' group.
Information
To automatically open the search options when performing a new search, check the box in the configuration under Display > Search.
Example
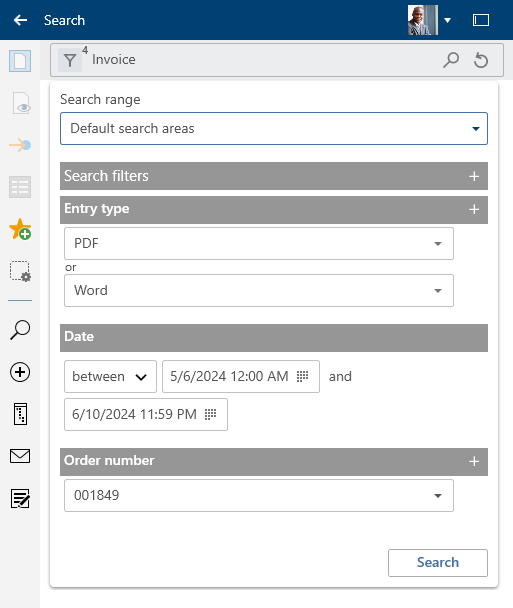
You want to search for a document. You know
- that it is an invoice,
- that it was filed as a PDF or Word document,
- that the document was filed within a specific period,
- the order number,
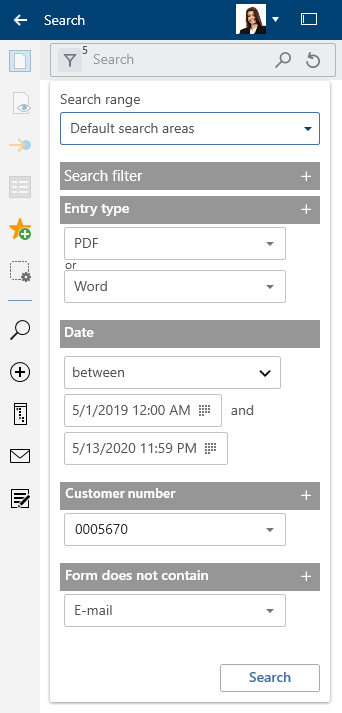
- that it was not filed with the E-mail metadata form.
Method
Enter the search term Invoice in the search field to run a search with ELO iSearch.

While entering a search term, the search-as-you-type function provides search suggestions in a drop-down menu.
Select Search options (filter icon) to show the search options.
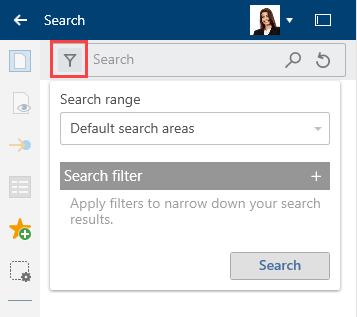
The search options open.
Select the Search range field.
The search range drop-down menu opens. This field is set to "Search all areas" by default.
Uncheck Microsoft Outlook to limit your search to the ELO repository.
Refer to the Manage e-mails section to learn how to perform a combined search in ELO and Microsoft Outlook.
Click the Search range field again to close the Search range field.
Apply search filters to narrow down your search results.
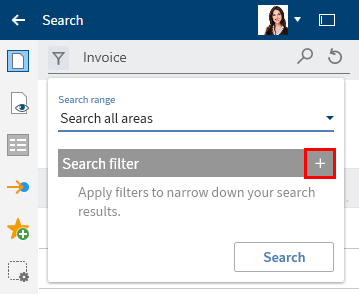
Select Add (plus icon) to apply a search filter.
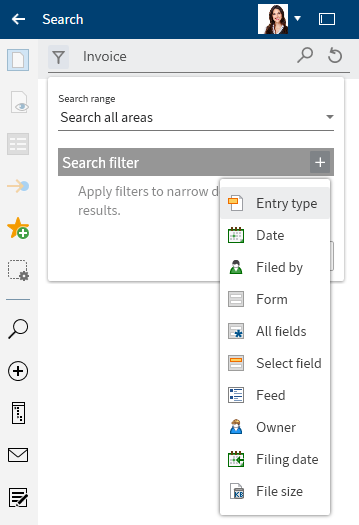
A drop-down menu with available search filters appears.
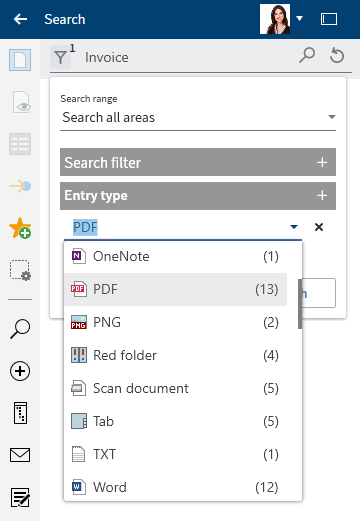
Select the Entry type search filter from the drop-down menu.
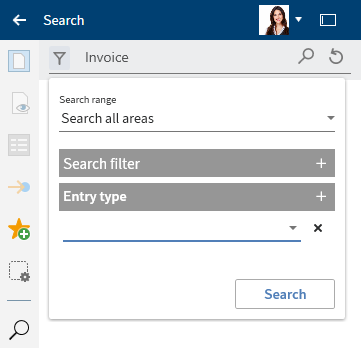
The Entry type search filter appears.
Select the value PDF from the drop-down menu.
Optional: To remove a filter, select the delete icon (X).
Information
The number of entries in ELO is shown in parentheses for each individual value.
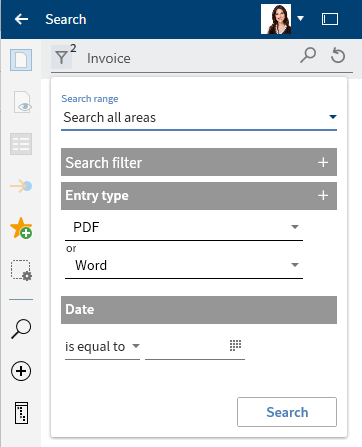
Select Add (plus icon) again to apply an additional search filter.
Select the value Word from the drop-down menu.

The second value from the drop-down menu is applied.
Information
The following search filters work in the same way: Filed by, Form, Feed, and File size.
Add the Date filter.
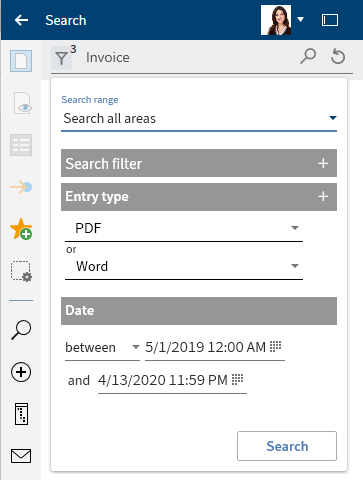
Select the option between from the drop-down menu.

Select the calendar icon to set a custom period. In the calendars, select the dates.
Information
The Filing date search filter works in the same way.
Apply the Select field search filter.
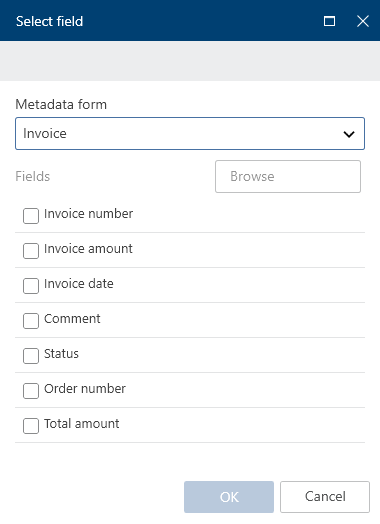
In the Select field dialog box, select the Invoice metadata form from the drop-down menu in the Metadata form field.
Check the box next to the Order number field and select OK.
The Select field search filter is applied.
Select the order number from the drop-down menu.
Select the Form search filter with the value E-mail.
Right-click on the Form search filter.
Click on does not contain. This negates the filter.
Select the magnifying glass icon to start the search.
Keyboard shortcut: ENTER key
Result
This example narrowing down the search with search ranges and search filters is complete.
The results are shown after you enter your search. You can choose between a table view and list view.
Information
The number shown next to the Search options button before the input field indicates how many search filters are active.
Outlook
In the Search work area, you can use the same functions on entries as in the Repository work area, for example edit documents or send entries.
To go to the filing location of the entry, select the entry. On the toolbar, select View > Go to or use the keyboard shortcut CTRL+ G.
You can set the defined search as a search favorite. The Add search favorite section explains how to save a search.
To view an entry in the results list, use the Preview function.
# Assign control
You can assign controls from a form in a Microsoft Office template to a field in the ELO metadata.
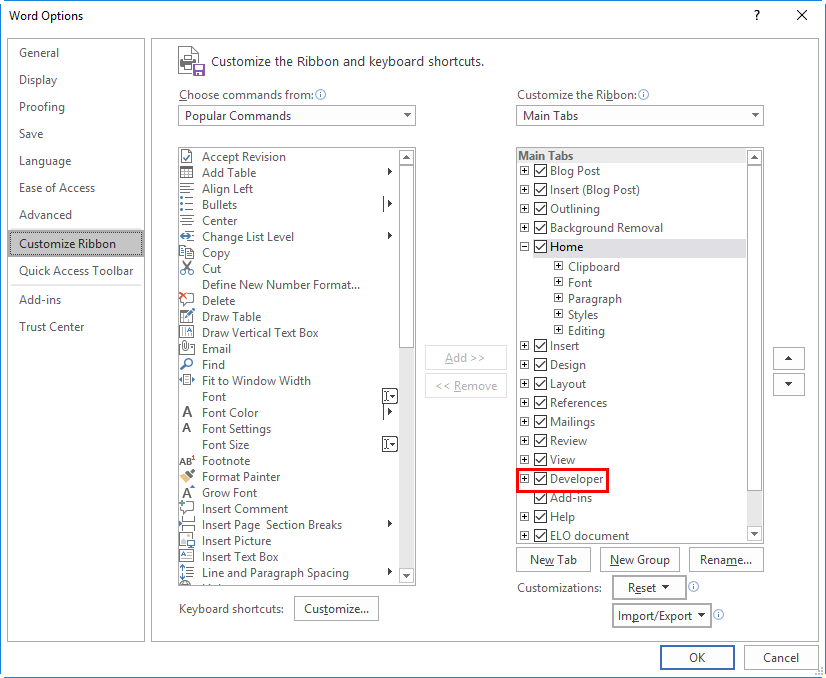
To do so, you need to enable the Developer tab in Microsoft Word: Ribbon > File > Options > Customize Ribbon.
To connect the content of the metadata to the Word form fields, in Metadata > General in the configuration, check the box next to Link the content of the controls from Word to the metadata.
Method
Create multiple controls in a document template in Microsoft Word, for example a content control for selecting the date or a drop-down list content control for the project name.
File the document to ELO and choose the metadata form with the fields you want to link to controls later on. In our example, we select the Report metadata form with the fields Project, Meeting date, Location, and Topic.
Select the filed document in ELO, then select Document > Check out and edit on the toolbar.
The document is opened for editing in Microsoft Word.
Switch to the Desktop work area.
In the Word template, select the control you want to assign to a field in the metadata form.

On the toolbar, select Organize > Assign control.
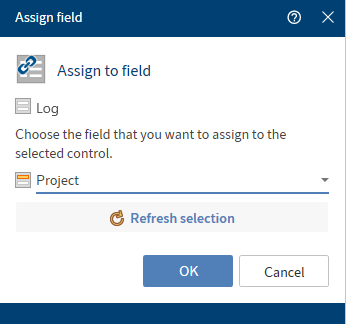
The Assign field dialog box opens with the name of the metadata form.
Choose the field that you want to assign to the selected control from the drop-down menu. In our example, we select the Project field.
Optional: Selecting Refresh selection refreshes the selection in Microsoft Word if you have made any changes in the meantime.
Select OK to close the dialog box.
The control has been assigned to a field.
Repeat this step for the other controls in your document template.
Optional: On the toolbar, select Organize > Overview of controls to check which fields are linked.
Result
The controls are now linked to fields in the ELO metadata.
Outlook
You can now create a report with the document template by pressing the Document from template button. When opening the document template, the Metadata dialog box opens. All information provided within the mapped fields is automatically transferred to the document's form fields.
Once the document has been created and checked back in, the values of the mapped fields are automatically checked and the content of the metadata form automatically adjusted.