# Create tiles
You can create tiles that provide you with quick access to a specific area of the repository. These types of tiles are called views.
A new view is displayed as a tile in the tile navigation on your My ELO home screen.
You can create two types of views:
- Folder view: A folder view takes you straight to a frequently used folder.
- Task view: A task view shows you tasks with criteria you selected (e. g. tasks with expired deadlines).
Information
Like views, search favorites are displayed as tiles on your My ELO home screen. You will find more information about search favorites in the: Save search chapter.
# Create folder view
You can create views for folders in the Repository work area that you use frequently.
Method
In the Repository work area, select the folder you want to create a view for.
On the ribbon, go to the View tab and select New view.
Keyboard shortcut: ALT + N
In the New view dialog box, the name of the folder is automatically displayed in the Name field. You can change this name if you want to use a different one.
In the Folder area, the folder that you just selected in the Repository work area is already selected. You can select a different folder if you want to.
Select OK.
Result
A tile is created for the new view under the Repository group in the tile navigation.
Outlook
- You can drag and drop a tile to another position.
- You can also pin a tile to the navigation bar using the context menu (right-click). For more information, refer to the Tile navigation chapter.
- If you have created multiple views, you have the option to group them. To learn how to create a group in the tile navigation, refer to the chapter Create group.
- You can rename or delete a folder view. To do so, select View > Views > Manage views on the ribbon and select the corresponding view in the dialog box.
# Create task view
You can create task views with your own custom criteria, for example with a high priority.
A task view creates a tile that gives you direct access to the tasks meeting the selected criteria.
Please note
Tasks displayed in a task view based on the criteria you set are no longer visible in the Tasks work area. You can access these tasks from the corresponding task view tile in the My ELO work area.
Method
Navigate to the Tasks work area.
On the ribbon, go to the View tab and select New view.
Keyboard shortcut: ALT + N
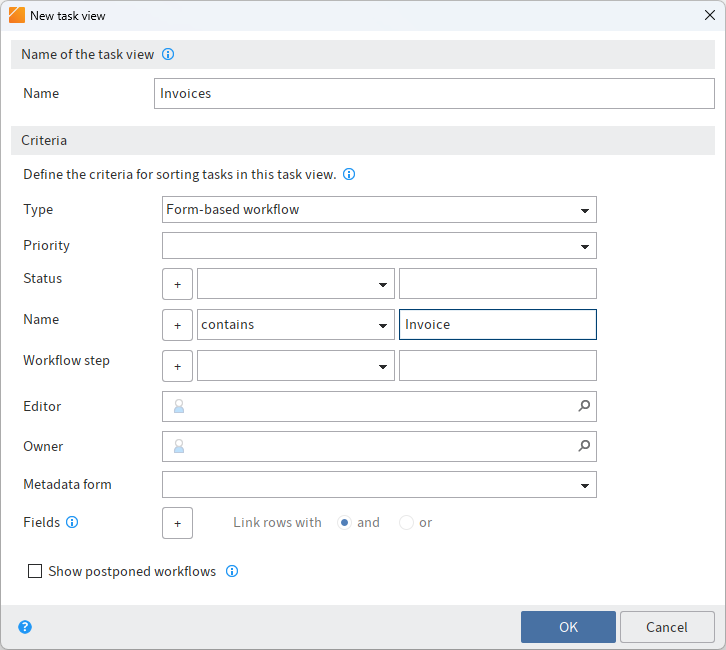
In the New task view dialog box, define the criteria for showing tasks in the task view.
Some fields are only enabled based on other fields. For example, Fields is enabled once you have made a selection under Metadata form.
You can set the following criteria:
Type: You can select the type of tasks that should be filtered for here. If no task type is selected, all tasks are displayed.
Priority: Use the Priority drop-down menu to specify the priority according to which you want to filter the tasks. Only tasks with the selected priority are displayed. If no priority is selected, all tasks are displayed.
Status/Name/Workflow step: Use the drop-down menu and the input field to define which criteria the status, name, or workflow step of the tasks must meet for the corresponding tasks to be displayed.
Use the drop-down menu to select which condition applies.
In the input field, enter the character string that the selected condition should be applied to. To enter multiple strings, separate the entries with the pilcrow character
¶.Editor: Select an editor of the tasks. Suggestions will appear as soon as you start to type. The task view only contains tasks assigned to the selected editor.
Owner: Select an owner of the tasks. Suggestions will appear as soon as you start to type. The task view only contains tasks assigned to the selected owner. The owner is the user who started the workflow.
Metadata form: Use the Metadata form drop-down menu to select a metadata form if you only want tasks with the corresponding metadata form to be displayed in the task view.
Fields: If you have selected a metadata form, you can use the plus sign to add fields so that you can filter by their contents.
Select the field from the first drop-down menu. In the second drop-down menu, select which condition applies.
In the input field, enter the character string that the selected condition should be applied to.
If you add multiple fields, you can connect the lines with and or or.
Show postponed workflows: If this workflows option is enabled, postponed workflows will also be displayed within the new task view.
Select OK.
Result
A tile is created for the new view under the Tasks group in the tile navigation.
Outlook
- You can drag and drop a tile to another position.
- You can also pin a tile to the navigation bar using the context menu (right-click). For more information, refer to the Tile navigation chapter.
- If you have created multiple views, you have the option to group them. To learn how to create a group in the tile navigation, refer to the chapter Create group.
- You can rename or delete a task view. To do so, select View > Views > Manage views on the ribbon and select the corresponding view in the dialog box. You will find more information on the Tasks work area in the Program interface > Tasks chapter.
# Edit and delete tiles
Use the Edit view function to edit the settings of a folder, task, or search view.
The Delete view function enables you to delete the selected folder view or task view.
Alternatively, you can use the Manage views function.
These functions can be accessed via Ribbon > View > Views.