# Administration
This chapter contains information on administrative tasks in the ELO Web Client.
# Configuration
You can make a number of settings on the configuration page of the ELO Web Client.
You can access the configuration via User menu [your name] > Configuration.
# Categories
The settings on the configuration page are divided into categories. When you open a category, you see the settings of the selected category. The settings are grouped by topic within the category.
You will find an i with additional information next to each setting.
# Configuration sets
The different settings are separated into groups. These groups are called configuration sets.
As the main ELO administrator, you have the right to manage all configuration sets. You can assign configuration sets to or remove them from users and option groups.
Information
Each user only sees the settings that were assigned to them via the configuration sets. Only you will see the sets themselves.
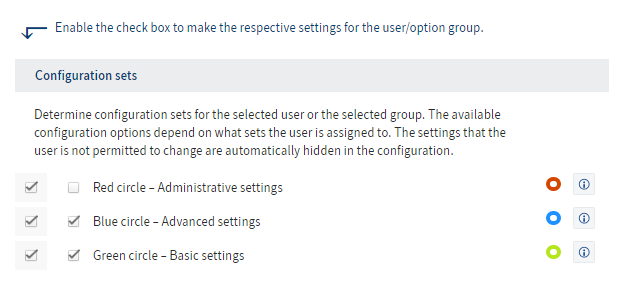
The following configuration sets exist:
- Red circle: Refers to administrative settings that have a significant impact. This set should be restricted to administrators.
- Blue circle: Refers to the settings that have a significant impact.
- Green circle: Refers to settings that do not have a significant impact.

Next to each setting, you will see which set they belong to.
Assign configuration sets
To assign a user or group a configuration set, proceed as follows:
Click Select user and select the user or the group.
Click the Configuration sets category and select the desired configuration sets.
The changes are saved automatically.
# Who do these settings apply for?
First, you need to select who you want to change the settings for. The following modes are available:
My configuration: All settings only apply to your own account. The configuration opens in this mode.
Create configuration for user/group: The settings apply for a certain user or users in an option group. To select this mode, click the Select user button and choose a user or an option group.
Please note
Option groups cannot be used to transfer permissions.
Create global configuration: The settings apply for all users. To select this mode, click the Select user button and choose Everyone.
Important
When you have changed a setting, leave the check box to the far left selected. If you clear the check box, the ELO Web Client restores the default settings.
# Apply ribbon settings
This function enables you to apply the functions of the ribbon for another user or another option group.
Click Select user and select the user or the group you want to apply the ribbon settings for.
Click Apply ribbon settings. Here, select the user or group whose ribbon settings you want to apply.
The functions on the ribbon of the two users/groups are now identical.
# Inheritance hierarchy of the settings

The ELO Web Client verifies which settings apply for which user at three levels. If there is an individual setting for a user, ELO uses this setting. If there are no individual settings for a user, the ELO Web Client checks whether the user is a member of an option group. If this is the case, the settings of the option group apply. The default values apply if no settings have been configured.
Custom user settings: This item only appears if you create a configuration for an option group. Use the Remove custom settings button to make sure that all users of an option group have indeed been assigned the same settings.
Please note
The Remove custom settings action is required if the members of an option group have previously had access to certain settings. If you now remove a configuration set from an option group, this option group has fewer settings to choose from. Changes made up to this point must be overwritten once.
# Home screens and entry points
The ELO Web Client has multiple start pages and entry points. Each entry point redirects to the respective start page. Different functions and areas are available depending on the start page.
Information
The default language is determined based on your browser's language setting. However, you can change the language in the logon dialog box or in the start parameters.
# Start pages
Choose from the following start pages:
- Main page
- Direct view
# Main page
This page offers the full functionality of the ELO Web Client.
The following entry points are also available for the main page:
# Manual logon
http://<host>:<port>/web-<repository name>/
Example: http://DELOSERVER:9090/web-Repository/
You will be redirected to the logon page. You must enter your user name and password.
If logon is successful, you will be redirected to the main page of the program. If logon fails, a corresponding error message is shown. In this case, correct your logon data and click OK.
Information
If you are logging on manually, the name you entered stays the same when you change the language settings or log on to the system again.
# Alternative (start parameters possible)
http://<host>:<port>/web-<repository name>/login.html
Example: http://DELOSERVER:9090/web-Repository/login.html
This entry point also redirects you to the logon page. You can add other start parameters to the entry point, which will affect various settings (e.g. client language, start page, etc.).
# Single sign-on (SSO)
http://<host>:<port>/web-<repository name>/sso.html
Example: http://DELOSERVER:9090/web-Repository/sso.html
This page uses SSO to log on to the repository. If logon is successful, you will be redirected to the main page of the ELO Web Client. Otherwise, it will revert to the manual logon page.
# Alternative (start parameters possible)
http://<host>:<port>/web-<repository name>/login/index.jsp
Example: http://DELOSERVER:9090/web-Repository/login/index.jsp
This entry point provides an alternative to SSO. You can add other start parameters to the entry point, which will affect various settings (e.g. client language, start page, etc.).
# Direct view
This is not a start page in the conventional sense but more of an interface that you can open documents in. This requires a GUID as an additional parameter that automatically provides the browser with a link that refers to the document with the GUID entered. If the browser cannot display the document, then a message or pop-up window will appear, depending on the browser setting.
Use the following entry point for direct view:
# Log on with GUID
http://<host>:<port>/web-<repository name>/guid.jsp?guid=<GUID>
Example: http://DELOSERVER:9090/web-Repository/guid.jsp?guid=(4BE6C7FB-7F13-4297-93E5-3A26AD22EFEF)
For compatibility reasons, this logon redirects you to the direct view. You also need to enter a GUID as a parameter.
# Access via start parameters
You can enter additional parameters for some logons. These parameters are attached to the URL when called. Always separate the first parameter from the URL with an ?. All additional parameters are separated with an &. The respective value is specified with an =.
http://<host>:<port>/web-<repository name>/ix/login.jsp
For example: http://ELOSERVER:9090/web-Repository/ix/logon.jsp?locale=fr&user=Anderson
The following parameters are available:
locale: Determines the language setting for the current session. The ELO Web Client currently supports the following languages: Danish, German, English, Finnish, French, Greek, Indonesian, Italian, Dutch, Portuguese, Portuguese (Brazil), Polish, Romanian, Swedish, Serbian, Slovakian, Spanish (International), Spanish (Latin America), Czech, Turkish, and Hungarian.
startPage: Determines the landing page that opens after logging on. The following values are allowed: main page = 1, and direct view = 3.
GUID: GUID of a document, required for the document view and can be specified for the main page. Enter the GUID of a document in parentheses, e.g. (9C0E2DA7-C1C6-4856-90D7-A50DA876F252).
# Log on with authentication start parameters
http://<host>:<port>/web-<repository name>/ix/urlLogin.jsp?user=<user name>&pw=<password>
Enter the parameters for the user name for this logon page (user) and password (pw). After SSO, additional parameters are evaluated and you are then redirected to the corresponding start page.
Please note
This logon page displays the user name and password in plain text. If Secure Socket Layer (SSL) was enabled, the parameters are encrypted but will still appear in plain text in the browser or in the browser history. This also applies for server logs.
# Settings via the ELO Application Server Manager
Use the ELO Application Server Manager or the URL <server>:<port>/web-<repository name>/status to call the ELO Web Client status page.
For example: http://ELOSERVER:9090/web-Repository/status
This page shows the installed client version. You can also change settings.
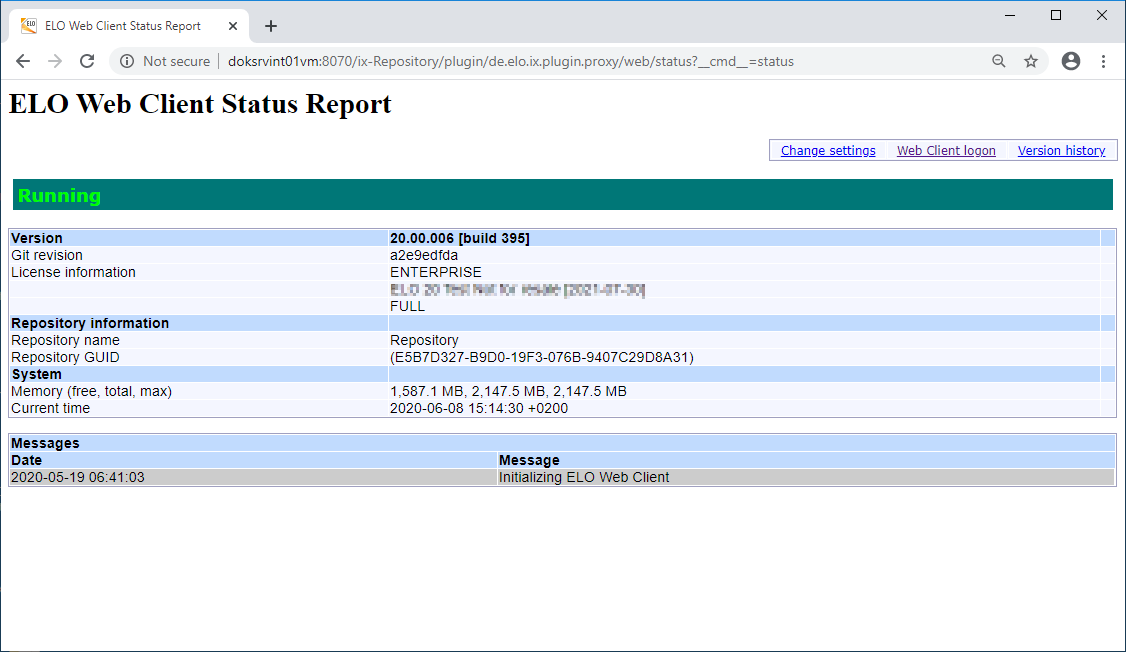
# Change settings
Click the Change settings link.
Information
You need to log on as ELO administrator to make any changes to the configuration settings.
Enter your ELO administrator logon and the corresponding password, then click OK.
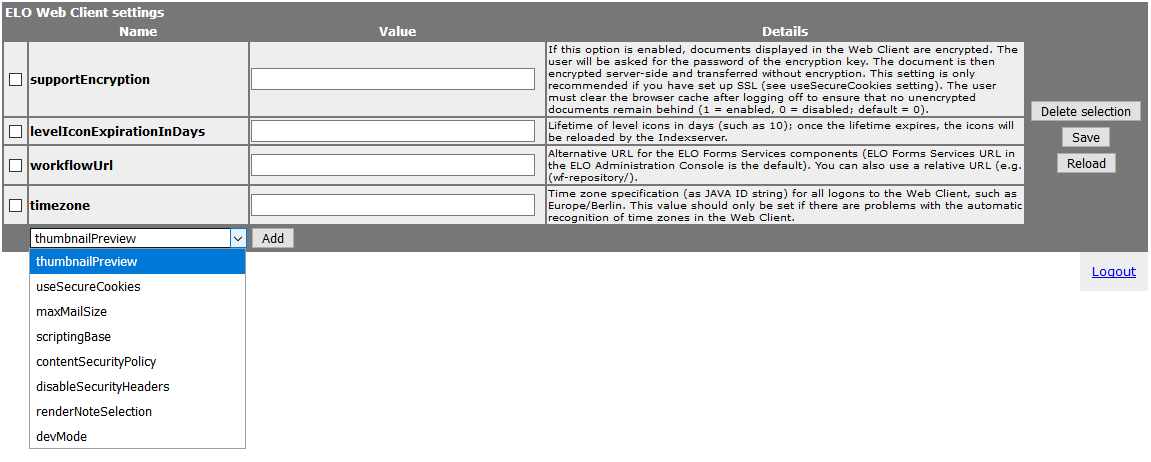
The ELO Web Client settings page appears.
Use the drop-down menu to add different options to the view.
When you select and add an option from the drop-down menu, an explanation appears in the last column.
Change the settings as required.
Click Save to save the changes you made.
The new settings are applied.
# Delete selection
If you want to undo a setting, delete the entry from the list.
Select the setting that you want to delete by clicking the check box next to the respective setting. To do so, select the check box next to the respective setting.
Click the Delete selection button.
# Reload
Click Reload to reload the page.
Please note
Unsaved changes will be lost if you use the Reload function.
# Web Client logon
Use the Web Client logon link to go to the page for manual logon. Log on with your logon credentials. You are redirected to the main page of the ELO Web Client.
# Version history
Click the Version history link on the status page of the ELO Web Client to open the current version history of the ELO Web Client. Here you can see what changes were made in the most recent updates.
# Troubleshooting
# Display errors in Internet Explorer
The ELO Web Client supports the current versions of all common browsers.
Problem: In Microsoft Internet Explorer, there may be some display errors when in compatibility view mode.
Solution: Check whether compatibility view is enabled and disable it.
Information
The following instructions apply to older versions of Microsoft Internet Explorer. Starting with version 11, the following configuration can no longer be made.
Open Microsoft Internet Explorer.
Press the F12 key to activate the developer tools.
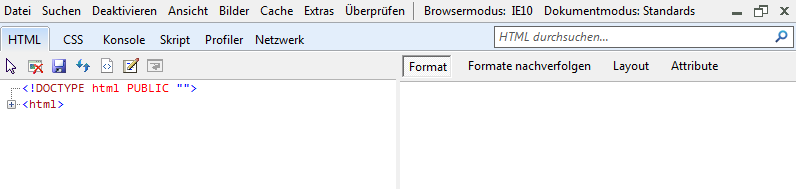
A window with developer tools appears.
Click the Browser Mode menu name.
A drop-down menu appears.

Check the option Internet Explorer 10. Follow the same procedure for Internet Explorer 9.
Click the Document Mode menu name.
A drop-down menu appears.

Check the option Standards (Page default).
Click Close.
Result: Compatibility view is disabled.
# Display errors in the intranet
Problem: Microsoft Internet Explorer enables compatibility view by default when you access the ELO Web Client via an intranet connection. This may lead to display errors.
Solution: Change the compatibility view settings.
Open Microsoft Internet Explorer.
Press the ALT key to show the menu bar.
Click Extras in the menu bar.
A drop-down menu appears.
Click the Compatibility View Settings option.
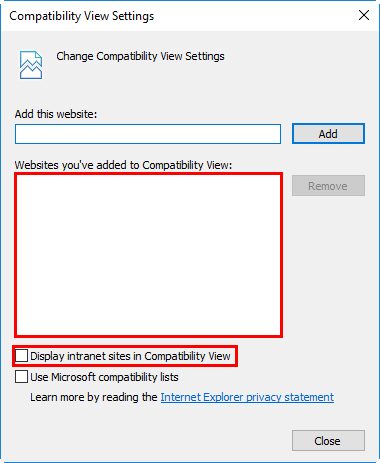
The Compatibility View Settings dialog box appears.
Remove the address of the ELO Web Client from the list of websites to be displayed in compatibility view.
Uncheck the option Display intranet sites in Compatibility View.
Click Close.
Result: Compatibility view for intranet sites is disabled by default.
# Configuration file
When you install the ELO Web Client, a service account reads the configuration files. The installation process writes the entries to the configuration file of the ELO Web Client, config.xml. The password is encrypted.
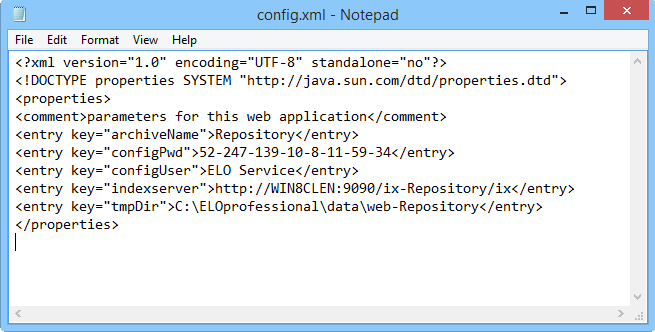
You can also make these settings manually by entering the corresponding values for configUser and configPwd.
# Change the password for the service account
If you changed the password for the service account, enter the changed password to configPwd.
Optional: To enter your password encrypted, use the password.bat help program from the ELO Server Setup directory.
Please note
If you enter the password for the service account unencrypted, a message will be issued in the log file of the ELO Web Client (example: web-arc-001.log) along with an indication of the encrypted password. Enter the encrypted password string to the config.xml configuration file under configPwd.