# Complete tasks with workflows
Using workflows, you can assign other users or groups tasks.
An integrated escalation management function allows you to track whether the set deadlines are met once a workflow is started.
Tasks are displayed in the Tasks work area. The Refresh function updates your task list. New tasks are indicated by a green dot.
Information
Monitoring functionality is also available in the Tasks work area. You will find more information in the Organize entries > Monitor changes chapter.
# Start workflow
The following options are available for starting workflows:
- Start ad hoc workflow function
- Start workflow function
Ad hoc workflows are simple, predefined workflows available in ELO. The workflows available to you when you run the Start workflow function were defined by your company.
Information
To allow changes to the template when starting the workflow, enable the option Start workflow in edit mode (Ribbon > User menu > Configuration > Advanced settings > Workflow).
You can learn how to start an ad hoc workflow in the Ad hoc workflow section.
Method
Select the entry (folder or document) you want to start a workflow for.
On the New tab, select the Start workflow function.
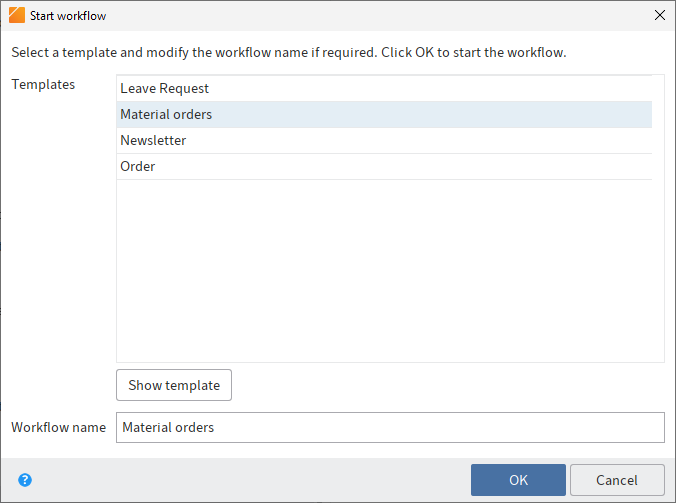
Select a workflow template.
Show template: You can see the individual steps of the workflow here. As the workflow is already configured, you do not have to configure any additional settings.
Information
To allow changes to the template when starting the workflow, enable the option Start workflow in edit mode (Ribbon > User menu > Configuration > Advanced settings > Workflow).
In addition to the workflow steps, you will see the respective editor and, if applicable, the time allowed for the workflow step until escalation (days:minutes:seconds).
Outlook
Once you have started a workflow, it will appear in your My ELO work area under My recently started workflows.
You can view workflows for an entry using the function Workflows for this entry (available in: Ribbon > Organize).
You can find information about creating a workflow template in the ELO workflow (opens new window) documentation.
# Start ad hoc workflow
The Ad hoc workflow function (available in: Ribbon > New > Create task) enables you to start a new ad hoc workflow.
Ad hoc workflows are simple, predefined workflows available in ELO. You can use an ad hoc workflow to route an item to users for approval or to notify users.
Method
Select the entry you want to start an ad hoc workflow for.
On the ribbon, select the New tab > Create task > Ad hoc workflow.
Configure the settings for the ad hoc workflow.
Select Completion options and configure additional settings for the ad hoc workflow here, for example:
Success message: The text from this field is shown to the recipient once the ad hoc workflow has been completed. It appears in the recipient's Tasks work area.
Cancellation message (approval workflows only): The text from this field is shown to the recipient if the ad hoc workflow has been canceled. It appears in the recipient's Tasks work area.
Withdraw the workflow from all users as soon as one user does not approve it (parallel approval workflows only): If this option is enabled, all recipients must approve the workflow. Otherwise, the ad hoc workflow is canceled entirely and the task is removed from the tasks of the other selected users. In your tasks and on your home screen, the message Not approved will appear in My ELO under My recently started workflows.
End script: If required, select a script that is executed after the ad hoc workflow is completed.
Select OK.
Result
The workflow is started and displayed in the Tasks work area of the selected users.
# Settings for the ad hoc workflow
The following options are available:
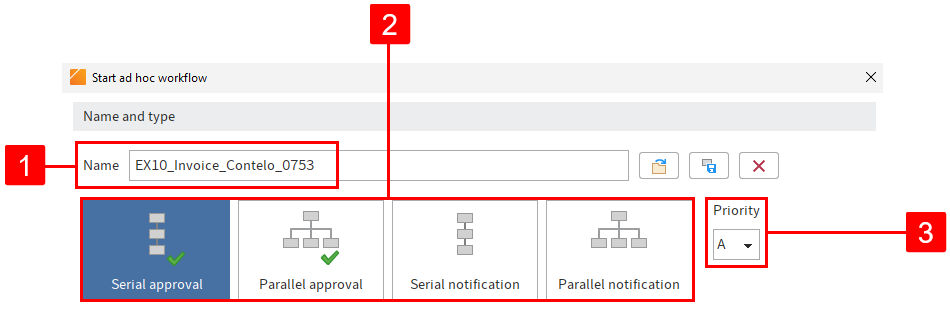
1 Name: Workflow display name
2 Ad hoc workflow type: Serial workflows are forwarded to the responsible users sequentially. Parallel workflows are sent to all involved users at the same time.
3 Priority: You can sort and filter the task list according to priorities.

4 Load ad hoc workflow from template (folder icon): Opens ad hoc workflows saved as a template.
5 Save as template (disk icon): Saves the current ad hoc workflow as a template. You can assign a name to the template.
Information
With the default settings, templates are only available to the user who creates them. However, a user with the corresponding permissions can forward these templates to other users as a reference/copy. The references/copies must be saved to the AdHoc Templates folder of the respective user.
6 Delete an existing template (X icon)
Please note
If you delete the original template, any references that you have created will also be deleted.
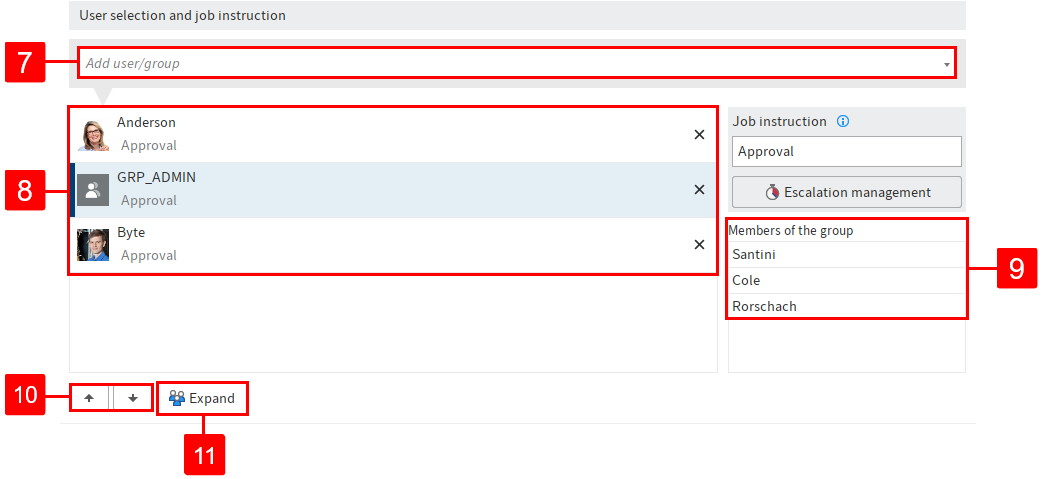
7 Add user/group
8 Users and groups that were added to the workflow
9 Members of the group: This list appears if you select a group.
10 Change order: To change the order of recipients in serial ad hoc workflows, select a recipient and change their position using the arrows (or drag-and-drop).
11 Expand: Show the individual members of a selected group. To do so, select the corresponding group and then click Expand. You can remove members by selecting the X icon.
Information
If the group is selected, one member of the group can accept and process the workflow. If you expand the group, every member of the group can accept and process the workflow.
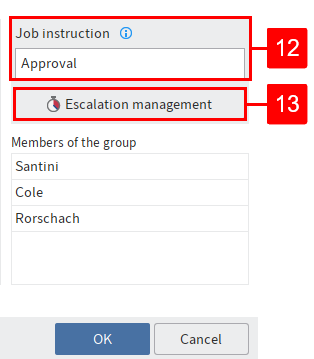
12 Enter job instruction: Enter the individual job instruction for the user selected in the list here. You can select multiple. The user sees the job instruction in the Workflow step column of the Tasks work area as soon as they have accepted the workflow.
Information
The job instruction can have a maximum of 128 characters.
13 Escalation management: Specify how long the workflow may remain with the respective user or group here. You can also select a user or group to be notified if the deadline is missed.
Information
If the workflow has escalated, it appears in the Tasks work area of the responsible users and in My ELO under Escalated workflows. Selecting an escalated workflow in My ELO takes you to the escalated workflow in your Tasks work area.
# Edit workflow
When you receive a workflow task, it will appear in your Tasks work area. You can see what task you are being requested to perform in the Workflow step field.
You have the following options for completing your task:
The workflow contains a form. You will see the form in the viewer pane on the Form or Metadata tab. In this case, forward the workflow by selecting the button on the form.
You can use the 'Forward workflow' function to process the workflow in a dialog box. You must have enabled the option Process tasks with "Forward workflow" dialog box in the configuration under Advanced settings > Workflow.
Information
You can also forward a workflow by double-clicking the entry in the task list.
You received the workflow as a member of a group. In this case, you have to accept it first by selecting the Accept workflow button on the Task tab. This prevents the workflow from being processed by multiple users at once. Once you have accepted a workflow, it will disappear from the task list of the other group members.
Information
If you are unable to accept a group task, you need the corresponding role. You can enable roles via User menu > Enable roles.
Information
If a group member selects or accepts a group task, the task is marked as read for all group members. If a group task is returned, it remains marked as read for all group members.
# Method with form
If you receive a workflow that you want to forward with a form, you can edit it on the Form or Metadata tab in the viewer pane.
Select the workflow that you want to forward.
Edit the fields of the form as indicated in the task.
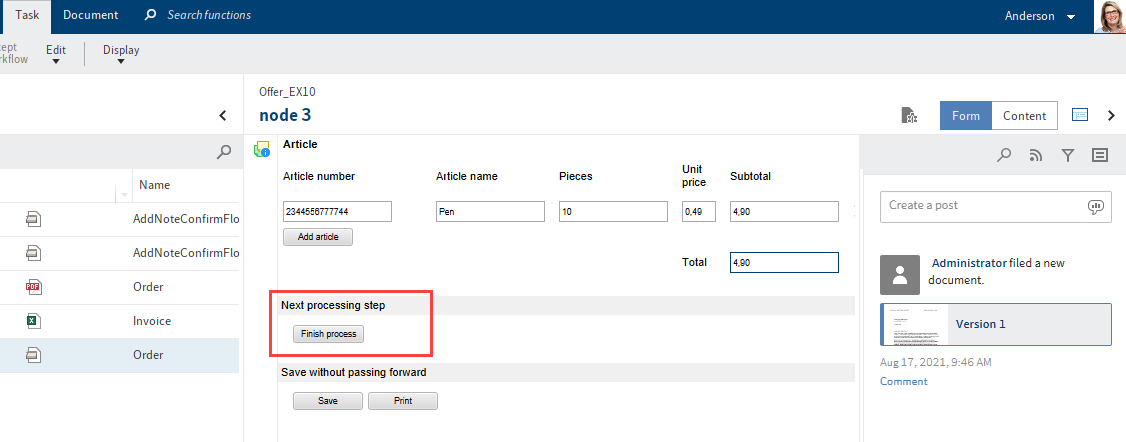
To forward the workflow, select the corresponding button within the form.
Depending on which settings apply for the current node, you can select one or more successor nodes under Forward.
# Method with dialog box
Select the workflow that you want to forward.
On the Task tab, select the Forward workflow function.
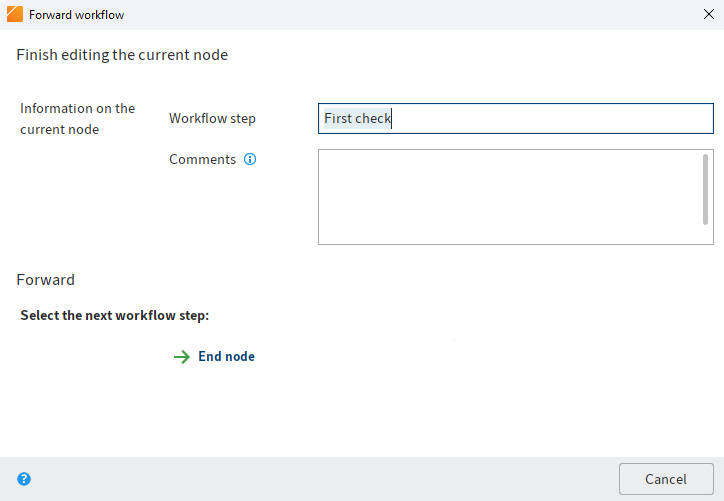
You can make the following settings:
Workflow step: Enter the name of the workflow node here.
Comments: Enter a message or instructions for the next user here.
Please note
You can only view the comment if you navigate to Organize > Overviews > Workflow overview and enable the List view.
As soon as you click the name of the successor node, the node is forwarded and the dialog box closes.
Select the next workflow step: Depending on which settings apply for the current node, you can select one or more successor nodes in the Forward area.
# Show workflow
In this dialog box, you can view and edit existing workflow tasks.
Click a workflow node in the workflow diagram to get more information on the node settings.
You will find more information in the chapter Workflow designer.
# Return workflow
Available in: Tasks work area > Ribbon > Task > Edit
Use this function to return a workflow node to the group that was originally assigned the node. The group is displayed again in the workflow node.
# Delegate workflow
Available in: Tasks work area > Ribbon > Task > Edit
Use this function to delegate a workflow node to another user. The user is displayed in an additional node in the workflow. Use the Delegate workflow dialog box to specify whether you want to be notified after completing the workflow task.
Information
Whereas in the Hand off workflow function, another user is assigned the workflow node, the Delegate workflow function creates an additional node for the user. The original assignment remains unchanged.
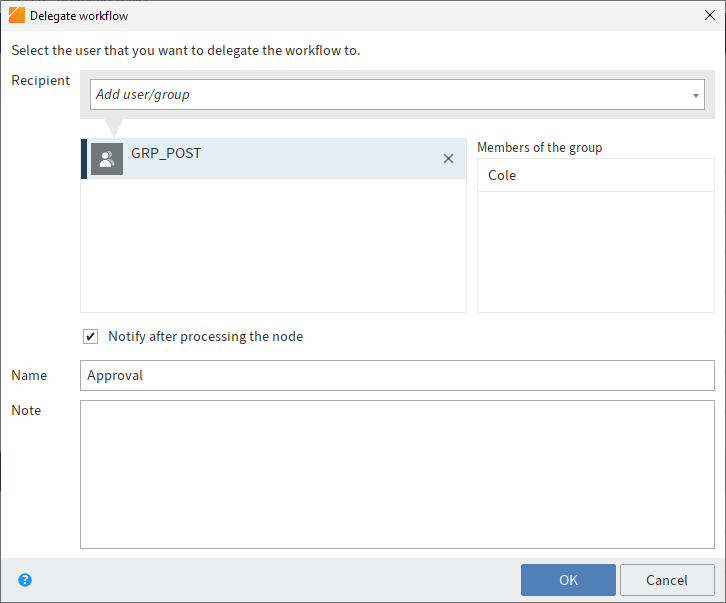
# Recipient
Search for the desired user or group in the Add user/group field. Suggestions will appear as you type.
Click the corresponding suggestion to select a user or a group.
Alternative: If you click the triangle to the right of the Select user/group field, this will open a drop-down menu. This menu contains a list of the users and groups you selected recently.
# Members of the group
If you select a group, a list of members appears.
Double-click the corresponding user in the Members of the group column to select a member of a group.
# Clear selection
To cancel the selection, click the X icon next to the selected user or group.
Return task to me after the node is processed: If this check box is selected, you will receive a notification after the node is processed.
# Name
Change the name of the task if required.
# Comments
Write a note or a job instruction for the user you are delegating the workflow node to.
# Hand off workflow
Available in: Tasks work area > Ribbon > Task > Edit
Use this function to transfer an active workflow node to another user. The user is displayed in the node and the workflow appears in the user's Tasks work area. The new user is entered in place of the original user.
Unlike the Delegate workflow function, you hand off the workflow step entirely and are no longer notified of the progress of the workflow.
# Mark as unread
Available in: Tasks work area > Ribbon > Task > Edit
This function enables you to mark a task as unread. The task is indicated by a green dot.
# Group tasks
Available in: Tasks work area > Ribbon > Task > Display
Use this function to add the group tasks to the list in the Tasks work area. Group tasks are tasks that were assigned to multiple persons, e. g. a department. To display group tasks in your task list, you need to be a member of the corresponding group.
You can tell whether the Group tasks function is enabled by the border around the button.
Information
If you are unable to accept a group task, you need the corresponding role. You can enable roles via User menu > Enable roles.
# Postpone workflow
Available in: Tasks work area > Ribbon > Task > Edit
Use the Postpone workflow function to suspend processing of a workflow. You can specify a date until which a workflow will be hidden in the Tasks work area. Once the date has been reached, the workflow appears in the list again. In the Postponement date column, you can sort postponed workflows in the task list in the Tasks work area.
You can create a task view that gives you an overview of your postponed workflows. You can find more information in the Create tile chapter.
Use the Cancel postponement function to cancel a workflow postponement. In the Postponement date column, you can sort postponed workflows in the task list in the Tasks work area.
# Cancel postponement
Available in: Tasks work area > Ribbon > Task > Edit
Use this function to cancel postponement of a workflow. If a workflow has been postponed, it remains active but is hidden in the Tasks work area.
Add a new task view to show the hidden workflows. For example, you can configure the view to only show postponed workflows. Switch to the Tasks work area > View tab. Select New view. Create a new view in the dialog box, enter the name Postponed workflows and enable the Show postponed workflows option.
To cancel a postponement, select the corresponding workflow and select Cancel postponement.
Information
If the Postponement date column is not displayed, there are two ways to show the column: Right-click the row with the table heading and select the check box in the drop-down menu before the Postponement date column name.
Alternative: In the gray toolbar, click Display options > Table > Restore table columns. The default table settings are restored. The Postponement date column is shown again.
# Extend workflow deadline
Available in: Tasks work area > Ribbon > Task > Edit
Use this function to extend the deadline of a workflow. The function can only be used with workflows that have passed a deadline.
Specify how many days, hours, and minutes you want to extend the deadline by.
The new deadline is displayed in the New deadline column.
The responsible user is displayed in the Responsible column.
Please note
This function does not apply to individual nodes but to the maximum duration that is specified at the start node.
# Escalations
Available in: Tasks work area > Ribbon > Task > Display
Use this function to display tasks with overdue deadlines and those for which you are entered as the responsible user in the Escalation management dialog box. The Show workflow function allows you to check at what point the task was escalated.
You can tell whether the Escalation function is enabled by the border around the button.
If a task is escalated, a red icon with a white exclamation mark is displayed in the Priority column of the task list.
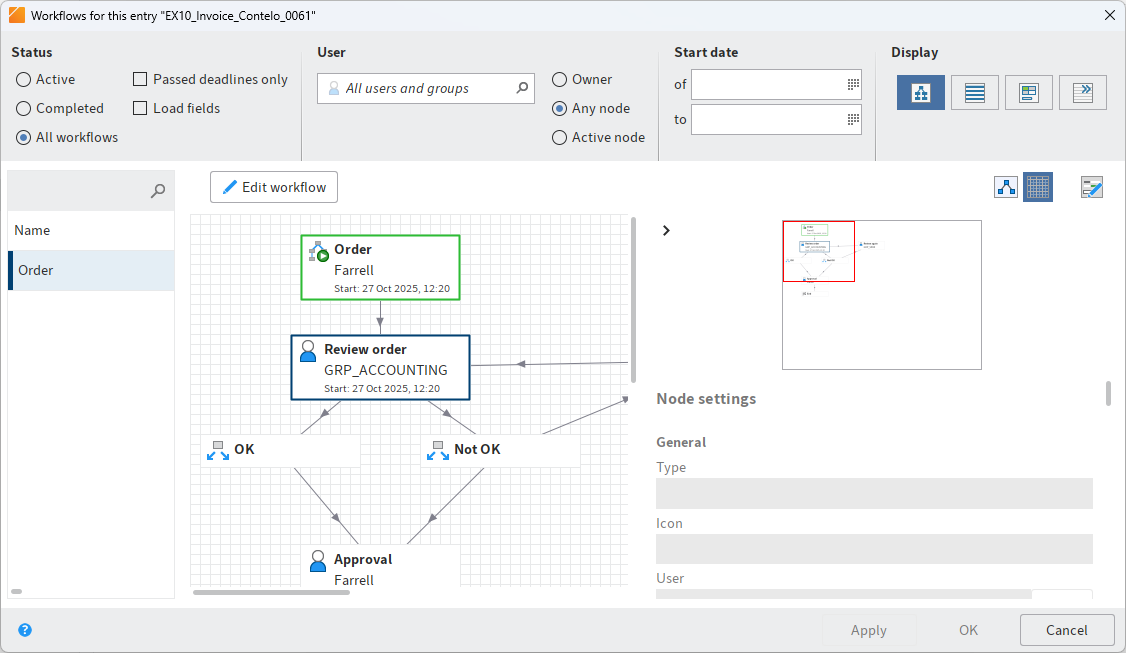
# Workflows for this entry
Use this function to open an overview with all workflows that exist for this entry. You can adjust the settings for viewing workflows.
Information
Hold down the left mouse button to adjust the size of the viewing panes. Drag the splitter bar at the right-hand corner of each window.
The workflows are listed as a table on the left-hand side. The selected workflow is shown as a diagram on the right-hand side. The status of the respective node is indicated by the colors in the diagram.
- Green: Node completed successfully
- Blue: Current node
- Red: Escalated node
- Gray: Future node
# Status
Select which workflows you want to view.
Information
You will only see workflows that you have permissions for.
Choose from the following options:
- Active: If this option is selected, you will only see active workflows.
- Completed: If this option is selected, you will only see workflows that are completed.
- All workflows: If this is selected, all workflows will be displayed.
- Passed deadlines only: If this option is selected, you will only see escalated workflows. This option can be selected in combination with Active, Completed, or All workflows.
- Load fields: If this option is enabled, the available metadata is shown in the drop-down menu under the columns with the title Index. This option can be selected in combination with Active, Completed, or All workflows. This option can also be combined with the Passed deadlines only option.
Please note
The Load fields option can increase loading times.
# Users
To filter the view, search for a user or group in the All users and groups search field. Suggestions will appear as you type. Select the desired user or group.
To cancel the selection, click the X icon next to the selected user or group.
Once you have selected a user/group, you can narrow down the list by selecting additional filter options:
- Owner: If this option is enabled, you only see workflows that the selected user/group is the owner of. The owner is the user who started the workflow.
- Any node: If this option is enabled, you only see workflows in which the selected user/group is entered as the editor of at least one node.
- Active node: If this option is enabled, you only see workflows in which the selected user/group is entered as the editor of the node.
# Start date
from/to: Define how long you want the workflow to show up in the overview. The start date of the workflow must be within this period.
# Display mode
Choose from the following options:
- Diagram view: If you select this option, the drop-down menu and the diagram for the selected workflow are displayed.
- List view: If you select this option, the drop-down menu and a detailed overview of the selected workflow are displayed.
- Form view: Select this option to view the drop-down menu and the workflow form for the selected workflow. The workflow form must be specified in the start node.
- No details: If this option is enabled, only the drop-down menu is displayed.
Apply: Select Apply to save the changes. The dialog box remains open.
OK: Select OK to save changes and close the dialog box.
Cancel: Select Cancel to close the dialog box without saving the changes.
You will find more information on the topic of workflows in the ELO workflow (opens new window) documentation.
# Workflow overview
Available in: Ribbon > Organize > Overviews
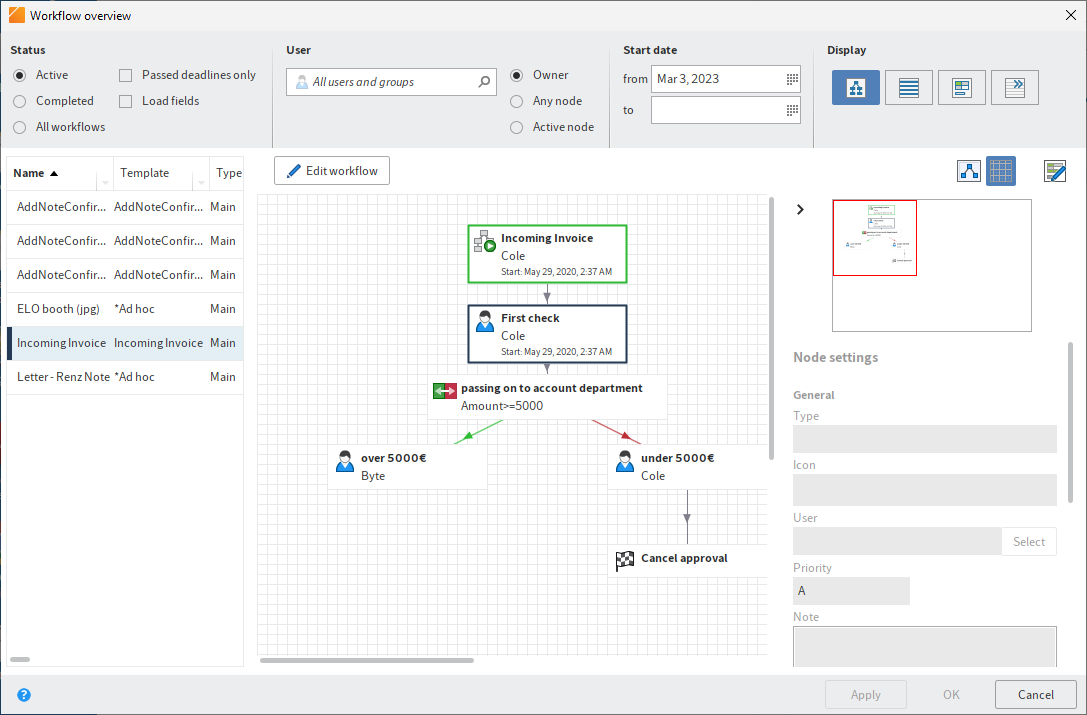
This dialog box contains an overview of all existing workflows. To view the details of a workflow, select the corresponding workflow from the list on the left.
Information
Hold down the left mouse button to adjust the size of the viewing panes. Drag the splitter bar at the right-hand corner of each window.
The workflows are listed as a table on the left-hand side. The selected workflow is shown as a diagram on the right-hand side. The status of the respective node is indicated by the colors in the diagram.
- Green: Node completed successfully
- Blue: Current node
- Red: Escalated node
- Gray: Future node
# Status
Select which workflows you want to view.
Information
You will only see workflows that you have permissions for.
Choose from the following options:
- Active: If this option is selected, you will only see active workflows.
- Completed: If this option is selected, you will only see workflows that are completed.
- All workflows: If this is selected, all workflows will be displayed.
- Passed deadlines only: If this option is selected, you will only see escalated workflows. This option can be selected in combination with Active, Completed, or All workflows.
- Load fields: If this option is enabled, the available metadata is shown in the drop-down menu under the columns with the title Index. This option can be selected in combination with Active, Completed, or All workflows. This option can also be combined with the Passed deadlines only option.
Please note
The Load fields option can increase loading times.
# Users
To filter the view, search for a user or group in the All users and groups search field. Suggestions will appear as you type. Select the desired user or group.
To cancel the selection, click the X icon next to the selected user or group.
Once you have selected a user/group, you can narrow down the list by selecting additional filter options:
- Owner: If this option is enabled, you only see workflows that the selected user/group is the owner of. The owner is the user who started the workflow.
- Any node: If this option is enabled, you only see workflows in which the selected user/group is entered as the editor of at least one node.
- Active node: If this option is enabled, you only see workflows in which the selected user/group is entered as the editor of the node.
# Start date (from/to)
Define how long you want the workflow to show up in the overview. The start date of the workflow must be within this period.
# Display mode
Choose an option for displaying the workflows.
Choose from the following options:
- Diagram view: If you select this option, the drop-down menu and the diagram for the selected workflow are displayed.
- List view: If you select this option, the drop-down menu and a detailed overview of the selected workflow are displayed.
- Form view: Select this option to view the drop-down menu and the workflow form for the selected workflow. The workflow form must be specified in the start node.
- No details: If this option is enabled, only the drop-down menu is displayed.
# Context menu
Some functions can only be called from the context menu. Right-click the list to open the context menu.
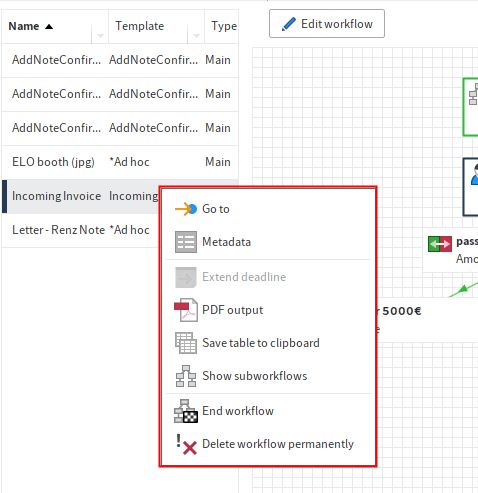
Go to: The Go to button takes you straight to the respective entry in the Repository work area.
Metadata: The Metadata menu item opens the metadata of the respective entry.
Extend deadline: You can edit the workflow deadline with the Extend deadline menu item.
PDF output: Select the PDF output menu item to save the workflow as a PDF outside of ELO.
Save table to clipboard: If you click the Save table to clipboard menu item, the data for the selected workflow is copied to your Windows Clipboard. From here, you can transfer the data to an external program.
Show subworkflows: The Show subworkflows menu item opens a dialog box that shows you the subworkflows associated with the selected workflow.
End workflow: You can stop the selected workflow with the End workflow menu item. If you do so, you can no longer edit the workflow.
Delete workflow permanently: Click Delete workflow permanently to remove the selected workflow from the system. You will be asked to confirm that you really want to delete the workflow.
Important
Permanently deleted workflows cannot be restored.
# General buttons
Apply: Select Apply to save the changes. The dialog box remains open.
OK: Select OK to save changes and close the dialog box.
Cancel: Select Cancel to close the dialog box without saving the changes.
You will find more information on the topic of workflows in the ELO workflow (opens new window) documentation.
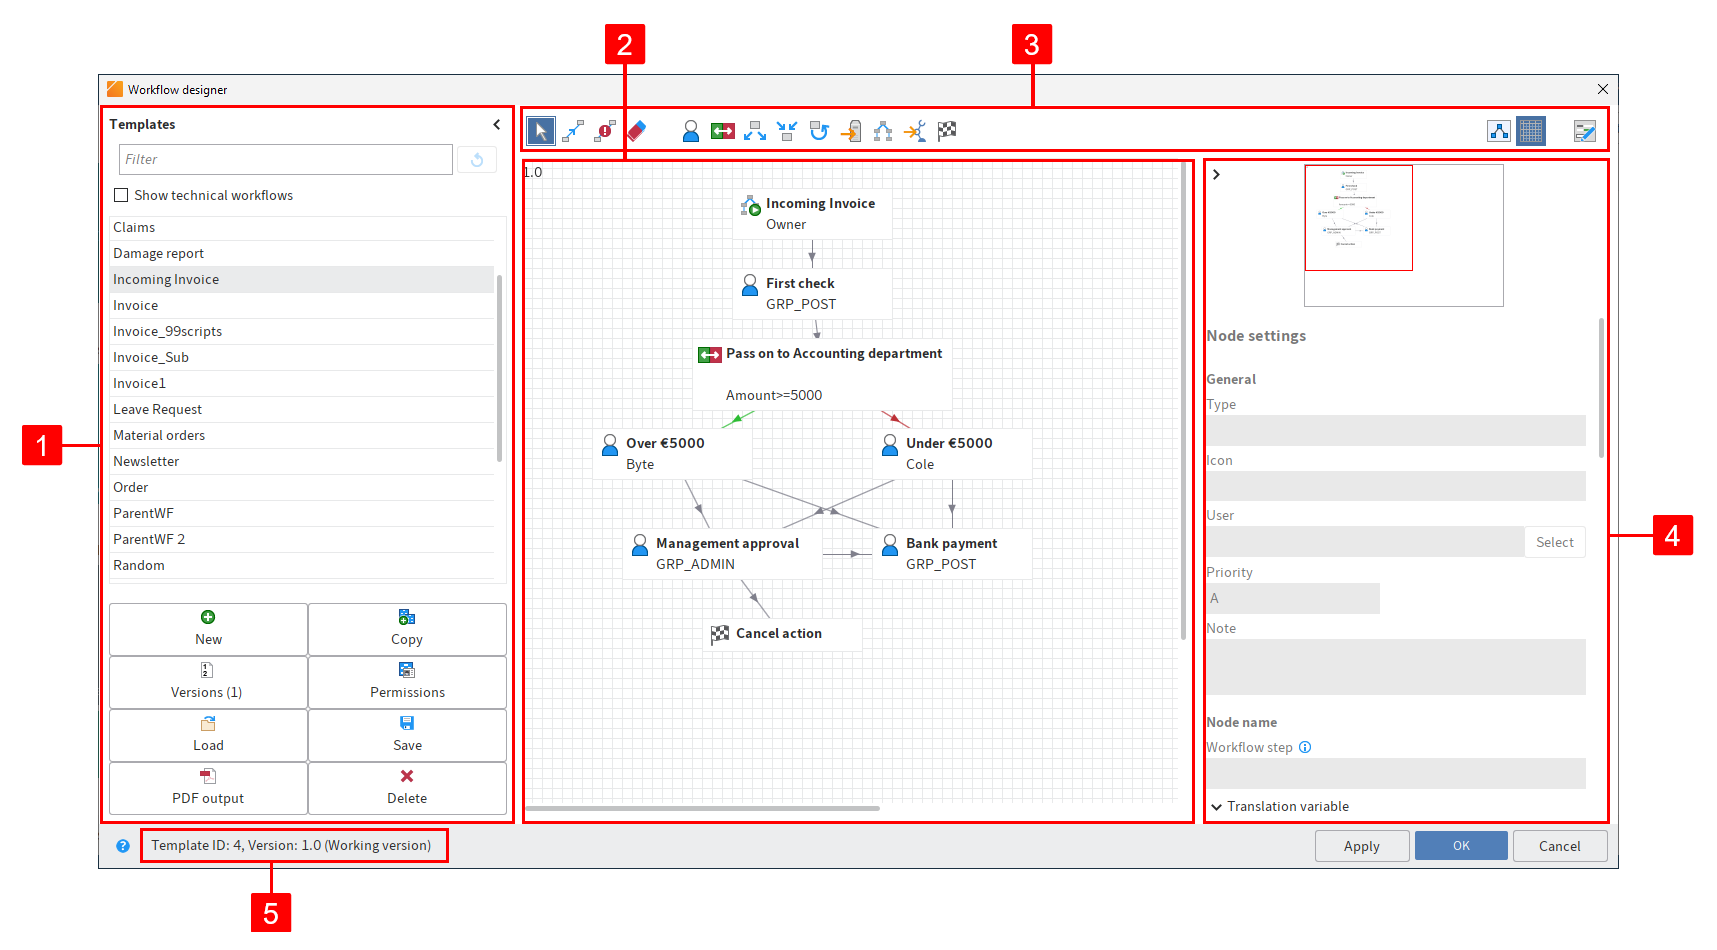
# Workflow designer
Information
Der Workflowdesigner ist nicht in ELOprofessional for Small Business verfügbar.
Available in: Ribbon > Organize > System
Use this function to open the Workflow designer. The Workflow designer enables you to create and edit the templates for your workflows.
Select a template to open the template in the graphical view.
Information
Some tools are only available when you are in editing mode. Select Edit workflow template to enable editing mode.
The workflow designer consists of the following areas:
1 Templates: All available workflow templates are listed in the Templates column on the left-hand side. Click an entry to open the graphical interface. The workflow is displayed as a diagram in the middle of the dialog.
To show technical workflows, check the corresponding check box.
Information
You can show or hide the Templates column using the double arrow icon.
In addition, the column contains the following buttons for managing workflow templates:
- New: Create a new workflow template.
- Copy: Copy a workflow template selected in the Templates list. This applies the template settings.
- Versions: This is where you manage the versions of a workflow template.
- Permissions: This is where you make the permission settings for the workflow template.
- Load: Load an already created and saved workflow template.
- Save: Save the workflow template externally.
- PDF output: Create a PDF overview of the workflow template.
- Delete: Delete the selected workflow template.
2 Workspace: In the workspace, the workflow templates are displayed in the graphic view. You can see the steps (nodes) and elements that a workflow consists of and how they are connected.
3 Toolbar: This is where you find the tools for creating and editing a workflow template.
4 Node editor: This area contains a preview window and the Node settings area. Define the settings for the individual workflow nodes in the Node settings area.
5 Status bar: This is where you find the ID of the workflow template, the current version, and the node ID of the currently selected workflow node.
Apply: Select Apply to save the changes. The dialog box remains open.
You will find more information on the topic of workflows in the ELO workflow (opens new window) documentation.
# Form designer
Available in: Ribbon > Organize > System
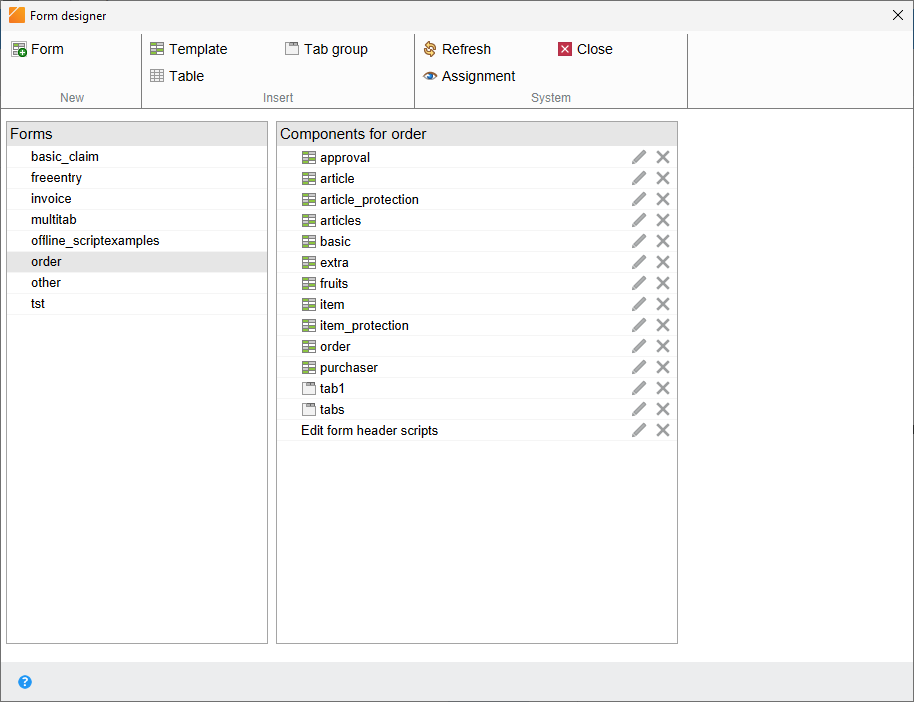
Use the Form designer dialog box to design and manage ELO forms used in the form-based workflow. Different content and buttons appear depending on the selected function. The basic functions are explained in the following.
# Toolbar
The toolbar is located in the top part of the dialog box. The tools differ depending on the selected function.
Form: Select Form to create a new form. A form can contain multiple templates.
Template: Use the Template button to create a new template for a form. Templates are the building blocks for forms. A form can consist of multiple templates and/or tables.
Tab group: Use the Tab group button to create a new tab group. Forms can be split into different tabs in tab groups. This makes it easier to structure large forms.
Table: Use the Table button to create a new table. Tables are a special type of template. With table templates, you have the option to record data in table form and save it to the database using special map fields.
Refresh: Refresh the form data with the Refresh button. This is necessary, for example, if you have loaded an image that you want to use in the form.
Close: Close the form designer with this button.
Assignment: Selecting the Assignment button opens a submenu. In this submenu, you can assign forms to individual metadata forms. These forms are displayed instead of the metadata preview if you select the corresponding option. You can edit the metadata via the form. If a form has not been assigned, ELO uses a default form.
# Forms
You can find a list with all existing forms in the Forms area.
# Components for
You can find all existing components of the selected form in the Components for area. Components are templates, tables, tab groups, and user scripts.
You will find more information on the topic of workflows in the ELO workflow (opens new window) documentation.