# Important components
# Repository structure
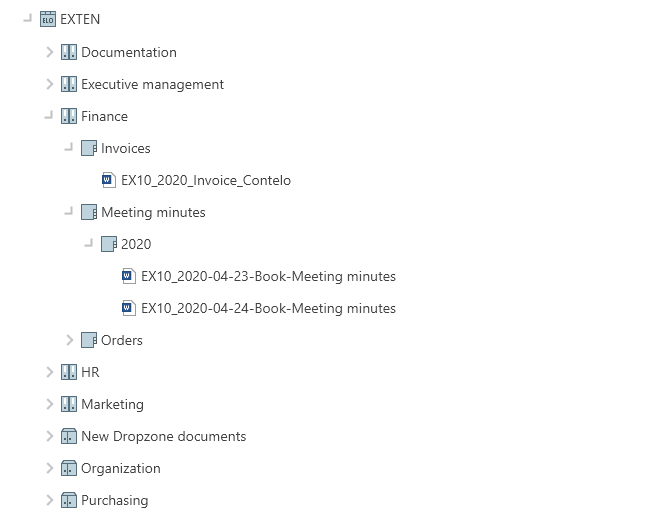
The repository gives you an overview of all folders and documents that you are authorized to access. Navigate between entries in the repository here.
You have the following navigation options:
- Mouse: Click an entry using the mouse. Clicking the arrow next to the folder expands the contents of the folder in the tree.
- Keyboard: You can navigate up and down the tree using the UP and DOWN arrow keys. Pressing the right arrow key opens a folder. Pressing the left arrow key closes the folder.
# Reference

Entries (folders or documents) with an arrow icon are references. Select View > Go to on the toolbar to go to the original entry. From the context menu, select Additional references to access the original entry or other references to this entry.
# Checked out document

Documents with a yellow arrow next to the document icon and a name are checked out by the corresponding user. They can be viewed (Document > Open in read-only mode), but not edited.
# Folders
In the repository structure, your documents are created in folders. If you've selected a folder, you can view the contents and the child folders in a separate window using the Preview function (keyboard shortcut: spacebar).
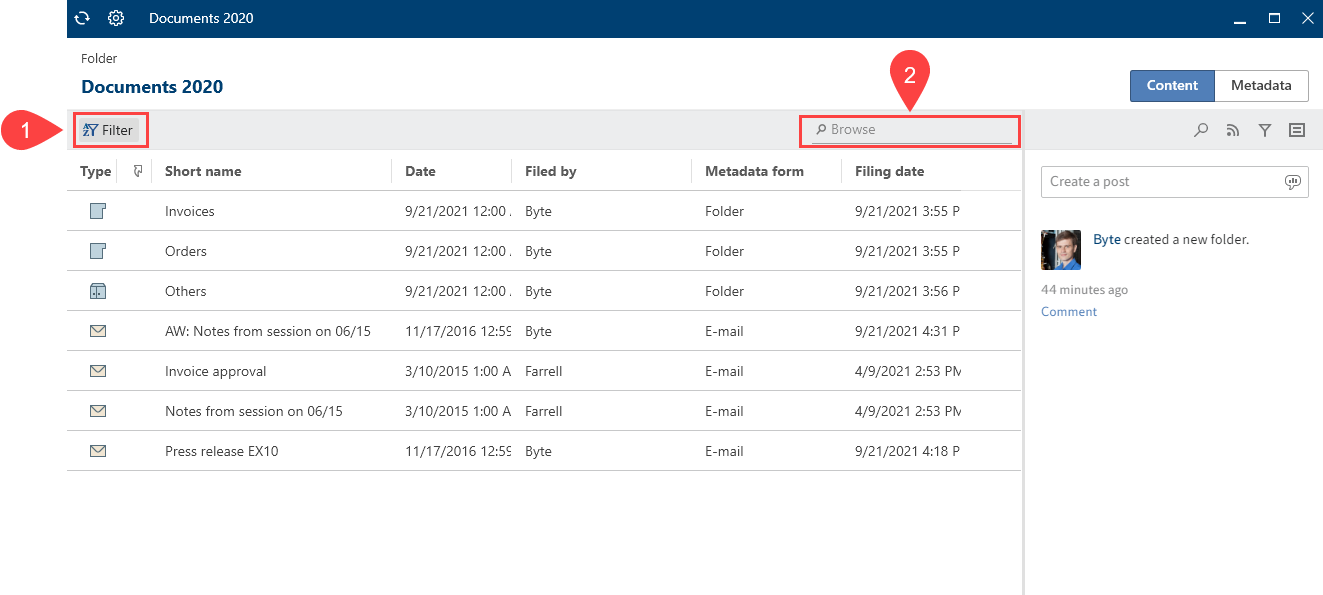
You can change how the folder is displayed and the sort order (1), or browse the folder by short name (2).
If you want to select multiple entries at once, you can only do this in the repository structure. You can find more information in the section How do I select multiple entries?.
You have the following options for working with folders:
- Create new folder: Create a new folder entry in your ELO repository.
- Insert folder: Insert a folder from the file system into the selected folder.
- Link folder: Link the filing of Outlook items with folders in ELO.
- Folder preview: See all child entries of the folder in a table view.
# Document
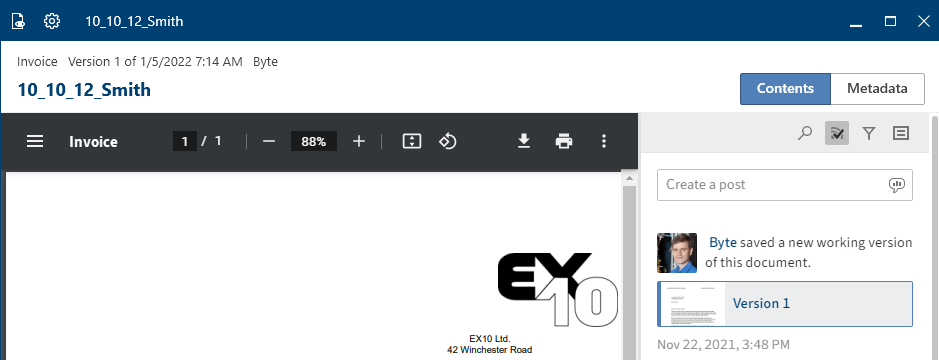
If you've selected a document, you can view the contents in a separate window using the Preview (keyboard shortcut: spacebar) function.
You have the following options for viewing the contents of a document:
- Open in read-only mode: Open the document in an external program.
- Preview: Open the document in a separate window. Additional functions are available there.
- Save as: Save the selected document on your file system and open it in an external program.
# Viewer pane
You can reach the viewer pane via the preview function (keyboard shortcut: spacebar). The selected document is shown there.
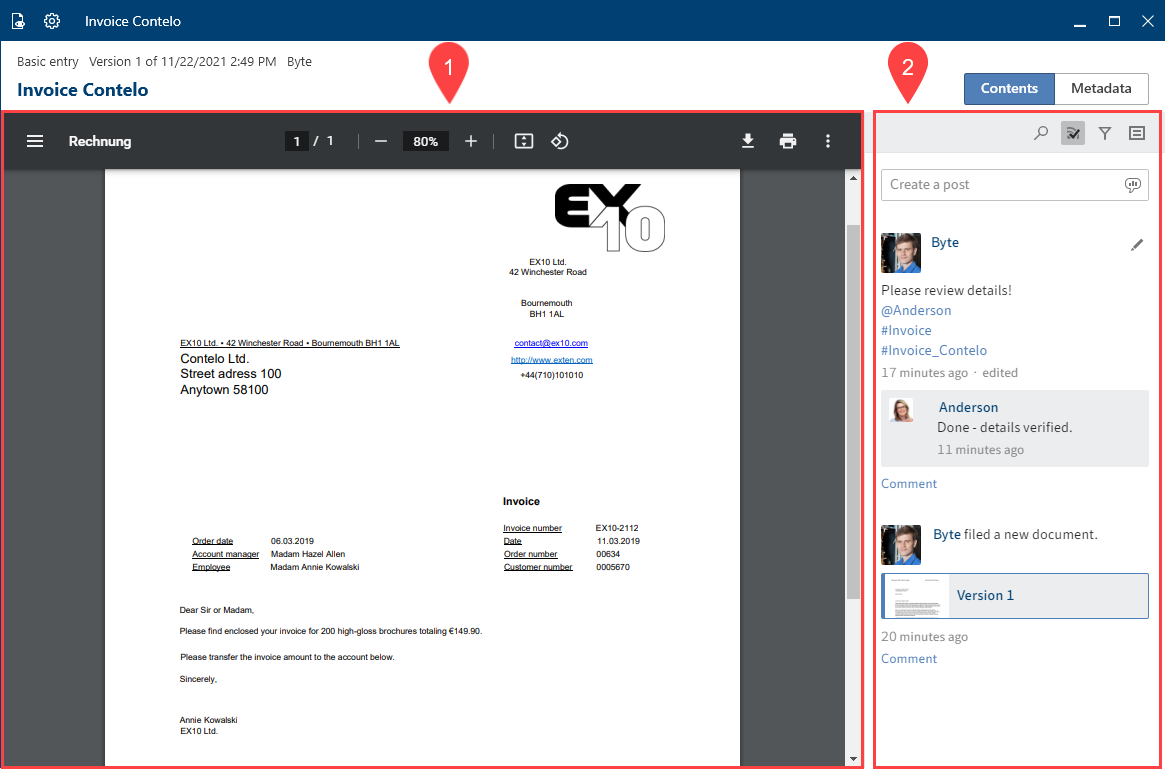
Each entry is made up of three elements: contents (1), feed (2), and metadata.
The contents and metadata are shown on the left, while the feed is always located on the right.

You can switch between the contents, metadata, and full text using the tabs.
- Metadata: Depending on the configuration, some parts of the form may initially appear collapsed with gen. 2 metadata. To expand a part of the form, click the arrow to the left of the header.
- Full text: The selected document appears in the full text. The document must have been added to the full text database. This display method lends itself to searches. A search field allowing you to search the text appears below it. For more information about the search field on the Full text tab, refer to the Preview section.
# Show entries
In the In use and Search work areas, you have two options for displaying entries:
The following explains the list and table views based on the In use work area. The views only differ from the Search work area very slightly.
# List view
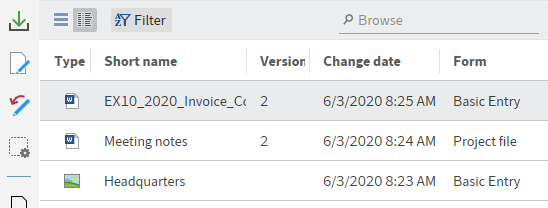
In the list view of the In Use work area, you will see all of the documents that are currently in use.

The following table explains the components of an entry.
| File type |  | This icon indicates the file type. |
| Short name |  | The short name is shown here. |
| Date |  | Here, you will see when the document was checked out. |
| Version |  | Here, you find the version number of the document and when it was filed. |
| Form |  | Here, you see the metadata form used to file the document. |
# Table view
You can also view documents in use in table format.
Right-click the header of the table view to open the context menu. The following options are available:
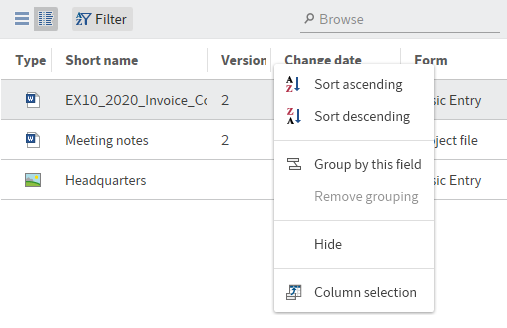
Sort ascending
Sort descending
Group by this field: If you select the Type field here, for example, the individual file types are sorted in groups.
Remove grouping
Hide
Column selection: You can add or hide fields in the table view.
Information
The Short name field is mandatory and cannot be hidden.
# Filter entries
In each of the views there are buttons that allow you to switch views, use filters, and search the entries.

The Filter button allows you to sort the entries in ascending or descending order based on the metadata. You can also group the entries.
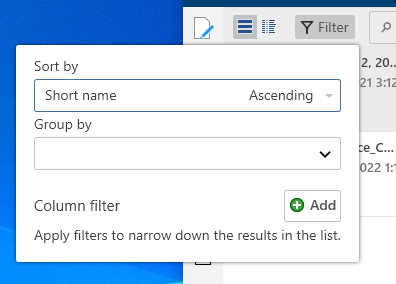
Select the respective name of the table column from the drop-down menus.
# Metadata
Before you can file documents to ELO or create new folders, you must enter metadata for the entries. This is done by using metadata forms, which contain corresponding input fields (called fields).
The Metadata dialog box is used to enter and edit the metadata. The dialog box usually appears automatically when you file a document or create a folder.
For more information on metadata, refer to the Metadata section in the 'Organize' group chapter.
# Feed

ELO offers several features that support collaboration within your company.
The feed is used to share information on an entry in ELO (document or folder) and track changes.
The following message types are shown in the feed:
- Posts
- Comment
- Polls
- Events (e.g. when a new version of a document is filed or changes are made to the working version)
# Create post

Use the Create a post field to comment on the respective entry in a feed. Select Create to upload the post.
The text in posts, polls, and comments can be formatted with the following syntax:
Bold: To format a part of the text in bold type, place an asterisk (*) at the beginning and end of the desired text section.
"I would like to stress this *again*." becomes: "I would like to stress this again." in the ELO feed.
Information
If you want the asterisk to appear as a character in the text, enter a backslash before the asterisk. The asterisk does not have a formatting function, but appears instead.
Click Create to post the comment.
# Poll

Selecting the Create poll button opens a new area in the ELO feed. In this area, you can start a user poll.
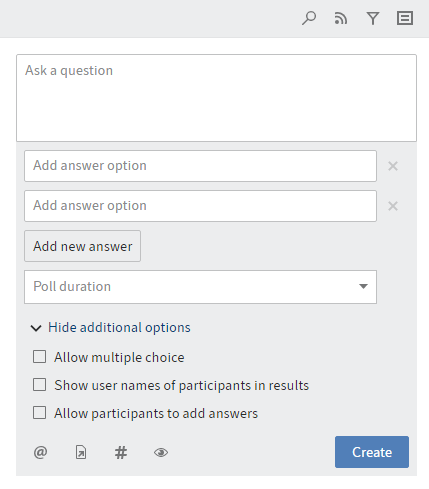
Poll duration: You can select how long you want the poll to remain open in the drop-down menu. You can also enter a specific number of days. For example, enter 14 for two weeks.
The Show more settings drop-down menu opens an area with additional settings.
- Allow multiple choice
- Show user names of participants in results: The names are visible to all users participating in the poll. If this option is disabled, the poll is anonymous for you as well.
- Allow participants to add answers
Select Create to start the poll.
Once a user has taken a poll, it can no longer be modified.
Select the X icon to delete a poll that has already started. You cannot undo this.
# Mention

Use the Mention user function (@ icon) to address your feed post directly to another person or group. The users mentioned then see the corresponding feed post in the My ELO work area.
Keyboard shortcut: As soon as you type an @ character, ELO automatically recognizes that you want to insert a mention. The Select user dialog box opens.
# Reference
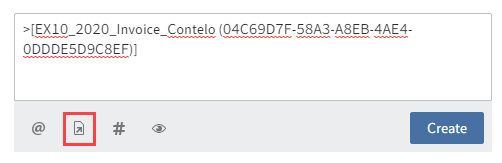
Select Reference entry (document icon with arrow) to link a feed post with an entry in ELO.
In the Reference dialog box, select an entry you want to reference. The reference jumps directly to the respective entry.
Keyboard shortcut: As soon as you type a > character, ELO automatically recognizes that you want to insert a reference.
# Hashtag

Use Insert hashtag (# symbol) to add hashtags to a post. You can subscribe to hashtags. You can also filter the My ELO work area by hashtags.
Keyboard shortcut: As soon as you type a # character, ELO automatically recognizes that you want to insert a hashtag. The hashtag drop-down menu opens.
# Subscribe to hashtag
If a feed post contains hashtags, you can subscribe to them.
Select the hashtag.
The discussion page for the selected hashtag appears.
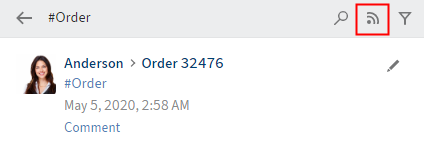
Select Subscribe (antenna icon).
You have subscribed to the hashtag. All posts that are marked with the corresponding hashtag appear in the My ELO work area.
# Visibility
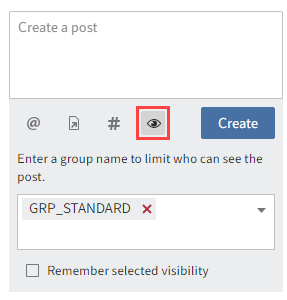
Use the Restrict visibility button (eye icon) to restrict who can read the post.
A drop-down menu with the available group names appears. Enter a group name or choose one from the list. You can also enter multiple group names and remove them using the X icon.
Your selection is applied. Only the selected groups can view your post.
Optional: You can apply this restriction for future feed posts. Check the box next to Remember selected visibility. Your visibility settings will be set as the default for new feed posts.
# Search feed

Selecting Search feed (magnifying glass icon) opens a search field that allows you to search within the currently selected feed. Clicking Search feed (magnifying glass icon) or pressing the ENTER key starts your search. When the search term is found, the feed is narrowed down to the corresponding posts. The matches are highlighted. Click Reset search (X icon) to exit the results list and return to the full feed.
# Subscribe to feed

Select Subscribe (antenna icon) to subscribe to the feed. All subscribed feeds are aggregated in the My ELO area. Once a post is added to a subscribed feed, you also see the post in the My ELO area.
# Automatically subscribe to feed

ELO provides you with the option to automatically subscribe to feeds. You can find the options in Configuration > General > My ELO. This concerns the following events:
- When filing a document
- When creating a new folder
- When checking in a new version
- When creating a post or comment
Check or uncheck the boxes to set when to automatically subscribe to the respective feed.
# Show filter options

Show filter options (filter icon) opens a window with filters for the corresponding feed. You can use these filters to restrict the feed to posts that match the respective filter.
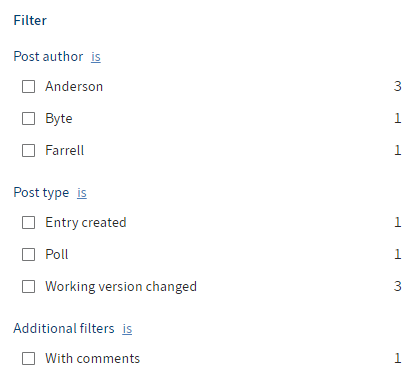
To apply a filter, select the corresponding filter in the list.
With the default settings, all filters are applied in is mode.

To negate the filter, select is and set it to is not.
The mode can be switched to is not in all categories apart from New since.
# Show metadata

You can select the Show metadata button (document icon) to view the metadata of the entry. The metadata form associated with the entry is always displayed. The fields of the form are only displayed if they contain data. In gen, 2 metadata forms, only the form associated with the entry is displayed, even if you have completed other fields.
# New comment

You can post comments in any feed. Post a comment by entering text into the input field below the feed post.
Edit

Select Edit (pencil icon) to edit your own feed posts and comments.
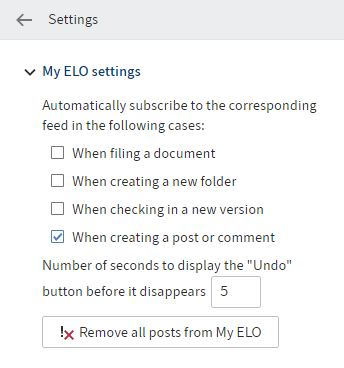
# Settings
To open the settings for My ELO, subscribed hashtags, and your polls, open the Settings (gear icon).

In the My ELO settings area, you can choose when to automatically subscribe to feeds.
The settings for My subscribed hashtags are split up into two areas.

Search for hashtag: Select a specific hashtag from the drop-down menu. Clicking a hashtag brings you to the hashtag overview page, where you can subscribe to it.
Subscribed hashtags: This list shows all hashtags you have subscribed to. The number in parenthesis following the hashtag indicates how often it has been used in ELO. The last hashtag you subscribed to is at the top of the list. To unsubscribe, click the checkmark next to the hashtag.

In the My polls area, you will see an overview of the polls you have initiated. To unsubscribe, click the checkmark next to the poll.
# Status: Different statuses
Available in: Desktop work area
ELO recognizes the status of open Microsoft Office documents as well as files in the Windows Explorer and Windows Desktop. In the Desktop work area, the different statuses are indicated in the Status area.
| 'Not filed' status | |
|---|---|
 | The document is not filed to ELO. You can either save the file as a new document or as a new version of the document. |
| 'Found in ELO' status | |
|---|---|
 | The document selected at the file system level is already filed to ELO. You can replace the selected file with an ELO link, file a new version of a document, or go to the location where the entry is filed in ELO. |
Please note
If you open the file from the Windows file system, ELO can no longer recognize the status due to a lock. In this case, you can either go to the location where the entry is filed in ELO or replace the file with an ELO link. We recommend checking the document out in ELO to edit it.
| 'View' status | |
|---|---|
 | A document filed in ELO is opened for viewing in an external program. You can check out and edit the document or file it as a new version. Once you have changed and saved the document in an external program, the status switches to In use. |
| 'In use' status | |
|---|---|
 | A document filed to ELO is currently being edited in a Microsoft Office program. You can check the document in, file it as a new version, or discard your changes. |
| 'In use by a web service' status | |
|---|---|
 | A document filed to ELO is currently being edited in a Microsoft Office program via a web service. This requires ELO to be connected as a drive. |
| 'Status not recognized' | |
|---|---|
 | The Windows user does not have read access to the document or an application is blocking read access. |