# Getting started
In this section, we will present ELO Learning based on two examples. These examples perform the most important functions of ELO Learning, from creating a course to releasing it on the learning platform.
This is a short guide. Follow the links for a more detailed description of the individual steps.
# Learning path assigned to participants
All new employees in your company are onboarded via a learning path. This learning path contains an e-learning course and a video.
The learning path is assigned by the course administrator and cannot be booked by employees themselves.
You need: A finished e-learning course and a video
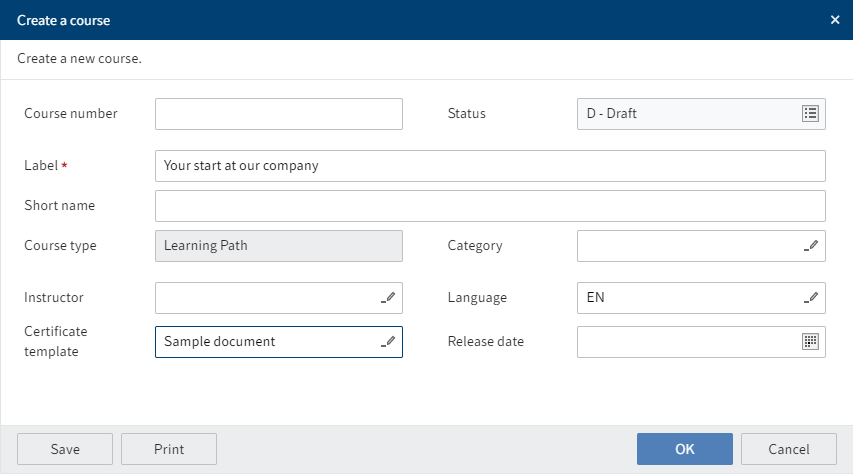
Fig.: 'Create a course' dialog box
Create a new Learning path type course: New tab > Learning > New course. In this example, leave Release date blank.
Create two courses with the types E-learning and Video.
These courses have to be edited before you can release them on the learning platform. You will find the courses in the repository in the //Course management//Courses folder.
Information
The order of further steps shown is only one of many possibilities.

Fig.: E-learning in the course folder
- Create the e-learning right in the specific course.

Fig.: Video in the 'Video' folder
- The Video folder is automatically created for Video type courses. Create the video in the Video folder. You can file videos with identical contents but different formats to this folder.
Configure course photos for the learning platform. In this example, you need course photos for the learning path as well as for the individual courses.
Enter additional information related to the courses via the form. This information has the following functions:
- On the Settings and Course data tabs, you can configure where the course will become visible on the learning platform and when in the Status and Release date fields.
- The information about the course is shown on the learning platform.
Edit the forms for the courses:
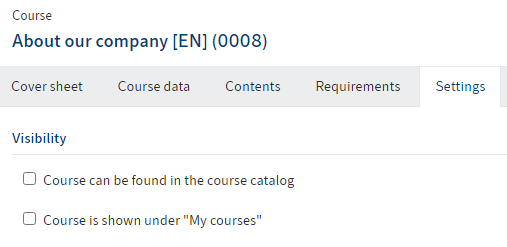
Fig.: 'Visibility' on the 'Settings' tab
As you do not want the courses to be visible outside of the learning path, do not check the Course can be found in the course catalog and Course is shown under "My courses" boxes.
Enter additional information related to the individual courses for the learning platform. You can control their release via the learning path.
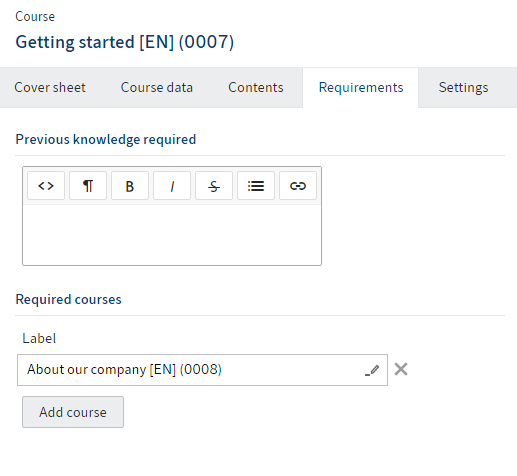
Fig.: Course dependency on the 'Requirements' tab
- Participants should watch the video before starting the e-learning course. In the e-learning form, select the video on the Requirements tab under Required courses.
Edit the learning path form:
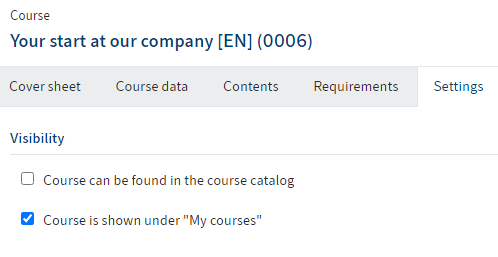
Fig.: 'Visibility' on the 'Settings' tab
- As you don't want the participants to be able to enroll in the learning path themselves, under Settings, check the Course is shown under "My courses" box. Do not check the Course can be found in the course catalog box.
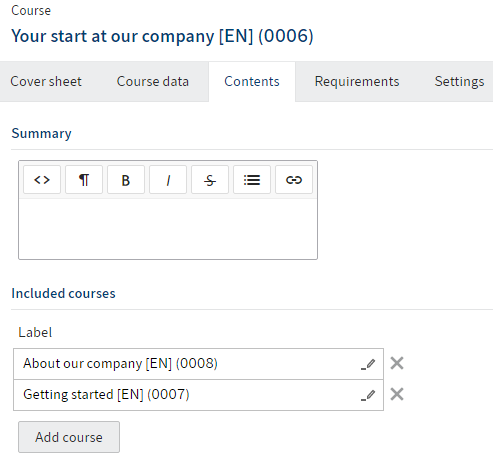
Fig.: 'Included courses' on the 'Contents' tab
- On the Contents tab, go to Included courses and select the video and the e-learning.
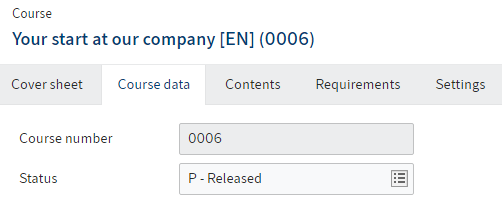
Fig.: 'Released' status on the 'Course data' tab
- On the Course data tab, select the status P – Released.
As only enrolled participants can see the learning path on the My courses tab of the learning platform and no participants have been enrolled yet, the learning path is not yet visible on the learning platform.
Enroll the new employees in the course: Course tab > Enroll participants.
The learning path now appears on the learning platform on the My courses tab for the selected employees.
To notify new employees of the learning path, you can write them a message.
# Course with multiple sessions for enrolling via the learning platform
You want to create a virtual classroom with multiple sessions. Before release, the course should be available as a preview on the learning platform. Users enroll themselves in their preferred session. Course materials are available for download.
For course participants to be able to discuss the course contents outside of the virtual classroom, link the course with an ELO Knowledge space.
You need: A GoToWebinar account, ELO Knowledge
Create a new Virtual classroom type course: New tab > Learning > New course. In the Release date field, select a date to release the course. Once the selected date has been reached, the course is automatically released on the learning platform.
The course now has to be edited before you can be release it on the learning platform. You will find the courses in the repository in the //Course management//Courses folder.
Information
The order of further steps shown is only one of many possibilities.
Configure course photos for the learning platform.
Enter additional information related to the course via the form. This information has the following functions:
- On the Settings tab, you can configure where a course is visible on the learning platform.
- The information about the course is shown on the learning platform.
Edit the course form:
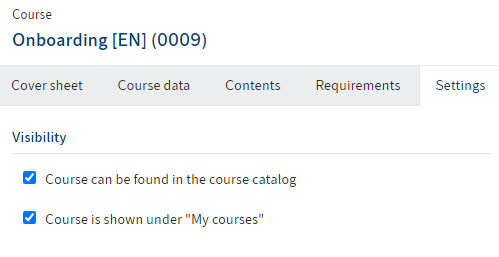
Fig.: 'Visibility' on the 'Settings' tab
- As you want participants to be able to enroll in the course themselves, check the Course can be found in the course catalog box. Also check the Course is shown under "My courses" box to give enrolled participants quick access to the course on the My courses tab.
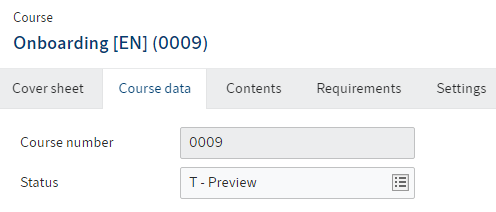
Fig.: 'Preview' status on the 'Course data' tab
- For the course to appear on the learning platform as a preview, on the Course data tab, set the status to T – Preview. The course appears on the learning platform as soon as you save your changes, but cannot be booked yet.

Fig.: Configured space on the 'Course data' tab
On the Course data tab, select a space for the participants under Knowledge management.
Enter additional information related to the course for the learning platform.

Fig.: Filed course material
The Course materials folder is created automatically for all courses. File your course materials to this folder.
Information
As soon as you enter instructors for the course, they are given access to the course and can create course materials and course contents.
Select the course and create sessions: Course tab > Add sessions.

Fig.: Session
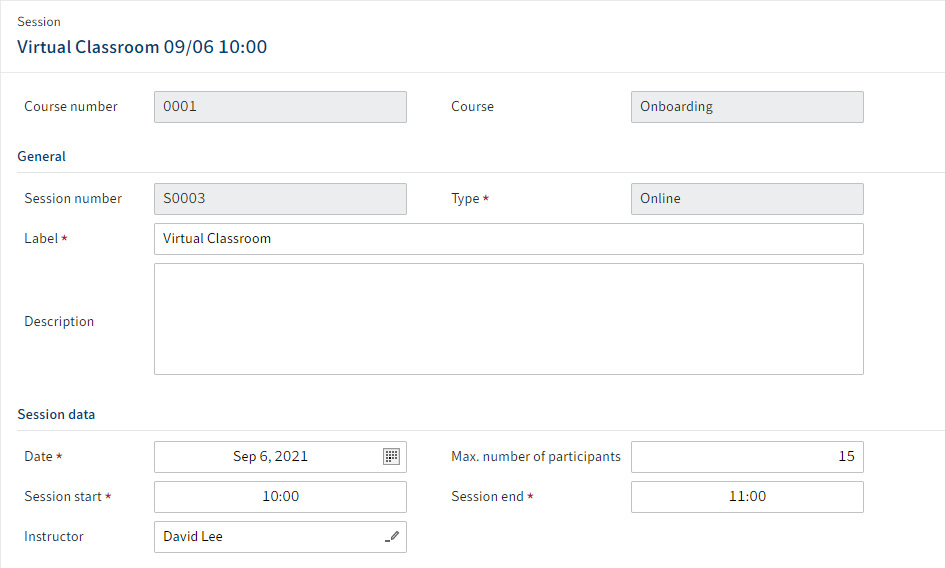
Fig.: Session instructor
As all sessions are carried out by different instructors, enter an instructor separately for each session in the form.
7 Release
Once the date selected under Release date has been reached, participants can enroll via the learning platform.
For participants to get their certificates, close the session once it has taken place: Course tab > Close session.