# Installation
To start reindexing, start the current version of the ELO Server Setup.
Click Upgrade Index on the ELO Server Setup start page.

Existing ELO installation: File system path to the existing ELO installation.
Index destination: File system path where you want to install the system for setting up the index. Once reindexing is completed, we recommend specifying a path different from the ELO installation path.
Application Server Port: Port for the Indexserver Tomcat. This port must not already be in use by another operating system service, including ELO services.
Upgrade Index: Configures the system for reindexing. First, you are forwarded to a summary, where you can then start the actual installation process.
Uninstall: Uninstalls the system installed during the Upgrade Index process. This must be done after reindexing. The services and programs installed for reindexing are removed. Data generated in the process, such as the full text database, is retained and must be subsequently removed manually.
# Upgrade Index
Selecting the Upgrade Index button takes you to the installation overview page. The information summarized there only applies to relevant points of the reindexing process.
Please note
The Upgrade Index function in the ELO Server Setup must not be performed on the production database in ELO 12 or higher, as changes to the database during the installation process will cause issues in older versions of ELO (e.g. affects the substitution rules).
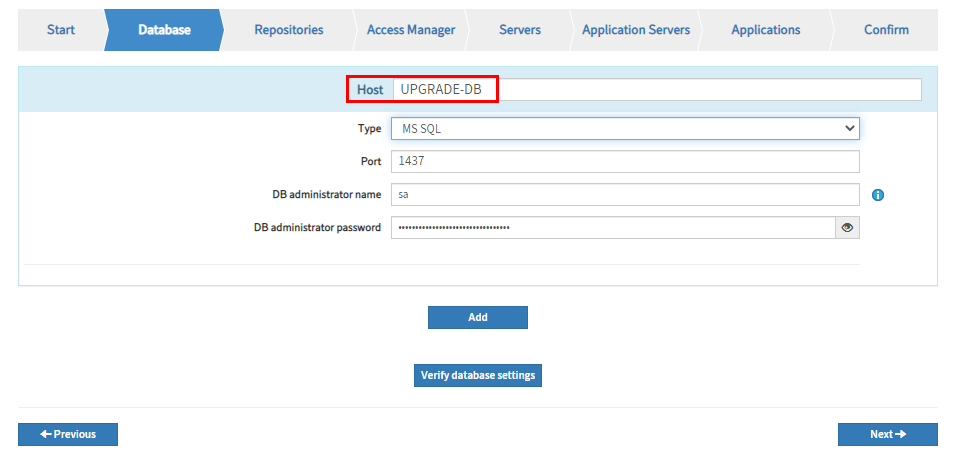
If you still want to use the function, you must duplicate the data of the production database in a separate database instance. You must specify this separate database instance in the Host field on the Database tab.
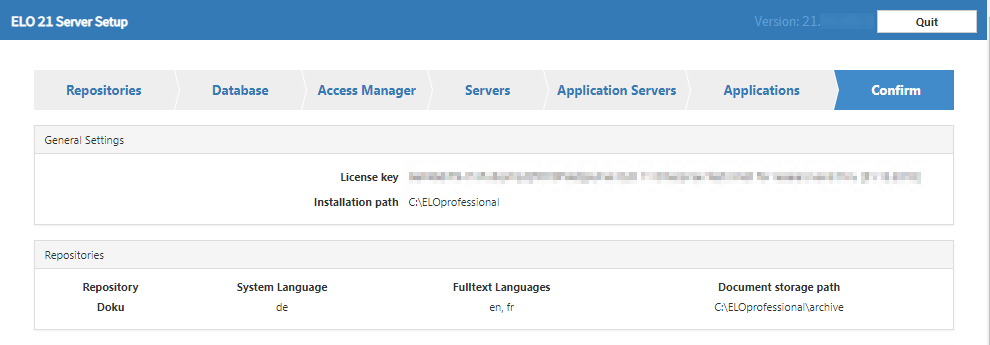
The installation path specified here and the document paths must correspond to the paths of the ELO installation.
Please note
You must use a current license key.
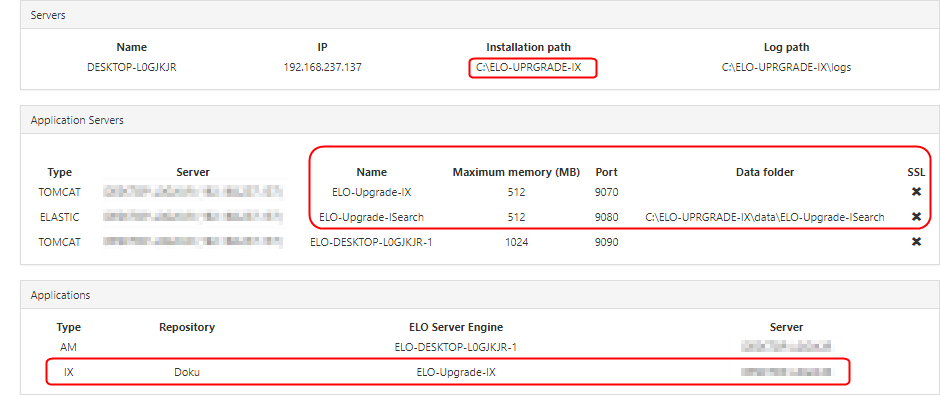
The paths (Installation path) under Servers must correspond to the path defined under Index destination. This also applies to Data Folder under Application Servers. This is where the ELO iSearch full text database is located after reindexing.
Select Install to start the installation of the upgrade system.
The ELO Server Setup installs the upgrade system consisting of an ELO Indexserver and an instance of ELO iSearch.
Information
No changes are made to the previous system.
After the installation is completed, select Finish to close the ELO Server Setup.
# Reindexing in the upgrade system
When the installation of the upgrade system is completed, go to the ELO Elasticsearch Configuration page (from the status page of the newly installed ELO Indexserver > Configure Options > iSearch config).
Select the instance _ALL from the IX-Instance drop-down menu if it is not already selected.
Check the settings for the instance _ALL on the Settings tab.
Make sure that the correct languages are selected in the Language settings area.
Click Save to save the settings.
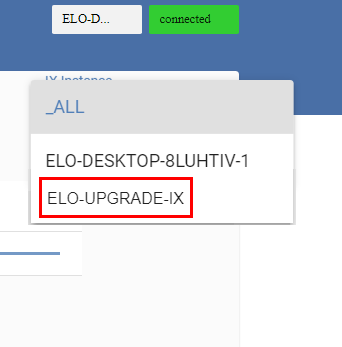
Select the instance of the upgrade system from the IX-Instance drop-down menu.
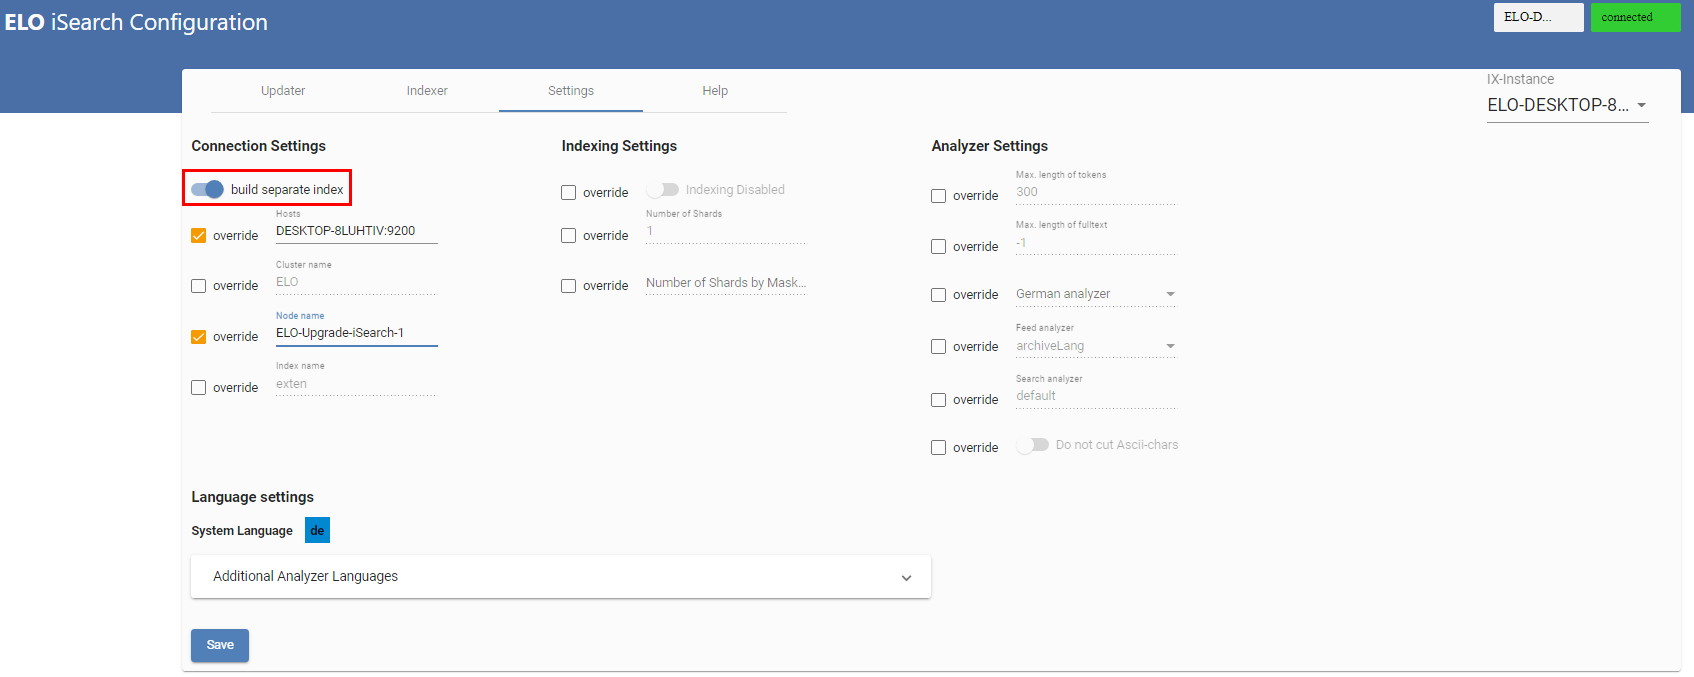
Check the settings for the instance on the Settings tab.
The Index name field must contain the name of the repository (in lower case).
Enable the option build separate index.
Click Save to save the settings.
Check the settings on the Indexer tab.
You need to enter the value -1 into the fields From object id and To object id.
Click Save to save the settings.
Select Create new index to start the reindexing process.
# Uninstalling the upgrade system
Once the reindexing process is completed, you can uninstall the upgrade system. The index that was created is retained.
To proceed, run the ELO Server Setup again.
Select Upgrade Index on the ELO Server Setup start page.

The Upgrade index screen opens. The path specifications should correspond to those of the previously created upgrade system.
Select Uninstall.
The upgrade system is uninstalled.
Once the uninstallation is completed, select Finish to close the ELO Server Setup.
# Updating to a new ELO version
If the upgrade system has been successfully uninstalled, you can now update the ELO server.
To do so, run the ELO Server Setup again.
Update the ELO server in the usual way (for more information, see the ELO Server documentation) with the Standard Configuration/Update or Advanced Configuration/Update functions.
After the installation is completed, select Finish to close the ELO Server Setup.
# Migrating data
Once you have successfully installed the new ELO version, you can transfer the index created by the upgrade system to your live system.
Stop the ELO iSearch service.
Navigate to the following folder in the file system:
<installation path of the upgrade system>/data/ELO-Upgrade-ISearch/
Copy the index folder.
Navigate to the following folder in the file system:
<installation path of the ELO server>/data/
Insert the copied folder and replace the existing index folder.
Start the ELO iSearch service.
Check the settings on the ELO Elasticsearch Configuration page.
Please make sure that the build separate index button is not enabled for any instance.
Test ELO iSearch in an ELO client.
If migration was successful, you can delete the remaining data from the upgrade system.
# Upgrade Index on a separate server
Reindexing requires a great amount of CPU resources and can cause high load on the server. You can mitigate the effects on the live system by reducing the process priority and performing reindexing on a separate server.
The setup requires two configuration files (%HOMEPATH%\.elosetup.conf and <ELO>\config\serversetup2\elosetup.conf) to run the Upgrade Index function on another server. Create the <ELO>\config\serversetup2\ folder. The path must match the live system's path. Other folders, such as <ELO>\archive or <ELO>\data are not required.
Next, the function can be run as described in Upgrade Index.
# Upgrade Index when migrating from ELO 9
You can also get the full text database ready using this method when migrating from ELO 9 to ELO 10.1 or higher. Rolling out Indexserver 10 also updates the database. For this reason, version 9.16.110 of the Indexserver or higher is required for ELO 9. An update from ELO 8 to ELO 10.1 is not supported.
As described in Upgrade Index on a separate server, the setup requires two configuration files for the Upgrade Index function, but these do not exist in ELO 9 systems and need to be created first. These must be created first. The setup creates the two files during the upgrade process.
Important
You should not complete the upgrade process. After entering the existing installation path and the license key, select Configure Upgrade or Review Upgrade after the system is analyzed to cancel the upgrade process. The upgrade must not be installed!
The two files are then created. Now, continue with Upgrade Index or Upgrade Index on a separate server.