# Microsoft Azure configuration
This chapter shows how to configure authentication with Microsoft Azure.
Information
By configuring authentication with Microsoft Azure, you can also enable the Check out to OneDrive function in the ELO clients.
You will find more information about this function in the Connect ELO to Microsoft OneDrive (opens new window) documentation and in the following user documentation:
- ELO Java Client (opens new window)
- ELO Web Client (opens new window)
- ELO Desktop Client (opens new window)
To enable this function, follow the instructions in this chapter and note the information in the Assign permissions chapter.
# Register app
First, you need to register an app in Microsoft Azure.
Please note
This documentation does not cover basic configuration of a Microsoft Azure environment or subscriptions, both of which are required for this.
Log on to Microsoft Azure as an administrator.

Go to App registrations.
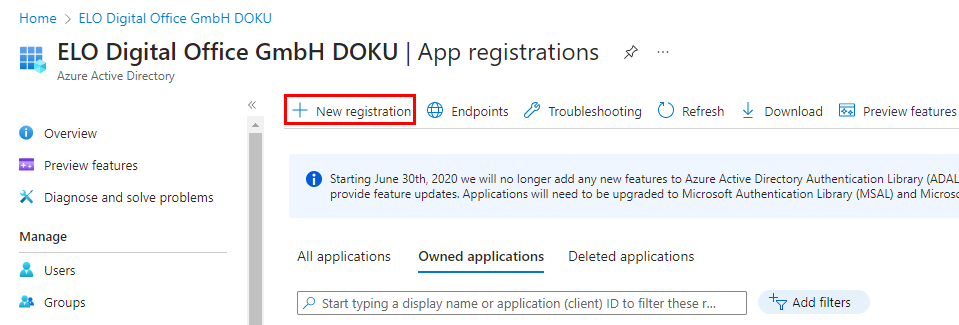
Select New registration.
The Register an application page opens.
Enter a name for the app. You can choose any name you like.
Example: ELOauth2
Under Supported account types, select the option Accounts in this organizational directory only (only <name of tenant> - individual client).
Under Redirect URI (optional), select the Web option.
Enter a URL that can be reached on the internet as follows:
https://<server address>/ix-<repository>/plugin/de.elo.ix.plugin.rest/auth2/callback/microsoftInformation

This URL is also provided on the ELO Modern Authentication configuration page under Callback URL.
Select Register.
The app is registered in Microsoft Azure.
# Assign permissions
You can assign the required permissions as soon as the app is registered.
Open the API permissions area.
Select Add permissions.
The Request API permissions area opens.
Select Microsoft Graph.
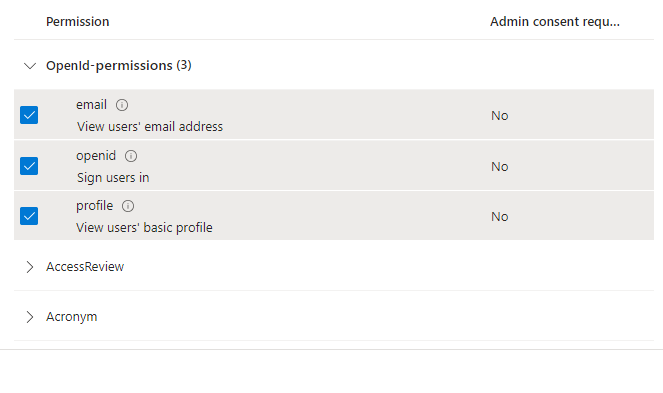
Add the following delegated permissions:
- Files.ReadWrite.AppFolder
- offline_access
- openid
- profile
- User.Read
Information
The Files.ReadWrite.AppFolder permission enables the Check out to OneDrive function in the ELO clients.
Confirm with Add permissions.
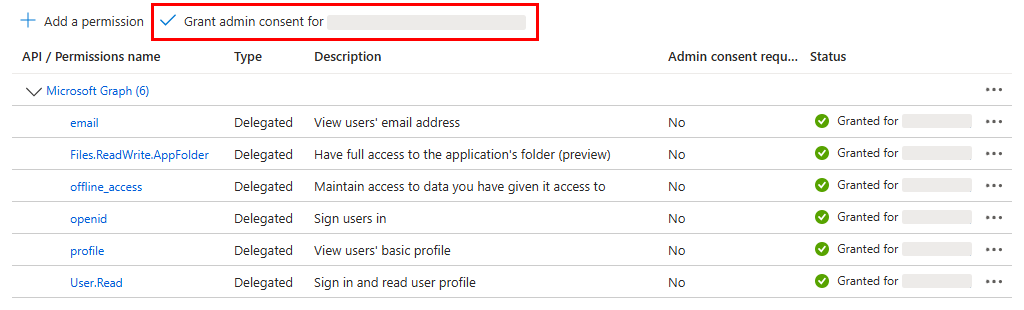
Select Grant admin consent for <tenant>.
The Confirm admin consent dialog box opens.
Click Yes to confirm.
The permissions are added.
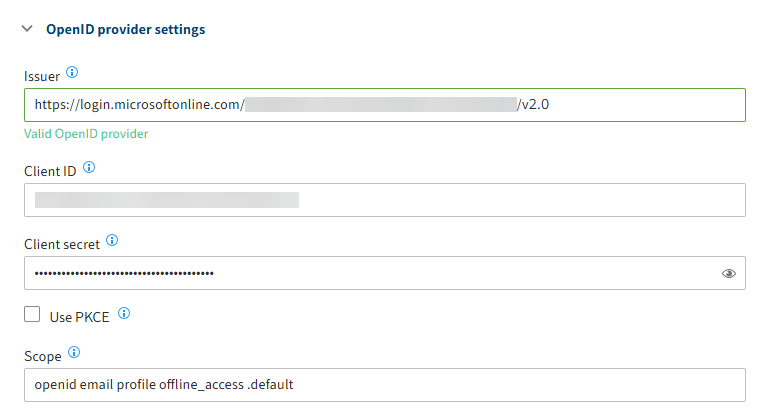
On the ELO Modern Authentication configuration page, enter the following values in the Scope field:
openid email profile offline_access .default
# Transfer information in configuration
After the app is registered and has been assigned permissions, you can transfer the information to the ELO Modern Authentication configuration page.
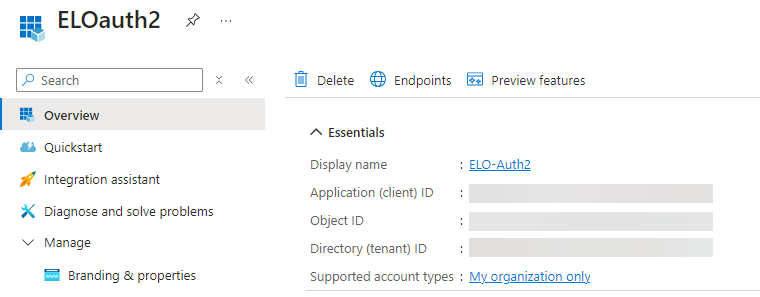
Open the Overview area in Microsoft Azure.
Copy the value for Application ID (client).
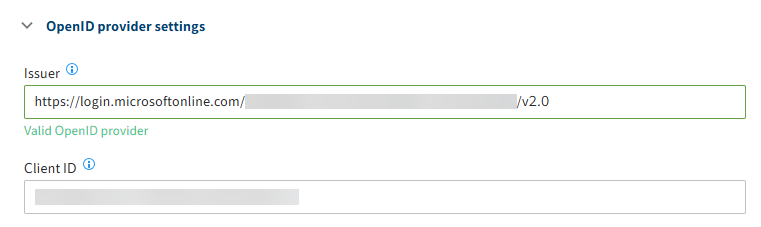
Enter the value on the ELO Modern Authentication configuration page under Client ID.
Optional: If you use the ELO Desktop Client and/or ELO Bot, you can also enter the copied value under Audience.
Copy the value for Directory ID (client) from Microsoft Azure.
Enter the value on the ELO Modern Authentication configuration page under Issuer instead of the
{tenant}placeholder.Save the settings with Save.
# Client secret
This also requires a client secret to enable the connection to the Microsoft Azure app to work. This must be entered on the ELO Modern Authentication configuration page.
Important
Regularly renew the client secret before its validity expires.
Once the client secret expires, it will no longer be possible to log on with ELO Modern Authentication. In this case, you have to use the Recovery URL.
Open the Certificates & secrets area in Microsoft Azure.
Select New client secret.
The Add a client secret area appears.
Enter a short description for the client secret in the Description field.
Select a time frame for Valid until.
Confirm with Add.
Microsoft Azure creates a client secret.
Copy the client secret from the Value column.
Please note
Write down the value of the client secret immediately after you create it. This value is no longer shown in its entirety when you open the overview of secrets at a later point in time.
Enter the copied client secret on the ELO Modern Authentication configuration page under Client secret.
Save the settings with Save.
All the other fields can be left unchanged and only need to be adapted if required.
The registration in Microsoft Azure has been successfully configured.