# Overview of ELO Flows components
Below, all graphical components are addressed in examples with their corresponding annotations.
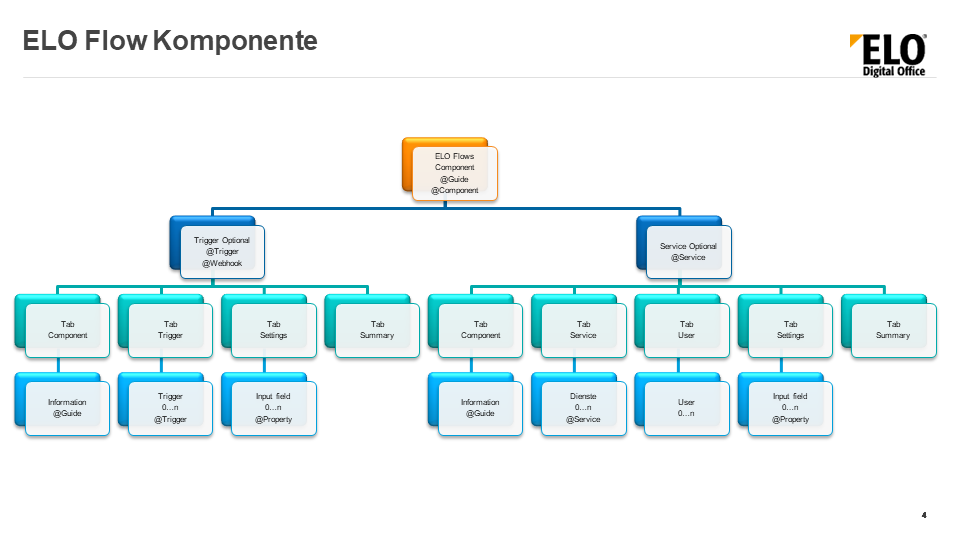
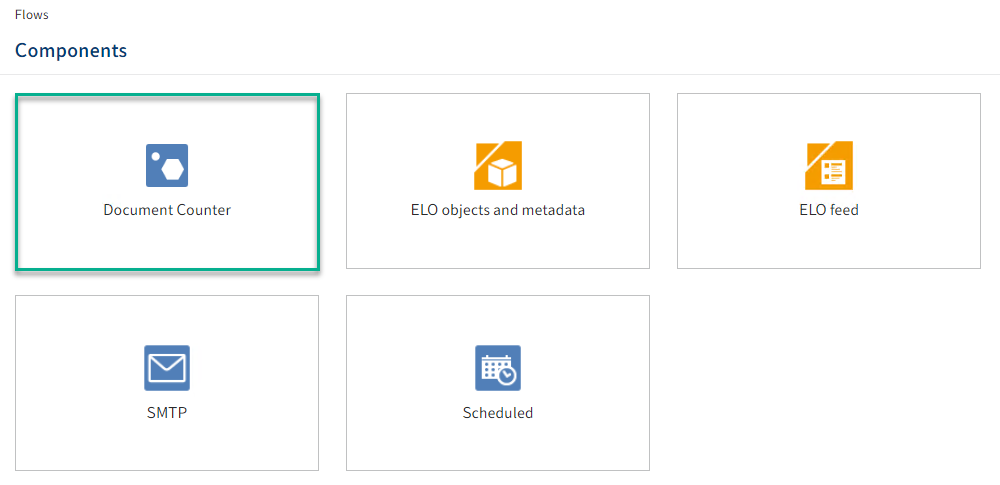
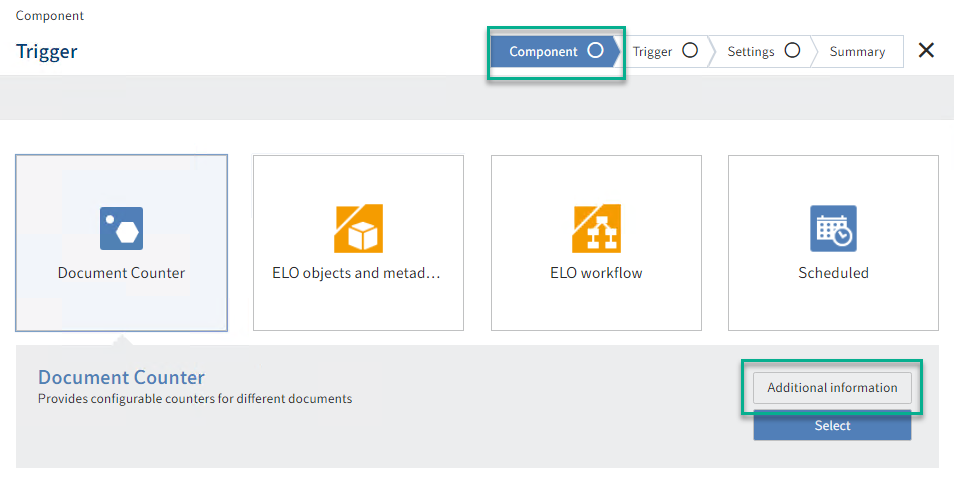
# ELO Flows component
Each flow is based on components. Components can contain multiple elements. For example, a component provides one or more triggers. These triggers then initiate additional actions in the flow. These actions are realized via services. Services are also provided by components.
Definition of the component class (here: CounterComponent):
@Component(version = "0.0.1", namespace = "academy.training", name = "Counter", displayName = "Document counter", description = "Unique allocation of identification numbers")
public class CounterComponent {
}
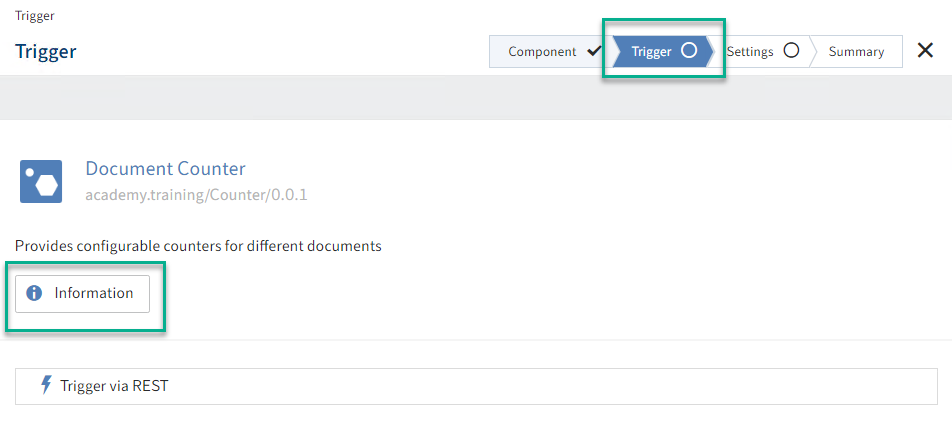
# Triggers
Triggers are used to call a flow.
If a component in a flow is used as the first component, it automatically provides triggers in the ELO Flows administration area.
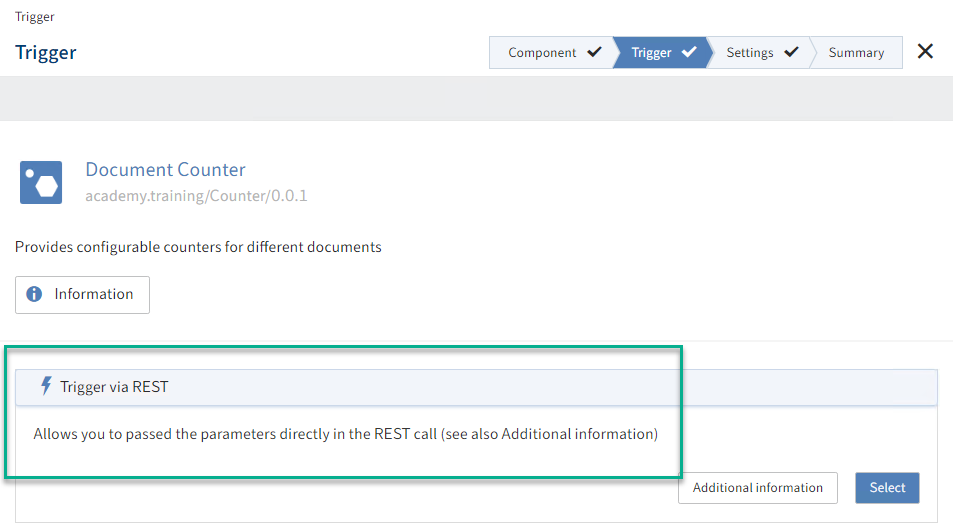
Please note
Triggers are always defined in the component class.
@Component(version = "0.0.1", namespace = "academy.training", name = "Counter", displayName = "Document counter", description = "Unique allocation of identification numbers")
public class CounterComponent {
  @Trigger(displayName="Call document counter")
  @WebHook(endpoint="createCounter")
  public CounterTriggerData triggerCounter(@Config CounterTriggerData triggerData) {
    //Implementation
  }
  @Trigger(…)
  @Scheduled(…)
  public TriggerData otherTrigger(@Config TriggerData triggerData) {
  //Implementation
  }
}
# Service
Services provide different functions in ELO Flows. If a component is not used as the first component in ELO Flows, then it provides different services for selection. If multiple services are available, they can also be grouped.
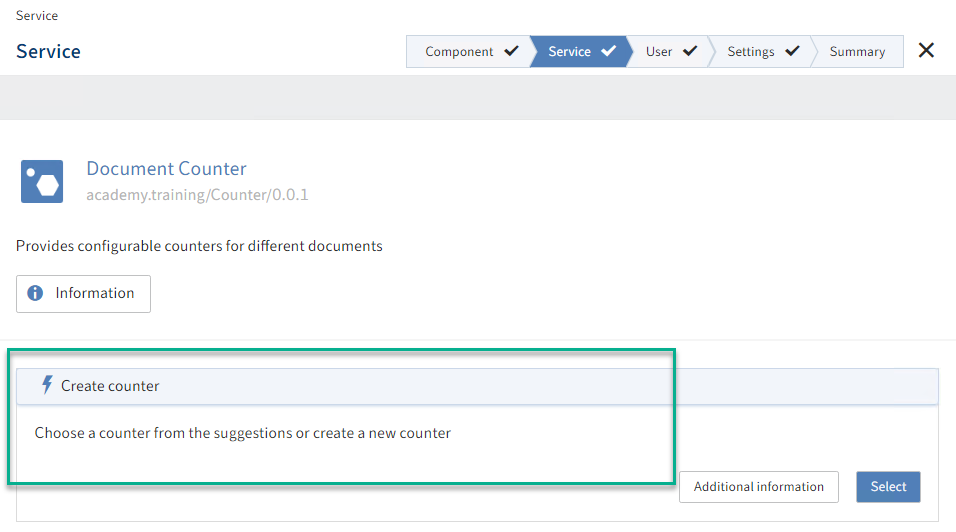
Please note
Services are always defined in the component class.
@Component(version = "0.0.1", namespace = "academy.training", name = "Counter", displayName = "Document counter", description = "Unique allocation of identification numbers")
public class CounterComponent {
  @Service(…)
  public ServiceOutputData createCounter(SerivceInputData ) {
    //Implementation
  }
}
# Input fields
The input fields are used to capture user data. The fields can have different types and also offer suggestions for input. Data from previous components can also be used via keys via the input fields. The input fields are transferred to a service @Service or trigger@Trigger, where they are used for configuration tasks over the course of the flow.
The following types are possible:
- String
- Integer
- Boolean
- Object
- Array
# String input field (text)
The input fields for values of different types also include the configuration tree and a JSONata editor.

To implement an input field, a class is declared that provides the fields via the annotation @Property. This class is transferred to a service/trigger method as a parameter. The variable type (String counterName under annotation @Property) determines the type of the field in the editor.

CounterInput.java
public class CounterInput {
  @Property(displayName="Counter name" description="Enter postfix and prefix for new counter")
  private String counterName; // Type string in input field editor
  //Implement getter and setter methods
}
CounterComponent.java
@Component(version = "0.0.1", namespace = "academy.training", name = "Counter", displayName = "Document counter", description = "Unique allocation of identification numbers")
public class CounterComponent {
  @Service(name="CreateCounter")
  public CounterOutput createCounter(CounterInput input) {}
}
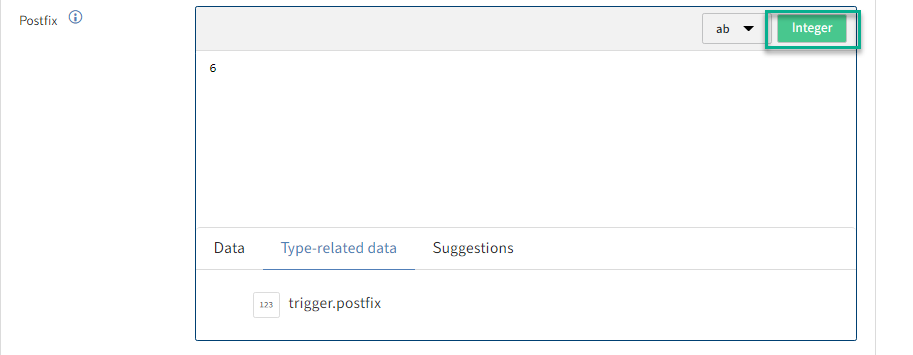
# Integer input field
To implement an integer type input field, proceed in the same way as for a string input field. The variable type, in our example postfix, is declared by the int type.

CounterInput.java
public class CounterInput {
  @Property(displayName="Postfix")
  private int postfix; //Type Integer in the input field editor
  //Implement getter and setter methods
}
CounterComponent.java
@Component(version = "0.0.1", namespace = "academy.training",
name = "Counter", displayName = "Document counter",
description = "Unique allocation of identification numbers")
public class CounterComponent {
  @Service(name="CreateCounter")
  public CounterOutput createCounter(CounterInput input) {}
}
# Boolean input field


CounterInput.java
public class CounterInput {
  @Property(displayName="Import counter")
  private boolean importCounter; //Type Boolean in the input field editor
  //Implement getter and setter methods
}
CounterComponent.java
@Component(version = "0.0.1", namespace = "academy.training",
name = "Counter", displayName = "Document counter",
description = "Unique allocation of identification numbers")
public class CounterComponent {
  @Service(name="CreateCounter")
  public CounterOutput createCounter(CounterInput input) {}
  }
}
# Object input field
If you need multiple input lines at once (including of different types), you can implement an Object type input field. This allows you to combine multiple fields into an object.
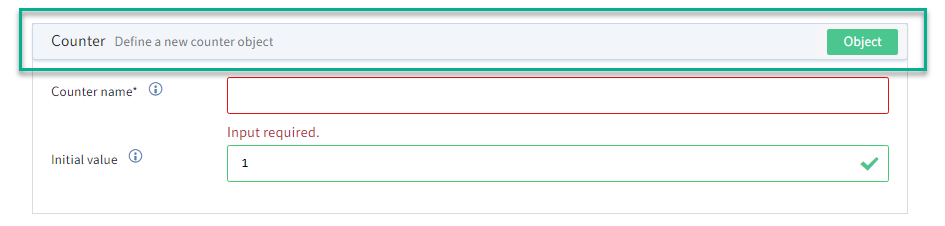
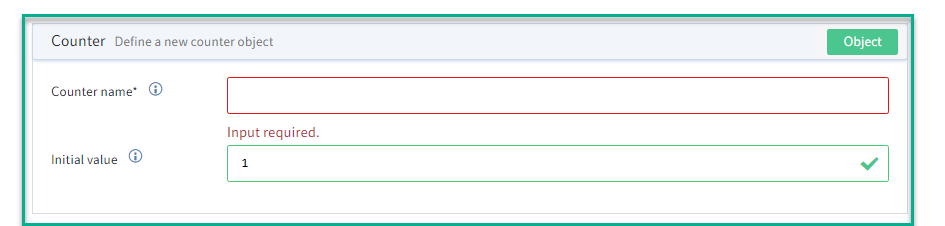
The example shows implementation of the CounterObject class as an internal class.
public class CounterInput {
  @Property(displayName="Define counter", description="Define a counter. Name and initial value")
  private CounterObject counterObj;//Type CounterObject in the input field editor
  class CounterObject {
    @Property(displayName="Initial value", description="The initial value is optional. The default value is 1"
    @DisplayOptions(order = 2, suggestValue = true)
    private int value = 1;
    @Property(displayName="Counter name", description="Enter the counter name"
    @DisplayOptions(order = 1)
    private String counterName;
    //Implement getter and setter methods
  }
}
@Component(version = "0.0.1", namespace = "academy.training", name = "Counter", displayName = "Document counter", description = "Unique allocation of identification numbers")
public class CounterComponent {
  @Service(name="CreateCounter")
  public CounterOutput createCounter(CounterInput input) {}
}
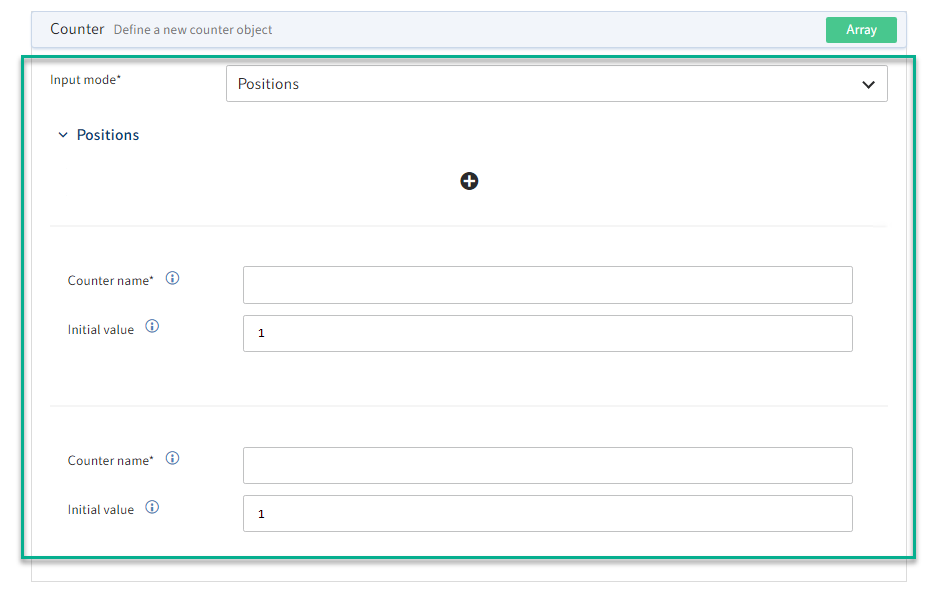
# Array input field
If multiple fields of one type (string, Boolean, integer, or object) are required, they can be combined into an array. In the example below, multiple object input fields are grouped.

public class CounterInput {
  @Property(displayName="Define counter", description="Define a counter with name and initial value")
  private CounterObject[] counterObjects;//Type CounterObject[] in the input field editor
  class CounterObject {
    //See object input field
  }
}
# Mandatory fields
All input fields can be marked as mandatory. The field name is then marked with an asterisk (*). This prevents the user from leaving the input screen if these entries are missing.
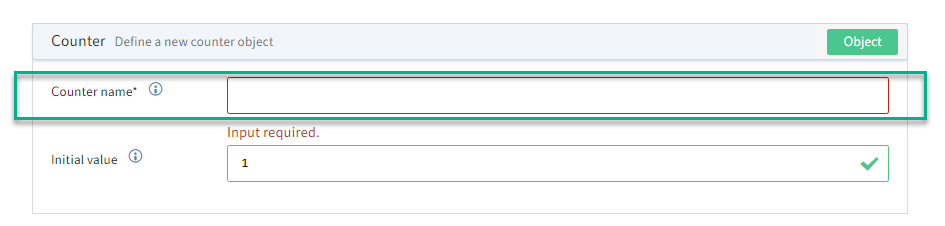
Setting the attribute required to true in the Property annotation marks the field as mandatory.
@Property(displayName="Counter name" description="Enter postfix and prefix
for new counter", required=true)
private String counterName; // Type string in input field editor
# Order, default field values
The fields can also be configured via the @DisplayOptions annotation. You can configure value suggestions (suggestValue) or the order (order) of the fields here.

@Property(displayName="Postfix")
@DisplayOptions(order=2, suggestValue=true)
private int postfix = 6;
@Property(displayName="Prefix")
@DisplayOptions(order=1, size=2)
private String prefix = "Invoice";
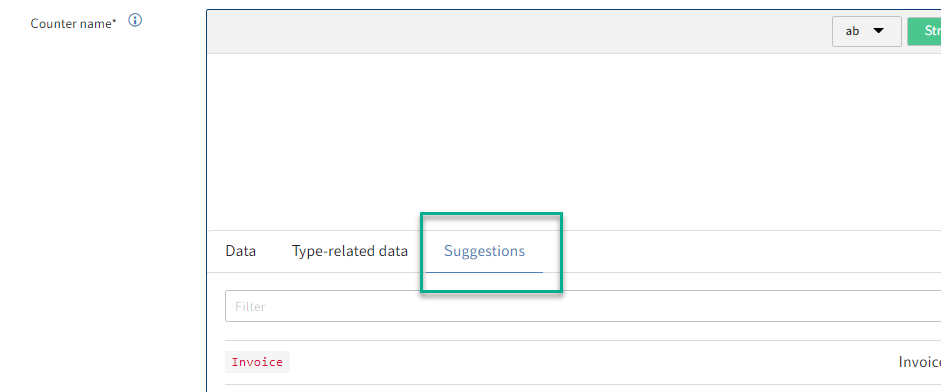
# 'Suggestions' tab
In all input fields, suggestion lists can be filled via the annotations @Lookup and @LookupProvider. The function with the annotation @LookupProvider must be implemented in the main component class @Component.
public class CounterInput {
  @Property(displayName = "Counter name", required=true)
  @Lookup("getCounters")
  private String counterName;
}
@Component(version = "0.0.1", namespace = "academy.training", name = "Counter", displayName = "Document counter", description = "Unique allocation of identification numbers")
public class CounterComponent {
  @LookupProvider("getCounters")
  public Map<String,String> getCounters() throws CounterException {
  HashMap<String,String> map = new HashMap<>();
    //Implementation
    return map;
  }
}
# Field groups
The input fields can be combined into groups by topics. In the figure, the fields Prefix and Postfix are combined into the group New counter.

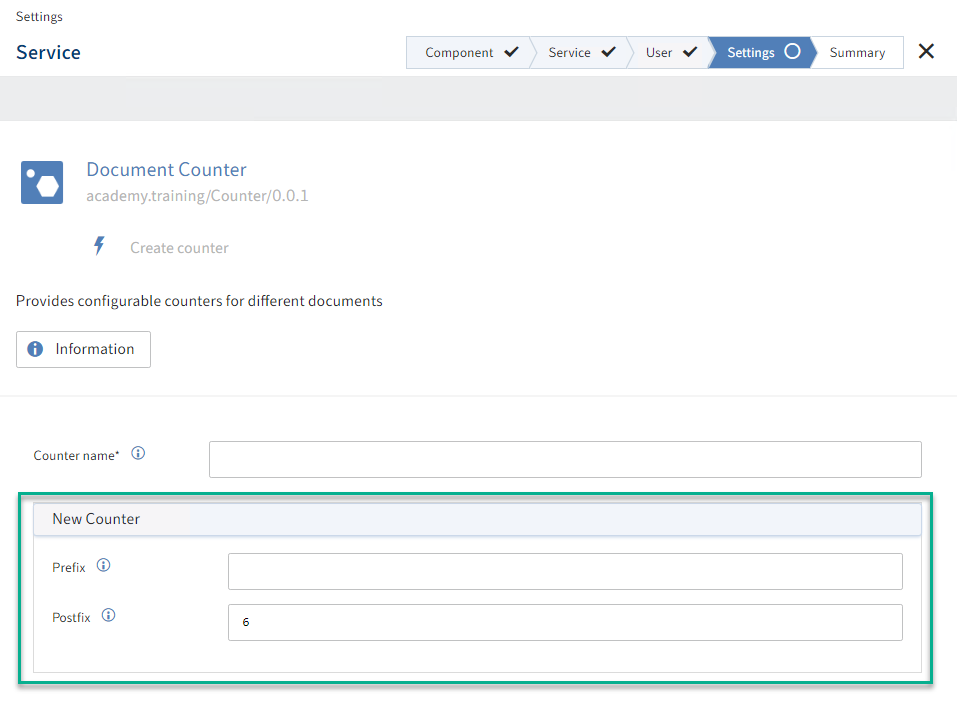
To group input fields, the annotations @PropertyGroups and @PropertyGroup are added to the class declaration. The annotation @PropertyGroupRef is also added to the fields that are combined into a group with the corresponding group name.
@PropertyGroups(@PropertyGroup(displayName="New counter", name="counterGroup"))
public class CounterInput {
  @Property(displayName = "Counter name", required = true, description = "Select a counter name")
  @Lookup("getCounters")
  private String counterName;
  @Property(displayName = "Prefix", description = "Only in combination with counter name")
  @PropertyGroupRef("countergroup")
  @DisplayOptions(order = 1)
  private String prefix;
  @Property(displayName = "Postfix", description = "Only in combination with counter name")
  @PropertyGroupRef("countergroup")
  @DisplayOptions(order = 2, suggestValue = true)
  private int postfix = 6;
}
# Service groups
Different services, see also the ELO objects and metadata component, can be combined into groups.
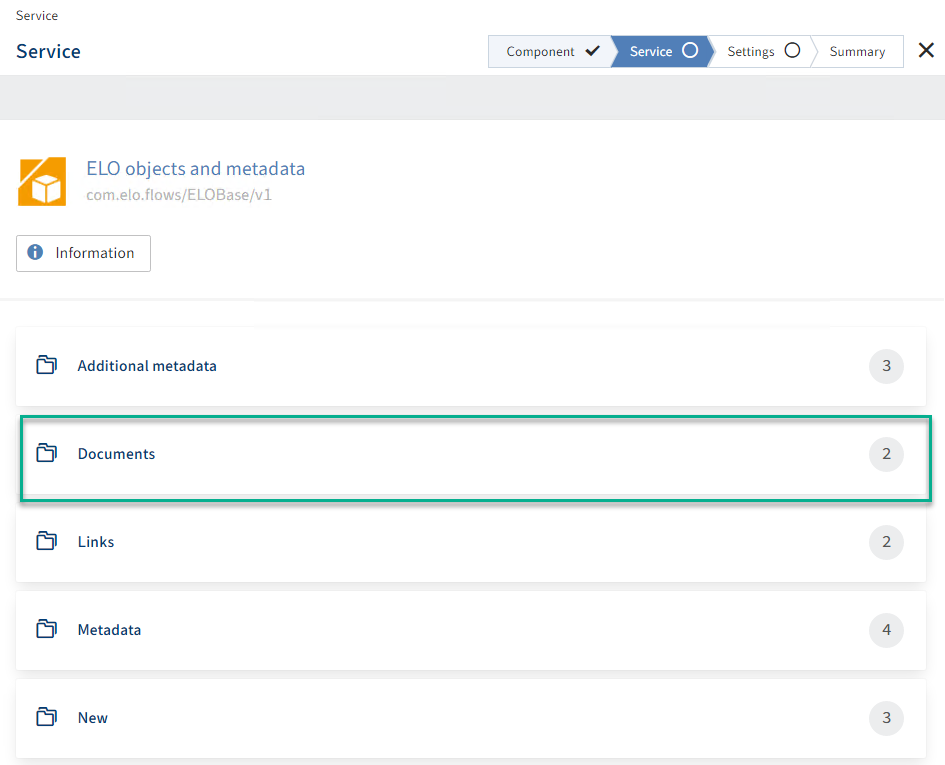
To group the services, the services are implemented in individual classes. The annotation @ComponentServices is added to these classes. For the groups to be shown, at least two groups have to be defined (i.e. two classes with @ComponentServices and contained @Services). The annotation @ComponentServices must always refer to the main component class (in our case CounterComponent) via the component attribute.
@Component(version = "0.0.1", namespace = "academy.training", name = "Counter", displayName = "Document counter", description = "Unique allocation of identification numbers")
public class CounterComponent {
}
@ComponentServices(component = CounterComponent.class, name = "CounterServices", displayName = "Manage counters")
public class CounterServices {
  @Service(name="CreateCounter")
  public CounterOutput createCounter(CounterInput input) {}
  @Service(name="ChooseCounter")
  public CounterOutput chooseCounter(CounterInput input) {}
}
@ComponentServices(component = CounterComponent.class, name = "CounterServices", displayName = "Import counters")
public class CounterServicesImportGroup {
  @Service(name="ImportCounter")
  public CounterImportOutput importCounter(CounterImportInput input) {}
  @Service(name="FindImportCounter")
  public CounterImportOutput findImportCounter(CounterImportInput input) {}
}
# Indexserver connection
The connection to the ELO Indexserver can be established automatically via the annotation @Connection and @ConnectionRequired. The connection to the ELOix is declared via the annotation @Connection in the IXConnection type variable and can be used in all methods via the annotation @ConnectionRequired.
public class CounterComponent {
  @Connection
  IXConnection ixConnect;
  @LookupProvider("getCounters")
  @ConnectionRequired
  public Map<String,String> getCounters() {
    HashMap<String,String> map = new HashMap<>();
    //Implementation
    return map;
  }
}
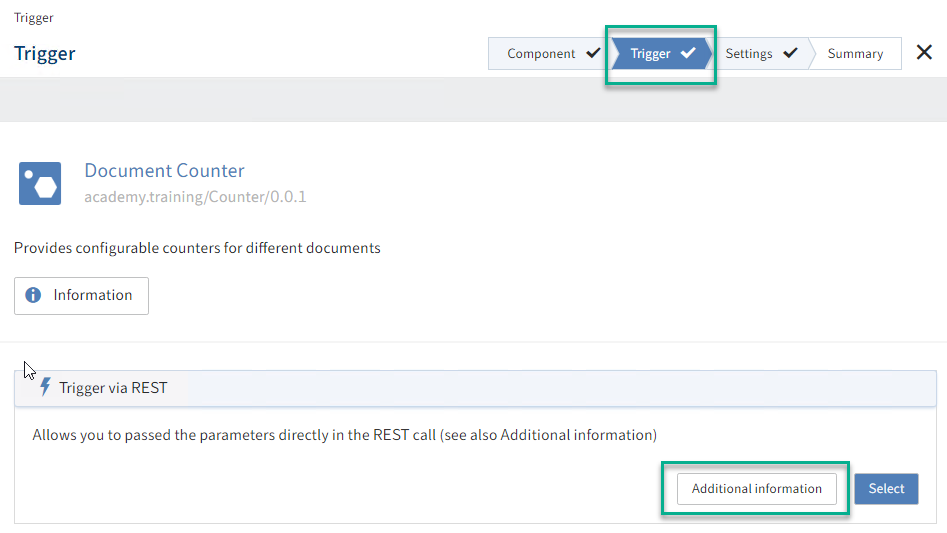
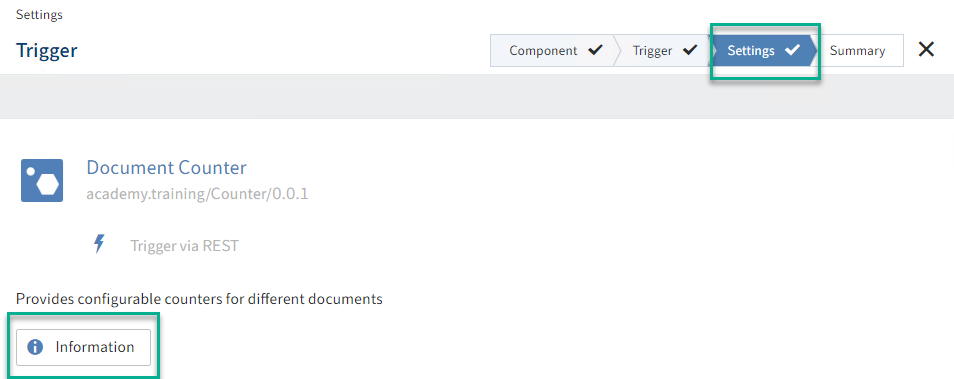
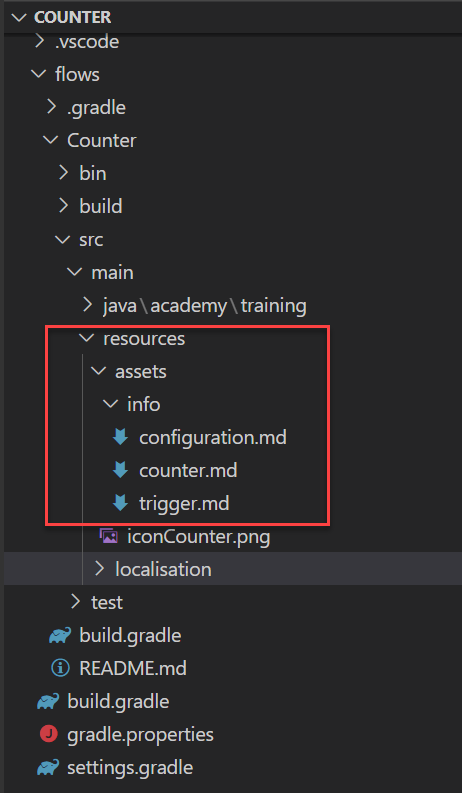
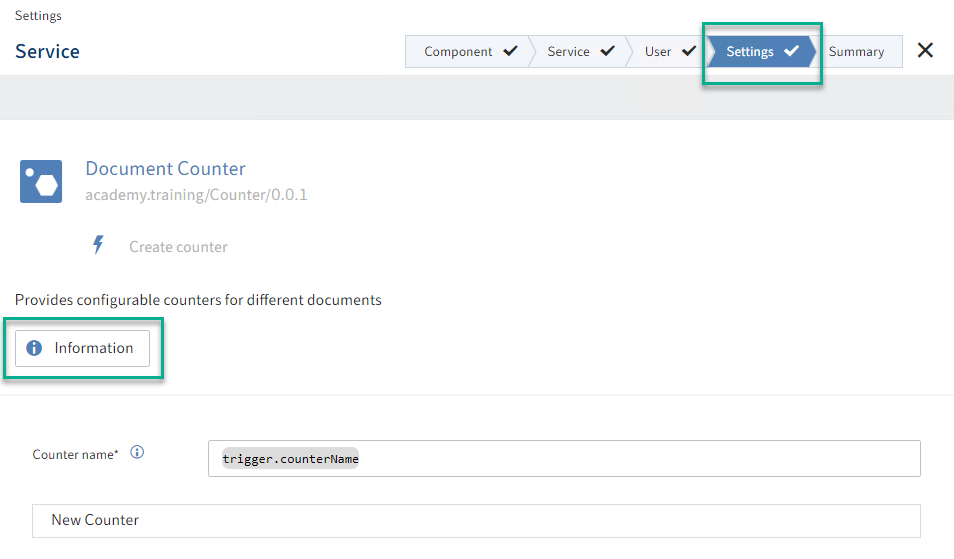
# Component information
The documentation can be integrated in different positions, such as the service or component description, via the annotation @Guide. First, you will have to file the relevant markdown file in the corresponding project structure, which is then referenced later in the solution implementation.
Please note
The markdown files are filed to the intended project structure (see figure). Otherwise, the documentation cannot be read or shown.
The following combinations with other annotations are possible:
Information on a component (
@Componentand@Guide). Visible in both the service and the trigger selection view.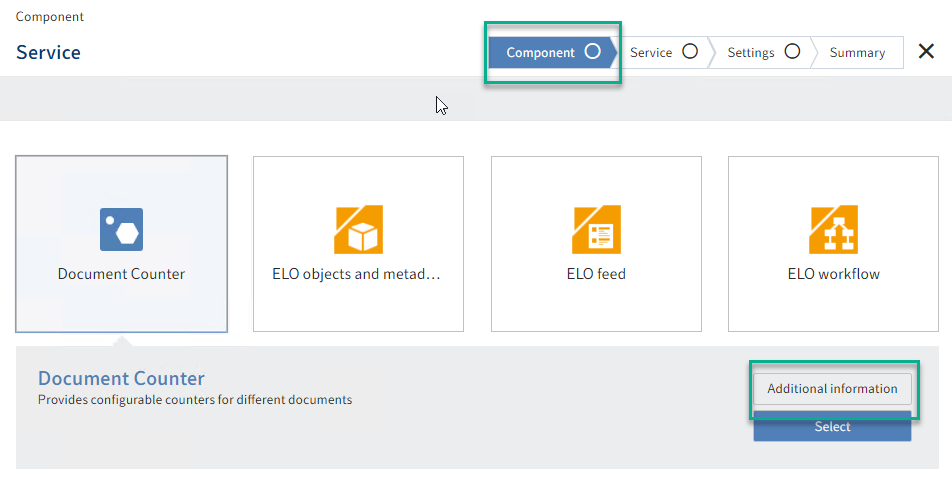
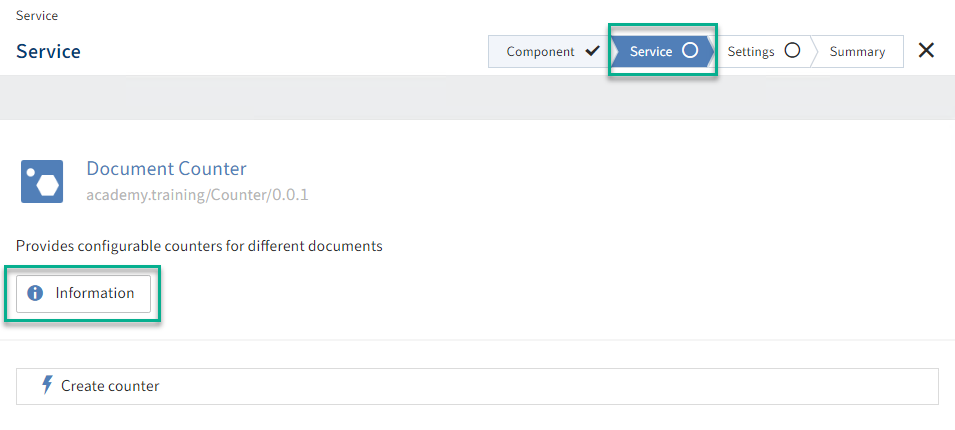
Information on a service (
@Serviceand@Guide).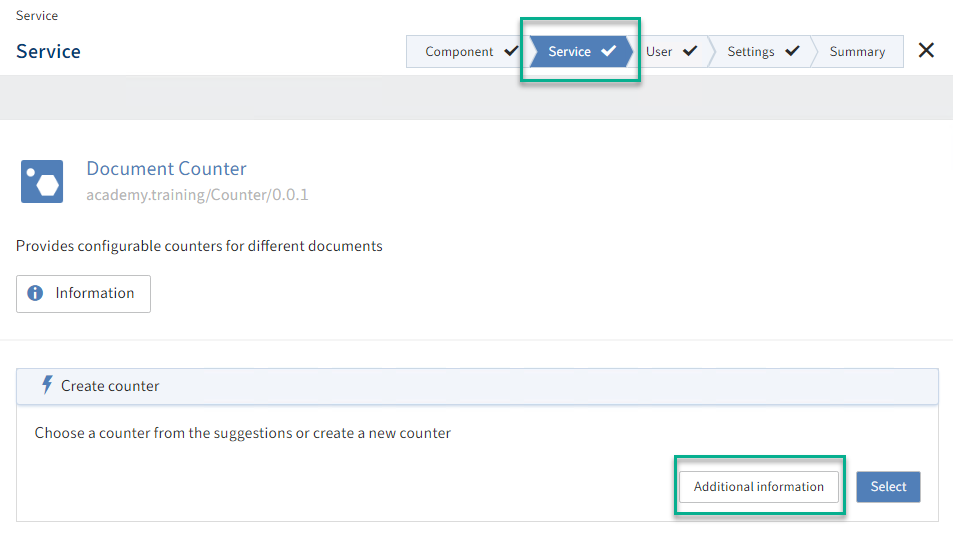
Information on a trigger (
@Triggerand@Guide)